New heated enclosure printer
-
Have a few good runs under my belt and am feeling pretty good about the settings. I revised the layer duct fan to blow a bit more and reduced the minimum layer time to 15 sec with no apparent change in the good results.
Still not quite sure I understand the thermal relationships going on. It takes setting the chamber temp to 35C for the bed heater to actually cycle. At 40C chamber or above it reads a couple of degrees over the setpoint of 90C, and continually reads 92 or 93.
@Phaedrux Is there some way to log or graph the activity of all the heater circuits to see what their duty cycles are? Maybe the good insulation and almost 80W of heat input from the printhead is enough to keep the chamber up to temp, as unlikely as that seems. At 50C chamber temp the outside surfaces are warm to the touch and the glass window pretty warm. At 35C chamber temp the outside surfaces or door window do not even feel warm.

The step in the airbox part is because it was being run with no supports even with completely horizontal overhangs to see how bad the bridging was. A blob developed at one overhang and hit the nozzle and shifted the bed a little but it kept printing. I only wanted the first couple of inches anyway to check the assembly, since that is where everything mounts to.

The marks on the back of the fairing parts are where I trimmed the ribs off but did not do a full finishing job. I'm very happy with the surface finish of the appearance surfaces. They have a consistent satiny appearance.
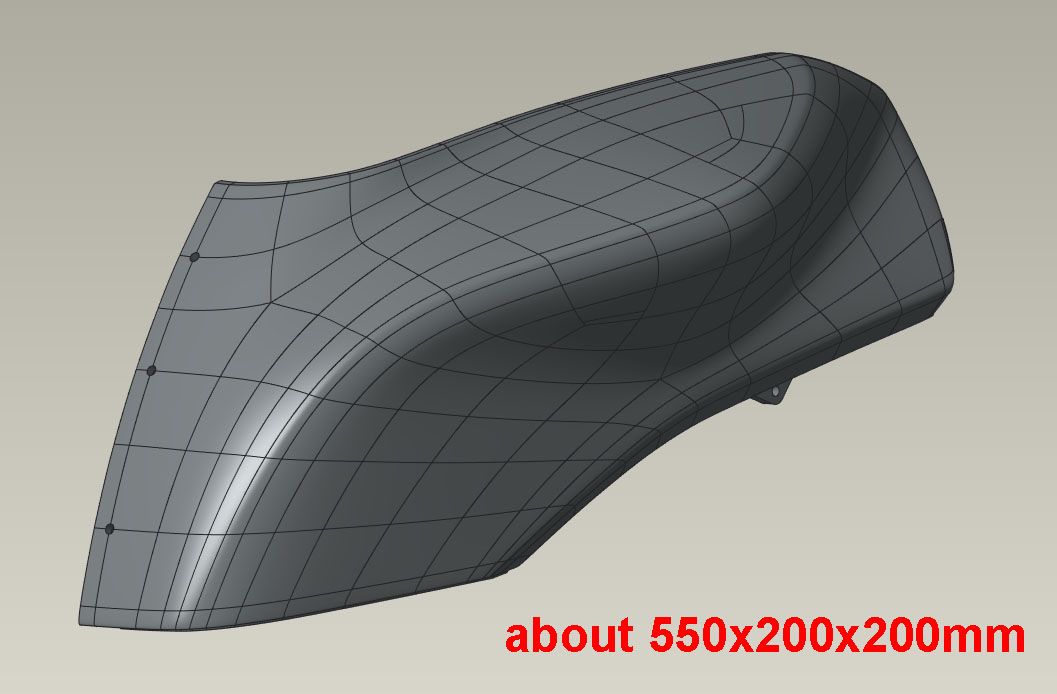
Now that I am feeling confident, one half of the gas tank/airbox cover is printing. Multiple smooth curvatures, some near vertical, some near horizontal. So far, so good. Projected to be a 13hr print and about halfway through. This is the first part with supports. I used the normal style as the tree support option resulted in a 2hr longer print time. Maybe I didn't tweak the settings optimally.
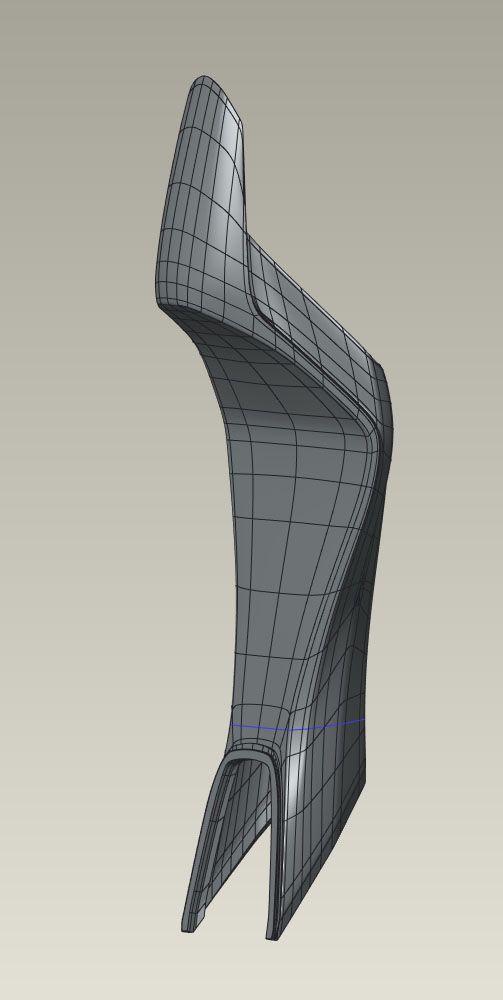
If that goes well, next I'll do the tailsection standing up, which is about 780mm tall, and really see how good the Z alignment, straightness, parallelism, etc are. I could print a large spiral vase box or cylinder and see quickly but that would be too easy!
Chris
Cosentino Engineering -
@coseng said in New heated enclosure printer:
Is there some way to log or graph the activity of all the heater circuits to see what their duty cycles are?
Not that I'm aware of.
-
@coseng said in New heated enclosure printer:
Is there some way to log or graph the activity of all the heater circuits to see what their duty cycles are?
No, but you can read the PWM averaged over the last 20 seconds or so from the object model.
Duet WiFi hardware designer and firmware engineer
Please do not ask me for Duet support via PM or email, use the forum
http://www.escher3d.com, https://miscsolutions.wordpress.com -
@dc42 OK, that is some info. How would I do that? Another option is to rig up an independent arduino logger. I guess if it is printing fine then no reason to fix it!
Chris
Cosentino Engineering -
Is there a fan in the enclosure to stir the air?
I assume the chamber heater is below the bed, so possibly having a stronger effect on the bed thermistor directly above it.
-
The tank finished successfully and is a mostly a really good print.


The only issues are on the horizontalish areas where I think another inner wall or skin layer is needed.


I was pleasantly surprised with how easily the standard supports broke off and the finish under them is still pretty good. I think a bottom skin is also needed. It is completely internal so does not really matter but it is nice to have 100% nice parts.

I then went tall and tried the subframe, but with minimal supports, which ended up being a mistake.

One out of two legs printed fine, so this could still be used as a mockup and i am letting it finish. On hindsight, I was suspicious of the small islands with nothing joining them to the main brim but decided to run it anyway. I'll add some supports before rerunning it. -
@phaedrux There are two recirculation fans below the two heater/fans heater units that are on the negative YZ wall of the chamber. The top of the table has a thin self-adhesive FEP sheet and the bottom is the silicone foam insulated heater. The table does divide the chamber into two sections pretty well with only about 1" clearance around the outside.

It is printing pretty consistently over 10+ hour runs, so at this point I'll think about it a little more, but just keep running with the same temp settings and not change the hardware at all. Maybe some slicer setting changes to correct those print gaps, since I strongly think those are slicer and not thermal or feed related. At the end of that 13hr print, the filament pinch wheel was completely free from any evidence of filament grinding/slippage, so am getting very positive filament drive.
The prints are coming out fine, but I am having one issue that requires me to babysit the first two layers. On the fist layer, the filament sometimes stops feeding. I notice it by the spool feed stepper not doing its chirp to feed. With my filament feed setup I can give a little manual push to the filament, then it starts feeding fine again. This happens 3-4 times on the first layer, then not again during the rest of the print. Each time it happens I have to blow off the pinch area because there are a lot of filament shards. Once the first layer is finished it does not happen again and as mentioned, at the end of the print the filament pinch area remains completely clean of debris.
The bed is flat. I test it at temp using a plunge indicator clamped to the printhead carriage and get about 0.05mm total variance. I tried using the BL Touch for bed mesh, but was getting hugely varying scans that did not correspond to a mechanical check with an indicator. Now I just use the BLTouch for Z homing and it seems to preform repeatably and I print with no bed mesh compensation.
Also, FYI there is about 0.8mm difference in Z homing between hot and cold states.
-
@coseng said in New heated enclosure printer:
to correct those print gaps, since I strongly think those are slicer
Yeah that's definitely a slicer thing. The defaults in Cura don't handle shallow slopes like that very well. I think you want skin removal width and skin expand distance. More top/bottom layers could probably help too.
Is it too much back pressure on the first layer? Too slow?
-
@phaedrux said in New heated enclosure printer:
Is it too much back pressure on the first layer? Too slow?
Good question! I don't know. Here are a couple of shots of it while printing the frist layer. It looks blobby, but the rest of the part comes out great.


It sounds a little like the printhead is hitting some of these high spots when doing non-print moves. Maybe it is over-extruding a little for the first layer? The bed is flat and the thickness of the extrusion and these blobby results look consistent across the part.
I'll dig a bit into looking at how the Cura skin settings work, thanks for the start.
-
@coseng said in New heated enclosure printer:
Maybe it is over-extruding a little for the first layer?
Yeah definitely. That's a messy first layer. Should be flat and smooth. I think the filament has nowhere to go it's pushing out and causing back pressure. Either too close, or flow too high. If the subsequent layers look fine, then it's probably too close.
If you don't want to mess with the probe distance just try cutting the first layer flow rate a bit.
-
@phaedrux If you don't want to mess with the probe distance just try cutting the first layer flow rate a bit.
OK, that's what I will try for this next overnight print of the other tank half, also with some revised skin settings to eliminate those sloped surface gaps.
-
@phaedrux Seems that the initial layer flow rate was set to 120%. I set it back to 100% and hopefully that will resolve the issues. Fingers crossed.
Since printing ABS is going so well, I ordered a small spool of clear PC to see if it would be able to print a clearish windscreen.
-
@phaedrux said in New heated enclosure printer:
@coseng said in New heated enclosure printer:
I think you want skin removal width and skin expand distance. More top/bottom layers could probably help too.I printed the other half of the tank cover with reductions in the 'skin removal width' and 'skin expand distance' parameters and the results are definitely an improvement and I'll go some more with the reduction.

The overall print quality was largely the same (very good) but some of the areas with gaps closed up completely and the rest closed up a lot.


I also made the support structure a but more coarse and noticed a decrease in the underside surface quality at the benefit of about 2 hrs less print time. Next time I think will be the fine supports.
So, definite progress, and only a little more to go!
Also, the reduction in initial layer flow did not seem to eliminate the first layer filament feed issue. The first layer surface seemed more even than before, but i still had to help the filament a bunch of times. Maybe I'll ty some more flow reduction or space the bed further down. I am a bit reluctant to mess with the bed distance, as even though it is giving me some problems, bed adhesion is not one of them!
-
Also looks like a taller layer height?
Try dropping the initial layer flow another 10% maybe.
-
@phaedrux Forgot I turned off adaptive layer height, but it is also that the pic it is zoomed in more.
It seems that with such a big machine and nozzle, getting rid of bells and whistles (variable line width, adaptive layers) is a good approach. Or at least turn them off if I don't have time to optimize them!
The next part has a big flat base surface so will be a good test of flow rate reduction and infill quality. Would adjusting the DWC extrusion on the fly factor be the same as adjusting the slicer flow rate?
-
@coseng said in New heated enclosure printer:
Would adjusting the DWC extrusion on the fly factor be the same as adjusting the slicer flow rate?
Yes, but you'd have to remember to return it to normal when the 2nd layer starts.
If you have time to watch it go down it could be a good way to find the right amount to reduce it by.
-
@phaedrux Yes, I babysit the first couple of layers so it is not a problem. First I sliced with 90% initial layer flow, it still happened, so I ended up down at 82% with the DWC slider. That's pretty far off! I guess it is time to look at the actual bed height at Z0 again. I did the standard procedure of setting it at zero with a sheet of paper under the nozzle when hot.
The first layer surface quality was a lot better. But there was still a little blobbing at the ends. Maybe a little less of infill overlap percentage.
-
Getting some really nice big prints out of the machine and even though I know there is still more slicer tuning to be done I just need the parts too much to slow down and do some careful tuning. Oh well, the many prices of success!
I now have the Cura 4.13 settings to 90% flow everywhere and 82% on the first layer and no filament tending is needed, at least for these two recent prints. On the first layer the brim top surface finish is quite nice, but the infill still is a little squishy at the ends where it merges into the perimeters. I'm not sure, but it seems to be overprinting some areas. I only notice it while tending the printer at the start of the cycle because these areas are covered by printing.


Tha areas that are least acceptable are mostly the bottom surfaces that are above supports and the bottom edges of some transitions that do not require supports.

I know that with a larger nozzle, big layer size, and fast print speeds there are limits to what can be achieved, but I am not sure how close to those limits these results currently are.
-
@coseng said in New heated enclosure printer:
@dc42 OK, that is some info. How would I do that? Another option is to rig up an independent arduino logger. I guess if it is printing fine then no reason to fix it!
The average PWM of each heater is in the object model, in heat.heaters[N].avgPwm.
Duet WiFi hardware designer and firmware engineer
Please do not ask me for Duet support via PM or email, use the forum
http://www.escher3d.com, https://miscsolutions.wordpress.com -
@dc42 OK, thanks. Sorry for the novice question, but would I enter that in the DWC command line? If I put it at regular intervals in the gcode would the machine console echo them for a DIY logger?