Duet3D Logo Duet3D
    • Tags
    • Documentation
    • Order
    • Register
    • Login

    I could use some help

    Scheduled Pinned Locked Moved
    Duet Hardware and wiring
    11
    682
    63.5k
    Loading More Posts
    • Oldest to Newest
    • Newest to Oldest
    • Most Votes
    Reply
    • Reply as topic
    Log in to reply
    This topic has been deleted. Only users with topic management privileges can see it.
    • A Former User?
      A Former User @rexx
      last edited by

      @rexx my last cr build was an SM800 Octocopter.

      rexxundefined 1 Reply Last reply Reply Quote 2
      • A Former User?
        A Former User @droftarts
        last edited by

        @droftarts good suggestions. I checked both set screws they were plenty tight.

        AC2613F2-A6E1-43CC-8E00-4A45B735D8C9.jpeg EBE75CBC-C07E-4A72-A645-87C5171DC2C0.jpeg

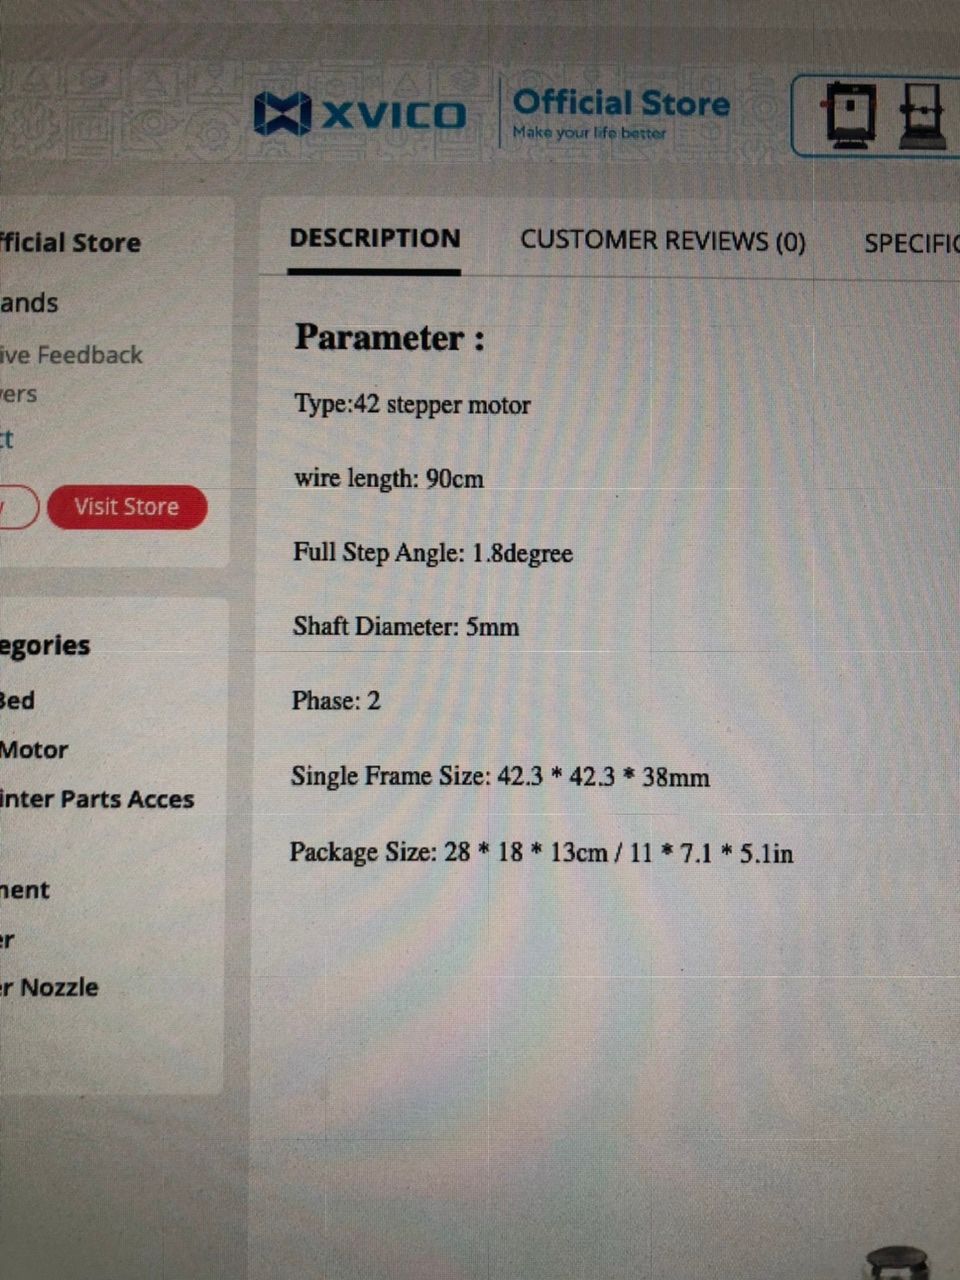
        Ian, how would you represent the motor pictured above in my config.g?

        Mac

        droftartsundefined fcwiltundefined 2 Replies Last reply Reply Quote 0
        • fcwiltundefined
          fcwilt @A Former User
          last edited by

          @mac said in I could use some help:

          This is the video I made of the test.

          Thanks mac,

          That was very informative. Something is seriously messed up.

          Just to play it safe would you please post your current config.g file so we can check the stepper settings.

          Frederick

          Printers: a small Utilmaker style, a small CoreXY and a E3D MS/TC setup. Various hotends. Using Duet 3 hardware running 3.4.6

          A Former User? 1 Reply Last reply Reply Quote 0
          • fcwiltundefined
            fcwilt @A Former User
            last edited by

            @mac said in I could use some help:

            This is the video I made of the test.

            Is it possible the stepper and belt are moving fine but the bed is not staying firmly hooked to the belt?

            I've never worked on one of these printers so I don't know how that connection is made.

            Frederick

            Printers: a small Utilmaker style, a small CoreXY and a E3D MS/TC setup. Various hotends. Using Duet 3 hardware running 3.4.6

            A Former User? 1 Reply Last reply Reply Quote 0
            • rexxundefined
              rexx @A Former User
              last edited by

              @mac nice ESC maddness or just one not formiliar with it specifically but i run a revolt 31"boat" well 2 but one is stock the other has leopard 36/74 1650kva on 6s 100C lipo's turning close to 26500 rpm's at 53 MPH 2 blade prop, that octocopter looks stable as a table

              A Former User? 1 Reply Last reply Reply Quote 0
              • Falkiaundefined
                Falkia
                last edited by

                Maybe an output of M122 after this strange jogging could give some information?

                Printer: "Deltacus" Delta with 510mm bed diameter and 925mm build height. Powered by Duet 2 WiFi. Duet Smart Effector with E3D Volcano.

                1 Reply Last reply Reply Quote 1
                • droftartsundefined
                  droftarts administrators @A Former User
                  last edited by

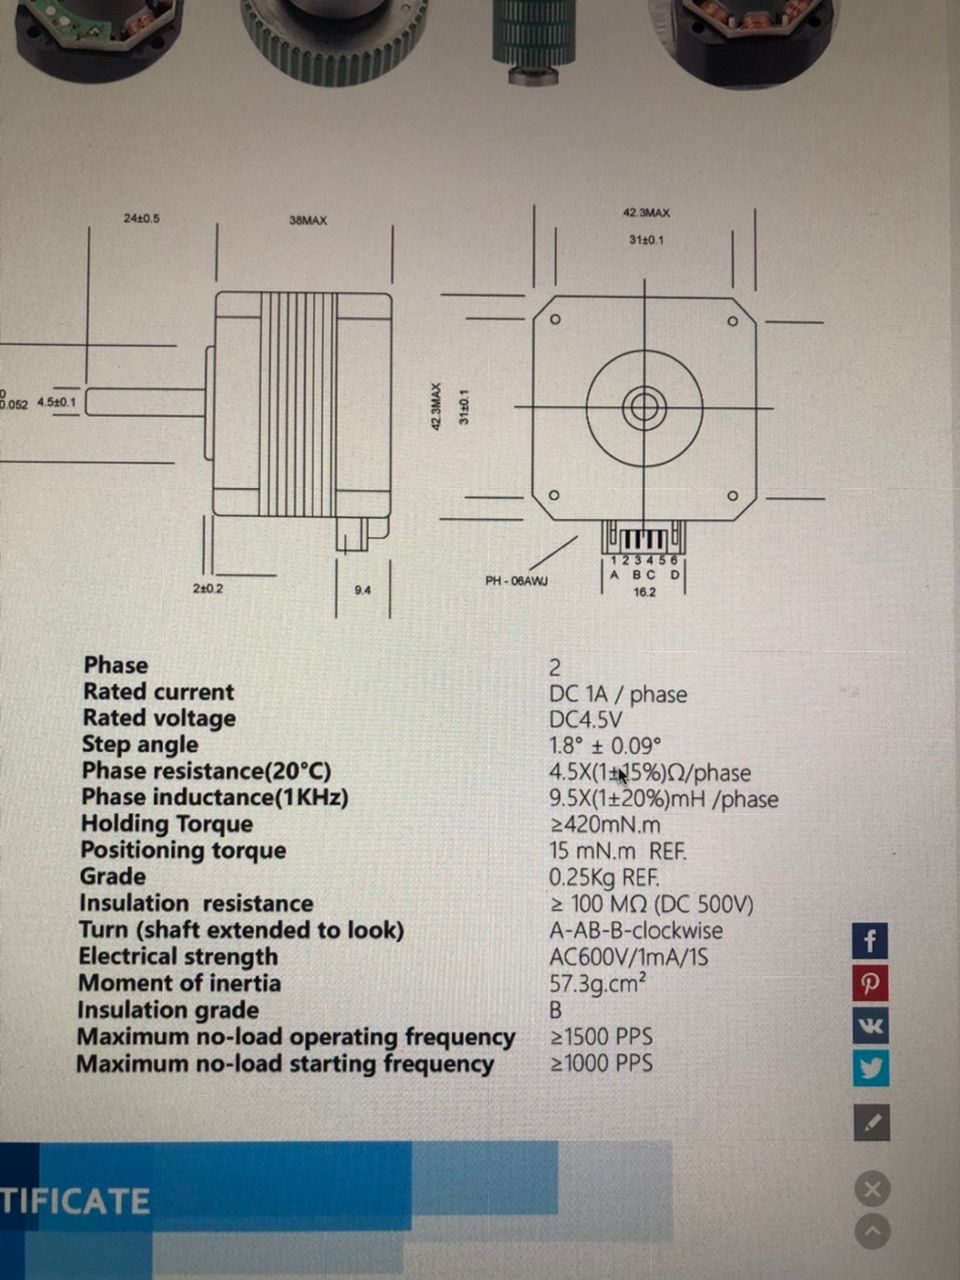
                  @mac I'm wondering if the motors just aren't compatible. If that screen grab is correct, 4.5ohms per phase of resistance is high, as is 9.5mH per phase of inductance. There's another thread about high inductance motors struggling with the Trinamic drivers on the Mini 5+. It could be why you have such high coil whine (the constant squealing noise).

                  I think one thing that did help earlier in this thread, and you're not doing at the moment as far as I know, is to use StealthChop all the time. Add D3 V0 to all of the M569 motor commands in config.g.

                  As for other settings, post your current config.g and I'll take another look.

                  Ian

                  Bed-slinger - Mini5+ WiFi/1LC | RRP Fisher v1 - D2 WiFi | Polargraph - D2 WiFi | TronXY X5S - 6HC/Roto | CNC router - 6HC | Tractus3D T1250 - D2 Eth

                  A Former User? 2 Replies Last reply Reply Quote 1
                  • fcwiltundefined
                    fcwilt @A Former User
                    last edited by

                    @mac

                    Hi mac.

                    To add a bit of info to what @droftarts posted mentioning the resistance and inductance of your steppers, here are those specs from three of my printers

                                 Yours      Mine #1  Mine #2   Mine #3
                    Resistance    4.5         1.4      1.5       1.6
                    Inductance    9.5         3.0      3.8       2.8
                    

                    As you can see your numbers are a good deal higher, at least as far as steppers go.

                    I believe that droftarts may have found the problem - which would be grand.

                    Frederick

                    Printers: a small Utilmaker style, a small CoreXY and a E3D MS/TC setup. Various hotends. Using Duet 3 hardware running 3.4.6

                    1 Reply Last reply Reply Quote 0
                    • A Former User?
                      A Former User @fcwilt
                      last edited by

                      @fcwilt both ends of the belt are hooked to the front and rear sides of the frame that supports the bed, creating a continuous loop. Each end of the belt is folded over a hook, and zip-tied in two ways: around the loop, and across the loop including the hook. If the belt isn't tight, the pulley wheel at the rear of the frame and yank on it, and eventually break it.

                      fcwiltundefined 1 Reply Last reply Reply Quote 0
                      • A Former User?
                        A Former User @droftarts
                        last edited by

                        @droftarts I'll try your suggestion, but Ian, if these motors are crap, I will immediately buy excellent motors to replace them if only you'll make a recommendation!

                        fcwiltundefined 1 Reply Last reply Reply Quote 0
                        • A Former User?
                          A Former User @droftarts
                          last edited by

                          @droftarts

                          Here's the newest config.g

                          ; Configuration file for Duet 3 Mini 5+ (firmware version 3.3)
                          ; executed by the firmware on start-up
                          ;
                          ; generated by RepRapFirmware Configuration Tool v3.3.10 on Mon Jun 27 2022 12:50:38 GMT-0700 (Pacific Daylight Time)
                          
                          ; General preferences
                          G90                                                ; send absolute coordinates...
                          M83                                                ; ...but relative extruder moves
                          M550 P"Frankenstein's Cinderella"                  ; set printer name
                          
                          ; Network
                          M552 S1                                            ; enable network
                          M586 P0 S1                                         ; enable HTTP
                          M586 P1 S0                                         ; disable FTP
                          M586 P2 S0                                         ; disable Telnet
                          
                          ; Drives
                          M569 P0.0 D3 V0 S1                                       ; physical drive 0.0 goes forwards
                          M569 P0.1 D3 V0 S0                                       ; physical drive 0.1 goes backwards
                          M569 P0.2 D3 V0 S1                                       ; physical drive 0.2 goes forwards
                          M569 P0.3 D3 V0 S1                                       ; physical drive 0.3 goes forwards
                          M584 X0.0 Y0.1 Z0.2 E0.3                           ; set drive mapping
                          M350 X16 Y16 Z16 E16 I1                            ; configure microstepping with interpolation
                          M92 X100.000 Y100.00 Z4000.00 E420.00                 ; set steps per mm
                          M566 X900.00 Y900.00 Z60.00 E120.00                ; set maximum instantaneous speed changes (mm/min)
                          M203 X6000.00 Y6000.00 Z600.00 E1200.00            ; set maximum speeds (mm/min)
                          M201 X500.00 Y500.00 Z200.00 E250.00               ; set accelerations (mm/s^2)
                          M906 X600 Y600 Z600 E600                           ; set motor currents (mA)
                          M84 S0                                             ; Disable motor idle current reduction
                          
                          ; Axis Limits
                          M208 X0 Y0 Z0 S1                                   ; set axis minima
                          M208 X220 Y220 Z240 S0                             ; set axis maxima
                          
                          ; Endstops
                          M574 X1 S1 P"!io5.in"                              ; configure switch-type (e.g. microswitch) endstop for high end on X via pin !^io5.in
                          M574 Y1 S1 P"!io6.in"							   ; configure switch-type (e.g. microswitch) endstop for high end on Y via pin !^io6.in
                          M574 Z1 S1 P"!io2.in"							   ; configure switch-type (e.g. microswitch) endstop for high end on Z via pin !^io2.in							   
                          
                          ; Z-Probe
                          M950 S0 C"io3.out"                                 ; create servo pin 0 for BLTouch
                          M558 P9 C"io3.in" H5 F120 T3600                    ; set Z probe type to bltouch and the dive height + speeds
                          G31 P500 X15.875 Y0.625 Z2.5                       ; set Z probe trigger value, offset and trigger height
                          M557 X5:190 Y5:215 S10                             ; define mesh grid
                          
                          ; Heaters
                          M308 S0 P"temp0" Y"thermistor" T100000 B4092       ; configure sensor 0 as thermistor on pin temp0
                          M950 H0 C"out0" T0                                 ; create bed heater output on out0 and map it to sensor 0
                          M307 H0 B0 S1.00                                   ; disable bang-bang mode for the bed heater and set PWM limit
                          M140 H0                                            ; map heated bed to heater 0
                          M143 H0 S33                                        ; set temperature limit for heater 0 to 33C
                          M308 S1 P"temp1" Y"thermistor" T100000 B4092       ; configure sensor 1 as thermistor on pin temp1
                          M950 H1 C"out1" T1                                 ; create nozzle heater output on out1 and map it to sensor 1
                          M307 H1 B0 S1.00                                   ; disable bang-bang mode for heater  and set PWM limit
                          M143 H1 S100                                       ; set temperature limit for heater 1 to 100C
                          
                          ; Fans
                          M950 F0 C"out3" Q500                               ; create fan 0 on pin out3 and set its frequency
                          M106 P0 S0 H-1                                     ; set fan 0 value. Thermostatic control is turned off
                          M950 F1 C"out4" Q500                               ; create fan 1 on pin out4 and set its frequency
                          M106 P1 S1 H1 T45                                  ; set fan 1 value. Thermostatic control is turned on
                          
                          ; Tools
                          M563 P0 S"optional" D0 H1 F0                       ; define tool 0
                          G10 P0 X0 Y0 Z0                                    ; set tool 0 axis offsets
                          G10 P0 R0 S0                                       ; set initial tool 0 active and standby temperatures to 0C
                          
                          ; Custom settings are not defined
                          
                          ; Miscellaneous
                          M501                                               ; load saved parameters from non-volatile memory
                          M911 S21 R23 P"M913 X0 Y0 G91 M83 G1 Z3 E-5 F1000" ; set voltage thresholds and actions to run on power loss


                          1 Reply Last reply Reply Quote 0
                          • fcwiltundefined
                            fcwilt @A Former User
                            last edited by

                            @mac said in I could use some help:

                            @fcwilt both ends of the belt are hooked to the front and rear sides of the frame that supports the bed, creating a continuous loop. Each end of the belt is folded over a hook, and zip-tied in two ways: around the loop, and across the loop including the hook. If the belt isn't tight, the pulley wheel at the rear of the frame and yank on it, and eventually break it.

                            It sounds secure so @droftarts suggestion about changing the M569 settings is an excellent next step.

                            Are you going to have a chance to do that soon?

                            If you do get to make the changes, just do again what you did in the video and see if now each click on "move by 10" actually moves the bed by 10, visually that is, not by the DWC display, it will always show the correct value even if the bed did not move at all.

                            Let's hope the problem has been found.

                            Hope you are feeling better.

                            Frederick

                            Printers: a small Utilmaker style, a small CoreXY and a E3D MS/TC setup. Various hotends. Using Duet 3 hardware running 3.4.6

                            A Former User? 1 Reply Last reply Reply Quote 0
                            • A Former User?
                              A Former User @rexx
                              last edited by

                              @rexx I had it in the air for up to twenty minutes at a time. And then the FAA shut us down.

                              I'm hoping to get a Mini 3 soon.

                              1 Reply Last reply Reply Quote 1
                              • A Former User?
                                A Former User @fcwilt
                                last edited by

                                @fcwilt ahhh, from my reading of Ian's comment, the D3 V0 will quiet the motors, but it won't address the resistance issues. I need to get better motors. Can you please suggest something. I'll order on Amazon, and have them in by the weekend if I'm quick enough.

                                fcwiltundefined 1 Reply Last reply Reply Quote 0
                                • A Former User?
                                  A Former User @fcwilt
                                  last edited by

                                  @fcwilt

                                  ; Configuration file for Duet 3 Mini 5+ (firmware version 3.3)
                                  ; executed by the firmware on start-up
                                  ;
                                  ; generated by RepRapFirmware Configuration Tool v3.3.10 on Mon Jun 27 2022 12:50:38 GMT-0700 (Pacific Daylight Time)
                                  
                                  ; General preferences
                                  G90                                                ; send absolute coordinates...
                                  M83                                                ; ...but relative extruder moves
                                  M550 P"Frankenstein's Cinderella"                  ; set printer name
                                  
                                  ; Network
                                  M552 S1                                            ; enable network
                                  M586 P0 S1                                         ; enable HTTP
                                  M586 P1 S0                                         ; disable FTP
                                  M586 P2 S0                                         ; disable Telnet
                                  
                                  ; Drives
                                  M569 P0.0 D3 V0 S1                                       ; physical drive 0.0 goes forwards
                                  M569 P0.1 D3 V0 S0                                       ; physical drive 0.1 goes backwards
                                  M569 P0.2 D3 V0 S1                                       ; physical drive 0.2 goes forwards
                                  M569 P0.3 D3 V0 S1                                       ; physical drive 0.3 goes forwards
                                  M584 X0.0 Y0.1 Z0.2 E0.3                           ; set drive mapping
                                  M350 X16 Y16 Z16 E16 I1                            ; configure microstepping with interpolation
                                  M92 X100.000 Y100.00 Z4000.00 E420.00                 ; set steps per mm
                                  M566 X900.00 Y900.00 Z60.00 E120.00                ; set maximum instantaneous speed changes (mm/min)
                                  M203 X6000.00 Y6000.00 Z600.00 E1200.00            ; set maximum speeds (mm/min)
                                  M201 X500.00 Y500.00 Z200.00 E250.00               ; set accelerations (mm/s^2)
                                  M906 X600 Y600 Z600 E600                           ; set motor currents (mA)
                                  M84 S0                                             ; Disable motor idle current reduction
                                  
                                  ; Axis Limits
                                  M208 X0 Y0 Z0 S1                                   ; set axis minima
                                  M208 X220 Y220 Z240 S0                             ; set axis maxima
                                  
                                  ; Endstops
                                  M574 X1 S1 P"!io5.in"                              ; configure switch-type (e.g. microswitch) endstop for high end on X via pin !^io5.in
                                  M574 Y1 S1 P"!io6.in"							   ; configure switch-type (e.g. microswitch) endstop for high end on Y via pin !^io6.in
                                  M574 Z1 S1 P"!io2.in"							   ; configure switch-type (e.g. microswitch) endstop for high end on Z via pin !^io2.in							   
                                  
                                  ; Z-Probe
                                  M950 S0 C"io3.out"                                 ; create servo pin 0 for BLTouch
                                  M558 P9 C"io3.in" H5 F120 T3600                    ; set Z probe type to bltouch and the dive height + speeds
                                  G31 P500 X15.875 Y0.625 Z2.5                       ; set Z probe trigger value, offset and trigger height
                                  M557 X5:190 Y5:215 S10                             ; define mesh grid
                                  
                                  ; Heaters
                                  M308 S0 P"temp0" Y"thermistor" T100000 B4092       ; configure sensor 0 as thermistor on pin temp0
                                  M950 H0 C"out0" T0                                 ; create bed heater output on out0 and map it to sensor 0
                                  M307 H0 B0 S1.00                                   ; disable bang-bang mode for the bed heater and set PWM limit
                                  M140 H0                                            ; map heated bed to heater 0
                                  M143 H0 S33                                        ; set temperature limit for heater 0 to 33C
                                  M308 S1 P"temp1" Y"thermistor" T100000 B4092       ; configure sensor 1 as thermistor on pin temp1
                                  M950 H1 C"out1" T1                                 ; create nozzle heater output on out1 and map it to sensor 1
                                  M307 H1 B0 S1.00                                   ; disable bang-bang mode for heater  and set PWM limit
                                  M143 H1 S100                                       ; set temperature limit for heater 1 to 100C
                                  
                                  ; Fans
                                  M950 F0 C"out3" Q500                               ; create fan 0 on pin out3 and set its frequency
                                  M106 P0 S0 H-1                                     ; set fan 0 value. Thermostatic control is turned off
                                  M950 F1 C"out4" Q500                               ; create fan 1 on pin out4 and set its frequency
                                  M106 P1 S1 H1 T45                                  ; set fan 1 value. Thermostatic control is turned on
                                  
                                  ; Tools
                                  M563 P0 S"optional" D0 H1 F0                       ; define tool 0
                                  G10 P0 X0 Y0 Z0                                    ; set tool 0 axis offsets
                                  G10 P0 R0 S0                                       ; set initial tool 0 active and standby temperatures to 0C
                                  
                                  ; Custom settings are not defined
                                  
                                  ; Miscellaneous
                                  M501                                               ; load saved parameters from non-volatile memory
                                  M911 S21 R23 P"M913 X0 Y0 G91 M83 G1 Z3 E-5 F1000" ; set voltage thresholds and actions to run on power loss


                                  1 Reply Last reply Reply Quote 0
                                  • fcwiltundefined
                                    fcwilt @A Former User
                                    last edited by

                                    @mac said in I could use some help:

                                    @droftarts I'll try your suggestion, but Ian, if these motors are crap, I will immediately buy excellent motors to replace them if only you'll make a recommendation!

                                    I get my steppers from Stepperonline usually.

                                    All NEMA 17 steppers will be the same frame size but they can vary in length. Yours are listed as 38mm long whereas mine are 48mm.

                                    Only you can determine how much space you have to go beyond 38mm.

                                    I could not find any NEMA 17 38mm steppers at Stepperonline.

                                    Frederick

                                    Printers: a small Utilmaker style, a small CoreXY and a E3D MS/TC setup. Various hotends. Using Duet 3 hardware running 3.4.6

                                    1 Reply Last reply Reply Quote 0
                                    • fcwiltundefined
                                      fcwilt @A Former User
                                      last edited by

                                      @mac said in I could use some help:

                                      @fcwilt ahhh, from my reading of Ian's comment, the D3 V0 will quiet the motors, but it won't address the resistance issues. I need to get better motors. Can you please suggest something. I'll order on Amazon, and have them in by the weekend if I'm quick enough.

                                      It may well do more than quiet them, the noise is just a symptom.

                                      It actually may allow them to work as they should.

                                      Frederick

                                      Printers: a small Utilmaker style, a small CoreXY and a E3D MS/TC setup. Various hotends. Using Duet 3 hardware running 3.4.6

                                      1 Reply Last reply Reply Quote 0
                                      • A Former User?
                                        A Former User @fcwilt
                                        last edited by

                                        @fcwilt you're not going to like this, but here goes:

                                        G1 H1 Y-10 F3600 would NOT move the bed. I tried twice, and I clicked multiple times each time.

                                        Then I changed H1 to H2.

                                        The command sent the bed back to the endstop 10 mm's at a time. When it was at -220 I looked to see what's what. There was another 10mm's to go, so I clicked on the send button. The bed went back that 10mm's, and depressed the endstop.

                                        Then I clicked on the Y+50 joy button at the far right of Home Y. Instead of going 50mm's, the bed went all the way to the front of the printer, and stopped without pounding on the adjustment cap.

                                        This machine has a mind of it's own. My apologies for such bad news.

                                        fcwiltundefined deckingmanundefined 3 Replies Last reply Reply Quote 0
                                        • fcwiltundefined
                                          fcwilt @A Former User
                                          last edited by

                                          @mac said in I could use some help:

                                          @fcwilt you're not going to like this, but here goes:

                                          G1 H1 Y-10 F3600 would NOT move the bed. I tried twice, and I clicked multiple times each time.

                                          Then I changed H1 to H2.

                                          The command sent the bed back to the endstop 10 mm's at a time. When it was at -220 I looked to see what's what. There was another 10mm's to go, so I clicked on the send button. The bed went back that 10mm's, and depressed the endstop.

                                          Then I clicked on the Y+50 joy button at the far right of Home Y. Instead of going 50mm's, the bed went all the way to the front of the printer, and stopped without pounding on the adjustment cap.

                                          This machine has a mind of it's own. My apologies for such bad news.

                                          You did re-boot the printer after editing the config.g file?

                                          I have no idea why H2 would work and not H1. Perhaps because H2 is not checking for the endstop to be activated and H1 is.

                                          But you cannot use H2 to home, it has to be H1.

                                          Here is a set of steppers that might fit - they are 39mm instead of 38mm and their specs are much better in regards to resistance and inductance:

                                          https://www.amazon.com/STEPPERONLINE-Stepper-59-49oz-42x42x39mm-Connector/dp/B094CR3228/ref=sr_1_4?keywords=nema%2B17%2Bstepper%2Bmotor&qid=1656547436&sprefix=nema%2B17%2Bst%2Caps%2C83&sr=8-4&th=1

                                          How much longer then 38mm could you fit? The larger ones tend to have more power and better specs.

                                          Frederick

                                          Printers: a small Utilmaker style, a small CoreXY and a E3D MS/TC setup. Various hotends. Using Duet 3 hardware running 3.4.6

                                          A Former User? 2 Replies Last reply Reply Quote 0
                                          • fcwiltundefined
                                            fcwilt @A Former User
                                            last edited by

                                            @mac said in I could use some help:

                                            @fcwilt you're not going to like this, but here goes:

                                            G1 H1 Y-10 F3600 would NOT move the bed. I tried twice, and I clicked multiple times each time.

                                            Then I changed H1 to H2.

                                            The command sent the bed back to the endstop 10 mm's at a time. When it was at -220 I looked to see what's what. There was another 10mm's to go, so I clicked on the send button. The bed went back that 10mm's, and depressed the endstop.

                                            Then I clicked on the Y+50 joy button at the far right of Home Y. Instead of going 50mm's, the bed went all the way to the front of the printer, and stopped without pounding on the adjustment cap.

                                            This machine has a mind of it's own. My apologies for such bad news.

                                            Here is a thought. Did you run M119 to check the endstop status first?

                                            If the Y endstop were already activated then the G1 H1 would not move.

                                            Frederick

                                            Printers: a small Utilmaker style, a small CoreXY and a E3D MS/TC setup. Various hotends. Using Duet 3 hardware running 3.4.6

                                            A Former User? 1 Reply Last reply Reply Quote 0
                                            • First post
                                              Last post
                                            Unless otherwise noted, all forum content is licensed under CC-BY-SA