How can I calibrate the temperature of my bed
-
@infiniteloop said in How can I calibrate the temperature of my bed:
or do I have to send back the 2 daughter boards because they are not suitable for these thermistors? -
The PT100 daughterboards are of limited value unless you have PT100 sensors to go with them. You can't just configure them into being something else.
-
@axiom Then I omit the daughterboardas.
Then the safest thing is to connect the thermistors in series?
However, I didn't quite understand the description of how to declare all 4 pieces in the code -
@infiniteloop said in How can I calibrate the temperature of my bed:
The proper way to do this is to put a SSR (type DC/DC) between the outcome (-) of each PSU and its heater
The same should also work with mosfets for each part?
-
@axiom said in How can I calibrate the temperature of my bed:
mosfets for each part?
Moin. Yes, absolutely.
Daughterboards: as @Phaedrux told you, these are of "limited value" with thermistors. That's an understatement - you can't attach thermistors to them. Instead, attach the thermistors to "bedtemp".
I'll post how to wire the four thermistors - give me a minute …
-
@axiom Here are two of the "better" options how to wire the thermistors:
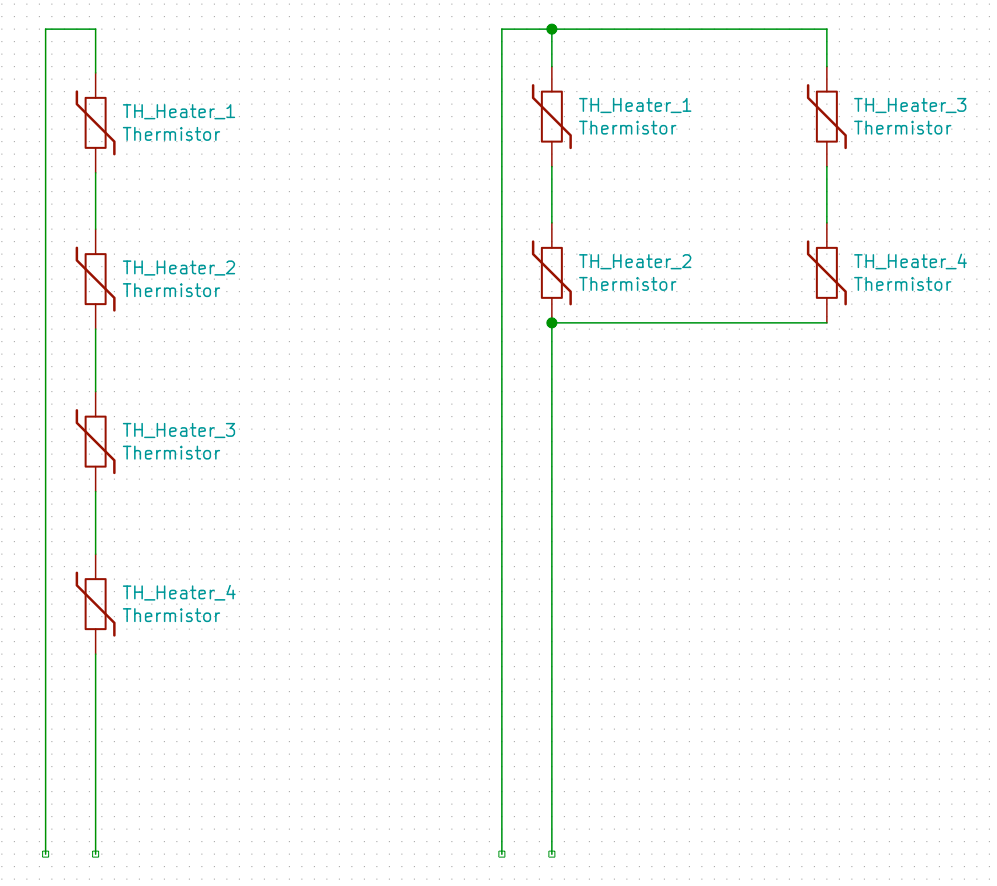
Left, it's a serial arrangement, resulting in a high impedance of 400 kOhm. As I wrote earlier, risk of interference with power signals may be high.
To the right, you see a serial/parallel combination: to the Duet, that arrangement looks exactly like a single thermistor.
In either case, the "open ends" at the bottom of my artwork are meant to be connected with "bedtemp".
-
@infiniteloop II opted for the serial/parallel combination, but where exactly do I have to specify half the resistance in the code (that's what it says in the description)?
Here my code:
Heaters
M308 S0 P"bedtemp" Y"thermistor" R4700 T100000 B3950 ; configure sensor 0 as thermistor on pin bedtemp
M950 H0 C"bedheat" T0 ; create bed heater output on bedheat and map it to sensor 0
M307 H0 B1 S1.00 ; enable bang-bang mode for the bed heater and set PWM limit
M140 H0 ; map heated bed to heater 0
M143 H0 S120 ; set temperature limit for heater 0 to 120C
M308 S1 P"e0temp" Y"thermistor" T100000 B4138 ; configure sensor 1 as thermistor on pin e0temp
M950 H1 C"e0heat" T1 ; create nozzle heater output on e0heat and map it to sensor 1
M307 H1 B0 S1.00 ; disable bang-bang mode for heater and set PWM limit
M143 H1 S280 ; set temperature limit for heater 1 to 280C
M308 S2 P"e1temp" Y"thermistor" T100000 B4138 ; configure sensor 2 as thermistor on pin e1temp
M950 H2 C"e1heat" T2 ; create nozzle heater output on e1heat and map it to sensor 2
M307 H2 B0 S1.00 ; disable bang-bang mode for heater and set PWM limit
M143 H2 S280 ; set temperature limit for heater 2 to 280CI stopped the autotuning because the cables got so hot!!!!!!!!!!!!!!!!!!!!!!!!!!!!!!!!!!!!!!!!!!!!!!!!!!!!!!!!
-
@infiniteloop My mistake, I did the math again...I have to solder on a thicker cable extension...
-
@axiom said in How can I calibrate the temperature of my bed:
I opted for the serial/parallel combination, but where exactly do I have to specify half the resistance in the code (that's what it says in the description)?
The description talkes of two thermistors, not four. Two thermistors in series double their resistance (2 x 100k = 200k), wired in parallel it's half of the resistance (100k / 2 = 50k). In your case, you have two times two thermistors in series (TH_Heater_1 + TH_Heater_2 = 200k, TH_Heater_3 + TH_Heater_4 = 200k). These pairs (of 200k each) are wired in parallel, et voilà: you get 100k (200k / 2). That's why I wrote:
To the right, you see a serial/parallel combination: to the Duet, that arrangement looks exactly like a single thermistor.
As I see from your config snippet above, you've entered the proper values for this thermistor array:
M308 S0 P"bedtemp" Y"thermistor" R4700 T100000 B3950 ; configure sensor 0 as thermistor on pin bedtempNow to the heaters:
I stopped the autotuning because the cables got so hot!!!!!!!!!!!!!!!!!!!!!!!!!!!!!!!!!!!!!!!!!!!!!!!!!!!!!!!!
OK, you've then used a thicker cable extension, but I wonder: how did this work initially when you tuned just one single heater? Don't you connect each heater individually to its dedicated PSU? If so, the currents should only add up on the mains side… have I missed something?
One last thing: please post the tuning report. If the bed heats up as fast as last time, maybe we should reduce power a bit by limiting the PWM to less than 1.0 (that's the S parameter in
M307). Finally, you build a 3D printer, not a pizza oven
-
@infiniteloop Hello, pizza oven was a separate project :-). When I first tested the single mat, I just didn't pay attention to the heat from the cable. I have now ordered a thicker cable for the extension...will probably not arrive until Saturday....I would rather not do the tuning until then.
My nozzles are still an open construction site...I have the Volcano Tunig set (2 heads) https://www.3djake.com/e3d/supervolcano-upgrade-kit-300-mm?sai=7419 . I also started the autotuning...at 180 degrees the heating process breaks off...can you help me there too or should I open a new topic? -
@axiom Better keep this thread focussed on your array of bed heaters, so that other readers with similar questions can reference it. And in case you want to limit PWM a bit, feel free to return to this thread.
Tuning your volcanos is a different topic. BTW, did you have a look at other threads dealing with hotend tuning under RRF 3.2 ff? With a quick forum search, you’ll find several discussions of 'tuning a heater' vs. 'tuning a tool'. For an in-depth treatment of the topic, you might also want to look at this here: Tuning the Heater Temperature Control.
-
@infiniteloop Ok I understand, I can only continue with the bed when the new cable extensions are hopefully there on Saturday, then I will report back
-
The new cable extensions are hopefully there on Saturday, then I will report back
That's fine. CU
-
@infiniteloop Now I soldered the cable extensions and did an autotuning on the bed:
Everything was done, but the following message came up:
Warning: heater behavior was not consistent during tuning
Auto tuning heater 0 completed after 3 idle and 25 tuning cycles in 2290 seconds. This heater needs the following M307 command:
M307 H0 R0.397 K0.309:0.000 D2.40 E1.35 S1.00 B0
Edit the M307 H0 command in config.g to match this. Omit the V parameter if the heater is not powered from VIN.Should i just be happy and ignore it?
-
Warning: heater behavior was not consistent during tuning
I'm not sure what this means. Did you note any anomalies in the temperature graph of DWC during tuning? Spikes or other abrupt changes? Maybe @droftarts or @Phaedrux have an explanation for this warning?
Should i just be happy and ignore it?
You can insert the tuning results into your config.g and see how it works. However, there is a probability of occasional heater warnings during print.
-
@infiniteloop Thanks, I'll do that, I also suspect that I still have to insulate the bed, but I can't find such large insulating mats or the material in rolls, but first of all you've been a great help. Thank you for your patience and the quick replies!
Do I have to somehow close the conversation as "solved" and if so, how does that work?
Many greetings,
Don -
@axiom Moin,
I also suspect that I still have to insulate the bed
I think you should not do that: you employ massive heaters, and the (relatively) short tuning time proves how (overly?) effective they are. If you want to enclose the printer, you get the additional benefit of heating the chamber to a certain degree, which might be helpful with some materials (PETG, ABS, …). Maybe you should even try to limit the heater's duty cycle (the S parameter in
M307) to 0.8 or 0.7 - obviously, you then need to re-tune the heaters to see how this works.Do I have to somehow close the conversation as "solved" and if so, how does that work?
Good idea, but honestly, I don't know how to do that

Greetings from northern Germany

-
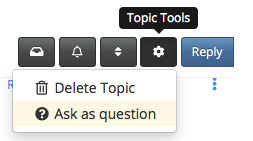
Do I have to somehow close the conversation as "solved" and if so, how does that work?
Found it: Forum Feature - Mark as Question/Solved
EDIT: the menu has changed a bit, now it looks like this:
-
undefined axiom marked this topic as a question 31 Jul 2022, 13:49
-
@axiom And now, after you've marked the topic as a question, you can go into the menu again and mark it as "solved"
-
undefined axiom has marked this topic as solved 31 Jul 2022, 15:35