Big pellet extruder; How to configure the servo motor?
-
Hello,
I have built a large pellet extruder with a servo motor but I am having some trouble hooking it up to my Duet.
Its a Lichuan 1.0Kw 80ST A5 230V servo set like this one
Full user manual is hereI have a Duet 6HC + a 1XD expansion board.
I have wired the Step+/step- and Dir+/Dir- from the 1XD to the servo control terminal and written the gcode config to the best of my ability.
I have read all the Duet documentation, but I still cant get it to work. If anyone has tried something similar and can point me in the right direction I'd really appreciate it!
Here is my full config.g file:
; Configuration file for Duet 3 MB 6HC (firmware version 3.3)
; executed by the firmware on start-up
;
; generated by RepRapFirmware Configuration Tool v3.3.16 on Sat Jul 01 2023 14:29:49 GMT+0200 (CEST)

; General preferences
G90                            ; send absolute coordinates...
M83                            ; ...but relative extruder moves
M550 P"3DPRINTOR"               ; set printer name

; Network
M552 P0.0.0.0 S1               ; enable network and acquire dynamic address via DHCP
M552 I1 S1
M586 P0 S1                     ; enable HTTP
M586 P1 S0                     ; disable FTP
M586 P2 S0                     ; disable Telnet


; Drives
M569 P0.0 S0                   ; physical drive 0.0 goes forward zL
M569 P0.1 S0                   ; physical drive 0.1 goes forward yL
M569 P0.2 S0                   ; physical drive 0.2 goes forward zR
M569 P0.3 S0                   ; physical drive 0.3 goes forward yR
M569 P0.4 S1                   ; physical drive 0.4 goes forward x
M569 P122.0 S1 R1 T5:5:5:5

M584 X0.4 Y0.1:0.3 Z0.0:0.2 E122.0     ; set drive mapping
M350 X32 Y16 Z16 I1                 ; configure microstepping with interpolation
M92 X64 Y320.00 Z800.00 E100.00     ; set steps per mm
M566 X50.00 Y50.00 Z60.00 E400.00         ; set maximum instantaneous speed changes (mm/min)
M203 X2000.00 Y3000.00 Z800.00 E30000.00   ; set maximum speeds (mm/min)
M201 X200.00 Y350.00 Z450.00 E2000.00     ; set accelerations (mm/s^2)
M906 X1800 Y3500 Z2940 E10 I30         ; set motor currents (mA) and motor idle factor in per cent
M84 S30                                  ; Set idle timeout

; Axis Limits
M208 X-5 Y0 Z-60 S1            ; set axis minima
M208 X1800 Y1000 Z700 S0       ; set axis maxima

; Endstops
M574 X1 S1 P"io4.in"		  ; configure switch-type (S1 = microswitch) endstop for low end on X via pin io4.in
M574 Y2 S1 P"io0.in+io1.in"   ; configure switch-type (S1 = microswitch) endstop for high end on Y via pin io0.in & io1
M574 Z1 S1 P"io2.in+io3.in"   ; configure switch-type (S1 = microswitch) endstop for low end on Z via pin io2.in  & io3

; Z-Probe
M558 P0 H0 F120 T6000          ; disable Z probe but set dive height, probe speed and travel speed
M557 X0:0 Y0:0 S10             ; define mesh grid

; Heater 0
M308 S0 P"temp0" Y"PT1000" ;A"Nozzle"   	                    ; configure sensor 0 as PT1000 on pin temp0
M950 H0 C"!io8.out" T0                           			; create extruder heater output on IO5 and map it to sensor 0
M307 H0 R1.191 K0.229:0.210 D20.76 E1.35 S1.00 B0 V5.0		; disable bang-bang mode for heater  and set PWM limit
M143 H0 S350                                 				; set temperature limit for heater 0 to 350C

; Heater 1
M308 S1 P"temp1" Y"PT1000" ;A"Name"                         ; configure sensor 1 as PT1000 on pin temp1
M950 H1 C"!io7.out" T1                           			; create extruder heater output on IO6 and map it to sensor 1
M307 H1 R1.053 K0.260:0.000 D27.18 E1.35 S1.00 B0 V5.0		; disable bang-bang mode for heater  and set PWM limit
M143 H1 S350                                 				; set temperature limit for heater 1 to 350C

; Heater 2
M308 S2 P"temp2" Y"PT1000" ;A"Name"   	                    ; configure sensor 2 as PT1000 on pin temp2
M950 H2 C"!io6.out" T2                           			; create extruder heater output on IO7 and map it to sensor 2
M307 H2 R0.858 K0.376:0.000 D30.47 E1.35 S1.00 B0 V5.0  	; disable bang-bang mode for heater  and set PWM limit
M143 H2 S350                                 				; set temperature limit for heater 2 to 350C

; Heater 3
M308 S3 P"temp3" Y"PT1000" ;A"Top"    	                    ; configure sensor 3 as PT1000 on pin temp3
M950 H3 C"!io5.out" T3                           			; create extruder heater output on IO8 and map it to sensor 3
M307 H3 R0.911 K0.213:0.000 D28.10 E1.35 S1.00 B0 V5.0		; disable bang-bang mode for heater  and set PWM limit
M143 H3 S350                                 				; set temperature limit for heater 3 to 350C

; Fans
; M950 F0 C"out7" Q500                     ; create fan 0 on pin out4 and set its frequency
; M106 P0 C"layerFan" S0                   ; set fan 0 value. Thermostatic control is turned off
; M950 F1 C"out1" Q500                     ; create fan 1 on pin out1 and set its frequency
; M106 P1 C"hotendFan" S1 H0 T35           ; set fan 1 value. Thermostatic control is turned on

; Tools
M563 P0 D0 H0:1:2:3 S"Extruder"  			; define tool 0
G10 P0 X0 Y0 Z0                    	    	; set tool 0 axis offsets
G10 P0 R0 S0                     	        ; set initial tool 0 active and standby temperatures to 0C
Cheers, Søren
-
I have just updated the 1XD to be sure firmware is the latest.
The servo driver is running/enabled, cooling is on and i was able to jog it.
When I try to cold extrude, I see a small green LED flash on both the 6HC and the 1XD.
What is most likely, that it is an issue with the servo drive settings, or with my configuration?
I have the servo drive in position mode - pulse control (chapter 6.1.1)
-
@sbNielsen said in Big pellet extruder; How to configure the servo motor?:
i was able to jog it.
So it's moving?
What is the issue?
-
@Phaedrux
The jogging was done 'manually' by operating the buttons directly on the driver.I can't get it to move by using the Duet interface.
I've tried adjusting all of the config.g settings, but no luck.
The only wires that goes to the driver from the 1XD is the step+/- and dir+/-
I've checked for continuity, and the solder is good.I'm wondering if there is a setting on the driver im missing somewhere.
-
@sbNielsen I took a look at the manual for the driver, but it's level of complexity is somewhat greater than other drivers I have looked at. I think it can take a step and direction signal, but I couldn't find anywhere in the manual that said specifically how to set it, and what timing to use in the T parameter in M569:
Taa:bb:cc:dd (firmware 1.21 and later) Minimum driver step pulse width, step pulse interval, direction setup time and direction hold time, in microseconds (only applies to Duet 2, Duet 3 Mainboards and the Duet 3 Expansion 1XD)
I see you have set it to:
M569 P122.0 S1 R1 T5:5:5:5But it may just be too fast. To be fair it isn't very fast, and I'd expect some movement, which makes it feel a bit more like a driver configuration error.
Ian
Bed-slinger - Mini5+ WiFi/1LC | RRP Fisher v1 - D2 WiFi | Polargraph - D2 WiFi | TronXY X5S - 6HC/Roto | CNC router - 6HC | Tractus3D T1250 - D2 Eth
-
@droftarts
Thanks for having a look Ian!Yes, I have been down the same path but the driver can take up to 1mHz so that should not be a problem.
As far as i can tell, the 'Position mode' should be the step/dir mode, and I have enabled the driver/motor as default on start up.
I will have another crack today and see if i missed something.
-
@sbNielsen have another look at how it is enabled. It may be that it doesn’t need an enable signal to be moved manually by the driver. Most stepper drivers are ‘active disable’ ie expect 0V to enable, 5V to disable.
Ian
Bed-slinger - Mini5+ WiFi/1LC | RRP Fisher v1 - D2 WiFi | Polargraph - D2 WiFi | TronXY X5S - 6HC/Roto | CNC router - 6HC | Tractus3D T1250 - D2 Eth
-
@droftarts
I just tried to put a multimeter between the step+ and step-, and I measured a constant 5V.5V when not cold extruding, and 5V when pressing extrude.
Then I tried to measure the Hz frequency between the step+ and step-, and I could not register any - also not when pressing extrude.
I don't know if any of that ^ is as expected?
I thought I should be able to see the Hz on the meter when hitting extrude?
-
@sbNielsen said in Big pellet extruder; How to configure the servo motor?:
@droftarts
I just tried to put a multimeter between the step+ and step-, and I measured a constant 5V.
5V when not cold extruding, and 5V when pressing extrude.That is expected, I think. See https://docs.duet3d.com/Duet3D_hardware/Duet_3_family/Duet_3_Mainboard_6XD_Hardware_Overview#connecting-external-motor-drivers
The Step and Dir outputs from the 6XD are either low (when "on") or floating/high-impedance when "off".
The Enable output is either low when "on" and high impedance when "off", or vice versa, depending on the position of the 'Driver Enable Polarity' (En_Pol) jumper.So it may be that the driver just need to be configured for this signal. Same for enable, depending on how you have set the jumper.
Then I tried to measure the Hz frequency between the step+ and step-, and I could not register any - also not when pressing extrude.
I thought I should be able to see the Hz on the meter when hitting extrude?That may be down to your multimeter, which may be expecting a sine wave rather than a PWM signal. Usually an oscilloscope is used to see the signal.
Ian
Bed-slinger - Mini5+ WiFi/1LC | RRP Fisher v1 - D2 WiFi | Polargraph - D2 WiFi | TronXY X5S - 6HC/Roto | CNC router - 6HC | Tractus3D T1250 - D2 Eth
-
@droftarts
Ok, so far so good then.I have sent an email to Lichuan tech support now, hopefully they can find the issue.
-
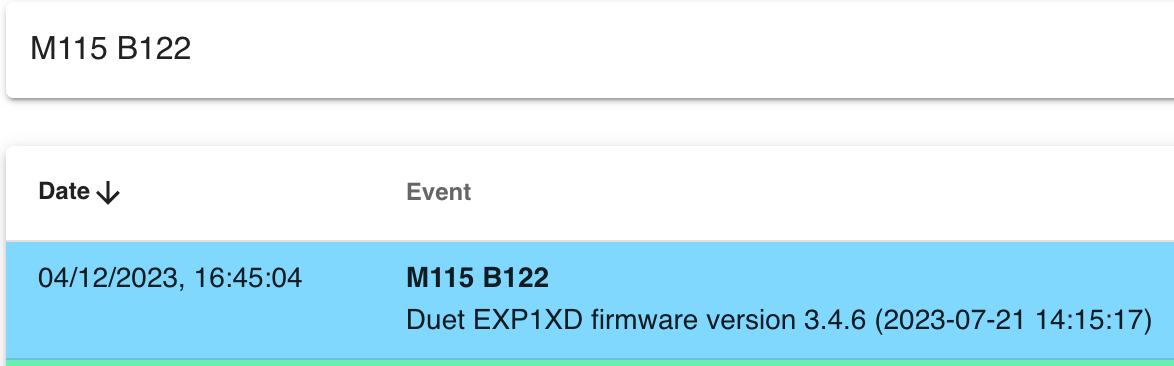
@droftarts
I spoke with the store who sold me the motor/driver, and they test each one before selling and usually the issue is on the control/Arduino/Duet side.I get a reading when sending M115 B122, so there is a connection to the 1XD.
All my config.g numbers are within a reasonable/expected value, so that an extrude command from the Duet WC should cause some kind of motion.
Could this be a fault on the 1XD board, failing to send the frequency? Does that ever happen?
-
@sbNielsen
Another sign that there is activity on the CAN bus, is that when i press extrude I get a brief flash of green on the 1XD.So a signal is definitely sent from the 6HC and received by the 1XD
-
@sbNielsen Have you tested both 1XD boards? I can imagine a fault on one board, but not on both. If you don't have an oscilloscope, you could wire an LED on each output (as the signalling is 5V), and see if they light up during the move (you may have to adjust the frequency to do this).
Ian
Bed-slinger - Mini5+ WiFi/1LC | RRP Fisher v1 - D2 WiFi | Polargraph - D2 WiFi | TronXY X5S - 6HC/Roto | CNC router - 6HC | Tractus3D T1250 - D2 Eth
-
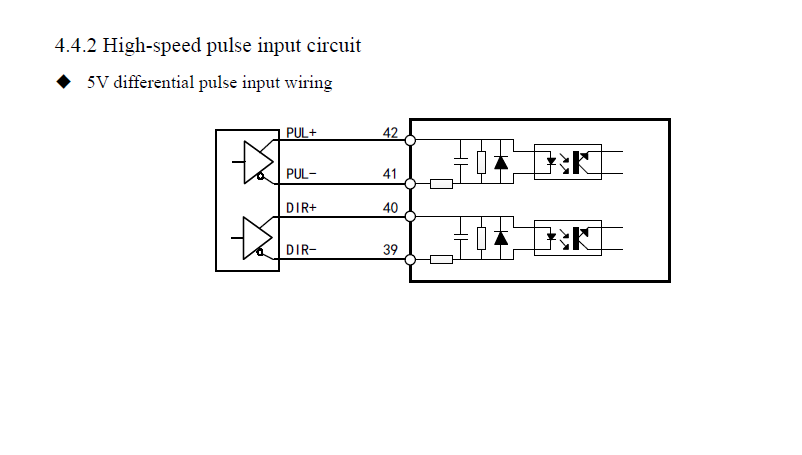
@sbNielsen did you wire the servo inputs like this from page 11 of the manual, with 1XD STEP+ and STEP- acting as PUL+ and PUL- respectively? If not, how did you connect them?
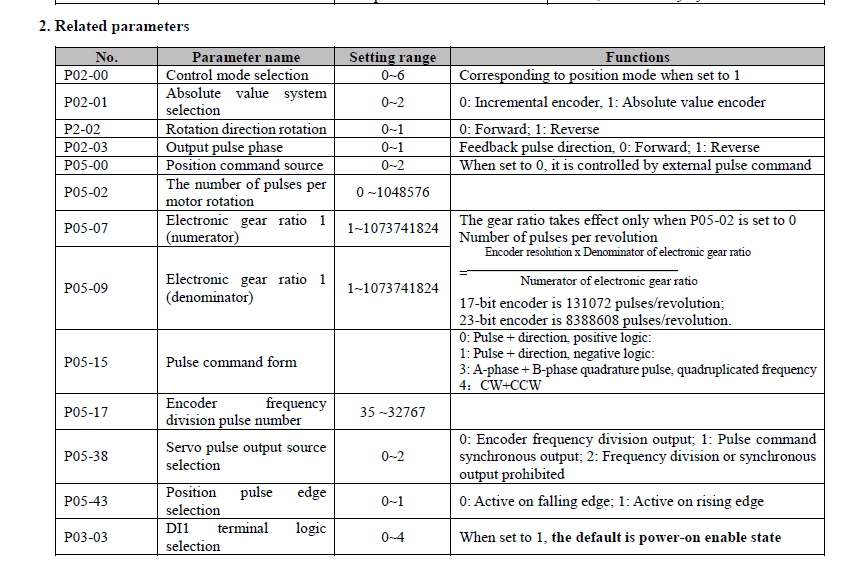
Have you set valid parameters in this table from section 6.1.2 on page 19?
-
- did you wire the servo inputs like this from page 11 of the manual, with 1XD STEP+ and STEP- acting as PUL+ and PUL- respectively? If not, how did you connect them?
Yes, thats how I wired it.
- Have you set valid parameters in this table from section 6.1.2 on page 19?
Yes. I had it in Position mode (external pulse control) P02-00:1 and P05-00:0. I also tried to change various other params to see if they were blocking - no luck.
I spoke with the store I bought the motor from. They have not heard about this before, and puts the fault likelihood on the Duet.
I just tested another external driver + stepper motor on the same 1XD board - this also failed.
So it starts to look like an error with the 1XD.
I have just ordered another one, and will test the new one as soon as it arrives.
-
@sbNielsen I know you updated the firmware on your 1XD, but looking back through the thread I can't see what version your 6HC is on. Can you send
M122andM122 B122and post the results, just in case?Ian
Bed-slinger - Mini5+ WiFi/1LC | RRP Fisher v1 - D2 WiFi | Polargraph - D2 WiFi | TronXY X5S - 6HC/Roto | CNC router - 6HC | Tractus3D T1250 - D2 Eth
-
Yeah sure. They're both are up to date.
-
@sbNielsen Actually, they are not. Your main board 6HC is on a older beta release of 3.5, and your 1XD is on 3.4.6. Please either downgrade your 6HC to 3.4.6, or update both boards with the 6HC and 1XD firmware here, which is 3.5.0-rc.1++: https://www.dropbox.com/scl/fo/gaxzegafmnmagaefo9mgc/h?rlkey=hk4wpttdje76oews8zkuh86q3&dl=0
Ian
Bed-slinger - Mini5+ WiFi/1LC | RRP Fisher v1 - D2 WiFi | Polargraph - D2 WiFi | TronXY X5S - 6HC/Roto | CNC router - 6HC | Tractus3D T1250 - D2 Eth
-
My god... I updated both boards and now at least the external stepper driver/motor is responding!
Can't believe it, I had updated the 1XD to - what I tought was - the latest version exactly to avoid this.
Will try and plug in the servo and hopefully that will work too!
Haha great friday gift so far!
-
@droftarts
I just plugged the servo, and it works!Thank you for the support!
-
 undefined sbNielsen marked this topic as a question
-
undefined sbNielsen has marked this topic as solved