Z HEIGHT BLTOUCH
-
Hi guys!
Today i've an other problem during my configuration
If i do Z home or i do mesh map (G29) the extruder cant be reach 0.
I can see 0 in dashboard but there is a 10 mm gap between extruder and bed.Can someone help me?
It's a 6HC duet 3 + genuine bltouch v3.1.
Thanks!
-
Provide links to your config.g (and other .g files like homeing, bed etc, if they are relavant to the issue). These files can be attached to the forum post using the "Upload File" button: Upload File icon or the text can be posted within code tags, using the "Code" button: Code icon
https://forum.duet3d.com/topic/5909/guide-for-posting-requests-for-help
-
@bricor ```
; General M550 P"Duet 3" ; set hostname ; Smart Drivers M569 P0.0 S0 D2 ; driver 0.0 goes backwards (X axis) M569 P0.1 S1 D2 ; driver 0.1 goes forwards (Y axis) M569 P0.2 S0 D2 ; driver 0.2 goes backwards (Z axis) M569 P0.3 S0 D2 ; driver 0.3 goes backwards (Z axis) M569 P0.4 S1 D2 ; driver 0.4 goes forwards (extruder 0) M569 P0.5 S1 D2 ; driver 0.5 goes forwards (extruder 1) ; Motor Idle Current Reduction M906 I30 ; set motor current idle factor M84 S30 ; set motor current idle timeout ; Axes M584 X0.0 Y0.1 Z0.2:0.3 ; set axis mapping M350 X16 Y16 Z16 I1 ; configure microstepping with interpolation M906 X3200 Y3500 Z3000 ; set axis driver currents M92 X46.4 Y40.4 Z404.13 ; configure steps per mm M671 X-30:220 Y0:0 S0.5 ; position of leadscrew/bed pivot point at left and right of X axis M208 X0:400 Y0:800 Z0:450 ; set minimum and maximum axis limits M566 X60 Y60 Z12 ; set maximum instantaneous speed changes (mm/min) M203 X24000 Y24000 Z180 ; set maximum speeds (mm/min) M201 X500 Y500 Z500 ; set accelerations (mm/s^2) ; Extruders M584 E0.4:0.5 ; set extruder mapping M350 E16:16 I1 ; configure microstepping with interpolation M906 E800:800 ; set extruder driver currents M92 E409:409 ; configure steps per mm M566 E120:120 ; set maximum instantaneous speed changes (mm/min) M203 E3600:3600 ; set maximum speeds (mm/min) M201 E250:250 ; set accelerations (mm/s^2) ; Kinematics M669 K0 ; configure Cartesian kinematics ; Probes M558 K0 P9 C"io4.in" H1 F120 R0.5 T6000 ; configure BLTouch probe via slot #0 G31 P500 X-50 Y90 Z 3.667 ; set Z probe trigger value, offset and trigger height M950 S0 C"io4.out" ; create servo #0 for BLtouch ; Endstops M574 X1 P"io0.in" S1 ; configure X axis endstop M574 Y1 P"io1.in" S1 ; configure Y axis endstop M574 Z1 S2 ; configure Z axis endstop ; Mesh Bed Compensation M557 X25:346 Y25:700 S40:40 ; define grid for mesh bed compensation ; Sensors M308 S0 P"temp0" Y"thermistor" A"PIATTO" T100000 B3988 ; configure sensor #0 M308 S1 P"temp1" Y"thermistor" A"UGELLO 1" T100000 B4138 ; configure sensor #1 M308 S2 P"temp2" Y"thermistor" A"UGELLO 2" T100000 B4138 ; configure sensor #2 bed.g
G28 ; home while true G30 P0 X20 Y400 Z-99999 ; probe near a leadscrew, half way along Y axis G30 P1 X180 Y400 Z-99999 S2 ; probe near a leadscrew and calibrate 2 motors if abs(move.calibration.initial.deviation) < 0.01 || iterations > 15 break homeall.g
; homeall.g G91 ; relative mode G1 H2 Z4 F2000 ; raise head 4mm G1 H1 X-240 Y-240 F7000 ; move up to 240mm in the -X and -Y directions until the homing switches are triggered G1 H2 X4 Y4 F1000; move slowly 6mm in +X and +Y directions G1 H1 X-10 Y-10 ; move up to 10mm in the -X and -Y directions until the homing switches are triggered G90 ; back to absolute mode G1 X100 Y100 F2000 ; put head over the center of the bed, or wherever you want to probe G30 ; lower head, stop when probe triggered and set Z to trigger height -
M558 K0 P9 C"io4.in" H-3 F120 R0.5 T6000 ; configure BLTouch probe via slot #0 G31 P500 X-50 Y90 Z 3.667 If i put H-3
 but i see Z -3 and not Z0.
 -
@nico-rast The M558 H parameter should not be negative. It does not set the height for the Z probe, it only sets the height, above Z zero, that the probe moves to ready for the next probe move, when doing multiple probing, eg when doing a mesh probe.
Z0 is set when the probe triggers, by the
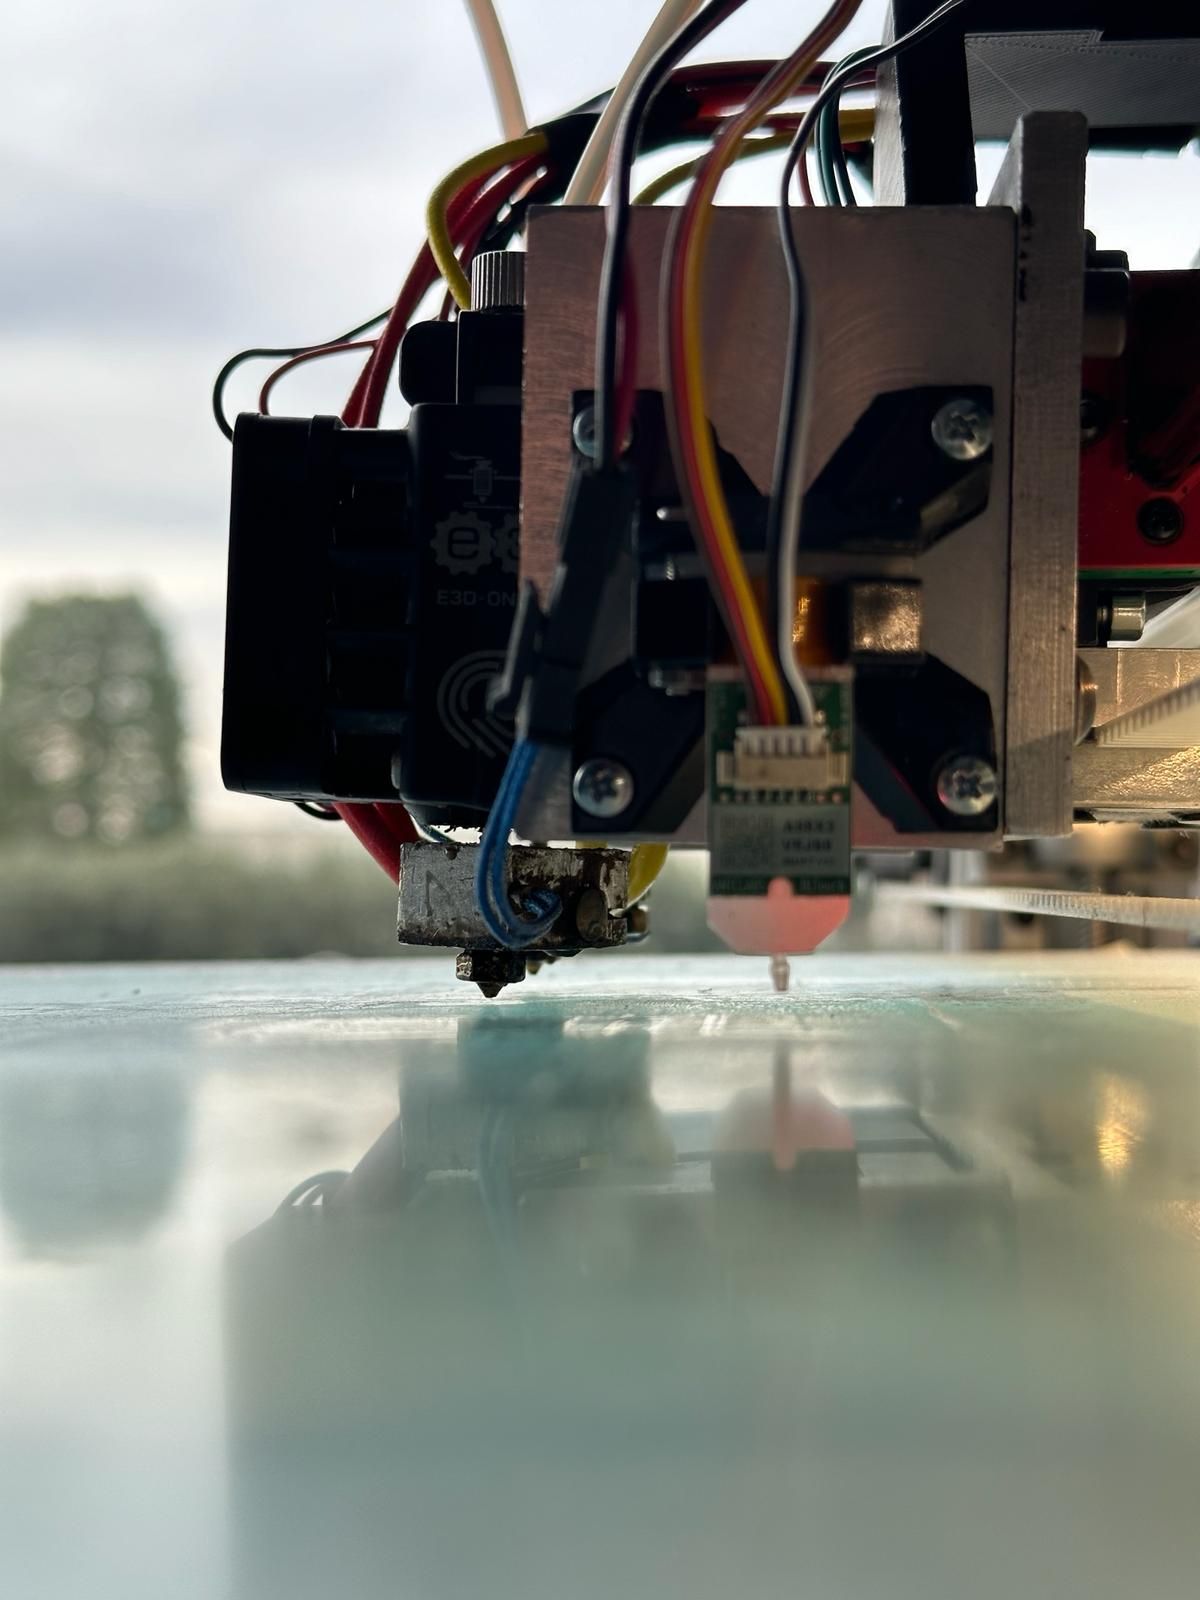
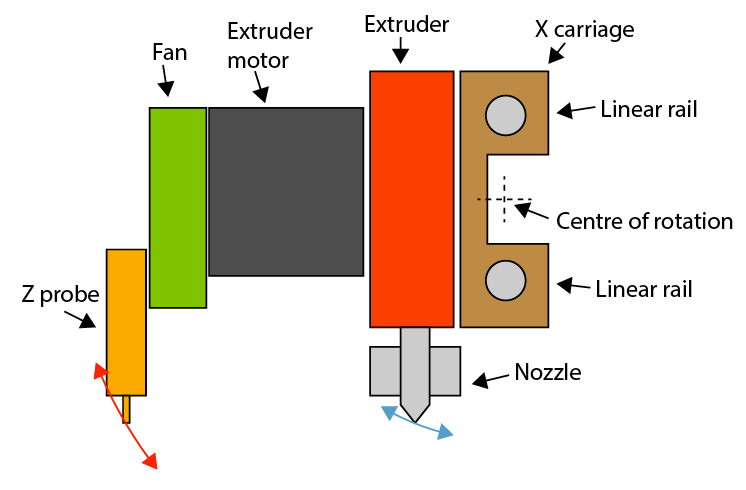
G31 P500 X-50 Y90 Z3.667command in your config.g. When the probe triggers, the hot end should be 3.667mm from the bed, and the Z height should be set to this. To get this offset correct, follow the guide here https://docs.duet3d.com/en/User_manual/Connecting_hardware/Z_probe_testingDoes the probe trigger when you home Z? Because it looks like your whole X carriage is tilted backwards, or your bed is far from level. With the way you have constructed your extruder, any rotation around of the X carriage around the X axis is amplified, because of how offset the nozzle is from the axis. It will move a much greater distance than the Z probe, and any mesh that the Z probe creates is unlikely to be accurate for the nozzle. Something like this will happen, except the nozzle and probe are swapped:
Ian
-
@droftarts said in Z HEIGHT BLTOUCH:
The M558 H parameter should not be negative. It does not set the height for the Z probe, it only sets the height, above Z zero, that the probe moves to ready for the next probe move, when doing multiple probing, eg when doing a mesh probe.
Z0 is set when the probe triggers, by the G31 P500 X-50 Y90 Z3.667 command in your config.g. When the probe triggers, the hot end should be 3.667mm from the bed, and the Z height should be set to this. To get this offset correct, follow the guide here https://docs.duet3d.com/en/User_manual/Connecting_hardware/Z_probe_testing
Does the probe trigger when you home Z? Because it looks like your whole X carriage is tilted backwards, or your bed is far from level. With the way you have constructed your extruder, any rotation around of the X carriage around the X axis is amplified, because of how offset the nozzle is from the axis. It will move a much greater distance than the Z probe, and any mesh that the Z probe creates is unlikely to be accurate for the nozzle. Something like this will happen, except the nozzle and probe are swapped:I followed the Z-offset calibration procedure from the above-mentioned guide and found the value to be 3.667 after placing the nozzle in contact with the bed, using an H value of 5, for example, in the M558 line when performing the bed probing routine. However, during the print startup phase, the extruder does not go to Z 0; instead, it remains at Z +3.667, even though the dashboard indicates 0. As for the carriage, I damaged it during the initial reset attempts
") , and I am currently creating a new, lighter aluminum (Ergal) carriage. I cannot adjust the print bed as it is screwed onto a rigid structure. Still, I can assure you that, having been machined, it is not deformed.
, and I am currently creating a new, lighter aluminum (Ergal) carriage. I cannot adjust the print bed as it is screwed onto a rigid structure. Still, I can assure you that, having been machined, it is not deformed. -
@nico-rast Is there more to your config.g? You don't have any heaters or tools showing in that configuration. I think that's why it is showing Z0, it is showing 'machine' Z0, because there is no tool to define Z offset against.
Ian
-
This is the entire configuration! What could be a good startup script for BLTouch? Currently, I am using these few lines; do you think they can be suitable?
; Configuration file for RepRapFirmware on Duet 3 Main Board 6HC ; executed by the firmware on start-up ; ; generated by RepRapFirmware Configuration Tool v3.5.0-rc.2+3 on Tue Jan 16 2024 12:12:38 GMT+0100 (Ora standard dell’Europa centrale) ; General M550 P"Duet 3" ; set hostname ; Smart Drivers M569 P0.0 S0 D2 ; driver 0.0 goes backwards (X axis) M569 P0.1 S1 D2 ; driver 0.1 goes forwards (Y axis) M569 P0.2 S0 D2 ; driver 0.2 goes backwards (Z axis) M569 P0.3 S0 D2 ; driver 0.3 goes backwards (Z axis) M569 P0.4 S1 D2 ; driver 0.4 goes forwards (extruder 0) M569 P0.5 S1 D2 ; driver 0.5 goes forwards (extruder 1) ; Motor Idle Current Reduction M906 I30 ; set motor current idle factor M84 S30 ; set motor current idle timeout ; Axes M584 X0.0 Y0.1 Z0.2:0.3 ; set axis mapping M350 X16 Y16 Z16 I1 ; configure microstepping with interpolation M906 X3200 Y3500 Z3000 ; set axis driver currents M92 X46.4 Y40.4 Z404.13 ; configure steps per mm M671 X-30:220 Y0:0 S0.5 ; position of leadscrew/bed pivot point at left and right of X axis M208 X0:400 Y0:800 Z0:450 ; set minimum and maximum axis limits M566 X60 Y60 Z12 ; set maximum instantaneous speed changes (mm/min) M203 X24000 Y24000 Z180 ; set maximum speeds (mm/min) M201 X500 Y500 Z500 ; set accelerations (mm/s^2) ; Extruders M584 E0.4:0.5 ; set extruder mapping M350 E16:16 I1 ; configure microstepping with interpolation M906 E800:800 ; set extruder driver currents M92 E409:409 ; configure steps per mm M566 E120:120 ; set maximum instantaneous speed changes (mm/min) M203 E3600:3600 ; set maximum speeds (mm/min) M201 E250:250 ; set accelerations (mm/s^2) ; Kinematics M669 K0 ; configure Cartesian kinematics ; Probes M558 K0 P9 C"io4.in" H-3 F120 R0.5 T6000 ; configure BLTouch probe via slot #0 G31 P500 X-50 Y90 Z 3.667 ; set Z probe trigger value, offset and trigger height M950 S0 C"io4.out" ; create servo #0 for BLtouch ; Endstops M574 X1 P"io0.in" S1 ; configure X axis endstop M574 Y1 P"io1.in" S1 ; configure Y axis endstop M574 Z1 S2 ; configure Z axis endstop ; Mesh Bed Compensation M557 X25:346 Y25:700 S40:40 ; define grid for mesh bed compensation ; Sensors M308 S0 P"temp0" Y"thermistor" A"PIATTO" T100000 B3988 ; configure sensor #0 M308 S1 P"temp1" Y"thermistor" A"UGELLO 1" T100000 B4138 ; configure sensor #1 M308 S2 P"temp2" Y"thermistor" A"UGELLO 2" T100000 B4138 ; configure sensor #2 ; Heaters M950 H0 C"out0" T0 ; create heater #0 M143 H0 P0 T0 C0 S140 A0 ; configure heater monitor #0 for heater #0 M307 H0 R2.43 D5.5 E1.35 K0.56 B1 ; configure model of heater #0 M950 H1 C"out1" T1 ; create heater #1 M143 H1 P0 T1 C0 S350 A0 ; configure heater monitor #0 for heater #1 M307 H1 R2.43 D5.5 E1.35 K0.56 B0 ; configure model of heater #1 M950 H2 C"out2" T2 ; create heater #2 M143 H2 P0 T1 C0 S350 A0 ; configure heater monitor #0 for heater #2 M307 H2 R2.43 D5.5 E1.35 K0.56 B0 ; configure model of heater #2 ; Heated beds M140 P0 H0 ; configure heated bed #0 ; Fans M950 F0 C"out7" ; create fan #1 M106 P0 C"UGELLO" S0 B0.1 H1 T45 ; configure fan #0 M950 F2 C"out8" ; create fan #2 M106 P2 C"UGELLO 1 MATERIALE" S0 L0 X1 B0.1 ; configure fan #2 M950 F3 C"out9" ; create fan #3 M106 P3 C"UGELLO 2 MATERIALE" S0 L0 X1 B0.1 ; configure fan #3 ; Tools M563 P0 S"UGELLO 1" D0 H1 F2:0 ; create tool #0 M568 P0 R0 S0 ; set initial tool #0 active and standby temperatures to 0C M563 P1 S"UGELLO 2" D1 H2 F3:1 ; create tool #1 M568 P1 R0 S0 ; set initial tool #1 active and standby temperatures to 0C Start Script
G90 M82 M106 S0 M140 S60 ; custom bed temp M190 S60 ; custom bed temp M104 S165 T0 ; custom hot end temp minus 50 degrees G28 ; home all axes G29 ; probe ABL M109 S215 T0 ; custom hot end temp Thanks.
-
@nico-rast I don't see anywhere where you have an active tool, so until a tool is made active, the firmware uses the probe point for it's reference point - you haven't told it to do anything else. If the probe is on the first tool, it makes sense to make the tip of the nozzle of that tool the origin point for the printer. To do this, set the first tool as active, by adding
T0either at the end of config.g, or at the start of homing.For more information on tool and probe offsets, see https://docs.duet3d.com/User_manual/Tuning/Defining_tool_and_Z_probe_offsets
Ian
-
@droftarts
just to know.. i'm not expert in coding...M208 X0 Y0 Z0 ; M208 Z0 S1 ; G10 P0 X50 Y0 Z-3.667 ; G10 P1 X55 Y0 Z-3.667 ; T0 is this right? I add this at the end of my config.g.
Currently, at the start of a print, the axes perform homing, the extruder heats up, then the bed, and afterward, the printer begins the mesh probing. Once the mesh probing is completed, the printer positions itself at approximately 3.6mm in height and starts printing, even though the dashboard indicates Z0.2.
With Z babystepping, I lower it down to -3.45mm, and it prints perfectly.Thanks.
-
With the G10 Z parameter of -3.667 that is saying the BLTouch triggers 3.667 BELOW the surface of the bed which is very unlikely.
Frederick
-
@nico-rast You already have M208 values in config.g, so you don't need those. You also don't need the G10 values for now - you may need it for the second tool, but let's get the first one working first.
You don't need the first G10, because you already have probe offsets set with
G31 P500 X-50 Y90 Z 3.667, which are referenced from the first tool's nozzle.So you only need
T0at the end of config.g. Then that tool is active when you probe, so the probe knows that is what is being referenced.Ian
-