Duet3D Logo Duet3D
    • Tags
    • Documentation
    • Order
    • Register
    • Login

    Fly-SHT36 Max V3 RP2040 Based CAN-FD Toolboard

    Scheduled Pinned Locked Moved
    RepRapFirmware on other controllers
    4
    48
    4.0k
    Loading More Posts
    • Oldest to Newest
    • Newest to Oldest
    • Most Votes
    Reply
    • Reply as topic
    Log in to reply
    This topic has been deleted. Only users with topic management privileges can see it.
    • jay_s_ukundefined
      jay_s_uk @CrazyCreator
      last edited by

      @CrazyCreator yes, if it's not connected it'll read like that. It'll also read like that if it's not calibrated

      Owns various duet boards and is the main wiki maintainer for the Teamgloomy LPC/STM32 port of RRF. Assume I'm running whatever the latest beta/stable build is

      CrazyCreatorundefined 2 Replies Last reply Reply Quote 0
      • CrazyCreatorundefined
        CrazyCreator @jay_s_uk
        last edited by

        @jay_s_uk
        That will be the next project. Calibrating the scanner... Yeaaaaah 😞

        http://www.crazycreatorcube.com

        1 Reply Last reply Reply Quote 0
        • CrazyCreatorundefined
          CrazyCreator @jay_s_uk
          last edited by CrazyCreator

          @jay_s_uk
          Can you help me again?

          When I send the MicroProbe to probe the bed, it moves to the planned point and the pin pops out briefly but then goes back in immediately
          and the bed stops.
          The DWC Show: Z-Probe 0
          Bildschirmfoto 2025-04-22 um 23.41.24.png
          Then the error message appears:
          Bildschirmfoto 2025-04-22 um 23.41.38.png
          The config.g for this:

          ; Endstops
          M574 X1 S1 P"!124.io1.in"                                                               ; configure switch-type (e.g. microswitch) endstop for low end on X via pin 124.io1.in on Fly-SHT36 Max V3
          M574 Y1 S1 P"!io2.in"                                                                   ; configure switch-type (e.g. microswitch) endstop for low end on Y via pin io2.in on MB6HC
          M574 Z1 S2                                                                              ; configure Z-probe endstop for low end on Z on Fly-SHT36 Max V3
          
          ; Z-Probes 
          ; Configuration for Z-Probe - BTT BiQu MicroProbe V2
          M558 P9 H6 F250:30 T8000 C"^124.io0.in"                                                ; set Z probe type to microprobe and the dive height + speeds
          M950 P0 C"124.io0.out"                                                                  ; Setup io0.out as on/off port on Fly-SHT36 Max V3
          G31 P500 X30.01 Y48.6 Z0.7                                                              ; set Z probe trigger value, offset and trigger height
          
          ; Configuration for Scanning Probe from SHT36
          ;M558 K1 P11 C"124.i2c.ldc1612" H5 F120 T6000                                           ; configure scanning probe via slot #1
          ;G31 P500 X0 Y0 Z0.7                                                                    ; set Z probe trigger value, offset and trigger height
          
          ; Define Mesh Grid and Probing Points distance
          M557 X30:300 Y15:250 P5                                                                 ; define mesh grid


          When i try the other way in config.g with !

          ; Endstops
          M574 X1 S1 P"!124.io1.in"                                                               ; configure switch-type (e.g. microswitch) endstop for low end on X via pin 124.io1.in on Fly-SHT36 Max V3
          M574 Y1 S1 P"!io2.in"                                                                   ; configure switch-type (e.g. microswitch) endstop for low end on Y via pin io2.in on MB6HC
          M574 Z1 S2                                                                              ; configure Z-probe endstop for low end on Z on Fly-SHT36 Max V3
          
          ; Z-Probes 
          ; Configuration for Z-Probe - BTT BiQu MicroProbe V2
          M558 P9 H6 F250:30 T8000 C"^!124.io0.in"                                                ; set Z probe type to microprobe and the dive height + speeds
          M950 P0 C"124.io0.out"                                                                  ; Setup io0.out as on/off port on Fly-SHT36 Max V3
          G31 P500 X30.01 Y48.6 Z0.7                                                              ; set Z probe trigger value, offset and trigger height
          
          ; Configuration for Scanning Probe from SHT36
          ;M558 K1 P11 C"124.i2c.ldc1612" H5 F120 T6000                                           ; configure scanning probe via slot #1
          ;G31 P500 X0 Y0 Z0.7                                                                    ; set Z probe trigger value, offset and trigger height
          
          ; Define Mesh Grid and Probing Points distance
          M557 X30:300 Y15:250 P5                                                                 ; define mesh grid
          

          If I connect it like this, the MicroProbe works. The pin pops out and is triggered by the bed, and the bed stops.

          BUT then I see a red 1000 on the display.
          Bildschirmfoto 2025-04-22 um 23.45.42.png

          But the homing works perfectly fine, even though it says 1000 in red. That's kind of surprising, because that's not how it's supposed to be, is it?

          Maybe you can take a look at my configuration?

          Attached are config.g and the homing files:
          config.g
          homeall.g
          homex.g
          homey.g
          homez.g

          Maybe

          http://www.crazycreatorcube.com

          jay_s_ukundefined 1 Reply Last reply Reply Quote 0
          • jay_s_ukundefined
            jay_s_uk @CrazyCreator
            last edited by

            @CrazyCreator the V2 is inverted so your second config is correct

            Owns various duet boards and is the main wiki maintainer for the Teamgloomy LPC/STM32 port of RRF. Assume I'm running whatever the latest beta/stable build is

            CrazyCreatorundefined 1 Reply Last reply Reply Quote 0
            • CrazyCreatorundefined
              CrazyCreator @jay_s_uk
              last edited by

              @jay_s_uk
              And this
              1745358348259-bildschirmfoto-2025-04-22-um-23.45.42.png
              is ok?

              http://www.crazycreatorcube.com

              1 Reply Last reply Reply Quote 0
              • CrazyCreatorundefined
                CrazyCreator @jumpedwithbothfeet
                last edited by CrazyCreator

                @jay_s_uk and maybe @jumpedwithbothfeet said in Fly-SHT36 Max V3 RP2040 Based CAN-FD Toolboard:

                ... , watch out for the ribbon connectors I found them quite tricky!

                I managed to get the ribbon cable in on the side of the probe, but on the board itself... No chance. It doesn't slide in deep enough to stay in place. It keeps falling out. 😞

                Do you have any tips that might make this easier or even possible?

                Is there nothing on the socket itself that you need to unlock or open before inserting the ribbon cable?

                http://www.crazycreatorcube.com

                CrazyCreatorundefined 1 Reply Last reply Reply Quote 0
                • CrazyCreatorundefined
                  CrazyCreator @CrazyCreator
                  last edited by

                  @CrazyCreator
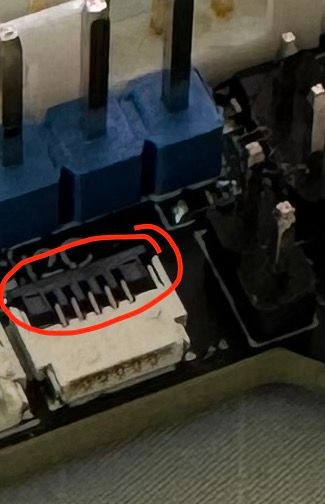
                  For anyone who has the same problem after me, here's how to connect or insert the ribbon cable.
                  You have to flip the small black bracket upwards, then insert the cable, and then flip the bracket back down. This secures the cable.
                  Of course, you should have known beforehand that there is a bracket on these mini jacks.
                  IMG_0786.jpeg

                  http://www.crazycreatorcube.com

                  1 Reply Last reply Reply Quote 0
                  • madeinta1wanundefined
                    madeinta1wan
                    last edited by

                    Hi @jay_s_uk ,

                    Have swapped from a Duet Toolboard to this and flashed the firmware (I think) and connected it to the CAN port on my Duet-modified OrangeStorm Giga and I'm unable to connect to it.

                    Set the DIP switches to this -

                    54ce3bad-9a1f-40e5-aecd-2f92e09fa0d7-image.png

                    But the Ali site says the exact opposite -

                    445476aa-f9f9-48da-9a85-639f9e2689b6-image.png

                    I'm assuming the info on the TeamGloomy page is the correct one, I've flipped the 120ohm jumper up and no joy- I get power lights and a rapidly flashing "working" LED but it just stays rapidly flashing.

                    So I'm stumped, the error I get when I boot is :

                    CAN response timeout: board 124
                    

                    Followed the flashing method, saw the drive put the firmware on it and the working light went solid and then started rapidly flashing again so I assume it flashed properly. Could it be that I received a SHT36v3 and not a SHT36 MAX V3? Is there some way of identifying it on the board?

                    Thanks in advance,

                    Nate

                    jay_s_ukundefined 1 Reply Last reply Reply Quote 0
                    • jay_s_ukundefined
                      jay_s_uk @madeinta1wan
                      last edited by

                      @madeinta1wan post some photos of the board, front and back.
                      If the LED is flashing rapidly it means theres no CAN connection. Can you also post a photo of your wiring at the mainboard side?

                      Owns various duet boards and is the main wiki maintainer for the Teamgloomy LPC/STM32 port of RRF. Assume I'm running whatever the latest beta/stable build is

                      madeinta1wanundefined 1 Reply Last reply Reply Quote 0
                      • madeinta1wanundefined
                        madeinta1wan @jay_s_uk
                        last edited by

                        @jay_s_uk

                        Sure thing,

                        Just to say that I was running the 1LC previously with a CAN connection and it ran well, I'll take some photos and post my config.

                        -N

                        madeinta1wanundefined 1 Reply Last reply Reply Quote 0
                        • madeinta1wanundefined
                          madeinta1wan @madeinta1wan
                          last edited by

                          @jay_s_uk ---

                          Thanks, after thinking about what you said I tried swapping my H and L in the CAN connections and I've got one of three tool boards running now.

                          🙏

                          Nate

                          1 Reply Last reply Reply Quote 1
                          • First post
                            Last post
                          Unless otherwise noted, all forum content is licensed under CC-BY-SA