extruder works but print not starting
-
@dc42 Hi Dave
I did but i edited my config files and uploaded many time after i calibrated the extruder
do i need to re-calibrate it again?
in simulation of print it works but when i try to print it heat up and home axis and looks ready for printing but not moving , and shows in duepanel and web interface the print time is going on but change in x,y,z or E steps. -
Can you post the first 50 or so lines of a gcode file you're trying to print?
Can you also post your config.g?
-
@phaedrux
; Configuration file for Duet WiFi (firmware version 1.21)
; executed by the firmware on start-up
;
; generated by RepRapFirmware Configuration Tool on Wed Aug 08 2018 15:32:33 GMT+0400 (Gulf Standard Time); General preferences
G90 ; Send absolute coordinates...
M83 ; ...but relative extruder moves; Network
M550 PTeignbridge Vigor ; Set machine name
M551 Pteignprop ; Set password
M552 S1 ; Enable network
M587 S"TEIGNBRIDGE" P"peacock1" ; Configure access point. You can delete this line once connected
M586 P0 S1 ; Enable HTTP
M586 P1 S0 ; Disable FTP
M586 P2 S0 ; Disable TelnetM584 X0 Y1 Z2:3:4:5 U3 V4 W5 E6 ; custome driver mapping Split Z into Z,U,V and W
; Drives
M569 P0 S0 ; Drive 0 goes forwards
M569 P1 S1 ; Drive 1 goes forwards
M569 P2 S0 ; Drive 2 goes forwards
M569 P3 S0 ; Drive 3 goes forwards
M569 P4 S0 ; Drive 4 goes forwards
M569 P5 S0 ; Drive 5 goes forwards
M569 P6 S0 ; Drive 6 goes forwardsM350 X16 Y16 Z16:16:16:16 U16 V16 W16 E16 I1 ; Configure microstepping with interpolation
M92 X80 Y80 Z640:640:640:640 U640 V640 W640 E837 ; Set steps per mm
M566 X900 Y900 Z16:16:16:16 U16 V16 W16 E1600 ; Set maximum instantaneous speed changes (mm/min)M203 X6000 Y6000 Z180:180:180:180 U180 V180 W180 E20000 ; Set maximum speeds (mm/min)
M201 X500 Y20 Z250:250:250:250 U250 V250 W250 E8000 ; Set accelerations (mm/s^2)
M906 X1500 Y1500 Z2700:2700:2700:2700 U2700 V2700 W2700 E800 I30 ; Set motor currents (mA) and motor idle factor in per centM84 S30 ; Set idle timeout(reduce all currents for Inactive motors)
; Axis Limits
M208 X0 Y0 Z0 U0 V0 W0 A0 S1 ; Set axis minima
M208 X1200 Y1200 Z1200 U1200 V1200 W1200 S0 ; Set axis maxima2
; Endstops
M574 X1 Y1 U2 V2 W2 S1 ; Set active high endstops; Z-Probe
M574 Z1 S2 ; Set endstops controlled by probe
M307 H3 A-1 C-1 D-1 ; Disable heater on PWM channel for BLTouch
M558 P9 H5 F120 T6000 ; Set Z probe type to bltouch and the dive height + speeds
G31 P25 X0 Y0 Z0 ; Set Z probe trigger value, offset and trigger heightM557 X100:600 Y100:600 S250 ; Define mesh grid
; Heaters
M305 P0 T100000 B4138 C0 R4700 ; Set thermistor + ADC parameters for heater 0
M143 H0 S120 ; Set temperature limit for heater 0 to 120C
M305 P1 T100000 B4725 C7.060000e-8 R4700 ; Set thermistor + ADC parameters for heater 1
M143 H1 S280 ; Set temperature limit for heater 1 to 280C; Fans
M106 P0 S1 I0 F500 H1 T45 ; Set fan 0 value, PWM signal inversion and frequency. Thermostatic control is turned on
M106 P1 S1 I0 F500 H1 T45 ; Set fan 1 value, PWM signal inversion and frequency. Thermostatic control is turned on
M106 P2 S1 I0 F500 H1 T45 ; Set fan 2 value, PWM signal inversion and frequency. Thermostatic control is turned on; Tools
M563 P0 D0 H1 ; Define tool 0
G10 P0 X0 Y0 Z0 ; Set tool 0 axis offsets
G10 P0 R0 S0 ; Set initial tool 0 active and standby temperatures to 0C; Automatic saving after power loss is not enabled
; Custom settings are not configured
-
herein the file i am trying to print
;TIME:25459
;Filament used: 66.807m
;Layer height: 0.4
;Generated with Cura_SteamEngine 3.4.0M104 S230
M109 S230
M82 ;absolute extrusion mode
G28 ;Home
G1 Z15.0 F6000 ;Move the platform down 15mm
;Prime the extruder
G92 E0
G1 F200 E3
G92 E0
M83 ;relative extrusion mode
G1 F1500 E-6.5
;LAYER_COUNT:170
;LAYER:0
M107
G0 F3600 X18.043 Y-85.362 Z0.3
;TYPE:SKIRT
G1 F1500 E6.5
G1 F1800 X18.852 Y-85.187 E0.04129
G1 X27.011 Y-82.963 E0.42191
G1 X27.803 Y-82.701 E0.04162
G1 X35.72 Y-79.602 E0.42416
G1 X36.475 Y-79.26 E0.04135
G1 X43.944 Y-75.377 E0.41998
G1 X44.658 Y-74.956 E0.04135
G1 X51.709 Y-70.279 E0.42213
G1 X52.374 Y-69.785 E0.04133
G1 X58.886 Y-64.388 E0.42196
G1 X59.498 Y-63.822 E0.04159
G1 X65.414 Y-57.744 E0.42316
G1 X65.96 Y-57.12 E0.04137
G1 X71.16 Y-50.496 E0.42014
G1 X71.637 Y-49.818 E0.04136
G1 X76.133 Y-42.633 E0.42286
G1 X76.536 Y-41.906 E0.04147
G1 X80.235 Y-34.298 E0.42205
G1 X80.558 Y-33.532 E0.04147
G1 X83.433 Y-25.557 E0.42294
G1 X83.673 Y-24.76 E0.04153
G1 X85.685 Y-16.51 E0.42366
G1 X85.838 Y-15.696 E0.04132
G1 X86.953 Y-7.36 E0.41959
G1 X87.019 Y-6.533 E0.04139
G1 X87.243 Y1.923 E0.42202
G1 X87.221 Y2.752 E0.04137
G1 X86.545 Y11.201 E0.42287
G1 X86.435 Y12.025 E0.04147
G1 X84.874 Y20.301 E0.42017
G1 X84.678 Y21.104 E0.04124
G1 X82.232 Y29.225 E0.42314
G1 X81.949 Y30.009 E0.04158
G1 X78.659 Y37.803 E0.42207
G1 X78.297 Y38.549 E0.04137
G1 X74.199 Y45.949 E0.42202
G1 X73.756 Y46.656 E0.04162
G1 X68.866 Y53.611 E0.42417
G1 X68.354 Y54.263 E0.04136
G1 X62.809 Y60.597 E0.41999
G1 X62.231 Y61.19 E0.04131
G1 X56.014 Y66.929 E0.42212
G1 X55.376 Y67.459 E0.04138
G1 X48.586 Y72.505 E0.42206 -
@marine85 said in extruder works but print not starting:
; Axis Limits
M208 X0 Y0 Z0 U0 V0 W0 A0 S1 ; Set axis minimaWhere does the A0 come from?
It would appear that you are missing a tool select command anywhere. Without it, the hotend won't be enabled. Try adding T0 to the end of your config.g to enable it at startup. And add T0 to your Cura start gcode. You should probably also change Cura to use RepRap flavour gcode. I think if you do that it will add the tool selection itself when it sends the temp commands.
-
@marine85 said in extruder works but print not starting:
; Fans
M106 P0 S1 I0 F500 H1 T45 ; Set fan 0 value, PWM signal inversion and frequency. Thermostatic control is turned on
M106 P1 S1 I0 F500 H1 T45 ; Set fan 1 value, PWM signal inversion and frequency. Thermostatic control is turned on
M106 P2 S1 I0 F500 H1 T45 ; Set fan 2 value, PWM signal inversion and frequency. Thermostatic control is turned onDo you have a part cooling fan? The way it is configured now all fans are thermostatically linked to the hotend.
Typically Fan0 would be used as the part cooling fan and Fan1 for the hotend. Fan2 possibly for cooling the duet.
For example, here is how I have it configured.
M106 P0 S0 H-1 C"Part Cooling" ; Set fan 0 (Part cooling blower) G-code controlled. Thermostatic control is turned off M106 P1 S1 H1 T45 C"Hotend Fan" ; Set fan 1 (Hotend fan) Thermostatic control. Turns on when hotend reaches 45c M106 P2 F100 L0.2 B0.5 T30:40 H100:101:102 C"Duet Fans" ; Set fan 2 Duet case fan. Tied to CPU and driver temps. -
@marine85 said in extruder works but print not starting:
G31 P25 X0 Y0 Z0 ; Set Z probe trigger value, offset and trigger height
Don't forget to calibrate the trigger height for your zprobe.
https://duet3d.dozuki.com/Wiki/Test_and_calibrate_the_Z_probe#Section_Calibrate_the_Z_probe_trigger_height -
@phaedrux many thanks
I will do these modifications and check -
I think the problem is with remapping the Extruder to driver "6" (E3) on duex2
but when reconfigure it again to driver"3" it works but the independent Z homing macro not working!
the macro was working fine when i map drivers 2,3,4 and 5 to Z with virtual axis U,V and W.
any help please how to sort our this issue?Thanks,
-
-
Is your config.g file the same as in your post of 15 August?
-
Did you make sure that Tool 0 is selected, either in your slicer start GCode or before you start a print?
Duet WiFi hardware designer and firmware engineer
Please do not ask me for Duet support via PM or email, use the forum
http://www.escher3d.com, https://miscsolutions.wordpress.com -
-
@dc42 Yes it is the same config
; generated by RepRapFirmware Configuration Tool on Wed Aug 08 2018 15:32:33 GMT+0400 (Gulf Standard Time)
; General preferences
G90 ; Send absolute coordinates...
M83 ; ...but relative extruder moves; Network
M550 PTeignbridge Vigor ; Set machine name
M551 Pteignprop ; Set password
M552 S1 ; Enable network
M587 S"TEIGNBRIDGE" P"peacock1" ; Configure access point. You can delete this line once connected
M586 P0 S1 ; Enable HTTP
M586 P1 S0 ; Disable FTP
M586 P2 S0 ; Disable TelnetM584 X0 Y1 Z2:3:4:5 U3 V4 W5 E6 ; custome driver mapping Split Z into Z,U,V and W
; Drives
M569 P0 S0 ; Drive 0 goes forwards
M569 P1 S1 ; Drive 1 goes forwards
M569 P2 S0 ; Drive 2 goes forwards
M569 P3 S0 ; Drive 3 goes forwards
M569 P4 S0 ; Drive 4 goes forwards
M569 P5 S0 ; Drive 5 goes forwards
M569 P6 S0 ; Drive 6 goes forwardsM350 X16 Y16 Z16:16:16:16 U16 V16 W16 E16 I1 ; Configure microstepping with interpolation
M92 X80 Y80 Z640:640:640:640 U640 V640 W640 E837 ; Set steps per mm
M566 X900 Y900 Z16:16:16:16 U16 V16 W16 E1600 ; Set maximum instantaneous speed changes (mm/min)M203 X6000 Y6000 Z180:180:180:180 U180 V180 W180 E20000 ; Set maximum speeds (mm/min)
M201 X500 Y20 Z250:250:250:250 U250 V250 W250 E8000 ; Set accelerations (mm/s^2)
M906 X1500 Y1500 Z2700:2700:2700:2700 U2700 V2700 W2700 E800 I30 ; Set motor currents (mA) and motor idle factor in per centM84 S30 ; Set idle timeout(reduce all currents for Inactive motors)
; Axis Limits
M208 X0 Y0 Z0 U0 V0 W0 S1 ; Set axis minima
M208 X1200 Y1200 Z1200 U1200 V1200 W1200 S0 ; Set axis maxima2
; Endstops
M574 X1 Y1 U2 V2 W2 S1 ; Set active high endstops; Z-Probe
M574 Z1 S2 ; Set endstops controlled by probe
M307 H3 A-1 C-1 D-1 ; Disable heater on PWM channel for BLTouch
M558 P9 H5 F120 T6000 ; Set Z probe type to bltouch and the dive height + speeds
G31 P25 X0 Y0 Z0 ; Set Z probe trigger value, offset and trigger heightM557 X100:600 Y100:600 S250 ; Define mesh grid
; Heaters
M305 P0 T100000 B4138 C0 R4700 ; Set thermistor + ADC parameters for heater 0
M143 H0 S120 ; Set temperature limit for heater 0 to 120C
M305 P1 T100000 B4725 C7.060000e-8 R4700 ; Set thermistor + ADC parameters for heater 1
M143 H1 S280 ; Set temperature limit for heater 1 to 280C; Fans
M106 P0 S0 H-1 C"Part Cooling" ; Set fan 0 (Part cooling blower) G-code controlled. Thermostatic control is turned off
M106 P1 S1 H1 T45 C"Hotend Fan" ; Set fan 1 (Hotend fan) Thermostatic control. Turns on when hotend reaches 45c
M106 P2 F100 L0.2 B0.5 T30:40 H100:101:102 C"Duet Fans" ; Set fan 2 Duet case fan. Tied to CPU and driver temps.; Tools
M563 P0 D0 H1 ; Define tool 0
G10 P0 X0 Y0 Z0 ; Set tool 0 axis offsets
G10 P0 R0 S0 ; Set initial tool 0 active and standby temperatures to 0C; Automatic power saving
M911 S10 R11 P"M913 X0 Y0 G91 M83 G1 Z3 E-5 F1000" ; Set voltage thresholds and actions to run on power loss; Miscellaneous
T0 ; Select first tool -
the macro i use for 4 x z axis homing to max end stop is
M400 ; make sure everything has stopped before we make changes
M584 X0 Y1 Z2:3:4:5 U3 V4 W5 E6
M574 Z2 U2 V2 W2 S1 ; set endstops to max
G91 ; use relative positioning
M584 Z2 U3 V4 W5 ; split z to control z,u,v and w
G1 Z1350 U1350 V1350 W1350 F4000 S1 ; course home z
G1 Z-250 U-250 V-250 W-250 F6000 S2 ; Down Z relative to current position
G90 ; back to absolute positioning
M400 ; make sure everything has stopped before we reset motors current
M584 Z2:3:4:5 ; combined z again
M574 Z2:3:4:5 S2 ; set endstops back to normal
M999 ; restart -
I am wondering whether the stepper driver 6 output could be faulty. Can you try driver 7 instead, if it is a DueX5 not a DueX2? Alternatively, test driver 6 by e.g. connecting the X motor to it and using X6 in the M584 command instead of X0.
-
Unfortunately i have duex2 the driver is working when assigned to stepmotor not extruder.
May be if i ordered duex5 would be a solution or this may be bug with the firmware? -
No i don't think it's a firmware bug. Please try removing E6 from your M584 command and changing X0 to X6 in it, and with the Duet powered down move the X motor connector to the E3 connector on the DueX2. Then power up and test the X axis. That will show whether the E3 driver (driver 6) is working correctly.
-
Hi Dave , I remapped the driver 6 to x and it is working now.
i will check the printing today.
I have another question I am testing PNP sensor LJ12A3-4-Z/BY and i did the static testing and it give me 1000 in in DWC.
when i configure my homez.g using this code Homing Z using a Z probe the z moves 4mm and stop
G91 ; relative mode
G1 Z4 F200 S2; raise head 4mm to ensure it is above the Z probe trigger height
G90 ; back to absolute mode
G1 X100 Y100 S2 F2000 ; put head over the centre of the bed, or wherever you want to probe
G30 ; lower head, stop when probe triggered and set Z to trigger heightI used the code of Homing Z using a Z min endstop switch in homez.g
and looks working i dont know if bed probing will work or not herein my codeconfig.g
; Axis Limits
M208 X0 Y0 Z0 S1 ; Set axis minima
M208 X1200 Y1200 Z1200 S0 ; Set axis maxima; Endstops
M574 X1 Y1 S1 ; Set active high endstops (NC); Z-Probe
M574 Z1 S2 ; Set endstops controlled by probe
M558 P5 X0 Y0 Z1 T4000 F300 H10 ; Set Z probe type to switch and the dive height + speeds(Analog Z probe, also used for homing the Z axis)
G31 Z0 P500 ; Set Z probe trigger value, offset and trigger height
M557 X15:1185 Y15:1185 S100 ; Define mesh gridhomez.g
G91 ; relative mode
G1 Z4 F200 S2 ; raise head 4mm to ensure it is above the switch trigger height
G90 ; back to absolute mode
G1 X0 Y0 S2 F2000 ; put the head wherever you want it to be when you home Z (omit this line if it doesn't matter)
G91 ; relative mode
G1 Z-1200 S1 F100 ; move Z down until the switch triggers
G90 ; back to absolute mode
G92 Z0 S2 ; tell the firmware that we are at Z=0mmFirmware Name: RepRapFirmware for Duet 2 WiFi/Ethernet
Firmware Electronics: Duet WiFi 1.02 or later + DueX2
Firmware Version: 2.02beta1(RTOS) (2018-08-12b5)
WiFi Server Version: 1.21
Web Interface Version: 1.22.1 -
@marine85 said in extruder works but print not starting:
I have another question I am testing PNP sensor LJ12A3-4-Z/BY and i did the static testing and it give me 1000 in in DWC.
Is the reading 1000 when the sensor is close to the bed and triggered, or when it is far from the bed and not triggered?
-
Reading 1000 when triggered and sensor indicator led on
-
You need to use different commands in homez.g to home Z using a Z probe. See https://duet3d.dozuki.com/Wiki/ConfiguringRepRapFirmwareCartesianPrinter#Section_Homing_Z.
-
when i use this homez.g
G91 ; relative mode
G1 Z4 F200 S2; raise head 4mm to ensure it is above the Z probe trigger height
G90 ; back to absolute mode
G1 X100 Y100 S2 F2000 ; put head over the centre of the bed, or wherever you want to probe
G30 ; lower head, stop when probe triggered and set Z to trigger heightx and Y axis only moves to 100,100 and Z not moving up or down and reading Z 4.0 and when i home z again z value increase by 4 becoming 8,12,etc..
the sensor reading is 0 when not triggered and 1000 when triggered .I tried to print but when heating is ready and homing x and Y showing this message and aborting the print
Error: G0/G1: insufficient axes homed
Cancelled printing file panal.gcode, print time was 0h 1m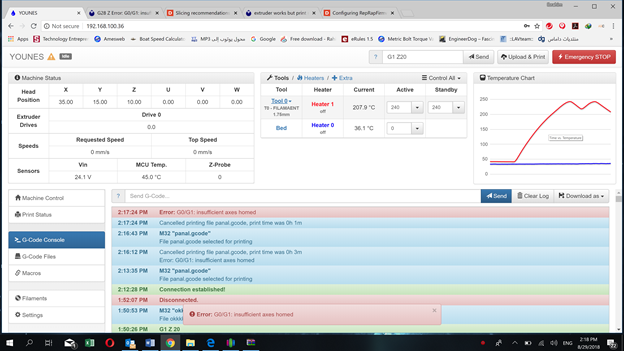 
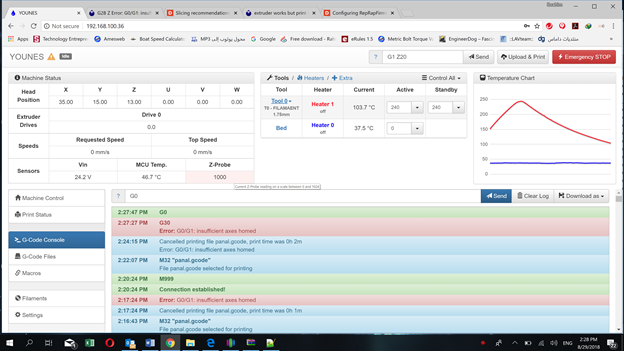
help please with this issue ?