Duet Wifi and CR-10
-
Yes that looks good to me (I don't know whether the steps/mm are correct for the CR10). Eventually you will want to add a M671 command as well, but that can wait. The M203 values may be too high, again I don't know the CR10.
-
@dc42 thank you. thats me all wired up so time to start the commissioning and see what needs changed.
so if i understand correctly then the M584 instructs both drives 2 and 4 to move when a Z instruction is given and both drives will be working on the same parameters defined in the script.
leveling can come later for the moment I just want movement in the correct drive and in the correct direction

baby steps for me as its all new so I just want to do one thing at a time.
plan is direction first
then rough steps/mm check
then worry about leveling........then throw a file at it and see how far out I am lol
-
OMG I an in love!!!
just threw a bunch of best guess settings at it when it looked OK I manually leveled the bed and started a print to see how bad it would be.....
erm..... even throwing 200% speed at it, its silent and the best print yet LOL
and I am sure there is a lot of tweaking to do but DAMN! I like!!
OK the bad... sliced in Cura and I am getting repeated M205 not recognised warnings - like hundreds of them - OK my stupidity need to change G code flavor in Cura from Marlin to Reprap O presume lol
hopefully something simple but thats the only problem lol
Big thanks to DC42 and the team I have no regrets at all!
-
@dc42 In the start g-code of the slicer I have:
G30 P0 X20 Y150 Z-99999 ; probe near left leadscrew
G30 P1 X280 Y150 Z-99999 S2 ; probe near a right and calibrate 2 motors
G30 P0 X20 Y150 Z-99999 ; probe near left leadscrew
G30 P1 X280 Y150 Z-99999 S2 ; probe near right leadscrew and calibrate 2 motors
G30 P0 X20 Y150 Z-99999 ; probe near left leadscrew
G30 P1 X280 Y150 Z-99999 S2 ; probe near right leadscrew and calibrate 2 motors
G30 P0 X20 Y150 Z-99999 ; probe near left leadscrew
G30 P1 X280 Y150 Z-99999 S2 ; probe near right leadscrew and calibrate 2 motors
G30 P0 X20 Y150 Z-99999 ; probe near left leadscrew
G30 P1 X280 Y150 Z-99999 S2 ; probe near right leadscrew and calibrate 2 motors
G28 Z ; home Z axis(Would look so much nicer if G-Code supported conditional loops)
In most cases I find 5 repeats of the leveling works well. -
5 repetitions is rather high. Do you find that the early ones consistently under-correct, and the following one makes smaller corrections in the same direction? If so then you can use the F parameter on the M671 command to speed up convergence.
-
well I have my first issue. trying to configure the extruder and its a mess.
so without the hotend fitted 460 steps/mm is the number
with the hotend clean and free of blockages and a 0.6mm nozzle I have to up that to 545 at 1mm/s feedrate
wile I didn't expect 5mm/s feedrate to work it only moved 1/2 the fillament
I have swapped the 20mm stepper for the great big lump that was on the CR-10 extruder but this has not made any difference.
it has to be either missing steps or slipping on the filament but how do I check?
0_1535705491199_config.g
config file as its equally likely I have done something daft -
If the extrusion rate is reducing by half then either the motor is skipping steps or the hobbed shaft is losing its grip on the filament. If the motor is skipping steps (which you can usually hear, or see the gear wheel flicking backwards), then you need to increase the extruder motor current if it will take more. If the hobbed shaft is losing its grip, try increasing the filament clamping force in the extruder drive - most extruder designs have a screw for adjusting this.
It's normal to get a slight increase in required steps/mm at high extrusion rates due to increase in the back pressure, but not as much as 100%, more like 5 to 8%. RepRapFirmware has a nonlinear extrusion facility to allow you to compensate for this effect.
-
@opentoideas Do you have any details on the hot end and extruder? It ought to be possible to extrude at 5mm/sec without having to up the steps per mm - I do it all the time when I'm loading filament. OK, I use a 0.5mm nozzle and yours is 0.6 but you are struggling with 1mm/sec feed rate so something is amiss. Have you tuned the heater and got the correct setting for thermistor? Just wondering if the actual temperature is lower than that being reported. I guess a quick and dirty test would be just to up the temperature by say 20 or 30 degC and see if that helps.
-
@dc42 @deckingman thank you
its a Titan Aero with a volcano hotend
not hearing any skips or stutters. the feed gear seems to be moving steady at all speeds and I have the clamp all the way to tight and for these tests the temp is up at 235 though it is PETG
I am not convinced the the thermistor is accurate though as it does not seem as hot as normal though I have no idea what it is so it may have to wait until the batch of new ones I ordered arrives. its not the best to be trying to guess with unknown components and heat could be out which wont help.
-
@opentoideas OK. I used to run Titans (5 of them) with my Diamond hot end. Steps per mm should be around 410. IIRC mine ranged from about 398 to 420. So, if you are having to use 460 without the hot end fitted, it would indicate an issue with the extruder motor or the hobbed bolt slipping or something like that, rather than a temperature thing? Unless the filament diameter is crazy out which is a bit unusual these days.
-
strange, the filament is certainly being gripped tightly as I cant move it when its being gripped but when you release the pressure on it it feels more reluctant to push.
yup something weird with the temps. i have a laser type thermostat gun and was only getting about 140C on the block.... set for 270C and now have 205 and the bloch went loose and had to be re tightened. I think my thermostat is way out.
like you I dont think its the whole issue but one thing at a time lol
-
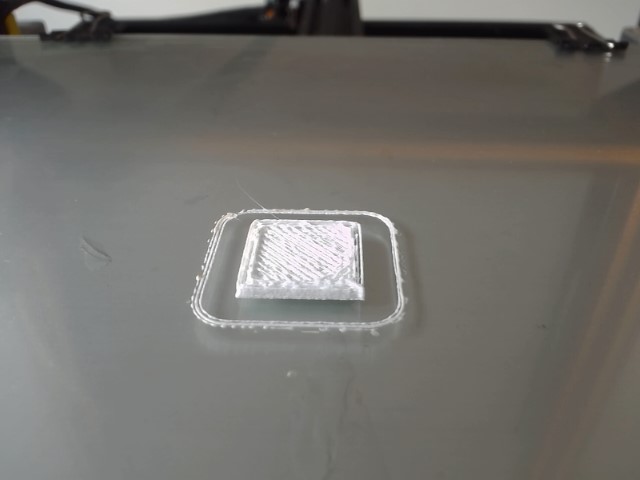
tho this is what its doing right now on a 20mm calibration cube
the only good thing is the X and Y are damn near 20mm lol
again I am ignorant here but given the gaps between each extruded line I would say it is massively under extruding
sliced with speed settings of 50mm/s and 50% for first layers. ran at 48% speed so a slow print!
-
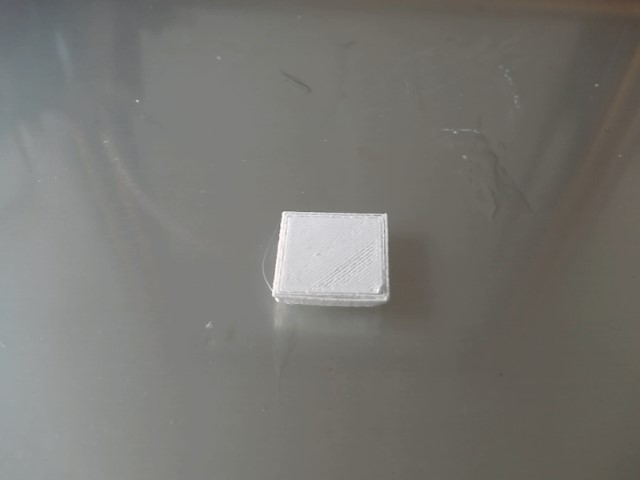
from the underside you can see the fill area is inconsistent too.
sorry is there a better way to do pictures?
-
ok the testing is over - the heatbreak just snapped.
when I pushed it I had plastic coming out at the top of the block
there was an unmarked and unknown nozzle in the block when I got it so when I removed that to replace it with a new know one I had to use LOT of force in a vice to move anything (even hot).
I think in the process I damaged the block as it certainly had marks from the force needed to get the old nozzle out - I have spares on the way but for now that puts any further testing on hold until they arrive

when they do i will start from scratch with all new parts.
-
not wanting to let a lack of a hotend stop me I have been trying to calibrate and figure out the leveling side of things....
@deckingman you were spot on 420 steps/mm for the extruder.
I wonder if the heatbreak was cracked and dragging or had a burr inside but I will see what happens once I have the parts to build the hotend again.
I cant seem to get any of the leveling routines to work. I suspect this is something to do with the Precision piezo sensor I am using as while I can level the Z axis without problem if i try to use G29, G30, G32 they all return :
Error: Z probe already triggered at start of probing movehmm I have the Piezo wired in as a Z endstop not a probe and I just remembered there is a connector by the screen connector for this.....
as expected I think this will be yet another "user error" lol time to have another look at the instructions to see if I should have the piezo in the probe connection.
-
@opentoideas said in Duet Wifi and CR-10:
not wanting to let a lack of a hotend stop me I have been trying to calibrate and figure out the leveling side of things....
@deckingman you were spot on 420 steps/mm for the extruder.
I wonder if the heatbreak was cracked and dragging or had a burr inside but I will see what happens once I have the parts to build the hotend again.
I cant seem to get any of the leveling routines to work. I suspect this is something to do with the Precision piezo sensor I am using as while I can level the Z axis without problem if i try to use G29, G30, G32 they all return :
Error: Z probe already triggered at start of probing movehmm I have the Piezo wired in as a Z endstop not a probe and I just remembered there is a connector by the screen connector for this.....
as expected I think this will be yet another "user error" lol time to have another look at the instructions to see if I should have the piezo in the probe connection.
The fact that you now have 420 steps per mm without the hot end indicates that there could well have been something like a crack or burr that was causing the issue. Once you get a new hot end fitted, if you then heat it and try to extrude by turning the turning the big gear with your fingers, it shouldn't be too difficult to push filament out of the nozzle (remember to power off the extruder stepper first though). I've become quite adept at using that technique to tell if something is amiss but of course, I have 5 extruders so it's easy to compare one with another.
Can't help with the auto levelling as I don't use any of that stuff - just "home and go" with a simple (but precision) switch.
-
@deckingman thanks, well I moved the probe to the probe input and all is well (who would of thought LOL)
now I just need to make it work consistently. if I go too fast the drive motion sets it off. too slow and its not consistent when it touches down. I just cant seem to find any middle ground. to be fair I think its the machine rather than the probe but I need to do some work so the axis run a bit smoother.
oh well at least I am getting to grips with how it all works!
-
The Titan Aero is a little fiddly to assemble. Make sure you follow the E3D assembly guide closely. Here are a few things I've learnt along the way about the Aero.
-
The large and small gear alignment is critical for good performance. Their faces need to be flush, and to get the teeth to mesh smoothly you'll have to slightly adjust the body of the mount.
-
The filament path isn't always properly aligned either, and you may need to adjust the position of the large gear on the shaft to get the filament lined up with the middle of the teeth. This can lead to under extrusion from slipping filament. The solution from E3D is to tap the gear further down the shaft. After doing that you'll need to adjust the position of the drive gear on the motor shaft to compensate. I also ended up having to add three 1mm precision shims on the motor shaft in between the heatsink and idler arm to keep the arm in alignment with the teeth.
Here's a picture of what I mean.

-
The bearings in earlier versions of the Aero were prone to failure. Take a close look at them and if you see any leaking lubricant or rust they will need to be replaced.
-
And finally, do not over tighten the screw that goes through the shaft of the large gear. It comes with an anti-vibration washer. Over tightening it even slightly is enough to damage the bearing and will cause poor extrusion eventually. Tight by hand only.
-
If you do find failed bearings, you can request replacements from E3D, but it might not be a bad idea to just have a handful of MR95ZZ bearings on hand for convenience.
-
-
@phaedrux .......Ahh, I so miss all those fun and games - which is all why I have no regrets about changing from Titans to Bondtceh BMGs
-
@deckingman Yes it's been a long string of frustrations with the Aero. When it's working well though it works well. During my recent trouble shooting as you've seen in my other thread on Z banding I rechecked the aero bearings and found one has failed again. I don't think it's causing my banding issue, but it may be responsible for some other surface artifacts. I've had really bad luck with bearings.
