Hypercube Fusion movement help
-
Yes that seems to check out.
Though 112mm/s may be too fast from a thermal management or mechanical movement perspective. As in, if you print that fast, the molten filament may not have enough time to cool before the next layer leading to surface quality issues. So for small objects with short layer times you may need to slow down or set a minimum layer time. For larger objects it may be perfectly fine.
Or the mechanics of the printer may not be able to handle it without ringing or shaking. You can test for this by creating a gcode file that goes through some series of movements without extrusion, and then use the speed factor to alter the speed for each iteration. You'll be able to see/hear/sense when things are running smoothly, or if there is a resonance or harsh movement. The same thing can be done to find good values for acceleration and jerk.
-
@Phaedrux I did do a print at that speed and apart from it warping the print quality was really nice even the supports came out good, it wasn't very high as it was just a clip in led support for the 3030 extrusion frame as it really needs some lighting so I can see what is happening with the print.
I did notice that I have to increase the z height by baby stepping by 0.05 even though I have the mesh bed compensation loaded and I have set the a probe up exactly as dc42 says on his wordpress page and it seems to run a new probe sequence at the start of every print. But if all I have to do to get a perfect 1st layer is put up with adding 0.05 and letting it run the probing everytime then that is fine by me.
Compared to my old printer which was a hictop i3 3dp11 with no bed probing and now looking back only able to get so so print quality, my hypercube fusion is pure enjoyment. It is quite, smooth, fast & the prints are really nice.
I just can't wait for my new E3D gold v6 to arrive to see how much of a difference it will make. I will probably also change to a genuine BMG or see what Bowden setups E3D has to offer to try and improve the printer even more.
-
@RAM said in Hypercube Fusion movement help:
I have to increase the z height by baby stepping by 0.05
You can modify your G31 Z value with that 0.05. Consider it a final tuning.
-
@Phaedrux oh cool I wasn't sure if I could do that as I didn't know if the probe would go out of sync, it never seems to give me the value below 2.5mm I think it is at 2.56 at the moment. I will change it so it reads 2.61
-
@Phaedrux when I add the 0.05 do I just add it in the config.g or do I need to run the whole z-prove calibration again 1st then add it ?
The reason I ask is I added it but it didn't seem to help. I run the bed mesh again and adjusted the bed slightly so could that have caused the issue where it didn't work ? -
@RAM the calibration just finds you the value. You can adjust it afterwards no problem.
Did you add 0.05 to the g31 z or subtract it? If you did one, try the other.
-
@Phaedrux I added it but now my new E3D 24v Gold V6 has arrived I will go through the whole calibration process again when it is fitted.
On a different thing would you say it is better to have the dual a setup so it will level the bed or is it more aggravation then it is worth the time of setting it up ?
-
@RAM said in Hypercube Fusion movement help:
On a different thing would you say it is better to have the dual a setup so it will level the bed or is it more aggravation then it is worth the time of setting it up ?
Do you mean this? https://duet3d.dozuki.com/Wiki/Bed_levelling_using_multiple_independent_Z_motors
It's not too difficult to setup, and if you are using 2 seperate Z motors anyway they are bound to get out of sync overtime, so having a means of leveling them automatically is pretty handy.
-
@Phaedrux yep that's what I meant, I will see if I can do it once I get the hotend installed and recalibrate/ tuned.
-
@Phaedrux just want to make sure I am understanding this right before I actually do this.
My build plates 310 x 320 mm in size, I have 2 leadscrews and the machine printable height is roughly 480mm
;example for 2 leadscrews for config.g M584 X0 Y1 Z2:4 E3; two Z motors connected to driver outputs Z and E1 M671 X-20:220 Y0:0 S0.5 ; leadscrews at left (connected to Z) and right (connected to E1) of X axis M208 X-5:205 Y0:200 ; X carriage moves from -5 to 205, Y bed goes from 0 to 200 So looking at this I take it I remove one of the stepper motors from the ZB socket and connect it to E1 motor socket.
Then make the config look like this so it fits my machine.
M584 X0 Y1 Z2:4 E3; two Z motors connected to driver outputs Z and E1 M671 X-20:320 Y0:0 S0.5 ; 320 would be changed to the actual distance of the other z screw from the 0 z screw M208 X-5:320 Y0:330 ; X carriage moves from -5 to 320, Y bed goes from 0 to 330 Am I thinking right or totally wrong ?
-
@RAM said in Hypercube Fusion movement help:
So looking at this I take it I remove one of the stepper motors from the ZB socket and connect it to E1 motor socket.
You have to move a specific motor. Because of the order you have defined the motors, Z2:4, and the order you have defined the leadscrews (left at X-20 Y0, then right at X320 Y0), you need to:
Plug the motor that's turning the left leadscrew at X-20 Y0 into Z
Plug the motor that's turning the right leadscrew at X320 Y0 needs to be plugged into E1Also, don't forget to put the jumpers back on the second set of Z motor pins.
Ian
-
@droftarts thanks for the information on how to do that I will have a go at it once I get everything working as it should.
Think I might have messed something up along the way.
I did a print last night with a word on it and it came out back to front so do I have the motors in the wrong ports or could I have something else messed up.
Please excuse the poor art work but I thought it might be best to show how my machine is to try and make things clearer.
as you can see my machine homes to the left on the X and to the rear on the Y.
I tried to look this up but DC tends to explain things in a way that I don't always understand. Please don't get me wrong the guy is a wizard but I miss the way he explains some of the things sometimes.
From what I read and if I understand this right is my machine meant to be homing to the left for the X axis and to the front for the Y axis ? and if I input say +15 Y on the DWC then it is meant to move to the rear and not to the front like it is currently and +15 on the X will make it move to the right as it currently is ?
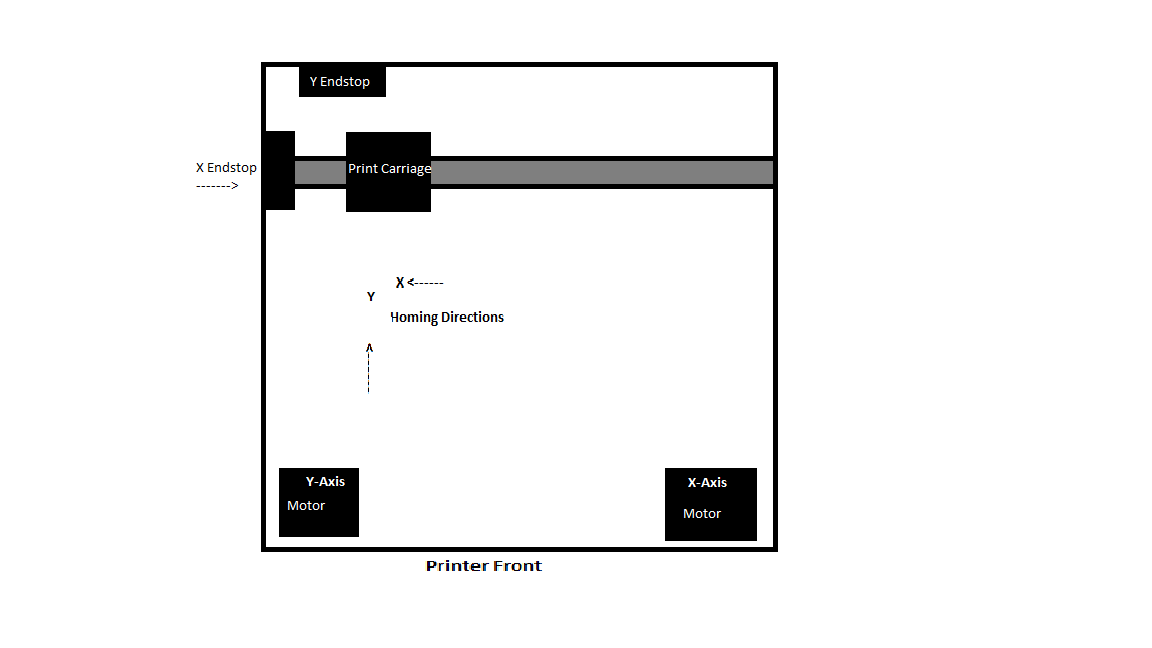
the way the motors are marked in the picture is how they are plugged into the Duet 2 wifi
If my corexy machine is meant to home the X to the left as it is and the Y to the front then could you please tell me what I need to change as I am really confused at the moment with what it is doing.
-
@RAM said in Hypercube Fusion movement help:
From what I read and if I understand this right is my machine meant to be homing to the left for the X axis and to the front for the Y axis ? and if I input say +15 Y on the DWC then it is meant to move to the rear and not to the front like it is currently and +15 on the X will make it move to the right as it currently is ?
The direction it homes in will depend on where the endstops are. But the direction of movement positive or negative should be such that -X is to the left, and -Y to the front. That makes the front left corner 0,0. A right hand cartesian coordinate system.
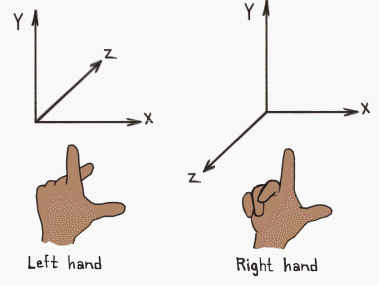
And as applied to the printer
Back at the start of the thread it was suggested to swap the motor cables, did you do that? I'm thinking that may not have been necessary and we only needed to change a motor direction.
In the corexy setup page there are some motor tests. If you run them and report the results we should be able to know what needs to be changed.
https://duet3d.dozuki.com/Wiki/ConfiguringRepRapFirmwareCoreXYPrinter#Section_Testing_motor_movement
-
@Phaedrux Yes you are right I did what was suggested and switched the motor cables on the duet but they are as the previous picture displayed as I double checked when I was doing the picture.
I have run the motor tests and this is what it is doing now.
Just so you know this is the type of explaination that I can't get my head round as I can't find a diagram of what is what.
"RepRapFirmware assumes that the motor connected to the X motor output moves the head in the +X and +Y directions when it runs forwards, and that the Y motor moves the head in +X and -Y directions when it runs forwards."
Also here is my config.g if it helps.
; Configuration file for Duet WiFi (firmware version 2.03) ; executed by the firmware on start-up ; ; generated by RepRapFirmware Configuration Tool v2.1.8 on Sun Jan 26 2020 18:02:23 GMT+0000 (Greenwich Mean Time) ; General preferences G21 ; Work in millimetres G90 ; send absolute coordinates... M83 ; ...but relative extruder moves M550 P"HEVO" ; set printer name M667 S1 ; select CoreXY mode ; Network M552 S1 P"ASUS" ; Enable network M587 S"ASUS" P"HevoRs**" ; Configure access point. You can delete this line once connected M586 P0 S1 ; Enable HTTP M586 P1 S0 ; Disable FTP M586 P2 S0 ; Disable Telnet ; Drives M569 P0 S1 ; physical drive 0 goes forwards M569 P1 S1 ; physical drive 1 goes forwards M569 P2 S1 ; physical drive 2 goes forwards M569 P3 S0 ; physical drive 3 goes backwards M584 X0 Y1 Z2 E3 ; set drive mapping M350 X16 Y16 Z16 E16 I1 ; configure microstepping with interpolation M92 X80.00 Y80.00 Z1066.67 E425.23 ; set steps per mm (original 420.00) M566 X900.00 Y900.00 Z60.00 E900.00 ; set maximum instantaneous speed changes (mm/min) M203 X10000.00 Y10000.00 Z600.00 E9000.00 ; set maximum speeds (mm/min) M201 X800.00 Y800.00 Z250.00 E800.00 ; set accelerations (mm/s^2) M906 X800 Y800 Z800 E800 I30 ; set motor currents (mA) and motor idle factor in per cent M84 S30 ; Set idle timeout ; Axis Limits M208 X0 Y0 Z0 S1 ; set axis minima M208 X310 Y320 Z500 S0 ; set axis maxima ; Endstops M574 X1 Y1 S1 ; set active high endstops M574 Z1 S2 ; set endstops controlled by probe ; Z-Probe M558 P1 H5 F120 T6000 ; set Z probe type to unmodulated and the dive height + speeds G31 P500 X33 Y0 Z2.300 ; set Z probe trigger value, offset and trigger height M557 X15:250 Y15:285 S20 ; define mesh grid ; Heaters M305 P0 T100000 B3950 R4700 ; set thermistor + ADC parameters for heater 0 M143 H0 S120 ; set temperature limit for heater 0 to 120C M305 P1 T100000 B4725 C7.060000e-8 R4700 ; set thermistor + ADC parameters for heater 1 M143 H1 S280 ; set temperature limit for heater 1 to 280C ; Fans M106 P0 S0 I0 F500 H-1 ; set fan 0 value, PWM signal inversion and frequency. Thermostatic control is turned off M106 P1 S1 I0 F500 H1 T45 ; set fan 1 value, PWM signal inversion and frequency. Thermostatic control is turned on ; Tools M563 P0 S"Main Extruder" D0 H1 F0 ; define tool 0 G10 P0 X0 Y0 Z0 ; set tool 0 axis offsets G10 P0 R0 S0 ; set initial tool 0 active and standby temperatures to 0C ; Custom settings are not defined ; Miscellaneous M501 ; Load saved parameters from non-volatile memory T0 ; Select first tool -
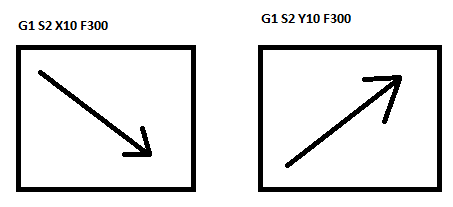
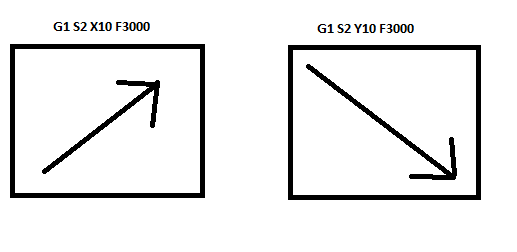
Ok, so based on the results of your
G91 G1 S2 X10 F3000test you're moving in X+ and Y-, so...If it moves towards +X and -Y, or towards -X and +Y, turn the power off and swap the X and Y motor connections.
Swap your motor connections and re-run the tests.
-
@Phaedrux now it is moving the opposite way to it was before with the motor cables swapped.
-
G1 S2 X10 F3000If the head moves diagonally in the +X and +Y directions, all is well.
Ok, so all good there.
G1 S2 Y10 F3000If the head moves diagonally in the +X and -Y directions, all is well.
All good there too.
Looking at your endstop configuration...
You haveM574 X1 Y1 S1which puts both endstops at the low end of travel. But you actually have the Y endstop at the back, which is the high end of travel.So you should have
M574 X1 Y2 S1.Now for your homeall you should have...
; homeall.g ; called to home all axes ; ; generated by RepRapFirmware Configuration Tool v2.1.8 on Sun Jan 26 2020 18:02:23 GMT+0000 (Greenwich Mean Time) G91 ; relative positioning G1 H2 Z5 F6000 ; lift Z relative to current position G1 H1 X-315 F1800 ; move quickly to X or Y endstop and stop there (first pass) G1 X5 F6000 ; go back a few mm G1 H1 X-315 F360 ; move slowly to X axis endstop once more (second pass) G1 H1 Y325 ; home Y axis G1 Y-15 F6000 ; go back a few mm G1 H1 Y315 F360 ; move slowly to X axis endstop once more (second pass) G90 ; absolute positioning G1 X150 Y150 F6000 ; go to first bed probe point and home Z G30 ; home Z by probing the bed G1 X0 Y0 Z5 ; return to a parked position With this you should be homing in the right direction and printed parts should no longer be mirrored.
-
@Phaedrux said in Hypercube Fusion movement help:
; homeall.g
; called to home all axes
;
; generated by RepRapFirmware Configuration Tool v2.1.8 on Sun Jan 26 2020 18:02:23 GMT+0000 (Greenwich Mean Time)
G91 ; relative positioning
G1 H2 Z5 F6000 ; lift Z relative to current position
G1 H1 X-315 F1800 ; move quickly to X or Y endstop and stop there (first pass)
G1 X5 F6000 ; go back a few mm
G1 H1 X-315 F360 ; move slowly to X axis endstop once more (second pass)
G1 H1 Y325 ; home Y axis
G1 Y-15 F6000 ; go back a few mm
G1 H1 Y315 F360 ; move slowly to X axis endstop once more (second pass)
G90 ; absolute positioning
G1 X150 Y150 F6000 ; go to first bed probe point and home Z
G30 ; home Z by probing the bed
G1 X0 Y0 Z5 ; return to a parked positionI changed the homeall.g file and now it is doing something strange when I press the homeall in DWC.
it homes the X fine but then goes back to the Y and seems to slip then starts to move to the right and keeps going.
homeall.g
;original values homing to front left corner after motor swap ; homeall.g ; called to home all axes homing x first then y then z and finally z to bed center before probing ; ; generated by RepRapFirmware Configuration Tool v2.1.8 on Sun Jan 26 2020 18:02:23 GMT+0000 (Greenwich Mean Time) ;G91 ; relative positioning ;G1 H2 Z5 F6000 ; lift Z relative to current position ;G1 H1 X-315 F1800 ; move quickly to X or Y endstop and stop there (first pass) ;G1 X5 F6000 ; go back a few mm ;G1 H1 X-315 F360 ; move slowly to X axis endstop once more (second pass) ;G1 H1 Y-325 F1800 ; home Y axis ;G1 Y15 F6000 ; go back a few mm ;G1 H1 Y-315 F360 ; move slowly to X axis endstop once more (second pass) ;G90 ; absolute positioning ;G1 Y15 F6000 ; move y 15mm away from home before homing z to stop collision with y sensor ;G1 X 146 Y 130 F6000 ; go to first bed probe point and home Z ;G30 ; home Z by probing the bed ;new values homing to back left corner ; homeall.g ; called to home all axes ; ; generated by RepRapFirmware Configuration Tool v2.1.8 on Sun Jan 26 2020 18:02:23 GMT+0000 (Greenwich Mean Time) G91 ; relative positioning G1 H2 Z5 F6000 ; lift Z relative to current position G1 H1 X-315 F1800 ; move quickly to X or Y endstop and stop there (first pass) G1 X5 F6000 ; go back a few mm G1 H1 X-315 F360 ; move slowly to X axis endstop once more (second pass) G1 H1 Y325 F1800 ; home Y axis G1 Y-15 F6000 ; go back a few mm G1 H1 Y315 F360 ; move slowly to X axis endstop once more (second pass) G90 ; absolute positioning G1 X150 G1 Y146 Y130 F6000 ; go to first bed probe point and home Z G30 ; home Z by probing the bed ;G1 X0 Y0 Z5 ; return to a parked position homex.g
; homex.g ; called to home the X axis ; ; generated by RepRapFirmware Configuration Tool v2.1.8 on Sun Jan 26 2020 18:02:23 GMT+0000 (Greenwich Mean Time) G91 ; relative positioning G1 H2 Z5 F6000 ; lift Z relative to current position G1 H1 X-315 F1800 ; move quickly to X axis endstop and stop there (first pass) G1 X5 F6000 ; go back a few mm G1 H1 X-315 F360 ; move slowly to X axis endstop once more (second pass) G1 H2 Z-5 F6000 ; lower Z again G90 ; absolute positioning homey.g
; homey.g ; called to home the Y axis ; ; generated by RepRapFirmware Configuration Tool v2.1.8 on Sun Jan 26 2020 18:02:23 GMT+0000 (Greenwich Mean Time) G91 ; relative positioning G1 H2 Z5 F6000 ; lift Z relative to current position G1 H1 Y-325 F1800 ; move quickly to Y axis endstop and stop there (first pass) G1 Y5 F6000 ; go back a few mm G1 H1 Y-325 F360 ; move slowly to Y axis endstop once more (second pass) G1 H2 Z-5 F6000 ; lower Z again G90 ; absolute positioning just incase there is something messing around causing a conflict.
on a side thought if I leave my homeall.g as it was it homes as it would normally (front left corner) if I was to move the endstop there would it cause any issues and would the prints be not mirrored or any other strange things?
if it is easier to move the endstop for the Y I can do that easy.
-
@RAM said in Hypercube Fusion movement help:
it homes the X fine but then goes back to the Y and seems to slip then starts to move to the right and keeps going.
maybe post a video?
@RAM said in Hypercube Fusion movement help:
G1 H2 Z5 F6000 ; lift Z relative to current position
G1 H1 Y-325 F1800 ; move quickly to Y axis endstop and stop there (first pass)
G1 Y5 F6000 ; go back a few mm
G1 H1 Y-325 F360 ; move slowly to Y axis endstop once more (second pass)
G1 H2 Z-5 F6000 ; lower Z againI forgot to mention before when I changed the homeall to make the Y move to the + direction, that would also need to happen in the home Y.
@RAM said in Hypercube Fusion movement help:
on a side thought if I leave my homeall.g as it was it homes as it would normally (front left corner)
Front left? But your picture before shows the Y endstop at the back. Perhaps a photo/video of your actual printer?
-
@Phaedrux if I only change the 1st part
M574 X1 Y2 S1But don't change the homeall.g file that is when it homes to the front left corner.
If I also change the homeall.g and do the
M574 X1 Y2 S1that is when it homes to the rear as it was before but then seems to go to the Y endstop slips and then travels to the right.What I was trying to ask without confusing the issue was if I leave the homeall.g file unchanged and just change the config.g line to
M574 X1 Y2 S1as suggested and then move my optical Y endstop to the front of the machine so it is where it should have been in the 1st place would it be able to print things not mirrored / back to front etc or do I have to change the homeall.g file.I was only asking to see if there was a easier solution to the problem when the homeall.g file got changed and it causing the issue where it seems to hit the Y endstop and then slips and travels right.
I will try and get a video of it doing the problem in a bit.
EDIT
couldn't upload the video here so here is the videos on youtubeThis is with just the
M574 X1 Y2 S1done in the config.g and not changing the homeall.g file.
M574 X1 Y2 S1 OnlyThis is with both the config.g file edited with
M574 X1 Y2 S1and also the homeall.g file edited with the changes as suggested which causes it to bounce on the Y endstop and then move off to the right.
Config.g & homeall.g files edited