Ender 3 + Hemera + bltouch
-
Hi,
Ran into a problem. I have ender 3 pro, upgraded with duet wifi, e3d hemera + bltouch. Bltouch is attached on the right side, on the extruder motor (have offsets calibrated as well). The problem is, that I keep getting weird results. Bltouch trigger height is calibrated numerous times and I keep getting stable results, when probing same point. Probing at 5mm/s. Trigger height is 0.85mm.
How I have calibrated trigger height? Homed all axis, at start point went Z=0. Then went through all corners, and adjusted the bed, just to have exactly 0mm gap between bed and nozzle. Then returned to start point and recalibrated trigger height. Even though, when homed, at Z=0, nozzle still has slight gap with bed (maybe 0.05mm).
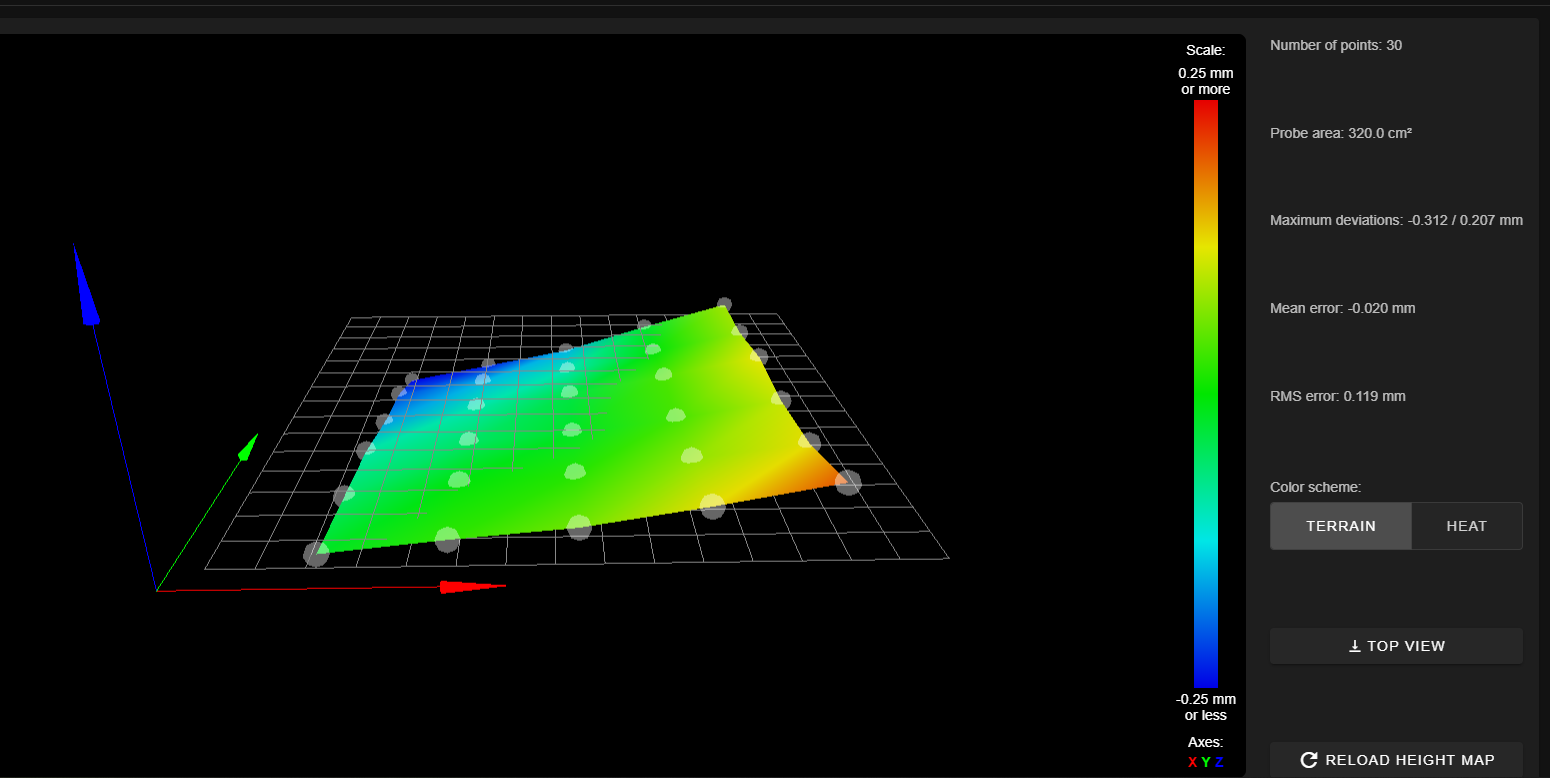
Ok, anyway. Since bed is completely parallel, did G29 bed mesh. And this is the most interesting part. As you can see in the pictures, it shows bed is tilted. But actually it is not (maybe could be tiny parts of mm, but not that much).
Made a test print over whole bed, and results are weird too (best surface where the bed mesh shows blue).I realised about the problem, when I was trying to print TPU(hemera can barely print it), when on the right side of the bed, lines were not squished enough against bed.
I was messing with this crap whole day and could not sort out the problem. Any ideas? Print bed is flipped, plain glass on top. Same results or ender print surface on glass.
-
Can you post your config.g and bed.g files
-
Attaching config.g and bed.g files. Please note, that in first post bed mesh was done with 40mm spacing for quicker probing (since results have same consistency and tendency, no need to probe much more points).
P.S. tried printing without bed compensation, then it was complete crap. Starting at blue corner, nozzle was too far from the bed, so I have stopped print.
-
@z4ibas said in Ender 3 + Hemera + bltouch:
(maybe could be tiny parts of mm, but not that much).
The heightmap display is intentionally exaggerated to highlight the difference in bed surface. If you look at the maximum deviations it is in fact only tiny parts of mm + or - from the Z0 point.
I would suggest altering your BLTouch configuration in config.g to match this. It will make it a bit more consistent and reject any bad probe points. Though it will making probing a bit slower. Though it should be possible to do a single detailed G29 and then load the heightmap before a print.
M558 P9 H5 F60 T6000 R0.5 A10 S0.003 ; set Z probe type to bltouch and the dive height + speeds G31 P25 X58 Y-6.5 Z0.8 ; set Z probe trigger value, offset and trigger height Also, your trigger height of 0.8 is quite low and indicates that the BLTouch isn't mounted at the correct height. Antclabs recommends that when mounted correctly the bottom of the probe body should be ~8mm above the nozzle tip, which would lead to a trigger height close to ~2mm. Also ensure that your probe is held perfectly upright without tilt as that can cause issues.
@z4ibas said in Ender 3 + Hemera + bltouch:
P.S. tried printing without bed compensation, then it was complete crap. Starting at blue corner, nozzle was too far from the bed, so I have stopped print.
That would indicate that the heightmap is in fact correct to some extent and is working properly. This means that there is potentially an issue with assembly. In an i3 style cartesian printer the X axis and Y axis must be perfectly aligned. Any skew can cause the nozzle to be higher or lower than expected at different parts of the bed. It may be worthwhile doing a partial rebuild to ensure that everything is trued up and square.
-
@jrsphoto
FWIW, check the height of your X Rail.
Home all axis's, then move tool to centre of bed.
Then measure from leg to top or bottom of X gantry on Both sides. (You might need to take display off to get to the right
If I start getting problems on the RHS of the bed I check this.
To adjust, hold the end with the X stepper and 'tweak' the other side either up or down so the height is at least within 1 or 2mm of the other.
I have seen a Linear conversion for the Ender3 by Ben Levi. Its about £150 but I think I would rather put the money towards another printer.
HTH
Paul
-
So far for the updates of today and more info:
@PaulHew I was aware of this yesterday, when re-done whole Z axis. I had 0.2mm height difference on X axis to frame. I guess that is not bad, like for single motor option. But besides that, it could not print any better. Anyway today I re-checked and found 2mm diff again, so made it within 0.2mm range again.
@Phaedrux Yes, the heightmap is obviously working, but I still don't think everything is still fine. Last night I have re-done bed mesh with few points and then printed PLA. whole bed was printed perfectly (changed trigger height to 0.8mm for more consistent results as recommended).
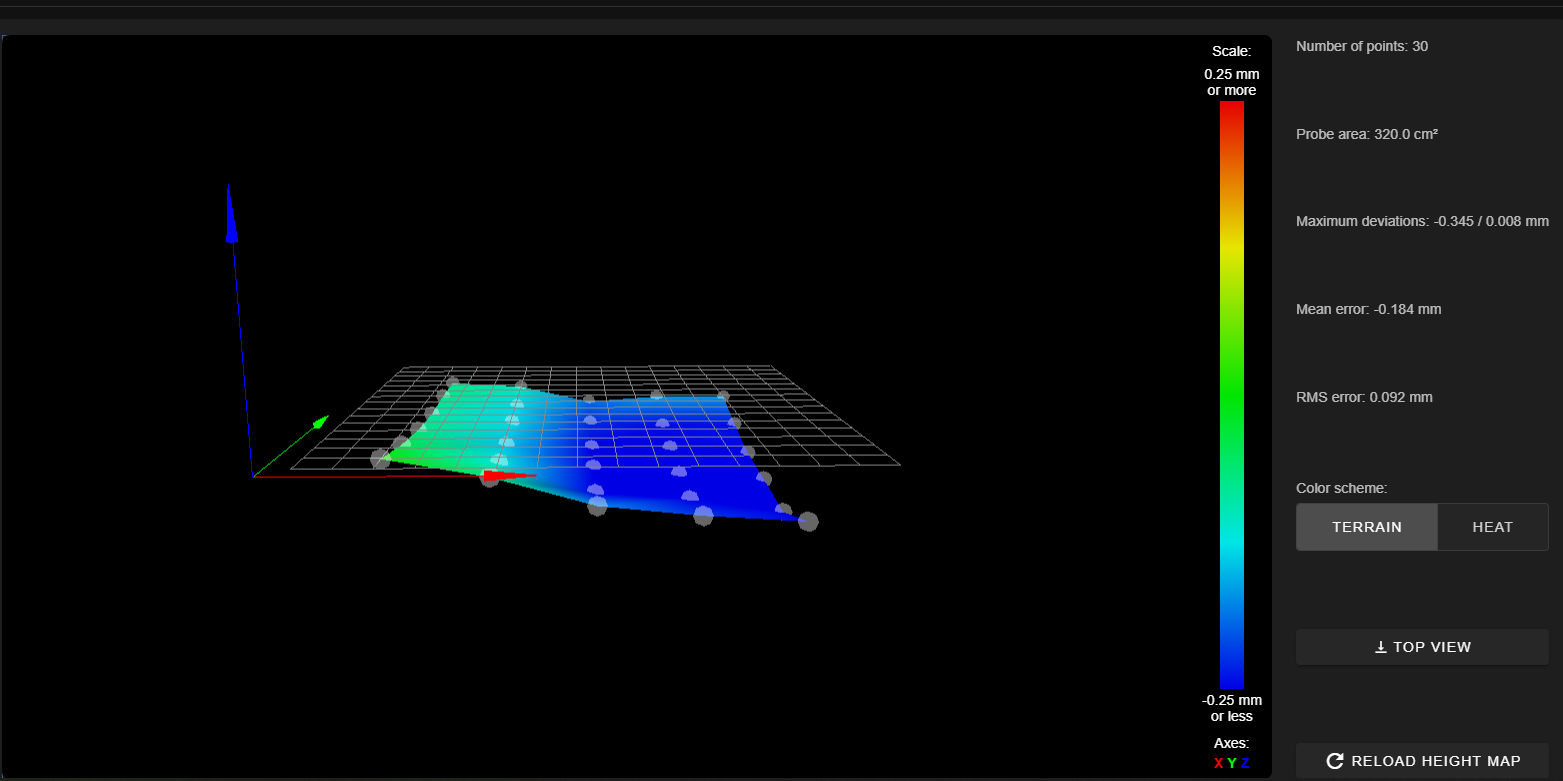
Today before printing, I have re-done bed mesh, since ender 3 heated build plate is aluminum and it sucks even there is a glass on top. Now according to bed mesh, bed is completely opposite (see pic)
Tried print not a big part 5x5cm in the middle. Whole layer over over-squished (I have no clue anymore why). Okay, nevermind, there is baby-stepping. But for some reason, it doesn't work anymore! It has no effect. I had to send G1 z0.2 to raise Z in first layer by 0.05mm, because baby step didn't work. Any reasons why? Runing last 2.xx firmware.
Talking about the probe itself - it is perfectly alligned with almost perfect 90degree angle. And I'm not sure if there is a specific reason set have trigger height arround 2mm? I don't see any difference if it triggers 0.01mm or 2-3mm from nozzle. All there values are just written into firmware
-
One more update
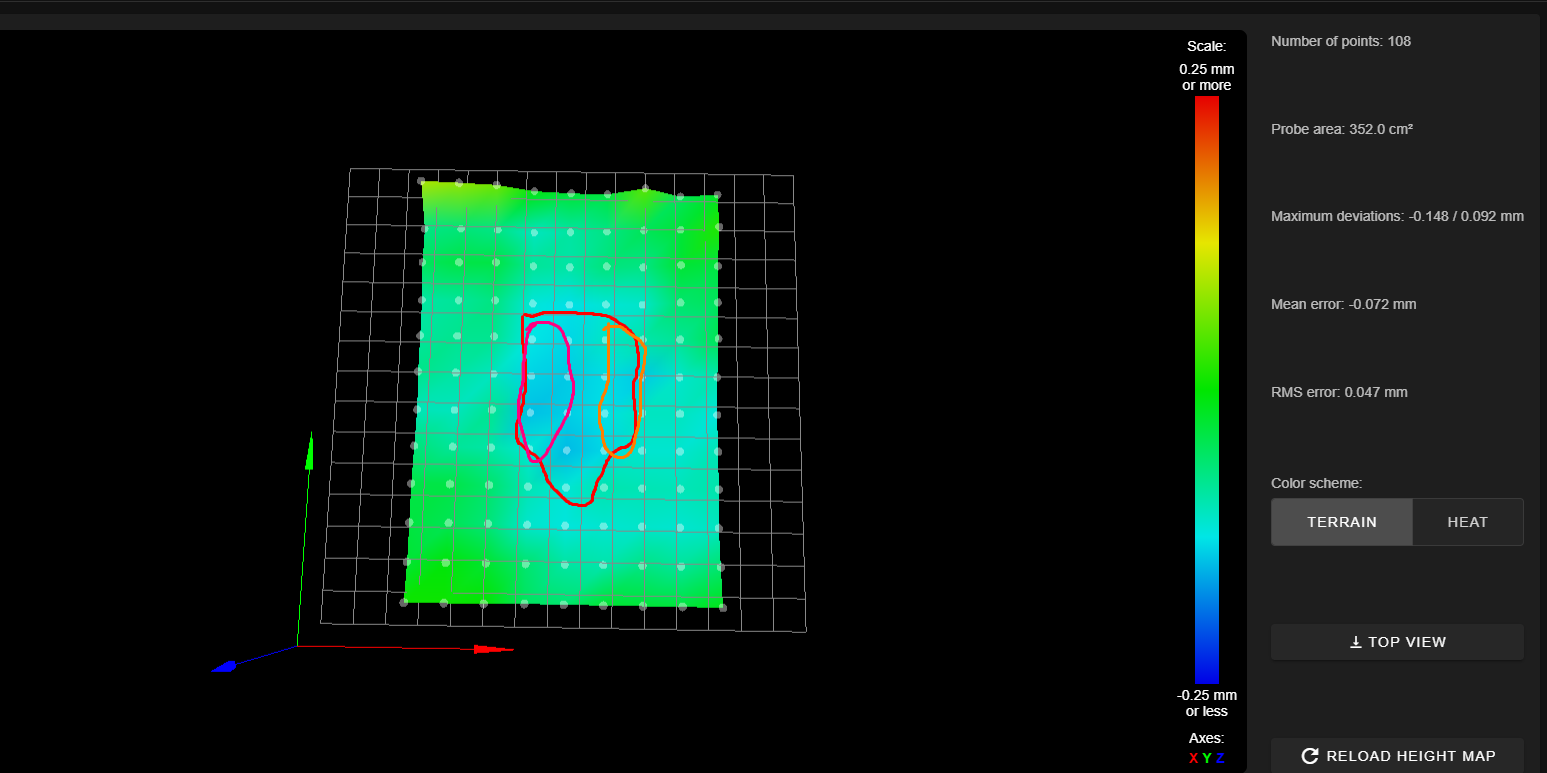
Okay moved probe slightly higher (not high enough), trigger height is 1.2mm. Re-probed bed, started a print. Bed mesh shows, that bed is a "bowl". Printed a part in the center (marked red). Orange shows, where nozzle was slightly too far, purple area shows where nozzle was slightly too close. Somewhere in betwen - was just right. Results are just weird.

-
@z4ibas said in Ender 3 + Hemera + bltouch:
because baby step didn't work
Were you trying to babystep up or down? If down it would be limited by the height of the first layer. You can change the M208 minima for Z to be slightly negative to give it more room to go down. M208 S1 Z-1 for example. Might be helpful while getting things tuned in but will increase your chances of a nozzle crash if not careful.
The bowl shape would match with most Ender beds. And the tilt would appear to have been mostly corrected. Seems like an improvement?
Are you now using the BLTouch settings I posted above?
-
@Phaedrux said in Ender 3 + Hemera + bltouch:
@z4ibas said in Ender 3 + Hemera + bltouch:
because baby step didn't work
Were you trying to babystep up or down? If down it would be limited by the height of the first layer. You can change the M208 minima for Z to be slightly negative to give it more room to go down. M208 S1 Z-1 for example. Might be helpful while getting things tuned in but will increase your chances of a nozzle crash if not careful.
The bowl shape would match with most Ender beds. And the tilt would appear to have been mostly corrected. Seems like an improvement?
Are you now using the BLTouch settings I posted above?
I have been using your recommended settings now, maybe better results, more reliability. Well, I'm with ender 3 pro, which has standard aluminum build plate with flexible removable surface. I swapped it with an ender glass surface. I have tried flipping it, same results (bowl effect). Also I have "glass fiber" creality surface, which is the same material in electronic boards. Bed mesh is completely different, it doesn't have bowl effect, just some twist, because it is a little bit flexible.
Funny, but I still keep getting weird results. Printing for example same 5x5cm part in the center of the bed. On the left side lines look perfect, and 4cm to the right - lines not being connected. This was printed in TPU. With PLA it gives much better results, almost perfect. I guess TPU is less forgiving, when laying down first layer. But still problem persists with TPU.
Obviously bed compensation works, just not sure if enough. Might be problem with backlash? Ordered an anti-backlash nut.
-
Hello guys again,
i just came back after some further testing of this leveling feature. I thought maybe BLtouch was giving wrong signals. I have replaced probe with E3D smart IR probe. I was able to mount it much closer to nozzle and probe whole bed a little better (offsets 6.2 mm x 17 mm). Also I have anti-backlash nut on Z axis.
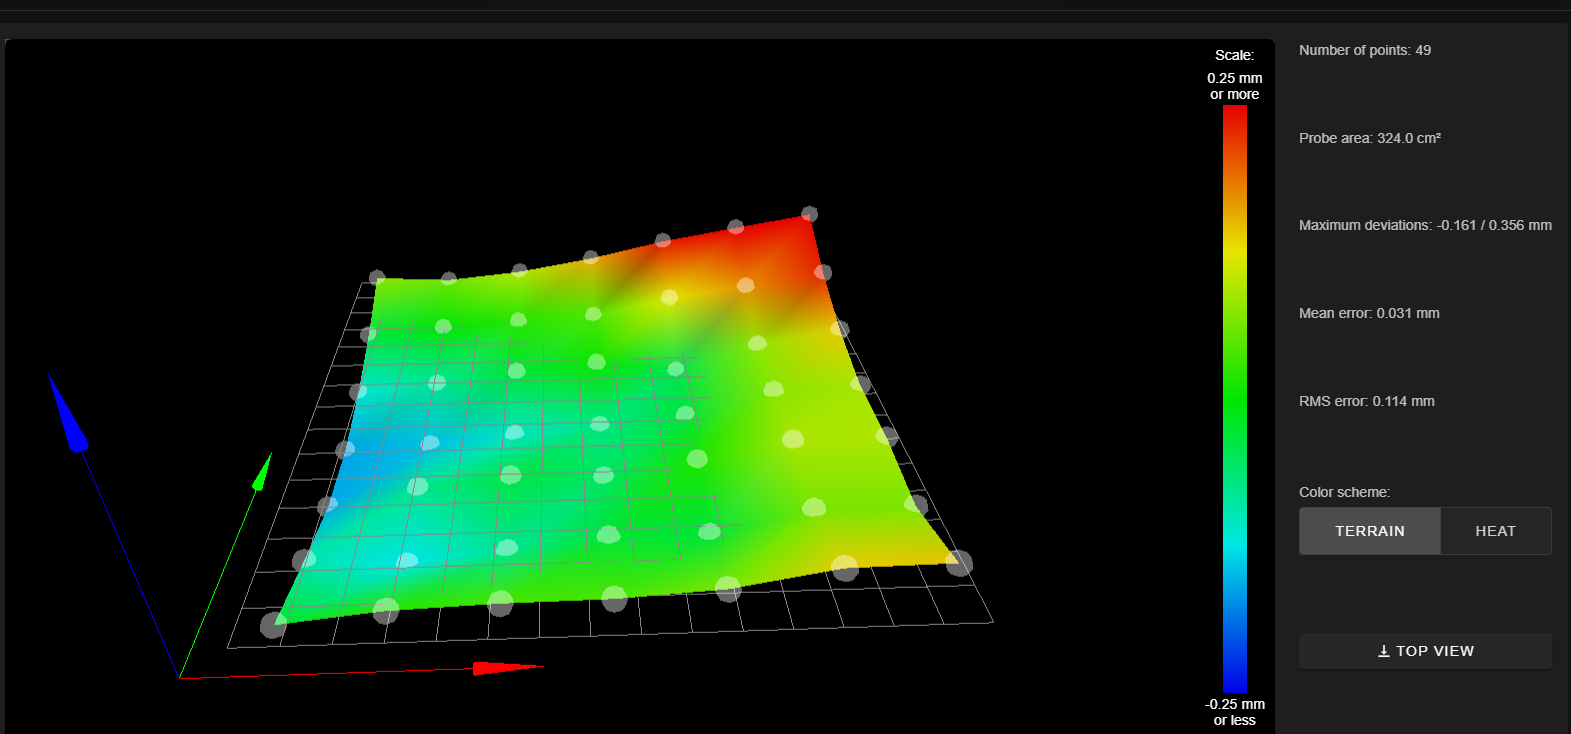
I was still using the function to probe every single points at least 2 times and with accuracy of 0.01 mm. Smart IR probes much more reliably and gives better repeatability. Also I have been using glass fiber bed (since glass one had strong bowl effect). Bed mesh looks very close to how the actual bed looks like. Attaching bed mesh screenshot.
Bed mesh appears to be working much better than it was before, however. Z probe calibrated at Z=0 (touching bed). Tried print object over whole bed and nozzle is way too high everywhere. Lines are not being connected, but it looks like bed mesh is working completely fine and compensating everywhere. Lines were everywhere looking the same width. Just why nozzle was still too high? What I have noticed, that second layer goes perfect. But anyway first layer does not adhere with bed good enough to hold through the print and I still get not nice surface finish.


