XYZ-cube with a pre-shadow?
-
@fcwilt said in XYZ-cube with a pre-shadow?:
How big a role does the E setting play?
Well a low E jerk in combination with pressure advance will likely cause a slowdown in print speed.
-
-
Continuing the opposite of your thoughts @Phaedrux
Is it possible that the extrusion slows down but not the movement so I get the dip.
Anyways, I just started a print with your suggestion. I'll post later today as it's past 3am here now.
-
Not much change on that sunken line. A comparison between 300 and 600mm/min jerk

To verify my settings:
M566
Maximum jerk rates (mm/min): X: 600.0, Y: 600.0, Z: 60.0, E: 3000.0, jerk policy: 0
-
No coasting or wipe enabled, correct?
Try a different slicer for comparison?
-
Should be disabled. I had them on some time ago and disabled to see if they could be the culprits.
; extruderUseCoasting,0
; extruderUseWipe,0I just tried PrusaSlicer but stopped the print. I have no experience on this slicer but it printed too slow and maybe a bit hot. But I can see the same artifacts here:


Copied the settings from the gcode-file for the previous post, not PrusaSlicer:
; G-Code generated by Simplify3D(R) Version 4.1.2 ; Sep 26, 2020 at 5:02:10 PM ; Settings Summary ; processName,ABS E5P PEI ; applyToModels,xyzCalibration_cube ; profileName,StiansEnder5PlusTitan (modified) ; profileVersion,2019-04-06 08:00:00 ; baseProfile,Default (modified) ; printMaterial,Clas Ohlson ABS ; printQuality,0.28 ; printExtruders, ; extruderName,Primary Extruder ; extruderToolheadNumber,0 ; extruderDiameter,0.4 ; extruderAutoWidth,0 ; extruderWidth,0.5 ; extrusionMultiplier,0.96 ; extruderUseRetract,1 ; extruderRetractionDistance,0.35 ; extruderExtraRestartDistance,0 ; extruderRetractionZLift,0.5 ; extruderRetractionSpeed,3600 ; extruderUseCoasting,0 ; extruderCoastingDistance,0.1 ; extruderUseWipe,0 ; extruderWipeDistance,2 ; primaryExtruder,0 ; layerHeight,0.28 ; topSolidLayers,2 ; bottomSolidLayers,2 ; perimeterOutlines,2 ; printPerimetersInsideOut,0 ; startPointOption,3 ; startPointOriginX,104 ; startPointOriginY,110 ; sequentialIslands,0 ; spiralVaseMode,0 ; firstLayerHeightPercentage,100 ; firstLayerWidthPercentage,150 ; firstLayerUnderspeed,0.15 ; useRaft,0 ; raftExtruder,0 ; raftTopLayers,3 ; raftBaseLayers,2 ; raftOffset,3 ; raftSeparationDistance,0.14 ; raftTopInfill,100 ; aboveRaftSpeedMultiplier,0.3 ; useSkirt,1 ; skirtExtruder,0 ; skirtLayers,3 ; skirtOutlines,8 ; skirtOffset,0 ; usePrimePillar,0 ; primePillarExtruder,999 ; primePillarWidth,8 ; primePillarLocation,5 ; primePillarSpeedMultiplier,1 ; useOozeShield,0 ; oozeShieldExtruder,999 ; oozeShieldOffset,2 ; oozeShieldOutlines,1 ; oozeShieldSidewallShape,1 ; oozeShieldSidewallAngle,30 ; oozeShieldSpeedMultiplier,1 ; infillExtruder,0 ; internalInfillPattern,Rectilinear ; externalInfillPattern,Rectilinear ; infillPercentage,30 ; outlineOverlapPercentage,15 ; infillExtrusionWidthPercentage,100 ; minInfillLength,1 ; infillLayerInterval,1 ; internalInfillAngles,45,-45 ; overlapInternalInfillAngles,0 ; externalInfillAngles,45,-45 ; generateSupport,0 ; supportExtruder,0 ; supportInfillPercentage,30 ; supportExtraInflation,0 ; supportBaseLayers,0 ; denseSupportExtruder,0 ; denseSupportLayers,0 ; denseSupportInfillPercentage,70 ; supportLayerInterval,1 ; supportHorizontalPartOffset,0.4 ; supportUpperSeparationLayers,1 ; supportLowerSeparationLayers,1 ; supportType,1 ; supportGridSpacing,4 ; maxOverhangAngle,45 ; supportAngles,0 ; temperatureName,Primary Extruder,Heated Bed ; temperatureNumber,0,0 ; temperatureSetpointCount,3,1 ; temperatureSetpointLayers,1,2,3,1 ; temperatureSetpointTemperatures,240,235,230,110 ; temperatureStabilizeAtStartup,1,1 ; temperatureHeatedBed,0,1 ; fanLayers,1 ; fanSpeeds,0 ; blipFanToFullPower,1 ; adjustSpeedForCooling,0 ; minSpeedLayerTime,6 ; minCoolingSpeedSlowdown,15 ; increaseFanForCooling,1 ; minFanLayerTime,45 ; maxCoolingFanSpeed,100 ; increaseFanForBridging,1 ; bridgingFanSpeed,100 ; use5D,1 ; relativeEdistances,0 ; allowEaxisZeroing,1 ; independentExtruderAxes,0 ; includeM10123,0 ; stickySupport,1 ; applyToolheadOffsets,0 ; gcodeXoffset,0 ; gcodeYoffset,0 ; gcodeZoffset,0 ; overrideMachineDefinition,1 ; machineTypeOverride,0 ; strokeXoverride,361 ; strokeYoverride,367 ; strokeZoverride,400 ; originOffsetXoverride,0 ; originOffsetYoverride,0 ; originOffsetZoverride,0 ; homeXdirOverride,1 ; homeYdirOverride,1 ; homeZdirOverride,-1 ; flipXoverride,1 ; flipYoverride,-1 ; flipZoverride,1 ; toolheadOffsets,0,0|0,0|0,0|0,0|0,0|0,0 ; overrideFirmwareConfiguration,0 ; firmwareTypeOverride,RepRap (Marlin/Repetier/Sprinter) ; GPXconfigOverride,r2 ; baudRateOverride,115200 ; overridePrinterModels,1 ; printerModelsOverride ; startingGcode,;Custom start commands - leveling after warmup,G32 ; home and level bed by screws,G29; MBL,,;prime,G1 Z50,G0 X0 Y0 F9000 ,G92 E0 ; zero the extruded length,G1 X40 E50 F200 ,G92 E0 ; zero the extruded length,G1 E-1 F500 ; Retract a little,G1 X80 Y20 Z0 F4000 ; Fast swipe of bed to wipe nozzle,G1 Z15 ; Raise before printing begin printing. ; layerChangeGcode, ; retractionGcode, ; toolChangeGcode, ; endingGcode,G91,G1 X999 Y999 Z50 H1 F1500,G1 X-15 Y-15 F9999,G1 E7 F300,G1 E3 F1000,G1 E-20 F1000,G90,M106 S0 ; turn off cooling fan,M104 S0 ; turn off extruder,M140 S0 ; turn off bed,M84 ; disable motors ; exportFileFormat,gcode ; celebration,0 ; celebrationSong,Random Song ; defaultSpeed,3600 ; outlineUnderspeed,0.8 ; solidInfillUnderspeed,0.8 ; supportUnderspeed,1 ; rapidXYspeed,6000 ; rapidZspeed,2400 ; minBridgingArea,10 ; bridgingExtraInflation,0.5 ; bridgingExtrusionMultiplier,1 ; bridgingSpeedMultiplier,1.25 ; useFixedBridgingAngle,0 ; fixedBridgingAngle,0 ; applyBridgingToPerimeters,1 ; filamentDiameters,1.7|1.75|1.75|1.75|1.75|1.75 ; filamentPricesPerKg,46|46|46|46|46|46 ; filamentDensities,1.25|1.25|1.25|1.25|1.25|1.25 ; useMinPrintHeight,0 ; minPrintHeight,0 ; useMaxPrintHeight,0 ; maxPrintHeight,0 ; useDiaphragm,0 ; diaphragmLayerInterval,10 ; robustSlicing,1 ; mergeAllIntoSolid,0 ; onlyRetractWhenCrossingOutline,0 ; retractBetweenLayers,0 ; useRetractionMinTravel,0 ; retractionMinTravel,1.5 ; retractWhileWiping,1 ; onlyWipeOutlines,0 ; avoidCrossingOutline,1 ; maxMovementDetourFactor,5 ; toolChangeRetractionDistance,12 ; toolChangeExtraRestartDistance,-0.5 ; toolChangeRetractionSpeed,600 ; externalThinWallType,0 ; internalThinWallType,2 ; thinWallAllowedOverlapPercentage,15 ; singleExtrusionMinLength,1 ; singleExtrusionMinPrintingWidthPercentage,33 ; singleExtrusionMaxPrintingWidthPercentage,175 ; singleExtrusionEndpointExtension,0.5 ; horizontalSizeCompensation,0 -
I would check the mechanics. This isn't something I would attribute to a config setting.
-
I've been considering that my self but not sure what to look for. It's a brand new E3D Hemera with a printed carriage. I ditched the metal plate and the v-slot wheels are mounted directly in the print. Seems just tight enough. I have the issue in both X and Y axis. So that makes me believe its something with the extruder. What could make it drop pressure before a sharp corner?
-
Are there any settings that could help me pinpoint any mechanical problems?
Like stupid slow printing that should work with any rubbish mechanics or increasing stress to provoke the issue further?
-
@strips I don't think it is a mechanical problem, I believe it has to do with pressure advance (or the entire combination of PA, X,Y,E jerk and acceleration). There is no "trickery" in the GCODE file, its simple movements.
For a fun test, start the print with PA=0, and increment every few layers, increasing by .01, until maybe .1 at the top? Also, try a XYZ cube without PA at all for comparison.
-
Strange stuff.
I have tried lots of combinations of high and very low jerk and acceleration. I have tested most combinations with PA from 0 to 1. I have tested Prusaslicer in addition to Simplify3D and I still get the strange line/shadow before a corner.
I went through the mechanics and re-"trammed" the printer. Adjusted all the v-slot wheels and retightening belts. Still no help.
So I'm beginning to think it's the filament that just get pulled like that in a corner. I would believe that this could be improved by temperature and speed but no. Tested the ABS between 215 - 250. Below 230 I get worse layer adhesion so I tend to print 230-240.
So I ditched the single wall tests. I have printed some XYZ-cubes in default size 20x20x20mm that actually doesn't show the line/shadow very much. Looks like some over extrusion but else not bad.
0.4mm nozzle
Layer height: 0.28
width 0.5
extrusion Multiplier 0.9
Retraction 0.35
topSolidLayers 3
perimeterOutlines 4
infillPercentage 90
temperature 240
bed 110
fanSpeeds 0Pressure advance 0.01, 0.025, 0.035 and 0.05


Please disregard the bottom layers. Seems I need to recalibrate the z probe offset

-
I would recommend starting over and checking the basics. The picture of the Z side from your first post has clear signs of over extrusion, most likely due to too high of a hotend temp. This could also be e-steps or extrusion multiplier, but I would start with lowering the hotend temp.
I found it impossible to print ABS without an enclosure. Eventually built a temperature controlled enclosure that holds a steady 65c and enabled part cooling, using a 5015 fan at 25%. Everyone says no cooling for ABS but it was necessary. There clear overhang issues in the X and Y pics of your last post that point to heat issues (too high of a hotend temp and or no part cooling).
It could also be an issue with the filament. ABS can be tricky and there are major differences between the brands. I've had the best luck with IC3D ABS. With IC3D ABS, I print at 245c but many manufacturers use additives that lower the temp to 220.
Once you get the over extrusion sorted, then move to adjusting pressure advance.
-
To check my extrusion I printed two 30x30x30 boxes. One with 4 layer outline and one with a single layer outline. Both with 0.5mm width.
I sampled the walls 4 times on each side. The single wall is slightly wider but the 4 walls is barely measurable.
Any suggestions which measurement I should weight the most?
I think I have put too much pressure on the calliper on earlier tests. I get slightly longer measurements when I only press the part of the calliper where it actually measures. Maybe spend a bit more on a sturdier one.
-
Looks a lot better but the Y-side overhang looks a lot worse than the X. Z top surface looks pretty good. Again, it looks a lot better in real life as I try to show off any imperfections with the lighting.
Changes:
- Extrusion 87%
- Temp to 220degC
- 0.1mm coasting


-
Looks a lot better!
There are still overhang issues and the Z face still shows signs of over extrusion above and below the Z.
Looks like you have an ABS blend that does not require higher temperatures or your extruder temperature might not be accurate. Would recommend trying to lower the temp a little more. Try printing a cube at 215 and another at 210 to see how the overhangs and over extrusion looks.
PS In my experience, having to use coasting is a sign of over extrusion.
-
I made two more runs with single wall boxes and expecting 0.5mm wall I get an average of 0.495. Almost 50/50 measurements of 0.49 and 0.5mm. The last was at 220degC and it's too easy to delaminate the walls but it looks pretty perfect!
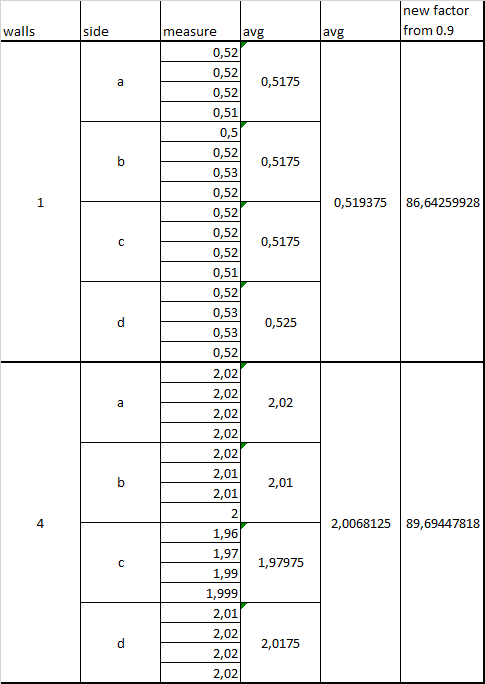
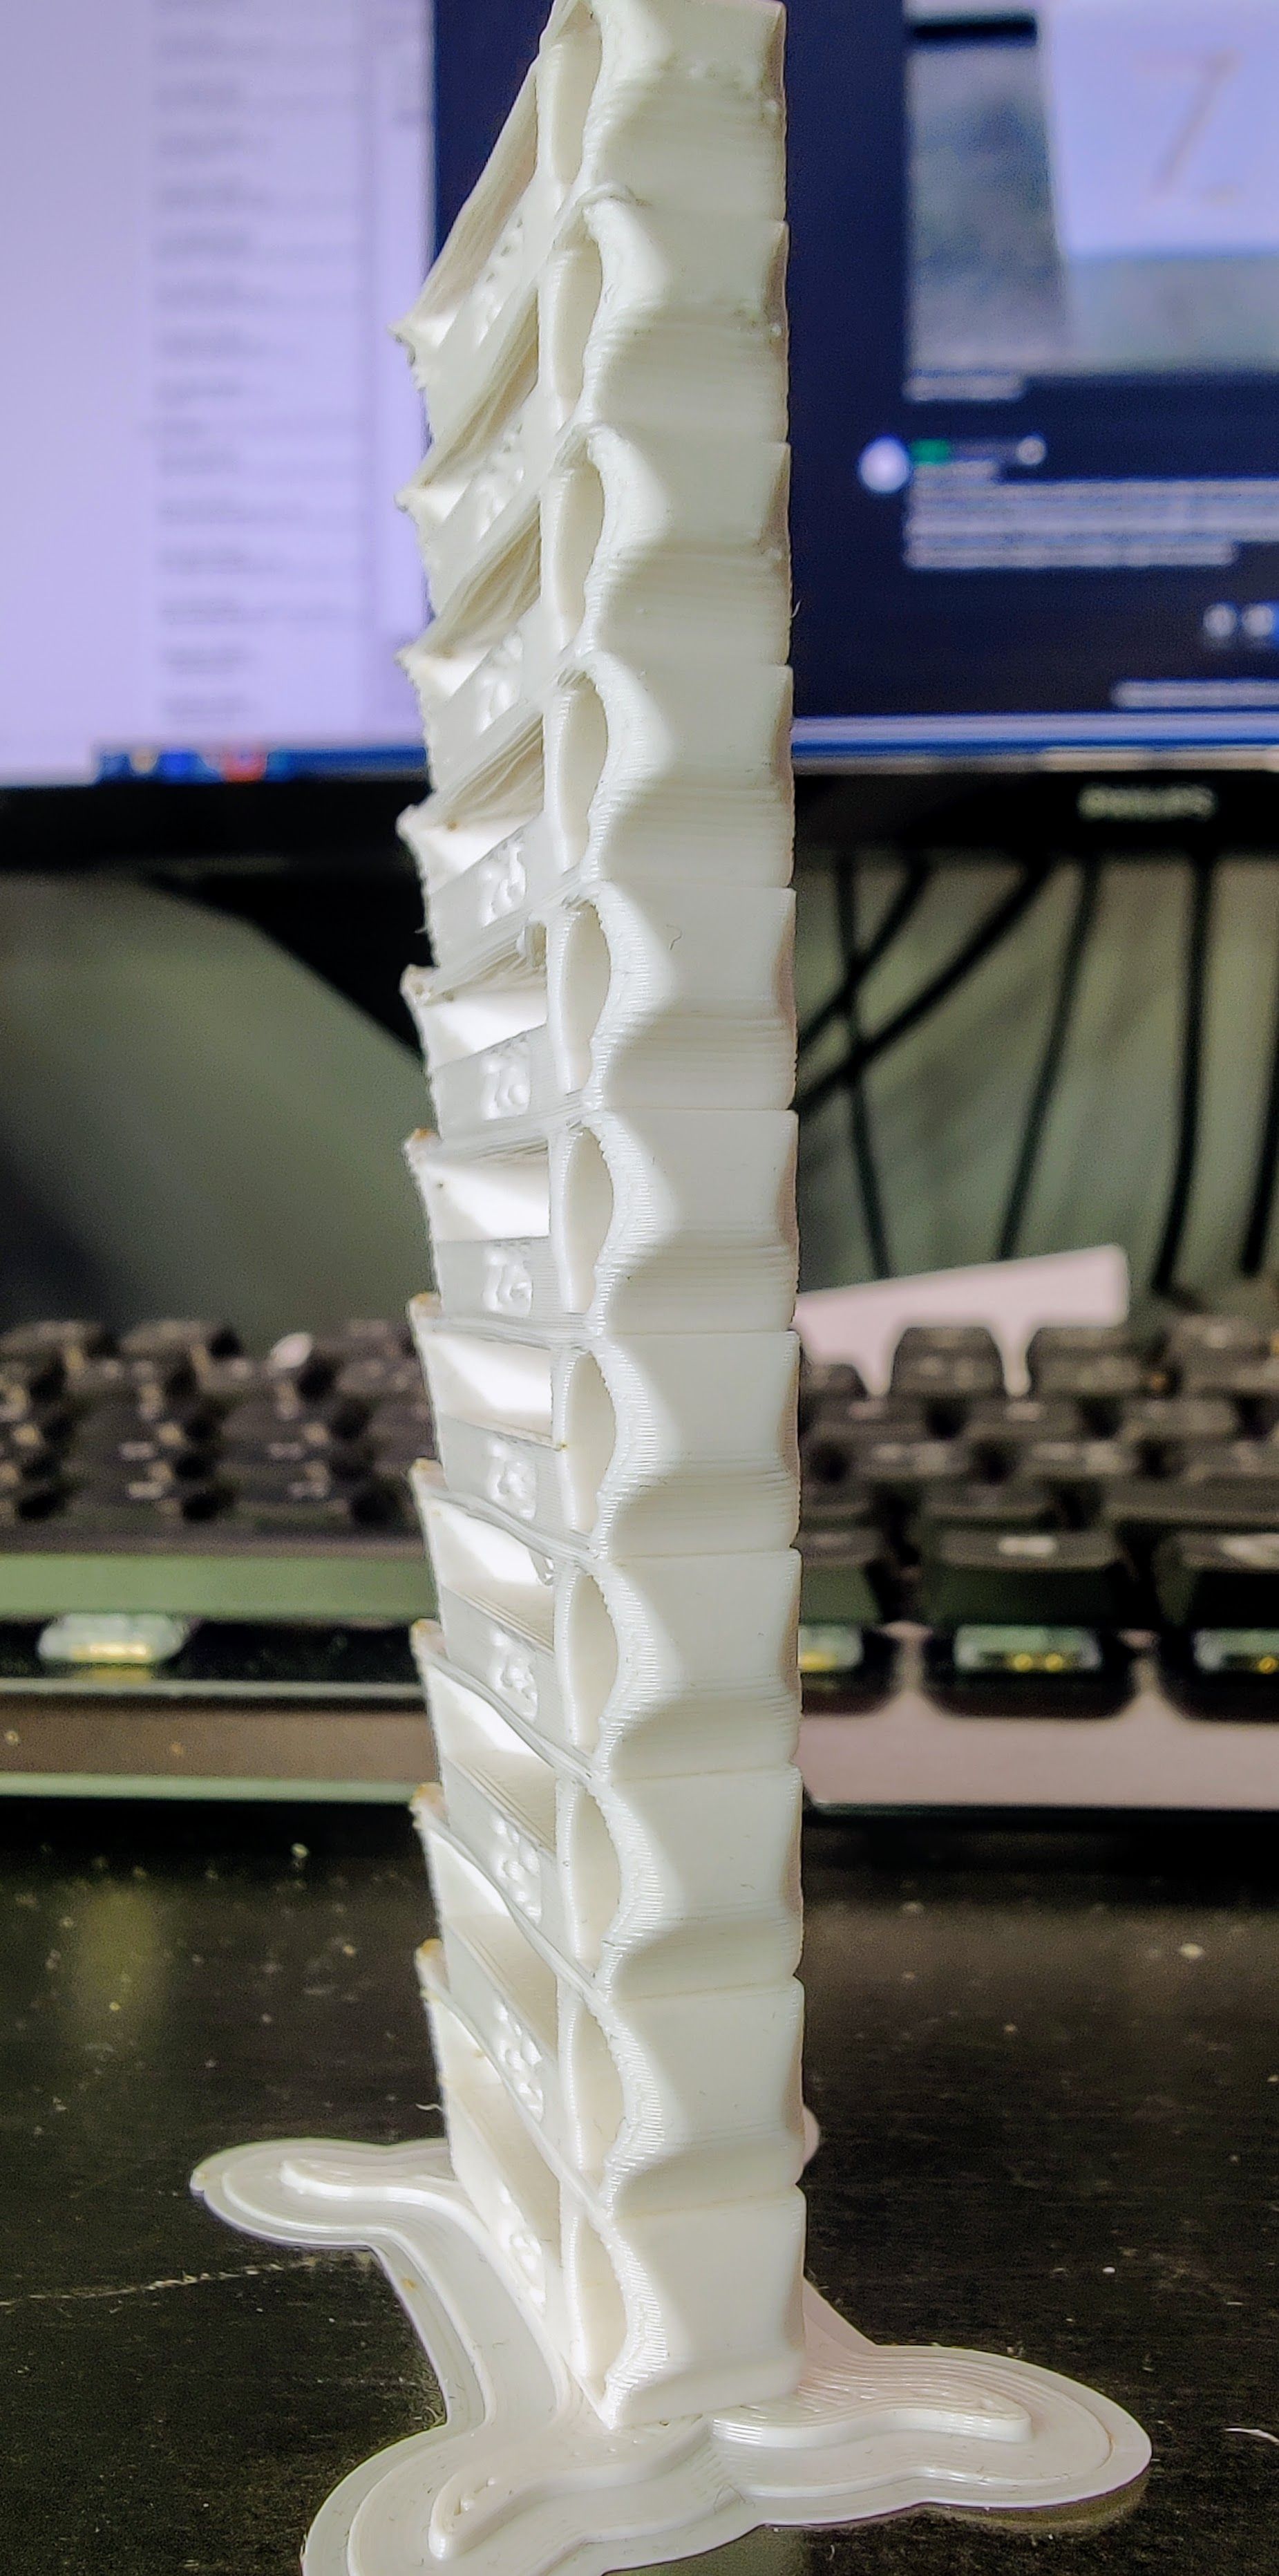
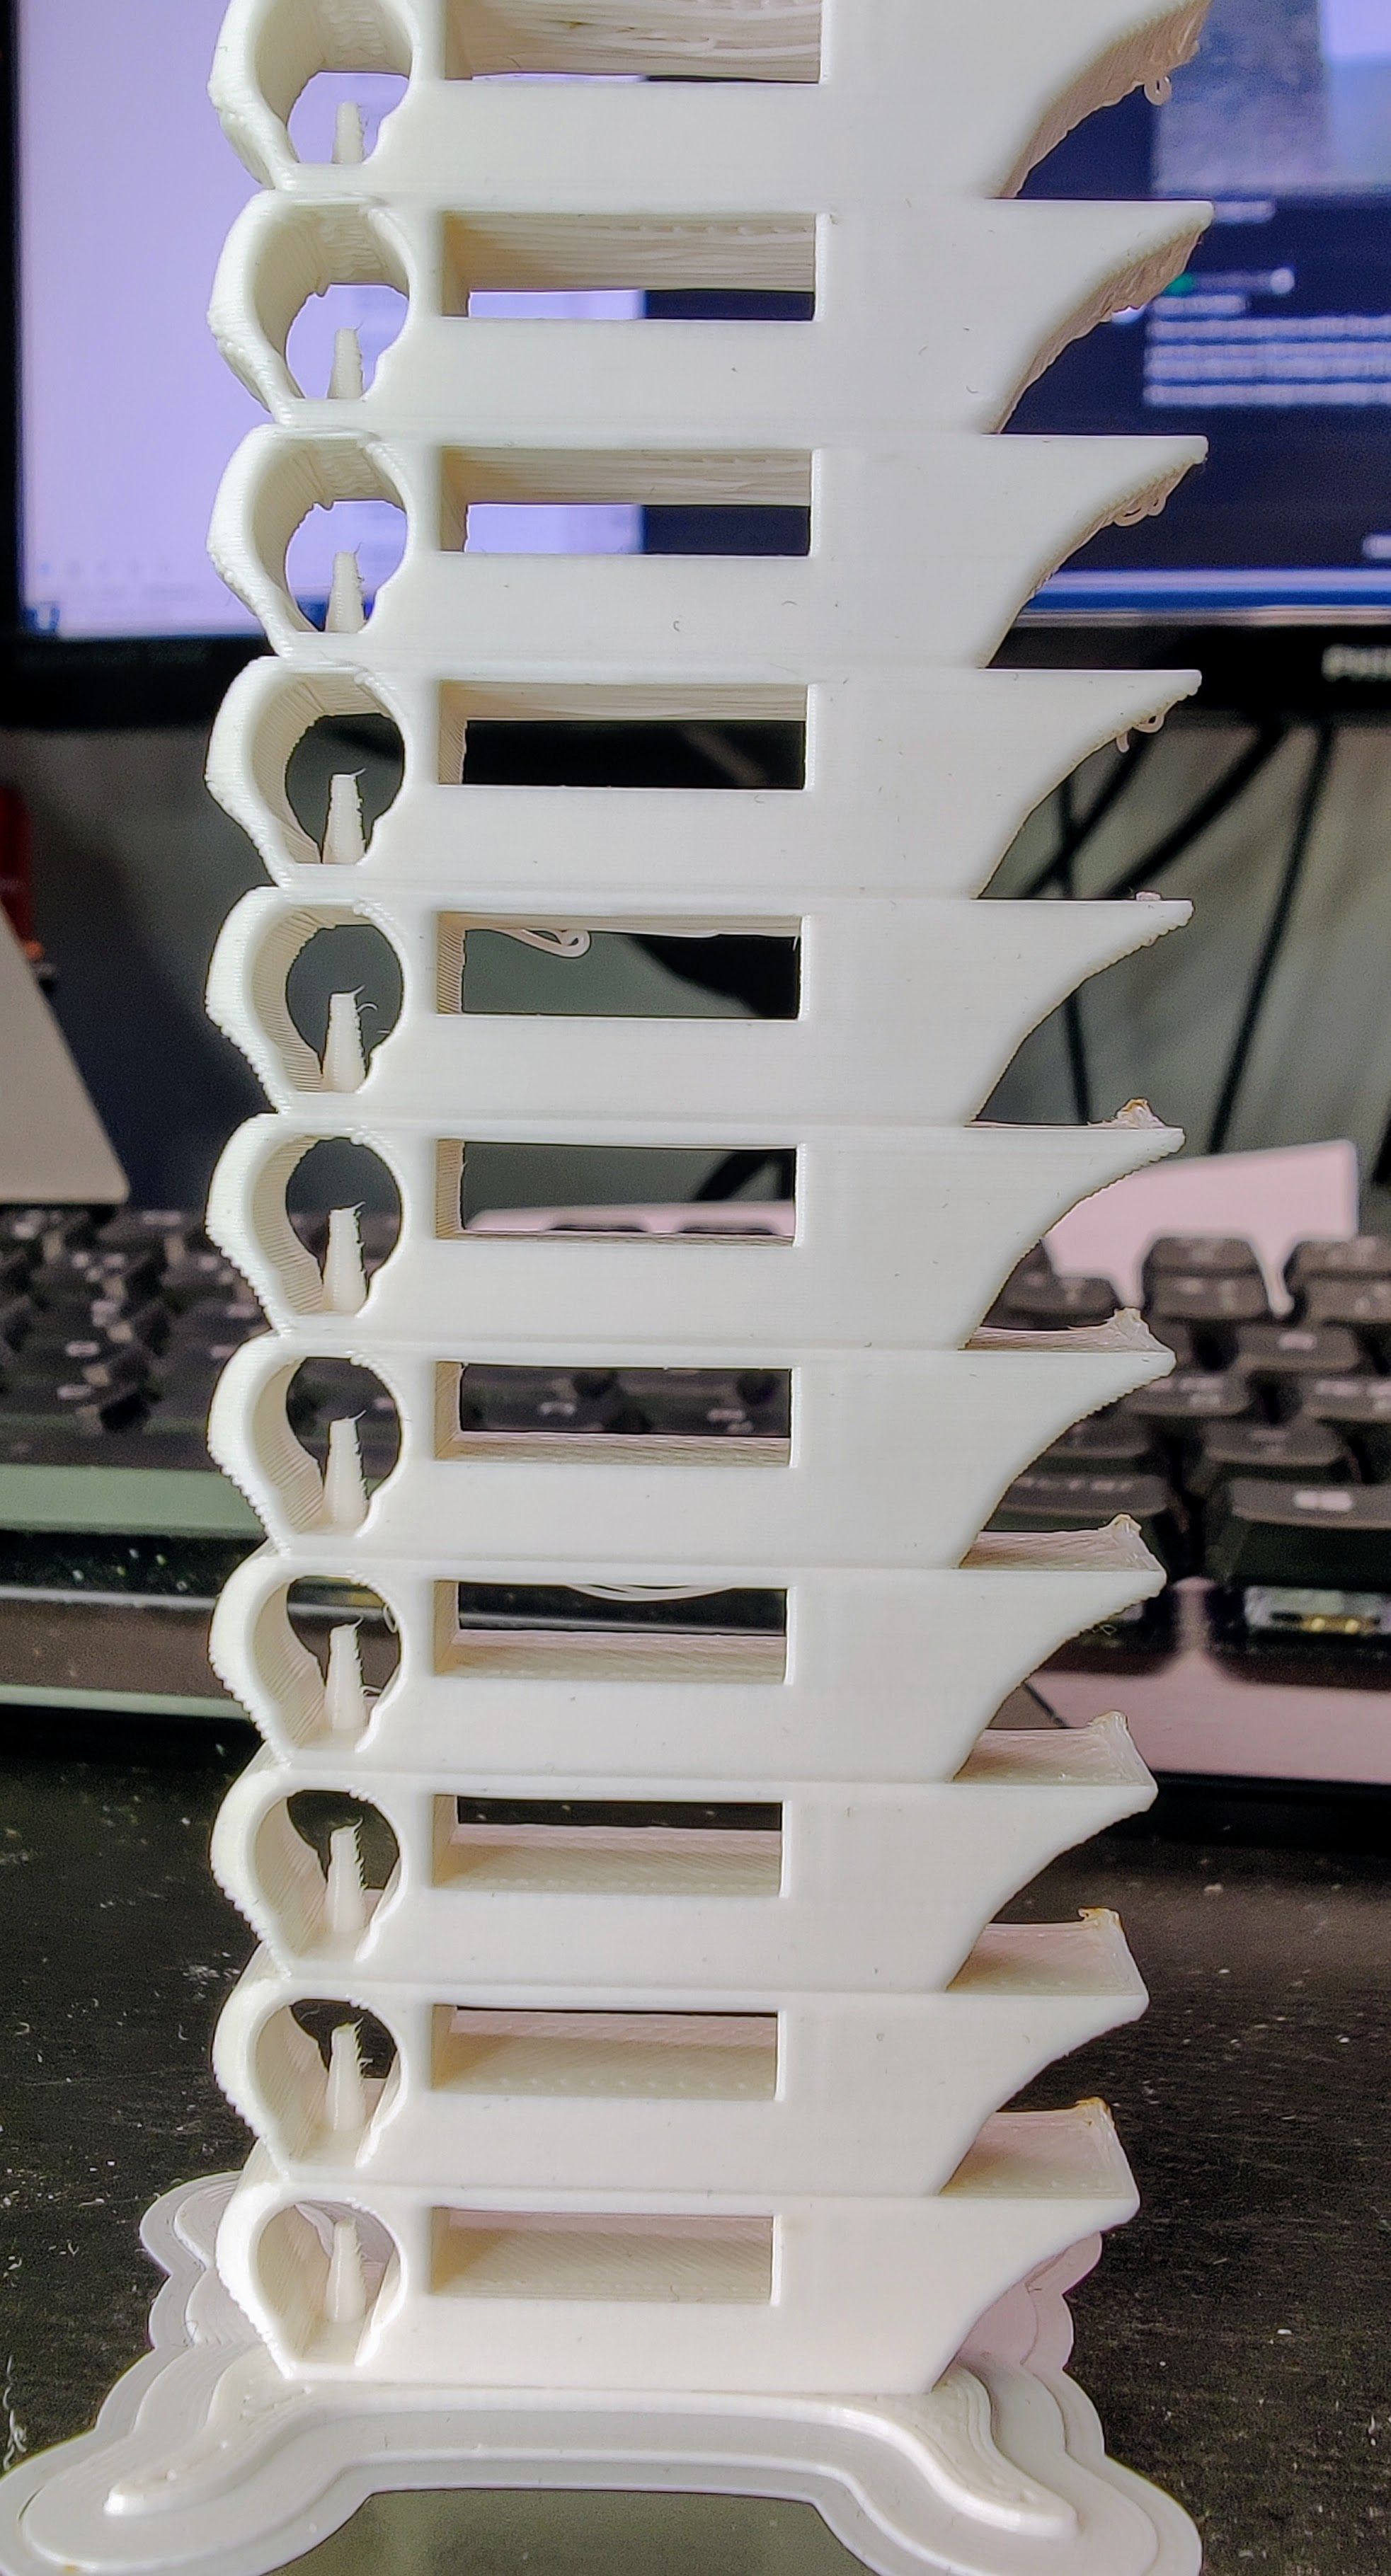
I made an temp-tower to show the effects of changing temp. It's surprisingly forgiving in a large range. Or maybe it sucks at just about any temp
 Need to buy another brand to test.
In my opinion it's the best temp-tower I have made so far. Bridging and steep overhangs are not very good. I have no enclosure but a very small room that gets about 40degC. I have no functioning cooling fan at the moment as well.
My goal is to make solid parts with good geometry for the printer it self. They do not have to look perfect but of course I want them too look as good as possible with the limitations. I want to use ABS to better withstand an future enclosure.
Trying to break the tower 215C broke very easily. Then 230C snapped with a bit more resistance but still easily delaminated. 240 required more force and 245 was much more solid. Not a very scientific test but confirms earlier observations that below 230 the layers do not bond properly. To avoid delamination for thin high parts I need to keep it above 230, preferably 240-245. I am not able to see much improvement below 240 anyways.
Lowest block is printed at 250 and lowering 5C every block above.

-
@strips
To me, it looks like your filament does like higher temperatures but is in desperate need of part cooling. 240 and 245 look good and would be correct if the filament is true ABS.There are some concerns such as over extrusion and burnt filament at the layer change. Would recommend increasing your retraction distance and or trying negative restart for retraction. ABS tends to need a little more retraction since it oozes and flows out the hotend a little easier.
-
I hope to be able to print a fan shroud now to enable me to print a better fan shroud
Made some technical parts and some are very good but some are bad. So next issue is cooling.
I did not believe ABS wanted cooling? Is there a way to only start fan when there are overhangs in S3D? There is a bridging option to use fan.
-
ABS not needing cooling is actually a common misconception. It does need part cooling for small prints with layer times that do not allow the print to cool enough before starting the next layer. It's also often necessary on overhangs and bridges.
A simple resolution to increase the later time is to add a second or third item to be printed. This helps quite a bit with the issue at Z seam, but this will not help with overhangs.
The only option I am aware of to resolve both the Z seam and overhang issue is to increase the ambient temperature of the build area (by using an enclosure) and use a cooling fan. It can be as simple as placing a cardboard box over the entire printer while printing. Please be careful with this since cardboard is flammable. Another good option for an enclosure is a small photo cube to enclose the printer. Here is an example.
-
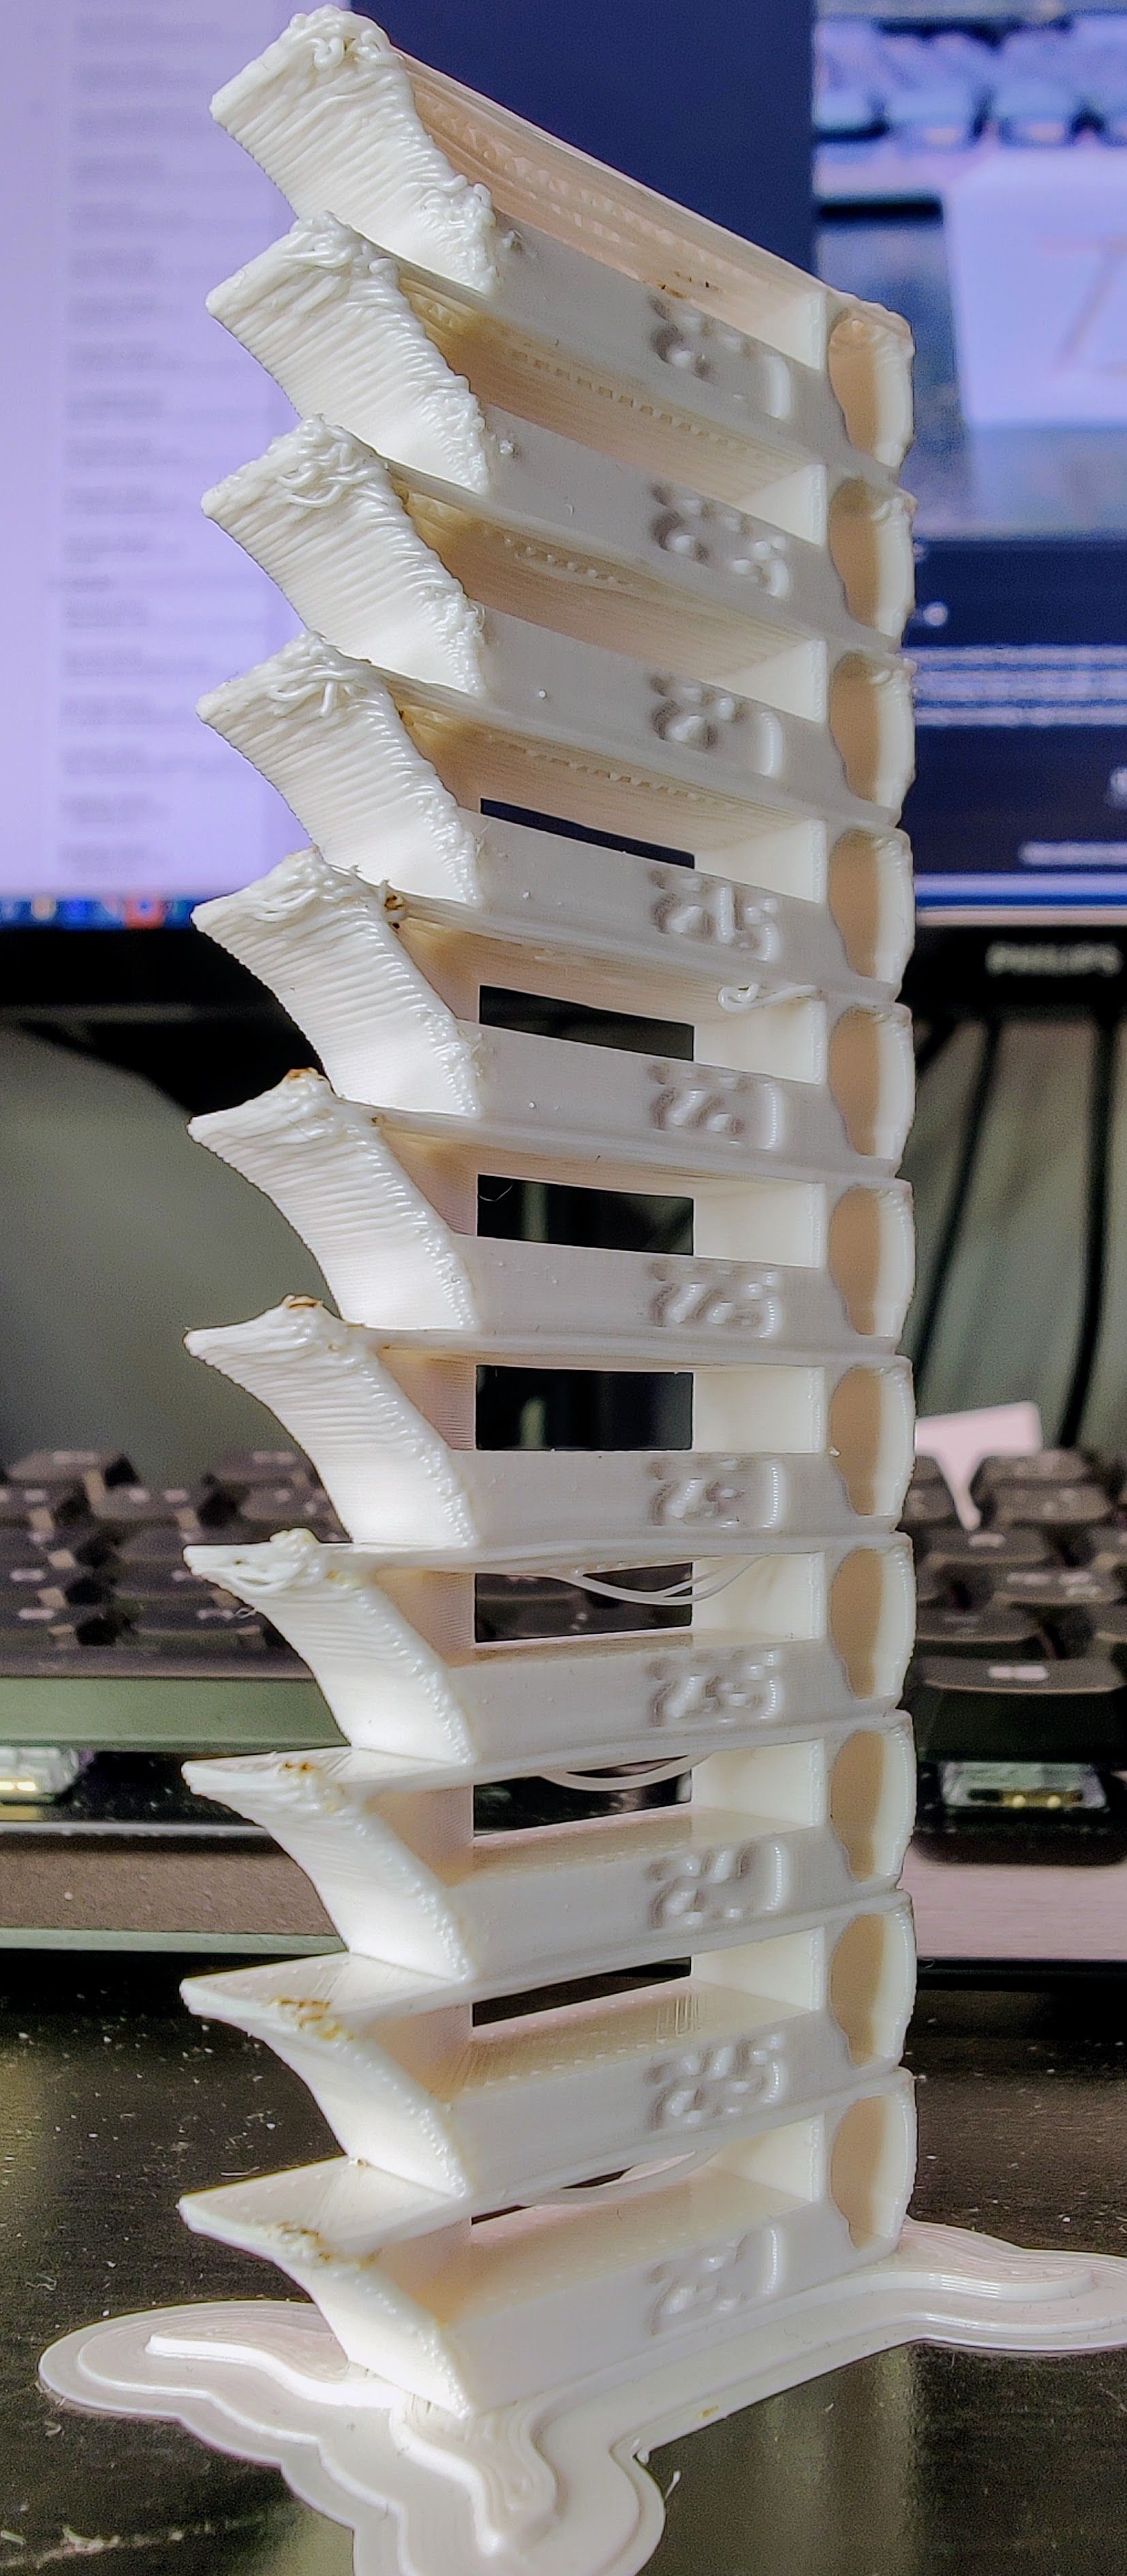
Thank you very much @mwolter. I have a lot better prints now.
These prints where printed with the new cooling fan shroud. The temp tower in the photos are all printed at 235C but the fan increases 10% for every block. Bottom level is no fan and the upper is 100%. 10% - 20% seems a good value.
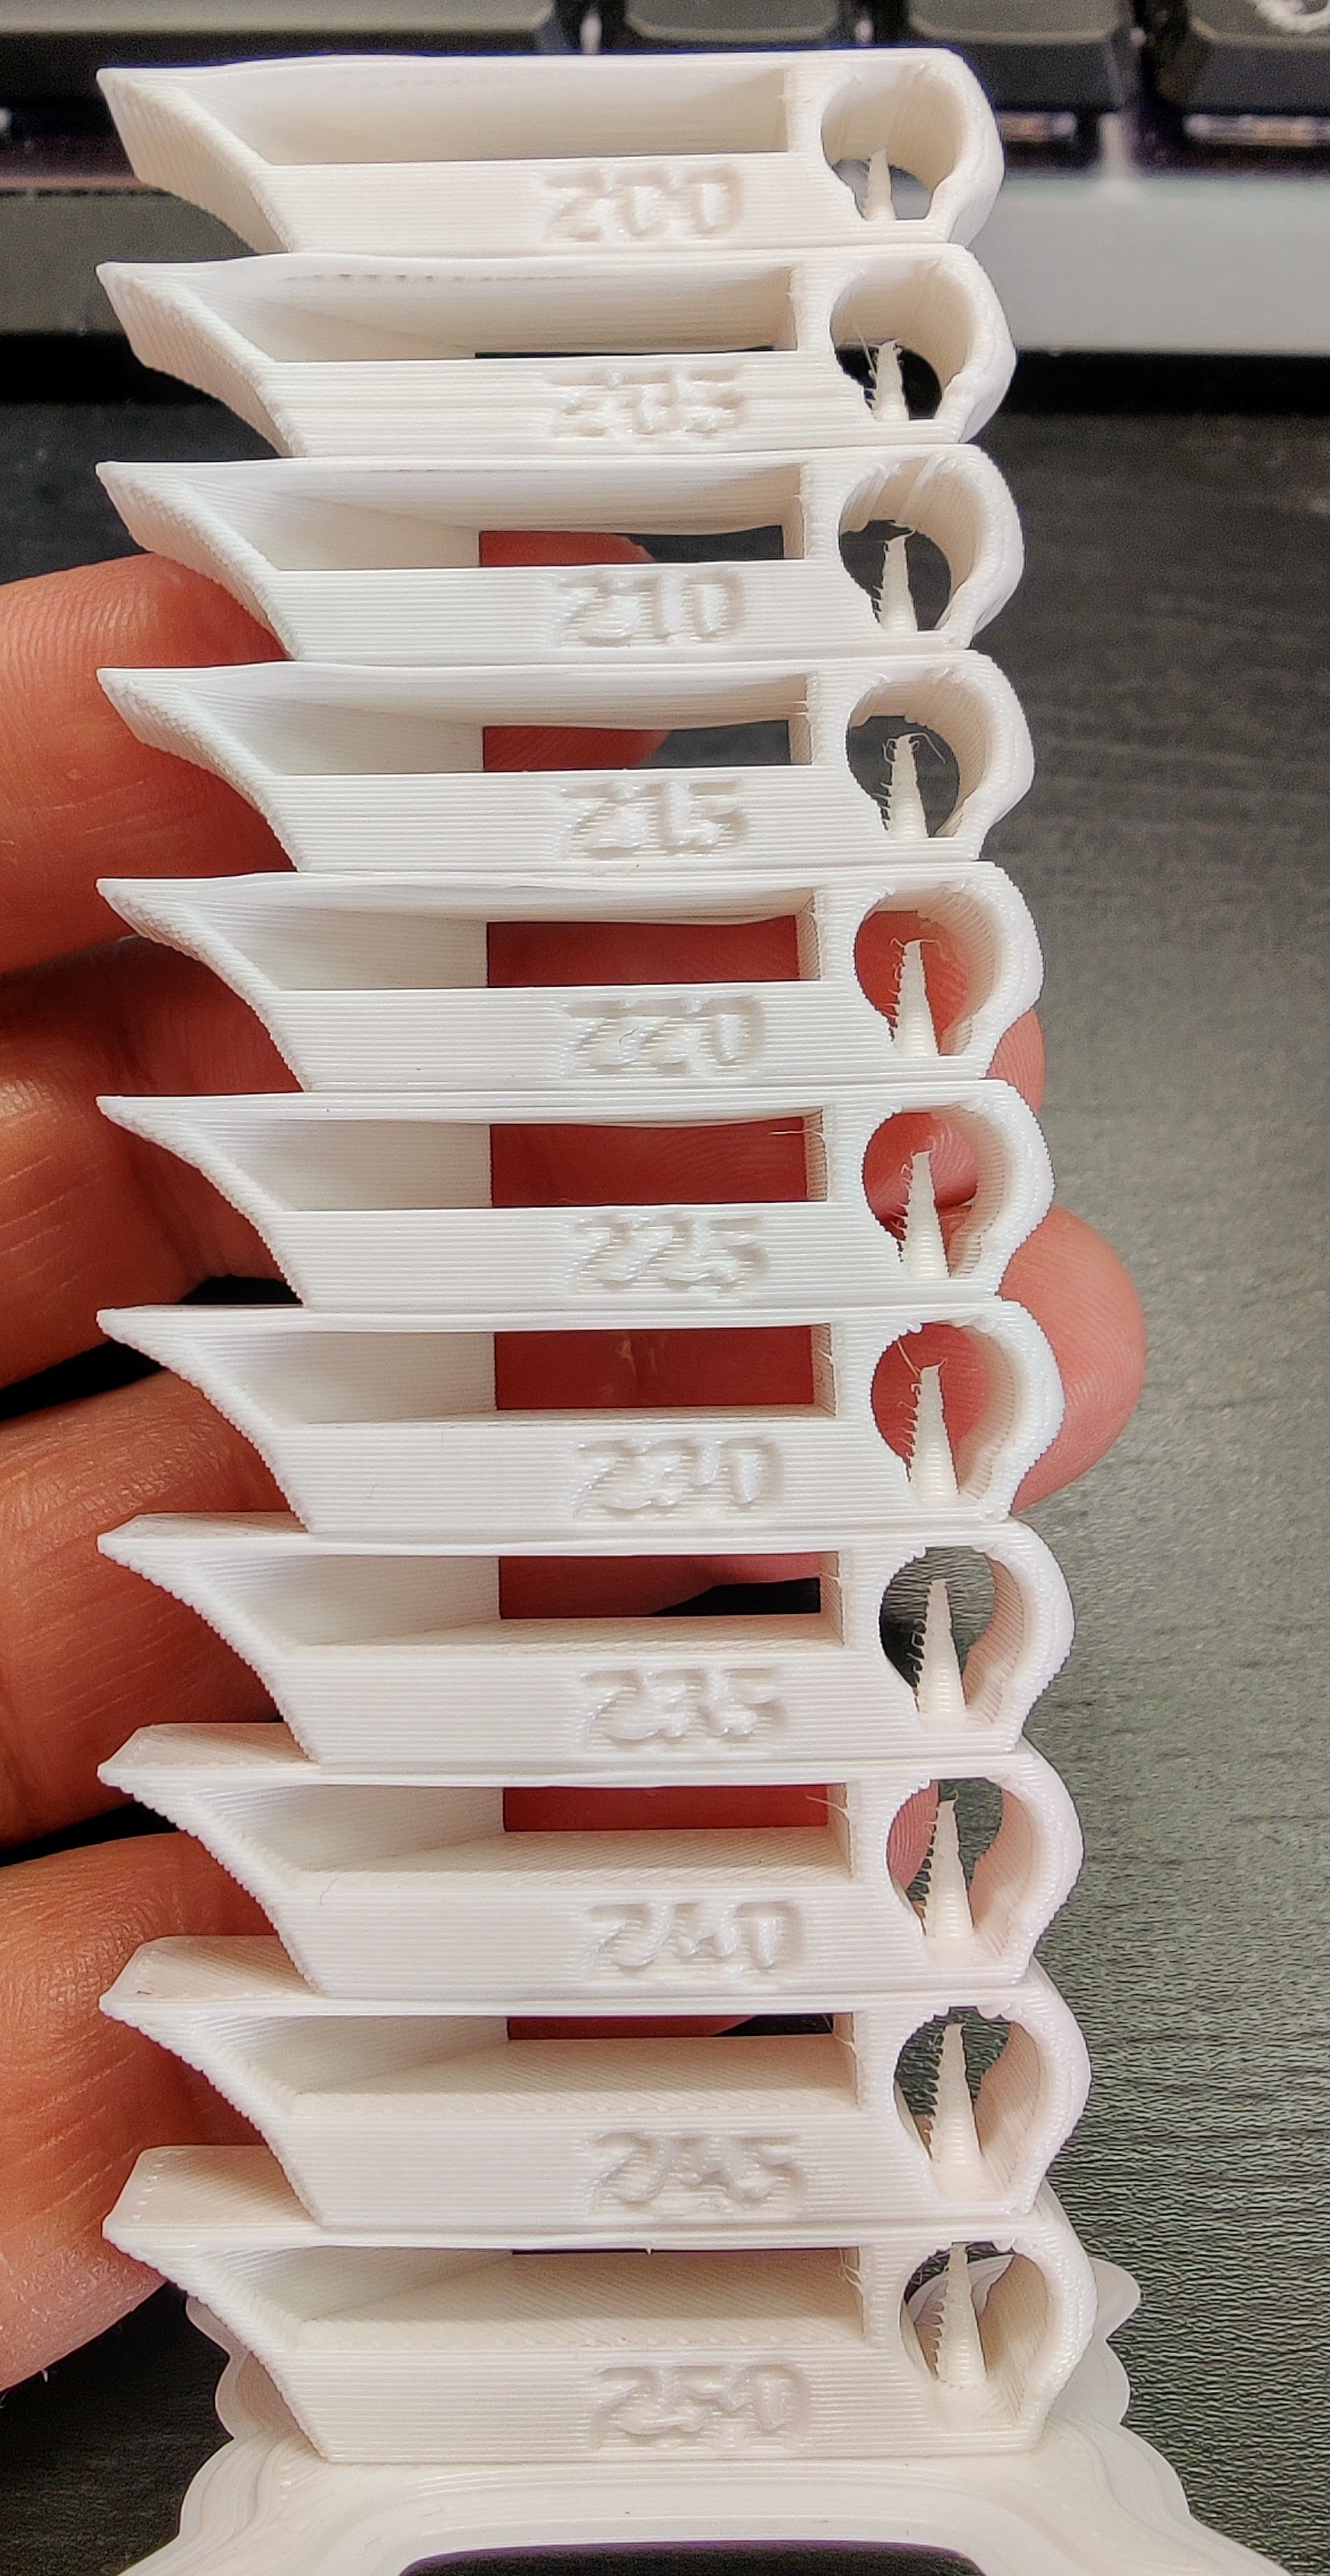

Seems like slight under extrusion but overall this part is almost perfect. Printed at 235C and 30% fan


