Problems while configuring IDEX
-
Hello,
i'm building an IDEX printer.
my mechanics configuration is similar to the one described here:
https://duet3d.dozuki.com/Wiki/ConfiguringMultipleIndependentXcarriagesCartesian
The differences: my X axis is homing on right side, so HIGH end (460mm). U axis is homing on left side, LOW end (-20mm)
the printable area for both extruder goes from 0mm to 440mm. Here's the config file:; Configuration file for Duet 3 (firmware version 3) ; executed by the firmware on start-up ; ; generated by RepRapFirmware Configuration Tool v3.1.4 on Sat Oct 31 2020 09:49:18 GMT+0100 (Ora standard dell’Europa centrale) ; General preferences G90 ; send absolute coordinates... M83 ; ...but relative extruder moves M550 P"Autotex 1" ; set printer name ; Network M552 P0.0.0.0 S1 ; enable network and set IP address ;M553 P255.255.255.0 ; set netmask ;M554 P192.168.50.254 ; set gateway M586 P0 S1 ; enable HTTP M586 P1 S1 T0 ; enable FTP M586 P2 S1 ; enable Telnet ; Drives M569 P0.0 S0 ; physical drive 0.0 goes backward M569 P0.1 S1 ; physical drive 0.1 goes forwards M569 P0.2 S0 ; physical drive 0.2 goes backward M569 P0.3 S1 ; physical drive 0.3 goes forwards M569 P0.4 S0 ; physical drive 0.4 goes forwards M569 P0.5 S1 ; physical drive 0.5 goes forwards M584 X0.0 Y0.2 Z0.3 U0.1 E0.4:0.5 ; set drive mapping M350 X16 Y16 Z16 U16 E16:16 I1 ; configure microstepping with interpolation M92 X76.58 Y80.00 Z1282.0513 U76.58 E837.00:837.00 ; set steps per mm M566 X900.00 Y900.00 Z12.00 U900.00 E120.00:120.00 ; set maximum instantaneous speed changes (mm/min) M203 X6000.00 Y6000.00 Z500.00 U6000.00 E1200.00:1200.00 ; set maximum speeds (mm/min) M201 X500.00 Y500.00 Z100.00 U500.00 E250.00:250.00 ; set accelerations (mm/s^2) M906 X3000 Y3000 Z3000 U3000 E1600:1600 I30 ; set motor currents (mA) and motor idle factor in per cent M84 S30 ; Set idle timeout ; Axis Limits M208 X0 Y0 Z0 U-20 S1 ; set axis minima M208 X460 Y305 U440 Z310 S0 ; set axis maxima ; Endstops M574 X2 S1 P"!^io0.in" ; configure active-low endstop for high end on X via pin io0.in pull up M574 U1 S1 P"!^io1.in" ; configure active-low endstop for low end on U via pin io1.in pull up M574 Y1 S1 P"!^io2.in" ; configure active-low endstop for low end on Y via pin io2.in pull up M574 Z1 S1 P"!^io3.in" ; configure active-low endstop for low end on Z via pin io3.in pull up ; Sensore filamento M591 D4 P1 C"io4.in" S1 ; Z-Probe M558 P0 H5 F120 T6000 ; disable Z probe but set dive height, probe speed and travel speed M557 X15:425 Y15:290 S20 ; define mesh grid ; Heaters M308 S0 P"spi.cs0" Y"rtd-max31865" A"Destro" ; configure sensor 0 as thermocouple via CS pin spi.cs0 M950 H0 C"out1" T0 ; create nozzle heater output on out1 and map it to sensor 0 M307 H0 B0 S1.00 ; disable bang-bang mode for heater and set PWM limit M143 H0 S500 A2 ; imposta limite di temperatura con spegnimento temporaneo se oltrepassato M308 S1 P"spi.cs1" Y"rtd-max31865" A"Sinistro" ; configure sensor 1 as thermocouple via CS pin spi.cs1 M950 H1 C"out2" T1 ; create nozzle heater output on out2 and map it to sensor 1 M307 H1 B0 S1.00 ; disable bang-bang mode for heater and set PWM limit M143 H1 S500 A2 ; imposta limite di temperatura con spegnimento temporaneo se oltrepassato M308 S2 P"temp1" Y"thermistor" T10000 B3963 A"Piano" ; define bed temperature sensor M950 H2 C"out3" T2 ; create badheater output on out3 and map it to sensor 2 M307 H2 B1 D100 ; abilita bang-bang M140 H2 ; map heated bed to heater 0 M143 H2 S200 A2 ; imposta limite di temperatura con spegnimento temporaneo se oltrepassato M308 S3 P"temp0" Y"thermistor" T10000 B3963 A"Camera" ; define chambre temperature sensor M950 H3 C"out0" T3 ; create chambre output on out3 and map it to sensor 3 M307 H3 B1 ; abilita bang-bang M141 H3 ; heater 3 is the chamber heater M143 H3 S150 A2 ; imposta limite di temperatura con spegnimento temporaneo se oltrepassato ; Fans ; Tools per stampare un oggetto solo M563 S"Destro" P0 D0 H0 X0 F0 ; define tool 0 G10 P0 X0 Y0 Z0 ; set tool 0 axis offsets G10 P0 R0 S0 ; set initial tool 0 active and standby temperatures to 0C M563 S"Sinistro" P1 D1 H1 X3 F0 ; tool 1 uses extruder 1 and heater 2 and maps X to U G10 P1 Y0 U0 Z0 S0 R0 ; set tool 1 offsets and temperatures ; Tools per stampare due oggetti contemporaneamente oggetti identici M563 S"Combinato" P2 D0:1 H0:1 X0:3 F0:0 ; tool 2 uses both extruders and hot end heaters, maps X to both X and U, and uses both print cooling fans G10 P2 X-110 Y0 U110 S0 R0 ; set tool offsets and temperatures for tool 2 M567 P2 E1:1 ; set mix ratio 100% on both extruders M568 P2 S1 ; turn on mixing for tool 2 ; Custom settings are not defined ; Stall detection M915 Z R0 F0 S0; R0 non fa nulla in caso di stallo F0 non filtrato S soglia (da -64 a +63)Everything looks ok with T0 and T1. I have problem with T2 (the duplication tool)
if i select T2 from DWC before homing the extruders moves about 100mm in the homing direction (U on left and X on right). if they are too close to the endstop they crash.
if i home before selecting any tool it homes correctly. Then i select T2 and the extruders moves about 100mm in the center direction (U on right and X on the left). DWC is indication 220mm for both X and U position. Jogging the X axis from DWC, they move together, but the X position is about 100mm higher than the correct value.
if i home after selcting T2, they home correctly, but DWC indicates 220mm for both X and U position, even if they are in home position, so if i move X axis from DWC on negative direction U crash against endstop, if i move it in positive direction X crash against enstop. they are moving together
i tested different offset value. tried to swap signs, but i can't make it work.
i commented everything in tfree tpost tpre.Board: Duet 3 MB6HC (MB6HC)
Firmware: RepRapFirmware for Duet 3 MB6HC 3.1.1 (2020-05-19b2)
working in stand alone modeWhat am i doing wrong?
Thanks in advance
Andrea
-
My suggestion - put T-1 P0 at the start of any of your homing files. That will deselect all tools, which I think is best when attempting to home everything. Once homed, it would be safe to select T2, etc.
As of RRF 3.1:
"Tool change files are now run even if the axes have not been homed. If you don't want certain parts to run when axes have not been homed, use conditional GCode in the tool change file."
You mention your tfree, tpost, tpre are empty, but I would recommend adding some conditional GCODE like the lines below to ensure the printer is homed prior to selecting any tools (as the T2 selection is more complex than switching from T0 to T1, etc)
from my tpre0.g (similarly put into my tpre1, tpre2 files)
; tpre0.g
; called before tool 0 is selected


; If the printer hasn't been homed, home it
if !move.axes[0].homed || !move.axes[1].homed || !move.axes[2].homed || !move.axes[3].homed
  G28
I think that these suggestions could solve your issues - let me know if they help.
-
Thanks for the suggestions.
The homing is now fixed.
i still don't understand why they moves even if the files are empty and how to adjust offset parameters correctly
-
@AndreaM said in Problems while configuring IDEX:
Thanks for the suggestions.
The homing is now fixed.
i still don't understand why they moves even if the files are empty and how to adjust offset parameters correctly
To clarify, you added both T-1 P0 and the tpre code I recommended?
When selecting T2, the movement to set the nozzles at their offset position happens because that is how the tool is defined - the two are not being independently moved during this phase. Running "T2 P0" which changes tools without macros, you'll see the hotends still move.
Regarding how to set up the offset correctly... you probably have it correct (in a way).
If you select T2, and then in DWC command it to X200, in real life it would look like it is at X310 right? That is because of the "X-110" in the G10 command.
In my G10 command, I actually have the offsets applied differently - different IDEX machine of course, my X homes to the low side, U to the hide side. I also have my (0,0) at the center of the bed.
G10 P2 X0 Y0 U-263.5 S0 R0I do it like that so in Cura I can setup the model on the imaginary buildplate where it will actually print.
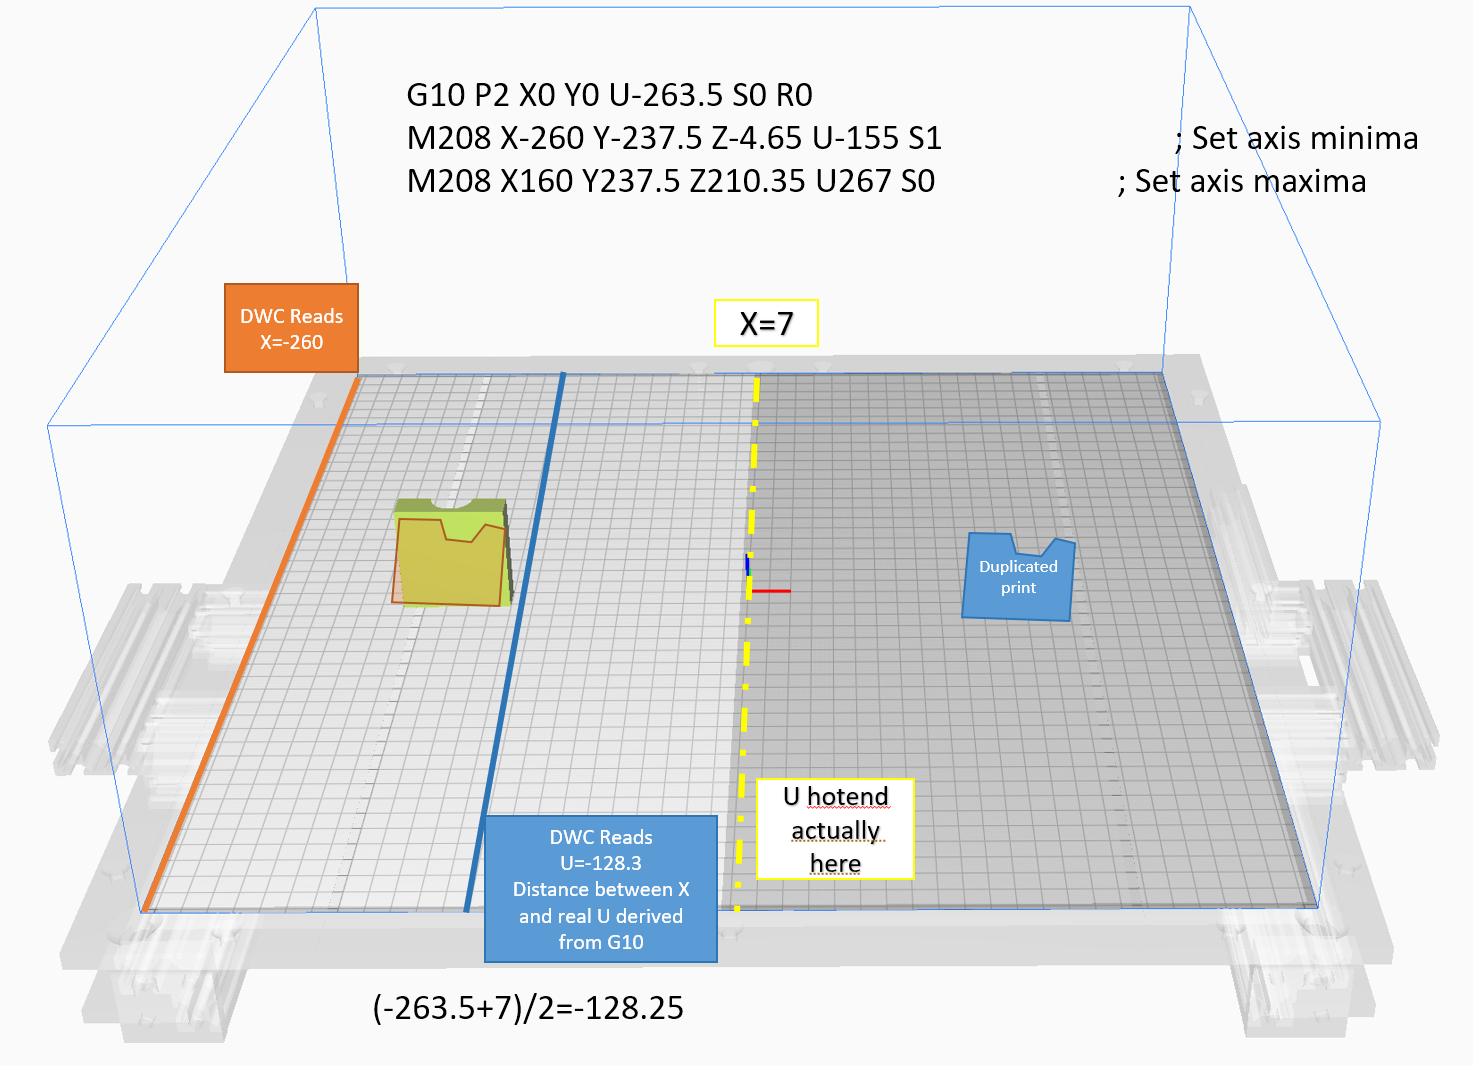
Picture above but in real life:
-
@sebkritikel said in Problems while configuring IDEX:
In my G10 command, I actually have the offsets applied differently - different IDEX machine of course, my X homes to the low side, U to the hide side. I also have my (0,0) at the center of the bed.
yes, i added both T-1 P0 and the tpre code you recommended .
i've been able also to fix offset thanks to yours suggestion. here's the correct command:
G10 P2 X-220 Y0 U20 S0 R0 ; set tool offsets and temperatures for tool 2
next step is print test
thanks for the time you spent. i have a workshop, if you need something milled just let me know.
-
@AndreaM said in Problems while configuring IDEX:
@sebkritikel said in Problems while configuring IDEX:
In my G10 command, I actually have the offsets applied differently - different IDEX machine of course, my X homes to the low side, U to the hide side. I also have my (0,0) at the center of the bed.
yes, i added both T-1 P0 and the tpre code you recommended .
i've been able also to fix offset thanks to yours suggestion. here's the correct command:
G10 P2 X-220 Y0 U20 S0 R0 ; set tool offsets and temperatures for tool 2
next step is print test
thanks for the time you spent. i have a workshop, if you need something milled just let me know.
Happy to help!