Duet3D Logo Duet3D
    • Tags
    • Documentation
    • Order
    • Register
    • Login
    1. Home
    2. sebkritikel
    • Profile
    • Following 0
    • Followers 1
    • Topics 10
    • Posts 370
    • Best 107
    • Controversial 0
    • Groups 0

    sebkritikel

    @sebkritikel

    137
    Reputation
    47
    Profile views
    370
    Posts
    1
    Followers
    0
    Following
    Joined Last Online

    sebkritikel Unfollow Follow

    Best posts made by sebkritikel

    • New Large Format IDEX Printer Project

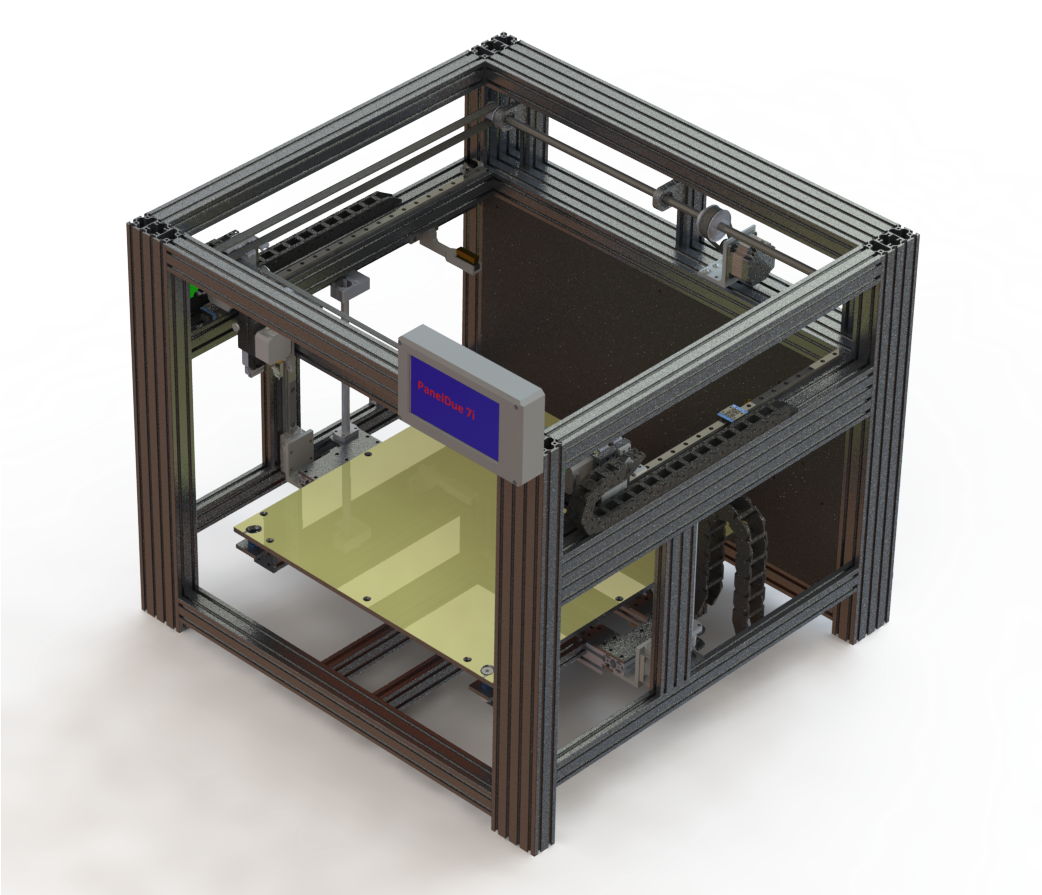
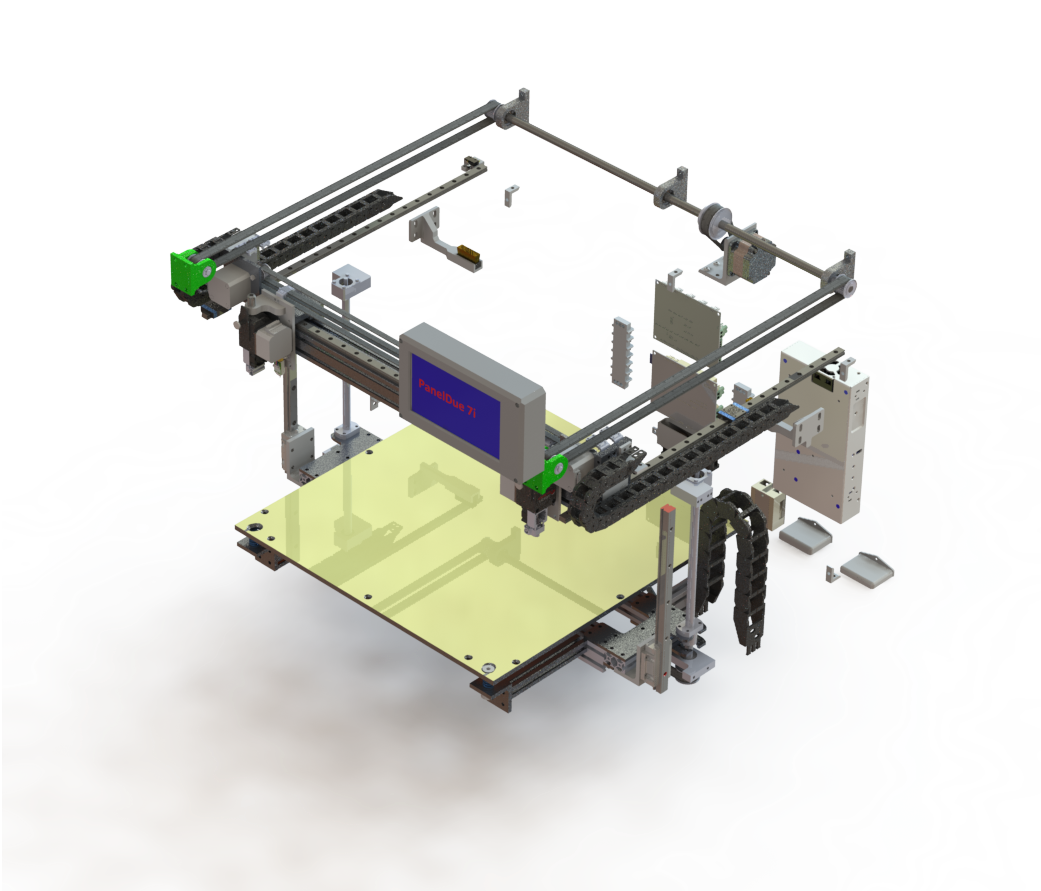
      I'm pleased to share a personal project of mine, where the initial design started in late 2018, and purchasing started in March of 2019. By no means is this complete, but I'm at a point where I'm excited to share the progress I have made so far.

      Some background - My first real experience with 3D printing was in 2017 at the office; we had a Stratasys Dimension 1200es BST that wasn’t getting much use. I started printing practically anything I could think of, starting with a small hand tool, and progressing to much larger and more sophisticated designs. In early 2018 I got the go-ahead to propose search for a new 3D printer model that we would buy two of – because more is better, right? At that point I realized both the age of the Stratasys machine, as well as the wealth of hardware and software options for printers available at the time.

      We opted to go with two BCN3D Sigmax printers – dual extrusion was a must, the IDEX technology had some potential uses, and the large bed width was attractive. I spent quite a bit of time learning how to effectively operate those machines (they are surprisingly a lot of work!); later I picked up a used Davinci 1.0 and flashed it with Repetier, built a MPCNC, and eventually the Stratasys went belly-up and made its way home with me.

      IMG_7489.JPG
      IMG_7491.JPG
      IMG_7490.JPG
      render2.png
      render3.png

      My initial design objectives were to have a machine that…

      • Has a rigid frame
      • Has a limited number of 3D printed components
      • Has an enclosed and heated chamber
      • Has a large print area
      • Is capable of printing high temperature thermoplastics
      • Is capable of dual extrusion
      • Is capable of fast travel speeds with reasonable accelerations

      To start the design, I purchased two Rexroth ballscrews and 3x sets of IKO LWL12B 500mm rails with two ML12 each, sizing the frame to these components. Later on I purchased two LWHT15 200mm rails with a single carriage each for use with the ballscrews for the Z-Axis.

      Other design and component decisions:
      I wanted to utilize the Gates GT3 series of belts and compatible pulleys

      • For the Y-axis I selected 3mm belt pitch, 15mm belt width
      • For the X/U-axis, I selected 2mm belt pitch, 9mm belt width

      I wanted to balance speed and resolution

      • 16x microstepping, managing to achieve 100steps/mm in the X/U axis, 96steps/mm in the Y axis
      • Y axis is geared down with a 2.25:1 gear ratio to compensate for the heavier axis
      • X, U, and Y axis run at 300mm/s max speeds and 4000mm/s^2 acceleration

      For the Y-axis and Z-axis, stepper motors are NEMA 23

      • Oriental Motor PKP264D28AA2, .74 N*m, 2.8 A/phase, 1.5mH/phase
      • Set to 2.4A in config.g
      • Run super cool, barely feel warm to the touch

      X and U axis use NEMA 17

      • Oriental Motor PKP244D23A2, .48N*m, 2.3 A/phase, 1.9mH/phase
      • Set to 1.8A in config.g
      • These run quite a bit warmer than the NEMA 23s

      Slice Engineering Mosquito and Mosquito Magnum for hotends

      • Various nozzles (P3D, E3D NozzleX, Slice Vanadium
      • Slice thermistors and heaters
      • 12V Sunon fans

      5/16” ATP 5 plate, 1000W Keenovo heater, SDF DF240S thermal cutoff (200°C holding temperature)

      • TCO holding temperature may be a little high, but Keenovo recommended a maximum operating temperature of 204°C based on the 3M adhesive rating.
      • Three-point bed leveling with probing
      • Initially looked at a kinematic bed solution but opted for a fixed countersunk screw/spring combo, with two slotted countersinks sized and positioned to account for thermal expansion.

      Bondtech BMG-M extruders

      IDEX

      • I do enjoy the IDEX technology on the BCN3D printers but wanted something a bit more structurally sound. Mechanically, lots of inspiration taken from the Stratasys Dimension 1200es.

      Duet controller board(s) - Duet 2 Wifi, Duex5, PanelDue 7i

      Snap action homing switches for X, U, and Y

      • These have moved quite a bit as the design has evolved, I’m not happy with how they are mounted at the moment
      • Had a homing “oopsie” where the U assembly crashed into the X carriage, actually moving the switch mounting block, and messing up my calibration!

      Right now I’m looking at a print volume (single extruder) of 420mm x 450mm (475mm Y travel) x 210mm, losing ~100mm (to ~320mm) on the X and U axis for dual extrusion (lesson learned there!).

      The project so far has been a blast, with many lessons learned along the way. The X-U axis has by far been the most challenging to build and design, I’m on the second major iteration and I’m still not entirely pleased, although I am getting satisfactory print results. As this is my first printer design and build, it was challenging to prioritize assembly design priorities. With this project, despite having a good idea of the components I wanted on each hotend assembly, it was the last item I designed and built up – ends up my build plate was a bit too big, leaving me little room to have nozzle wipe stations, purge buckets, etc. On future projects I for sure have a better idea of what assemblies to prioritize, making further decisions based on the size and function of said assemblies.

      While working on this project, I did not initially intend to share the design files, however because of all that I learned from the fantastic content and individuals on this community and others, I figured I should give back and contribute this project.

      https://drive.google.com/drive/folders/12TOxGG-kKjuYwNuwhYpwor9TGhdfy2mg?usp=sharing

      The Google Drive link contains a Solidworks (19-20) pack-and-go, as well as assembly parasolids (.x_t) and IGS files. A (very!) rough BOM and various images and videos of my progress are also available.

      How have I done so far?

      • Has a rigid frame - definitely nailed this one! Almost entirely end tapped extrusions with fasteners + access hole
      • Has a limited number of 3D printed components - making progress, but not quite done. Y axis bearing holders, most of the hotend carriage assembly is still 3D printed
      • Has an enclosed and heated chamber - making progress on enclosure, have not installed+tested active chamber heating (excluding built plate)
      • Has a large print area - pretty satisfied
      • Is capable of printing high temperature thermoplastics - goes hand in hand with the heated enclosure, no issue with extruding 9085 PEI, but I have not tested an actual PEI print (the volume above the build plate stabilizing at 50°C without being fully enclosed, which is pretty neat, but not enough for PEI)
      • Is capable of dual extrusion - accomplished
      • Is capable of fast travel speeds with reasonable accelerations - accomplished

      Many thanks to Slice Engineering, PrintedSolid, and Filastruder ( @elmoret ) for fast shipping, excellent communication, and great customer service when it was needed, as well as to the Duet team for a fantastic product.
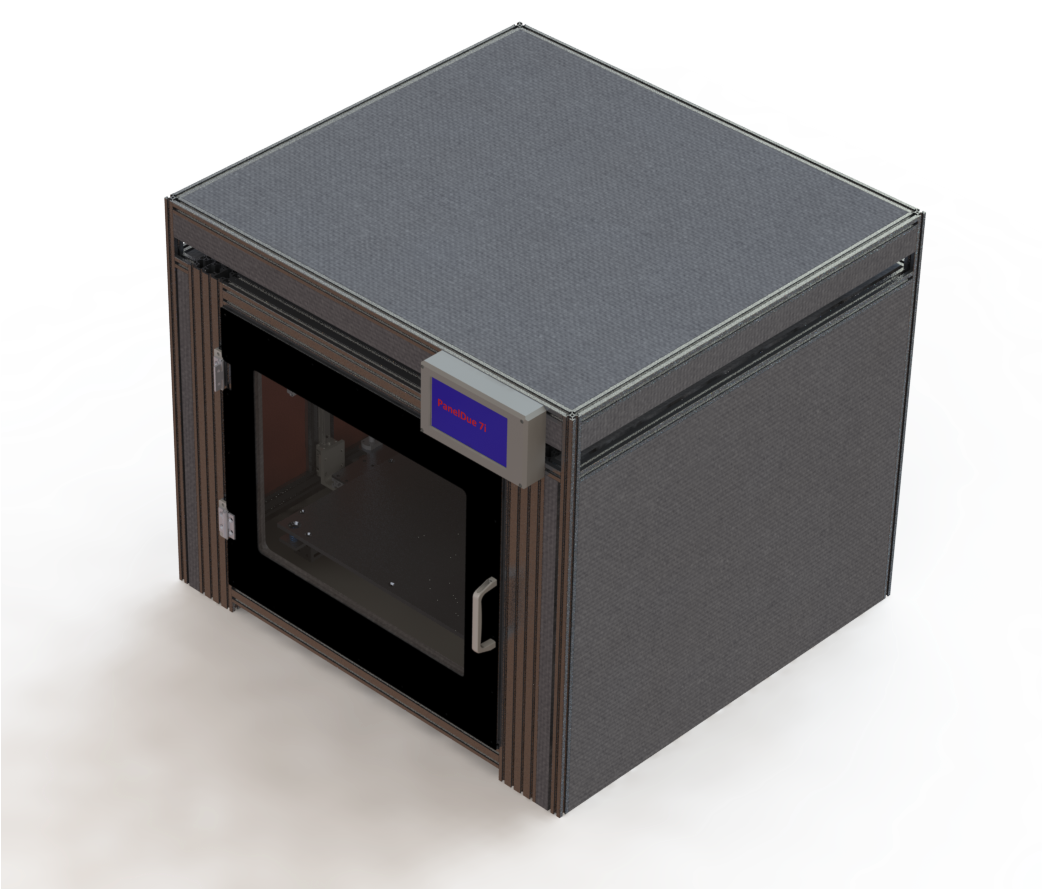
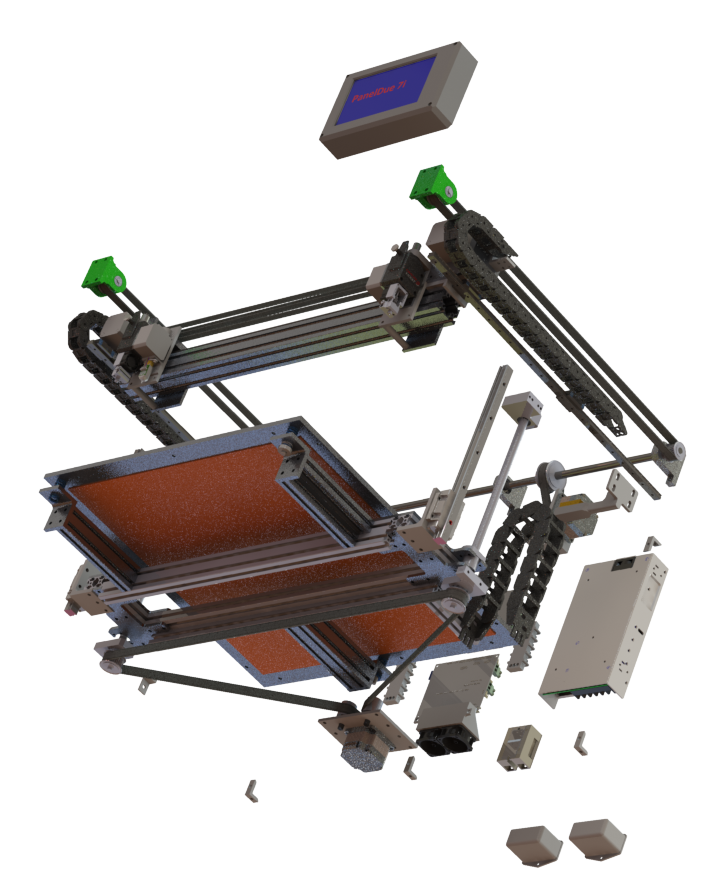
      render1.png
      render4.png
      IMG_7493.JPG

      posted in My Duet controlled machine idex bondtech nema23 enclosure
      sebkritikelundefined
      sebkritikel
    • RE: IDEX anyone?

      @BlueDust said in IDEX anyone?:

      I am thinking about building an IDEX printer as a 2nd printer. Few questions...
      Could I use a filament sensor on each extruder?
      Using a Duet2, would I also need a Duex5 to run an IDEX?
      Is best practice installing a bed level sensor on both hotends?

      Are there any considerations or limitations I should be aware of in regards to building an IDEX printer and it's use?

      Thanks!

      I'm running an IDEX, and I do enjoy the flexibility of it. Some advantages when compared to single extrusion - multi material, mirror/ditto print, and different diameter nozzles in the same print (walls vs infill, etc).

      You will need an expansion board when using a Duet2, I'm using a Duex5, but I think you can get away with a Duex2.
      I only have a bed leveling sensor on one hotend, I calibrate the second within the config.g to line up with the first hotend.

      Like any multi extrusion setup, it gets expensive. The mechanics and design considerations of the gantry holding the two hotends gets a little more complex, and you have additional hardware to sling around. Whenever you change your nozzle setup, you will need to re calibrate both hotends, as there are minute differences in nozzles.

      posted in General Discussion
      sebkritikelundefined
      sebkritikel
    • RE: Many issues after upgrading to 3.0 RC-12

      @TheBasedDoge said in Many issues after upgrading to 3.0 RC-12:

      Ok, here it is. thank you!

      ; Configuration file for Duet WiFi (firmware version 3)
      ; executed by the firmware on start-up
      ;
      ; generated by RepRapFirmware Configuration Tool v2.1.8 on Sun May 10 2020 13:55:08 GMT-0400 (Eastern Daylight Time)
      ; Axis Limits
      M208 X0 Y0 Z0 S1                                       ; set axis minima
      M208 X300 Y0 Z0 S0                                     ; set axis maxima
      

      M208 X300 Y0 Z0 S0 ; set axis maxima

      That looks like a mistake - Y300 right??

      posted in Firmware installation
      sebkritikelundefined
      sebkritikel
    • RE: Duet3D announces new tool board at FormNext

      @Surgikill Most stepper motors used by 3D printing enthusiasts are built using 'Class B' insulation for the motor windings. For 'Class B', the max allowable winding insulation temperature is 130°C, which often yields a max motor ambient temperature of 40-50°C (not stepper casement temperature).

      http://www.drivesandautomation.co.uk/useful-information/nema-insulation-classes/

      Example motor with specs on insulation, thermal rise, etc
      https://catalog.orientalmotor.com/item/2-phase-bipolar-stepper-motors/42mm-pkp-series-2-phase-bipolar-stepper-motors/pkp244d08a2

      Most of us skirt by this 'max temperature' limitation by running steppers at 85% or so of the rated current, that gives some margin for an elevated ambient temperature. Running with an ambient temperature higher than the spec'd motor ambient could result in reduce service life for the motor. Ends up most of us ignore what 'Class B' insulation means, or simply don't know (I have been ignoring it, been running ambients in the 60-70°C on my motors 🤠 )

      Without looking at a datasheet... the roto motor likely has 'Class B' insulation.

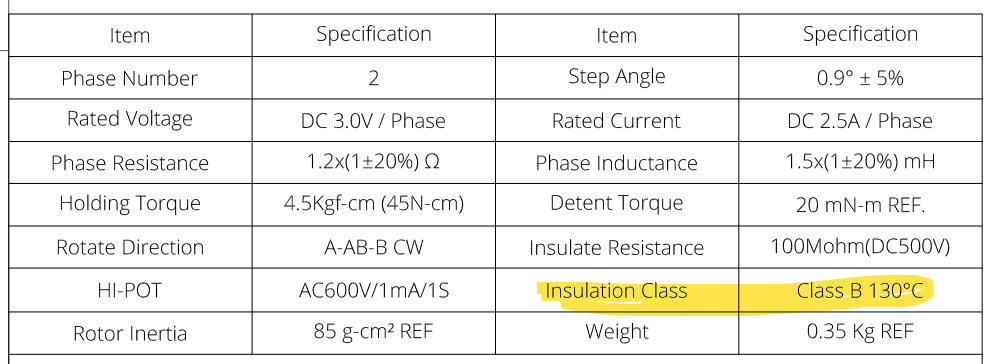
      Speaking of datasheets, a lot of steppers used in printers seen here don't go into the detail manufacturer's like Oriental Motor use on their datasheets (example snippet from a popular stepper seen here):
      197c7ff6-e980-4b5b-af54-73e013fb573a-image.png

      If you read the specs above, and don't further research what 'Class B' means, you might assume the motor running at 130°C is fine... and by running at 130°C, one might think thats the easily observable casement temperature (they do get hot!).

      With extruder motors, its often recommended to run them at a significantly reduced current (at least when they were using smaller NEMA17 motors) for two reasons:

      1. The torque at full current was much greater than what was needed for extrusion force
      2. The casement thermal rise at full (or 85%) current could soften the filament, depending on how the filament drive was connected to the stepper)

      Its possible that, while the roto motor uses 'Class B' insulation, it doesn't need to run at rated current, meaning theres higher margin for ambient temperature (maybe, a good amount of conjecture on my part of the requirements of the roto motor 🙂 )

      As far as that LDO pancake stepper, LDO has been making a series of high temperature motors for the enthusiast community using higher rated winding insulation.

      posted in General Discussion
      sebkritikelundefined
      sebkritikel
    • RE: Pressure advance limits?

      @gnydick said in Pressure advance limits?:

      @engikeneer thanks. Yes, I'm aware of the distinction. From my pictures, you can see the ghosting only happens after sharp feature changes. That's why I believe it's PA.

      I may be missing something, but I don't believe its PA, and I do believe it is DAA, M593. Have you configured M593?

      I think you're conflating a PA "fix" at 2000 mm/s^2 when really the system doesn't create ringing at 2000mm/s^2.

      I would recommend running your same test, but with an appropriate value of M593 configured. Verify the speed at which your outer perimeters are set to (stock print speed doesn't always equal the perimeter speed... make sure you double check), and divide that by the "peaks" of the ghosting ripples.

      posted in Tuning and tweaking
      sebkritikelundefined
      sebkritikel
    • RE: Danal's passing

      I am saddened by the news. While I had limited direct interaction with Danal, his posts were always insightful and his projects an inspiration. He will certainly be missed in all the communities he participated in.

      posted in Off Topic
      sebkritikelundefined
      sebkritikel
    • RE: Delta stepper upgrade - advice welcome

      @Nxt-1 said in Delta stepper upgrade - advice welcome:

      @sebkritikel Thank you for the suggestions. Do you have any experience with either of the motors you suggested?

      I have also found these from the same supplier:

      PKP266MD28BA

      • Rated current: 2.80 A
      • Holding torque: 1.32 Nm
      • Inductance: 3.90 mH
      • Rotor inertia: 290.0 gcm²
        (6.35 mm shaft)

      PKP266MD28B2

      • Rated current: 2.80 A
      • Holding torque: 1.40 Nm
      • Inductance: 3.00 mH
      • Rotor inertia: 310.5 gcm²
        (8 mm shaft)

      These see to be the longer versions of the ones you linked (54 mm vs 39 mm)

      I don't have any experience with those models, however I do use two PKP264D28AA2 NEMA23s (2.8A/phase, 1.8°, 39mm, 74Ncm, 1.5mH inductance) on my printer, and they are fantastic.

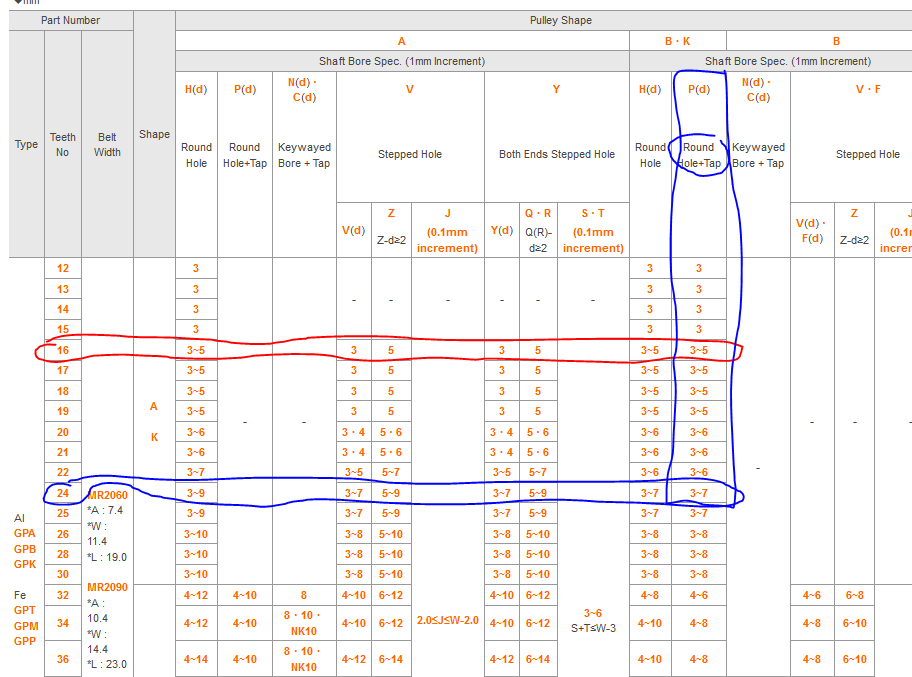
      I see you're trying to hit 200steps/mm with a 2mm pitch belt @ 16teeth on a pulley... I don't know how realistic it will be to find a pulley with 16 2mm teeth, and 6.35mm or greater shaft bore

      Excerpt from Misumi's 2mm PowerGrip® GT®3 catalog listing

      34e6bb57-fcf4-4aa5-9b5f-6e54ba6c6e75-image.png

      posted in General Discussion
      sebkritikelundefined
      sebkritikel
    • RE: Tips to mitigate vertical artifacting Duet 2 Wifi

      @bot said in Tips to mitigate vertical artifacting Duet 2 Wifi:

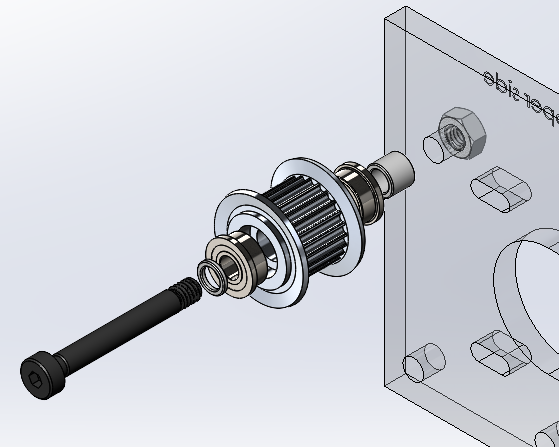
      Well, I wasn't able to find any ready-to-go off-the-shelf idlers from Misumi (that are more than 5 or 6 mm), but I've always wanted to try using one of their customizable pulleys for idlers: See info here.

      You can choose a wide range of sizes of pulley there, and you can get stepped holes made which should allow for easy placement of bearings. They have a variety of options and you can have the stepped hole sized how you wish. See:

      snip

      [Edit: this photo is slightly misleading, there are more options to configure to get a full part number. Still playing around with it 😛 ]

      I've done that on my machine, and it works quite well (albeit the assembly stackup can get pricy quick!). Must carefully select parts based on all the appropriate parameters.
      287ae057-3ed8-45f7-94a9-b8da2c7162ef-image.png

      Something to look out for is there is an issue on Misumi's site it seems, where you cannot select all the options on the left side (for example, with the Gates MR2 page, the "T" parameter does not show up. As an example, filling out all the available options can give you "GPA30MR2090-A-Y4-Q6-R6-S3", so copying and pasting that P/N with the addition of "-T3" into the search pulls up a real part.

      For this case, do we want GT2/GT3 (Gates MR) or the 2GT series?
      Looking at 2GT
      Looks like something like 26teeth would match the 16mm OD (16.04mm OD, 16.55 PD). However the max 'shaft' hole for this size is 6mm, and the max counterbore is 8mm. However, it looks like the site gets stuck at GPA26GT2060-A-Y6, and we cannot configure past that.

      posted in Tuning and tweaking
      sebkritikelundefined
      sebkritikel
    • RE: Power Supply Sizing

      @Phaedrux said in Power Supply Sizing:

      Can you share the listing? Do they have a model number?

      Consider shopping here instead so you can be sure of what you're getting.

      https://www.omc-stepperonline.com/

      I might be blind, but they don't publish rated voltage? Seems odd but I may have missed it. Plenty of other specs though.

      (2.8A)^2 * 1Ohm *1.5(scaling)= 11.8W
      Looking at some roughly equivalent Oriental Motor specs, I'd guess they're rated for about 3V or so
      2.8A * 3V = 8.4W

      The Nema23s I'm using are rated at 1.6V and .57ohm, at 2.8A/phase.
      (2.8A)^2 * .57Ohm *1.5(scaling) = 6.7W
      2.8A * 1.6V = 4.48W

      I'd say the two methods (Voltage vs. Resistance) get pretty close (remove the scaling factor and they are actually nearly the same). Going bigger never hurt anything but your wallet! 🙂

      Don't forget to add in fans, heaters etc.

      posted in Duet Hardware and wiring
      sebkritikelundefined
      sebkritikel
    • RE: Creating height maps only where the part is being built

      @Jered said in Creating height maps only where the part is being built:

      Interesting post, but not automated enough to matter for me. I think I will look into the scanning probes as they don't require a lot of time to use. My printer is a 500mm ratrig, so it is large and requires about 25min to probe

      @Jered said in Creating height maps only where the part is being built:

      . I was kind of hoping that, as a temporary fix, I could automatically have the area where the part is printed to be probed, but it looks like I would have to program this for every part made.

      Not sure I follow, as the link @Phaedrux posted shares several (IIRC) entirely automated solutions. Typically you add a line or two to your slicer (PrusaSlicer, Cura, etc) start code, which will automatically pass the X/Y Min/Max values to either M557. Following that the start gcode would then call for that area to be probed and used as the height map. Linked thread goes into some elegant start scripts that use mesh.g, but some simpler methods below.

      Not sure what it looks like for PrusaSlicer, but I think something like this in your start code would work:

      M557 X{first_layer_print_min[0]}:{first_layer_print_max[0]} Y{first_layer_print_min[1]}:{first_layer_print_max[1]} 
      G29 S0
      

      In Cura, I have added a MeshPrintSize post-processing plugin (to handle the replacement of the min/max placeholders), and then have added the following to my start gcode:

      M557 X%MINX%:%MAXX% Y%MINY%:%MAXY% P3:3
      G29 S0
      

      I'd recommend taking a closer look at the linked thread, you should find a nice automatic implementation that will work for you.

      posted in Tuning and tweaking
      sebkritikelundefined
      sebkritikel

    Latest posts made by sebkritikel

    • ATSAME51J19A (Adafruit M4 CAN ) Bootloader and Firmware

      First time digging into a project like this, so bear with me.

      Preconditions - have cloned all the necessary repositories per the RRF, Duet3Expansion, Duet3Bootloader instructions. Working off 3.6-dev instructions. I'm successfully able to build RRF, Duet3Expansion, and Duet3Bootloader builds for existing products.

      Link to board: https://learn.adafruit.com/adafruit-feather-m4-can-express/pinouts
      Schematic of board (sans additional crystal): https://cdn-learn.adafruit.com/assets/assets/000/097/531/original/adafruit_products_FeatherCAN_sch.png?1607462483

      Current limitations (that I aim to resolve shortly):

      • Hardware - the Feather M4 Express does not have a crystal on XOSC0 or XOSC1. I aim to add a 25MHz crystal to XOSC1 (PB22 and PB23)
      • Programming/debugging - previous efforts have been without an Ateml-ICE (or similar).

      For bootloader changes, this is what I have done/believe I need to do:

      1. Add same51j19a_flash.ld to src\Hardware\SAME51\
      2. Edit src\Config\SAME51config.h to add board specific LED pins, as well as CanStandbyPin_* and CanBoostEnablePin_*
      3. Add to src\BoardType.cpp an #elif block for the new device
      4. Add an if block to src\Bootloader.cpp to start the can transceiver
      5. Define the SAME51J19A in src\RepRapFirmware.h
      6. In Eclipse, create a new build configuration, edit the Cross GCC Compiler, Cross G++ Compiler, Cross G++ Linker options for the new board type, using the new ame51j19a_flash.ld file, and __ SAME51J19A __ option

      For what its worth, I'm able to build the new bootloader file without errors (not that it means much without being able to test it! 🤠 )

      In CANlib, I added a new default address (104) for the board in src\CanId.h

      In CoreN2G:

      1. Edit an #elif to add || defined(__ SAME51J19A __) in src\Core.h
      2. Do the same in src\SAME5x_C21\SAME5x\hal\utils\include\parts.h
      3. Add hri_port_e51.h to src\SAME5x_C21\SAME5x\hri\

      For the actual firmware (Duet3Firmware), I'm also able to successfully build without errors (believe me, there were plenty of errors before). The Feather M4 comes with a uf2 flashing mechanism, so I tried some builds with that in mind, but no LED activity (or any sort of CAN comms). Realized that missing a crystal on XOSC* was probably pretty important, but I tried forcing the use of the 32.768khz crystal (out of curiosity), no luck there (I believe I sufficiently butchered the code enough to test out a build of the stock 1HCL with only the 32.768khz crystal, and it may have worked?). I can verify that the board is fine, uploaded some Arduino sketches, with them working as expected.

      1. In src\Config\BoardDef.h, add the new board
      2. Create a FeatherM4CAN.h config in src\Config\
      3. Add a same51j19a_flash.ld file in src\Hardware\SAME5x_C21\SAME5x\ (memory needs to be double checked once I receive the ATMEL-ICE
      4. In src\Platform\Platform.cpp edit some elif blocks to add the FeatherM4CAN, and add a block to enable the CAN transceiver
      5. Adjust src\Hardware\SAME5x_C21\SAME5x\Main.cpp to set the frequency to 25MHz, and XOSC1 for the FeatherM4CAN

      In FreeROTS, update src\include\FreeRTOSConfig.h to include the SAME51J19A

      Does the above all sound reasonable? Anything obvious that I'm missing? Hopefully the arrival of the Ateml-ICE will yield more fruitful results. I recognize that there might be a lot of redundant work, considering the similarities between the already implemented SAME51 flavors.

      Details can be found in my repositories: https://github.com/jcwebber93?tab=repositories

      posted in Firmware developers
      sebkritikelundefined
      sebkritikel
    • RE: Getting Started - Suggested Products

      @XYZMechanical said in Getting Started - Suggested Products:

      I am looking for a controller for my cross-core 3d printer application to be connective via an ethernet or wireless (wifi) connection; with expansion to control/slave future multi material units, and nozzle changers. (I am designing these to be utilized on a machine network such as Ether/IP, CAN or modbus: Please advise products with this in mind.)

      I have a personal deadline to make a decision on a source this month and looking for a list of parts to control a minimum of: (The system will implement servos for the motion-axis, and may be Teknik ClearPath PN: CPM-SDSK-2310S-RLN)

      • Emergency Stop Onput
      • 8 motors minimum as step & direction, (x, y, z, Ext motors) (homing switches for x,y&x)
      • Servo Extruder (please advise on your motion control products)
      • Extruder-nozzle-melt-zone heater & temperature sensor
      • Extruder-cool-zone cooler/fan & temperature sensor
      • Bed heater & temperature sensor
      • Filament-present sensor, 2x (Feed-inlet, Extruder-Inlet)
      • Bed level touch-probe
      • Nozzle Strain-gage, (flow monitoring)
      • Part Cooling Fan, 2x
      • 4-inch-minimum, Touch Screen HMI (please advise on a product from your store that meets these minimum needs)

      1. What draws you to the Teknik ClearPath solution? Motor selection is complicated, but you'll know best. In my opinion, a solution that allows for native closed loop control would be the stepper motors of your choice, with suitable encoders, and the Duet3 1HCL expansion boards. This allows for native closed loop tuning and control, without having to output step/dir/enable to a seperate control system. The 1HCL, like many of the Duet3 line of products, connects to a Duet3 mainboard via CAN-FD. https://docs.duet3d.com/Duet3D_hardware/Duet_3_family/Duet_3_Expansion_1HCL
      2. DuetWebControl (web browser) has an emergency stop button. You can read more about DWC here: https://docs.duet3d.com/User_manual/Reference/Duet_Web_Control_Manual
      3. You can control a closed loop stepper motor for an extruder using the 1HCL expansion board. Duet does not have a product to natively drive DC or BLDC motors, but if you had a seperate controller that accepts step/dir, you could then use the Duet3 1XD.https://docs.duet3d.com/Duet3D_hardware/Duet_3_family/Duet_3_Expansion_1XD
      4. You can use nearly any sensor of your choosing, so long as you read the sensor interface and the corresponding Duet documentation. Your extruder temperature needs will depend on what you aim to print, and what sort of hotend you select. https://docs.duet3d.com/User_manual/Connecting_hardware/Temperature_choosing
      5. You can control a bed heater (and/or chamber heater(s)), be it AC (through a separate SSR) or DC, with a Duet board easily. https://docs.duet3d.com/User_manual/Connecting_hardware/Heaters_overview
      6. Duet boards have a variety of fan headers, and can drive a variety of fans.
      7. Duet offers a touchscreen (Duet PanelDue), but IMO is a touch dated. I believe a refreshed product is on the horizon.

      The Duet 3 6HC is a great mainboard, with plenty of I/O. https://docs.duet3d.com/Duet3D_hardware/Duet_3_family/Duet_3_Mainboard_6HC_Hardware_Overview

      posted in General Discussion
      sebkritikelundefined
      sebkritikel
    • RE: Integrating AI with 3D printer

      @infiniteloop said in Integrating AI with 3D printer:

      Edit: Next time, you better remove the stage directions given by your bs-generator (did I say "AI"?):

      I have been following developments in areas such as [Mention something specific you found in your research about their work or the general field, e.g., AI-powered design tools, smart manufacturing processes].

      😂

      posted in 3D Printing General Chat
      sebkritikelundefined
      sebkritikel
    • RE: Homing and Axis issues

      @daniel-armstrong When I imagine bottom left, if I'm standing in front of the machine, I'm thinking of the X limit switch on my left, and the Y limit switch closest to me. If this is correct, then both X and Y are homing to the low side.

      @daniel-armstrong said in Homing and Axis issues:

      M574 X0 P"xstop" ; Set active high X endstop
      M574 Y0 P"ystop" ; Set active high Y endstop
      M574 Z1 P"zstop" ; Set active high Z endstop

      Why X0 and Y0 above? If you intend to have them on the low side of each axis, it should be X1 and Y1.
      https://docs.duet3d.com/User_manual/Reference/Gcodes/M574 . I would also recomend setting the S flag as well (unsure if there is a default). Sounds like they should be:

      M574 X1 P"xstop" S1  ; X axis homes low side, active high
      M574 Y1 P"ystop" S1  ; Y axis homes low side, active high
      M574 Z1 P"zstop" S1  ; Z axis homes low side, active high
      

      Unsure on Z, reused what you had.

      What I'm imaging based on "bottom left", is this isn't correct, let me know!
      7e3b41ed-c98f-4b65-ac6c-05fe5ff95aae-image.png

      If my thoughts above are correct, then in homeall.g you appear to be moving X and Y in the wrong direction. Again, check my notes above for Z. Some questions:

      1. I see move.axes[0].max2, move.axes[1].max2, move.axes[2].max2 ... is the max2 right? Later you use move.axes[0].max, but I'm not familiar with a max2 in the object model (I'm also not particularly well versed in CNC mode)
      2. You're using H1 mode for your homing moves, which is good. I think then that the G92 command is redundant, as H1 is setting position to the limit defined in M208.
      posted in CNC
      sebkritikelundefined
      sebkritikel
    • RE: Bed Heater Unexpected Behaviour

      @RockB What type of bed heater are you using? What wattage? Is it a DC heater directly powered by the Duet Wifi?

      Does the temperature eventually drop back to ambient, or does the Duet eventually throw a heater fault, indicating it believes something is wrong?

      posted in Duet Hardware and wiring
      sebkritikelundefined
      sebkritikel
    • RE: 6HC 12V fans on OUT_X partially engage ground switched fans

      @droftarts and @dc42 , thanks for explaining that!

      Looks like in the "connecting fan documentation" there is a similar note (as what was explained to me above) for the Duet 2.. Perhaps indicating that is also applicable to (at least) the 6HC and 6XD would be sufficient.

      posted in Beta Firmware
      sebkritikelundefined
      sebkritikel
    • 6HC 12V fans on OUT_X partially engage ground switched fans

      Was helping another Duet user with some issues they were having, and confirmed the behavior. I was running 3.6.0-rc.1+1 , other user was on some flavor of 3.6.0 Beta. In my case, given the following:

      • 1.02 6HC powered by 48V
      • OUT 7-9 voltage jumper set to 12V
      • 12V fans connected to out 7-9
      • OUT 4-6 voltage jumper set to 12V
      • 24V fan ground connected to OUT_4 out4
      • 24V fan +24V to 24V power supply
      • 48V power supply, 24V power supply grounds tied together

      In this case, commanding the 12V fans to spin will cause the 24V fan to spin some.

      • Set all three 12V fans at 0%, 24V sees ~.25V, does not spin
      • 12V #1 at 100%, 24V fan sees ~8V and spins
      • Add second 12V fan at 100%, 24V fan sees ~10.5V and spins faster
      • Add third 12V fan at 100%, 24V fan sees ~11V and spins faster.
      • Set all three 12V fans at 0%, 24V sees ~.25V and stops spinning

      Changing the OUT 4-6 jumper to VIN:

      • Set all three 12V fans at 0%, 24V sees 0V, does not spin
      • 12V #1 at 100%, 24V sees 0V, does not spin
      • Add second 12V fan at 100%, 24V sees 0V, does not spin
      • Add third 12V fan at 100%, 24V sees 0V, does not spin
      • Set all three 12V fans at 0%, 24V sees 0V, does not spin

      If this is a hardware limitation, I recommend documenting this, as the general understanding when it comes to Duet products is that you can used mixed-voltage components, switching them on the ground side. In the testing above, the solution is to use a dedicated OUT bank, setting it to VIN, however that may not be an option for some users.

      posted in Beta Firmware
      sebkritikelundefined
      sebkritikel
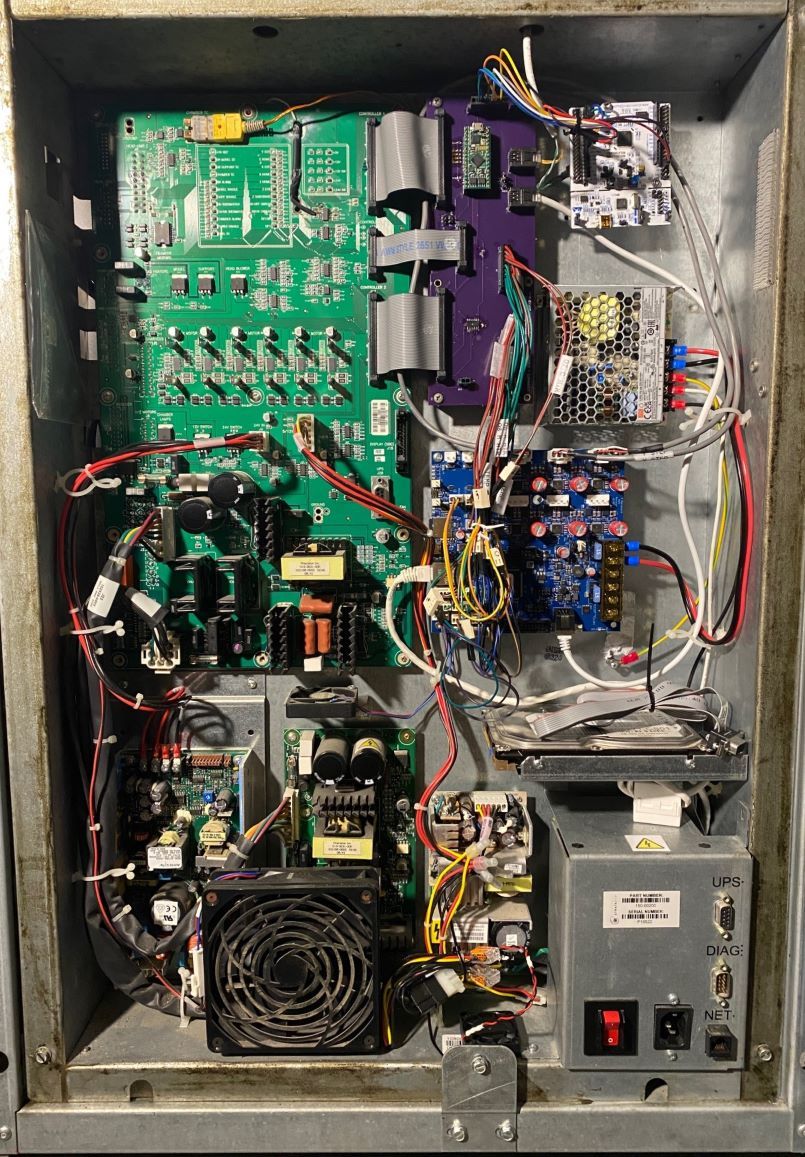
    • RE: 'DuePrint' with a Duet 3 6HC - Stratasys Dimension Conversion

      Time for an update! Files published here: https://github.com/jcwebber93/DuePrint3/
      Includes

      • Interface Board KiCad Project
      • Detailed BOM
      • Wire List (from-to)
      • RRF configuration files

      Major changes:

      • Received, built, and tested the v1.1.0 interface board. I recognize its not that complicated of a design... but it works! Chief issue - functions that are driven by the OUT_X headers are powered on once power is applied to the system. This is bad in that, once power is applied, but before the 6HC fully initializes, the chamber and extruder heaters blip on. If the system is powered on, with the Duet not yet loaded with an updated config.g, the heaters will turn on. I need to address this, pretty major oversight.
      • Added a small 48V power supply to power the 6HC (and by extension the stepper motors). Gives a bit of extra speed.
      • Swapped out the Geckodrive G320x for a STM32 Nucleo-64 running SimpleDCMotor (derived from SimpleFOC). Several weeks back, I lost extrusion control. Extruder motor control is PWM signals (Stratasys control board, G320x, Nucleo-64, etc) -> series resistor -> 74AC14 hex inverter w/Schmitt Trigger -> L298 -> DC motor. I found I had burnt up a series resistor, as well as the 74AC14! On the Dimension 1200 PDB, the series resistors are 121ohm, while on the uPrint PDBs, they are 1k ohm. Based on some additional bench testing, I believe the G320x in this application outputs a peak voltage (and/or current?) that is much too high for the 74AC14s used on this PDB, as isn't intended to be used as logic control. I repaired the board (one damaged pad later...), but still needed a method of consuming STEP/DIR and outputting a signal to drive the extruder motor. Came across the SimpleDCMotor extension of SimpleFOC, which was quite straightforward to implement.

      sIMG_3466.JPG

      DuePrint3 v1.0.0.JPG

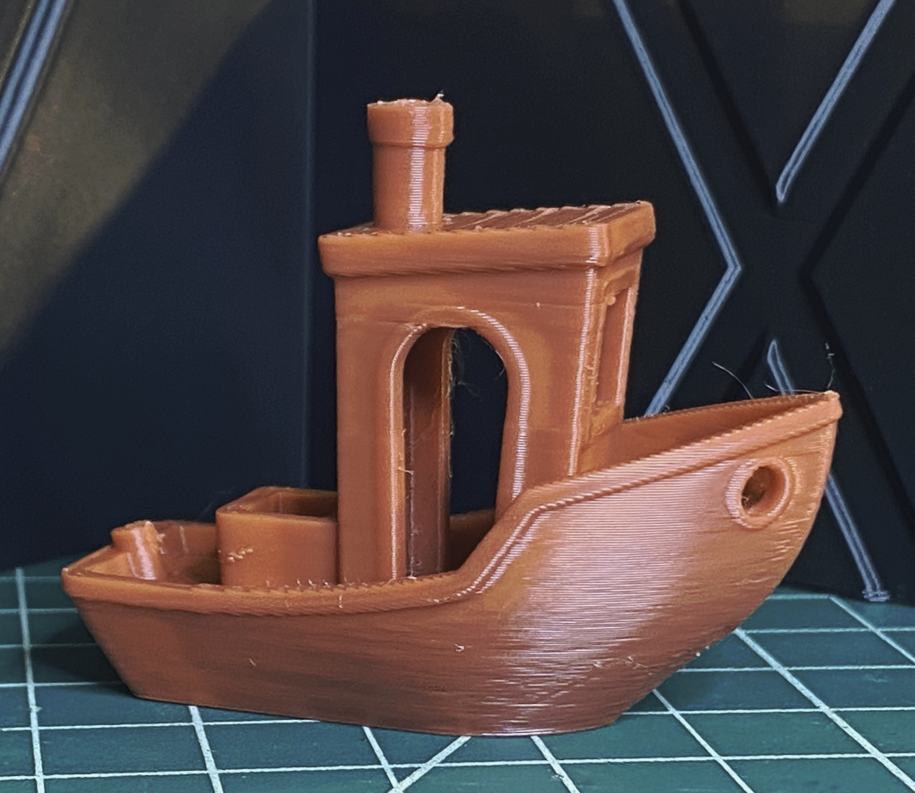
      Not too bad for an ABS Benchy printed at ~200mm/s at 305°c hotend, 75°C chamber! Plenty more tuning to do.
      50ddee67-4859-46d3-a738-9f0215c3293e-image.png

      posted in My Duet controlled machine
      sebkritikelundefined
      sebkritikel
    • RE: SZP Accelerometer Orientation - Incorrect Silkscreen?

      @droftarts Thanks! I apologize for the extraneous detail and having the nugget of the datasheet axis orientation at the bottom of the post - might have been good to lead with that instead.

      posted in General Discussion
      sebkritikelundefined
      sebkritikel
    • SZP Accelerometer Orientation - Incorrect Silkscreen?

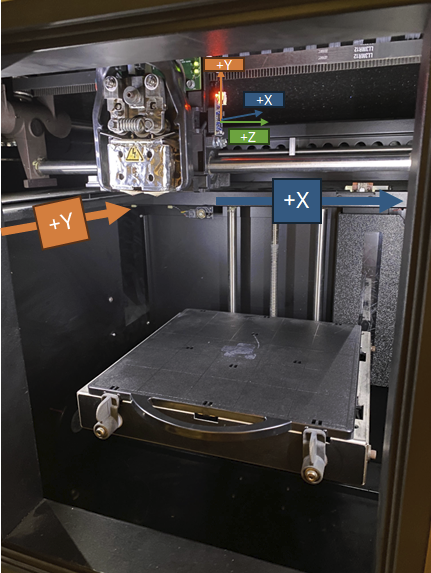
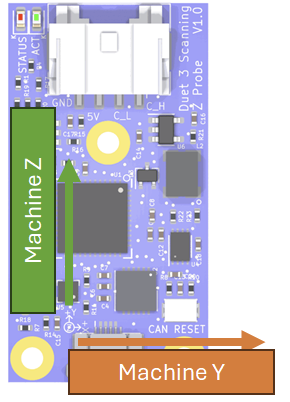
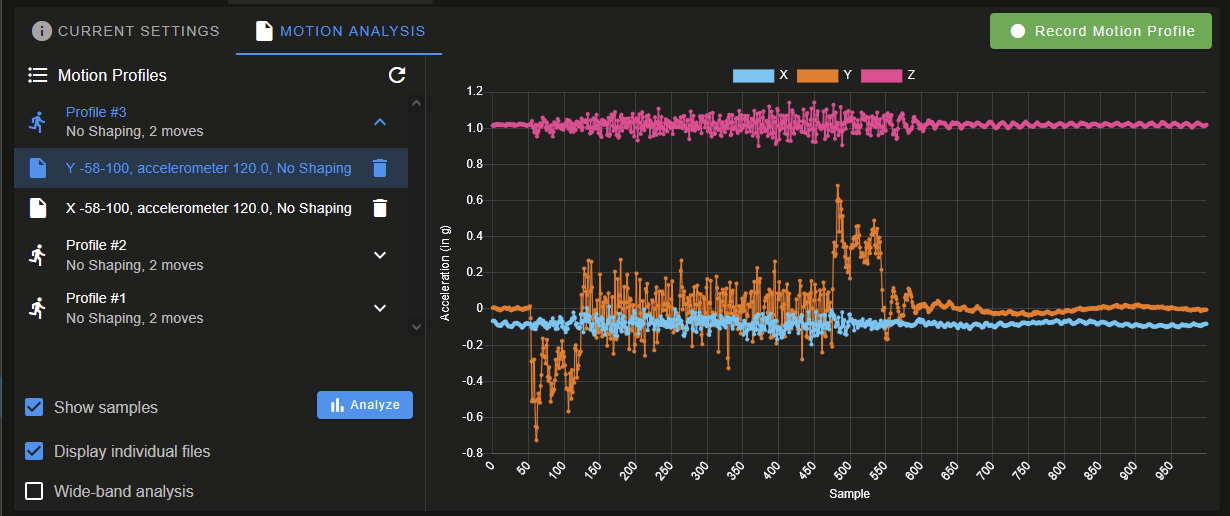
      All boards on 3.6.0-rc.1+3. Commissioning my Stratasys Dimension conversion, and using the SZP (v1.0 revision) was the easiest way to attach an accelerometer. I'm finding that the results displayed in the input shaping plugin do not match the expected results based on the silkscreen axis. Silkscreen axis appears to be rotated 90° clockwise about the Z-axis. Printer and SZP are oriented as such:
      d6d6ba43-bcc5-453b-801b-1253d1fde07a-image.png
      Machine X (viewing from the front) is negative to the left, positive to the right. Machine Y is negative towards the front (door), positive towards the back - pretty standard setup.

      SZP is installed with the 4-pin JST PA connector pointed UP - meaning, per the silkscreen:

      • Accelerometer Y -> machine Z
      • Accelerometer X -> machine Y
      • Accelerometer Z -> Machine X

      2638aa1f-304b-4ad1-b93d-e84892519988-image.png !

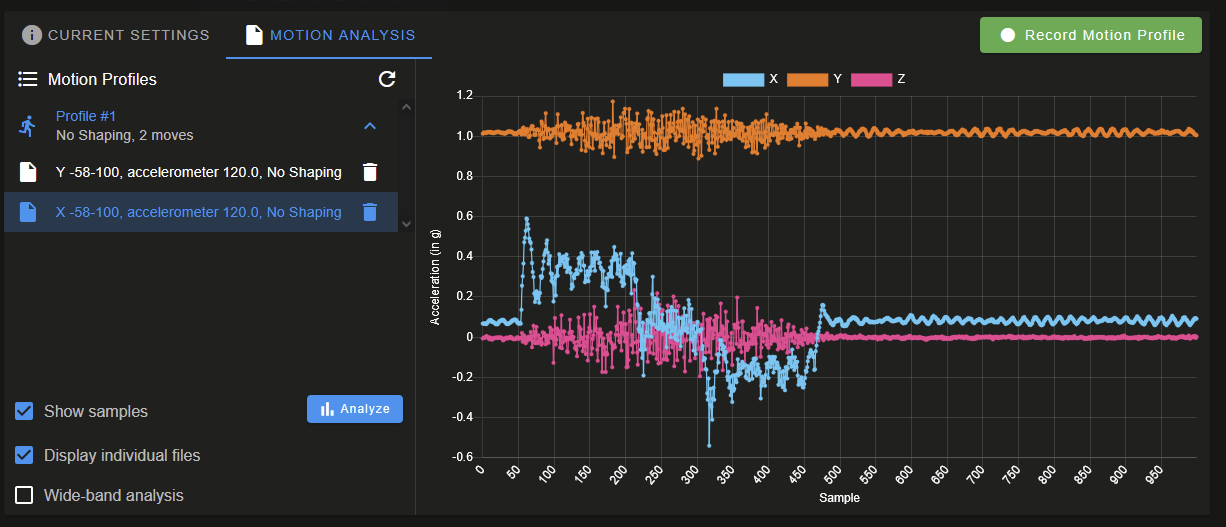
      Per M955, with accelerometer (top of board/chip) Z oriented towards machine +X, first digit of I is 0, and with board +X oriented towards machine +Y, the second digit should be 1. Towards the end of my config.g I have

      M955 P120.0 I01
      

      After a fresh power up, M955 P120.0 reports:

      Accelerometer 120:0 type LIS2DW with orientation 1 samples at 800Hz with 14-bit resolution
      

      Input shaping plugin results for I01
      e0b78081-7486-407d-a652-3f5d4d9b3831-image.png
      1461a865-91fc-45cb-b57e-c4f8aecd2098-image.png

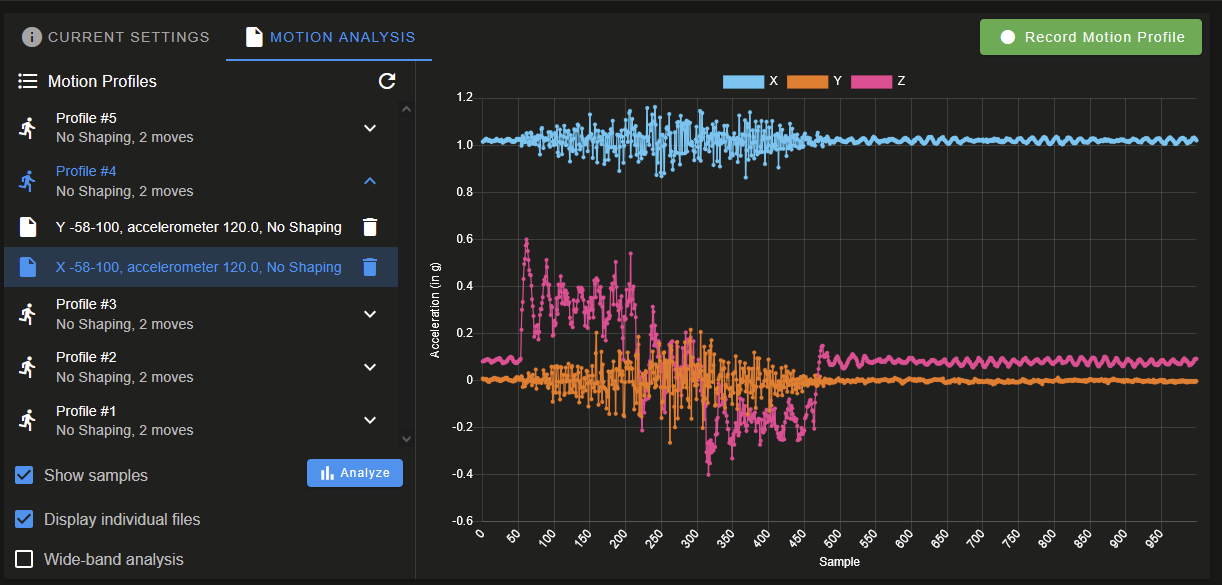
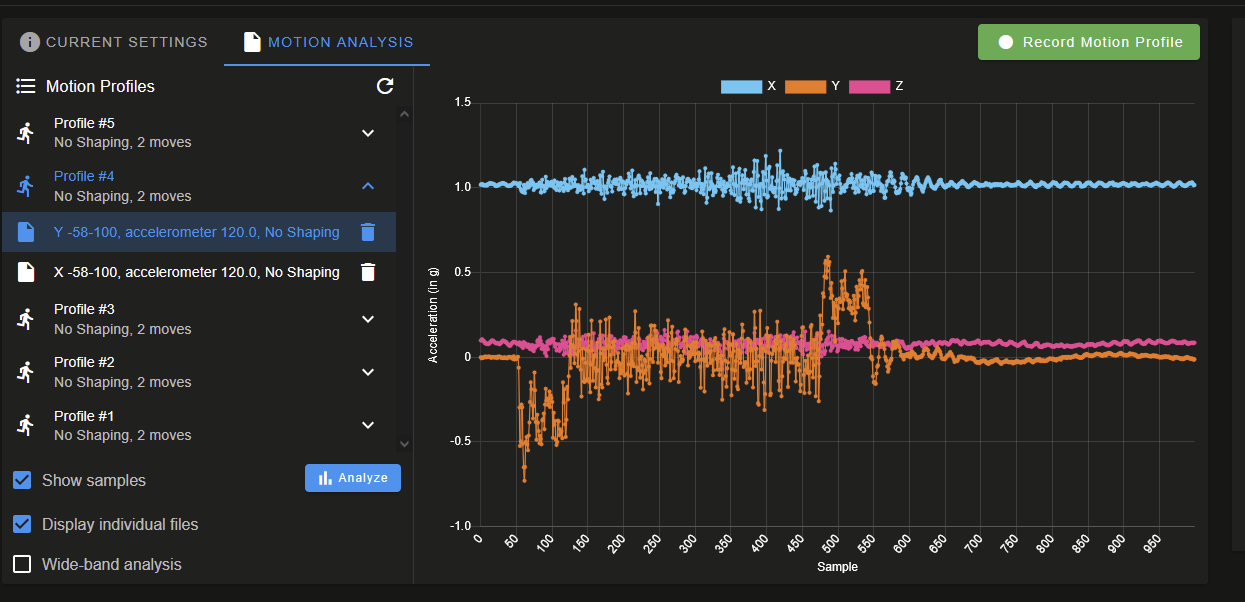
      The graph's X-axis does show accelerations during X moves, however right away we see that the graph's Y results are reporting gravity. During Y moves, accelerations are instead displayed on the graph Z-axis.

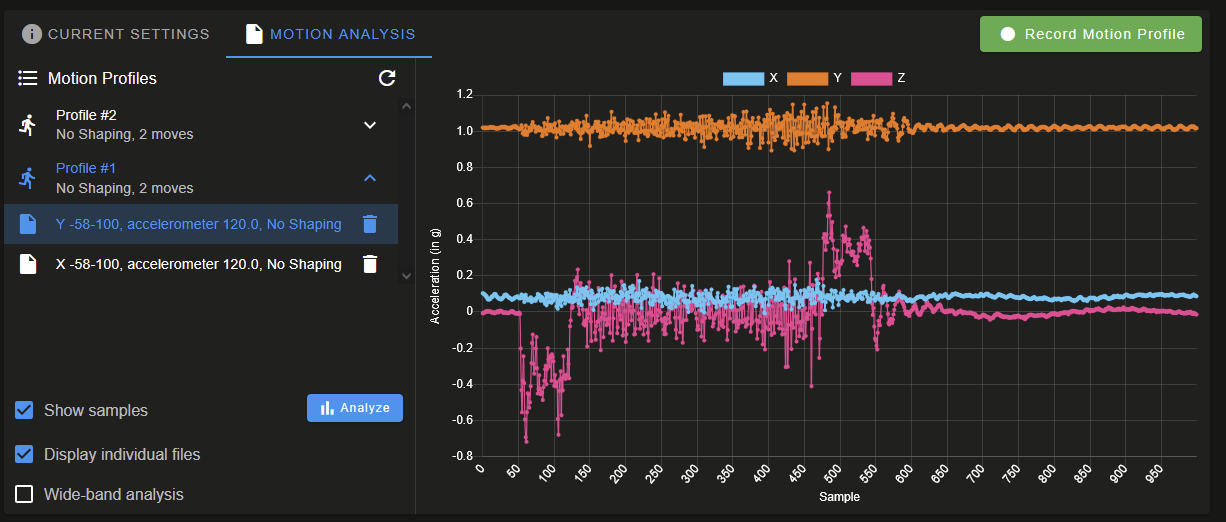
      Changing this to I42, gives the expect chart results, meaning:

      • Accelerometer Y -> machine Y
      • Accelerometer X -> machine Z
      • Accelerometer Z -> Machine -X

      52ab62a0-47bd-447f-b1d3-a71ea035935f-image.png
      4f589552-d2d7-4ab2-9579-0d78c1d3275a-image.png

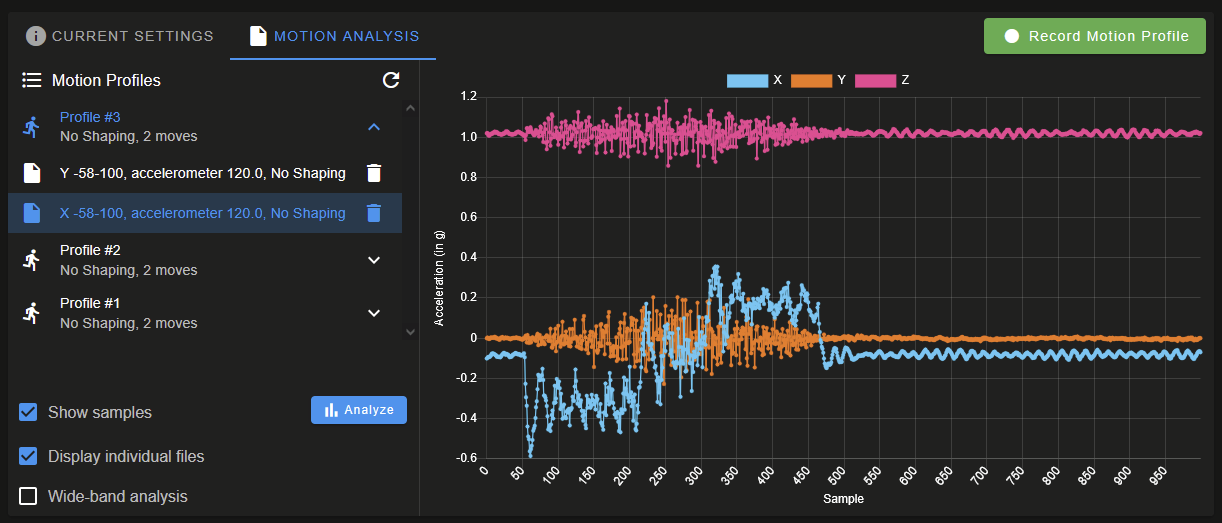
      Here is I20, leading me to believe the firmware needs to be corrected (or silkscreen 😵 ). I can try and find where the orientation is defined later.
      543ece26-1df7-4c72-ad63-e8d14cb673a7-image.png
      6416b9b3-ed6e-4d55-b727-f2c81bd9af9c-image.png

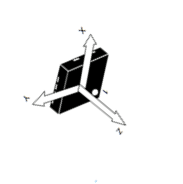
      The graphs for I20 match the orientation shown in the LIS2DW12 datasheet vs. the silkscreen:
      43f6f0ed-16e2-4f4f-9081-767d0544c81d-image.png

      posted in General Discussion
      sebkritikelundefined
      sebkritikel