Problems with IDEX printer configuring
-
My machine is markforged kinematics style IDEX printer.
; Configuration file for Duet 3 (firmware version 3)
; executed by the firmware on start-up
;
; generated by RepRapFirmware Configuration Tool v3.2.0 on Tue Dec 29 2020 21:29:27 GMT+0200 (Itä-Euroopan normaaliaika)

; General preferences
G90                                                ; send absolute coordinates...
M83                                                ; ...but relative extruder moves
M550 P"My Printer"                                 ; set printer name
M669 K11 Y-1:-1:0:1


; Network
M552 P0.0.0.0 S1                                   ; enable network and acquire dynamic address via DHCP
M586 P0 S1                                         ; enable HTTP
M586 P1 S0                                         ; disable FTP
M586 P2 S0                                         ; disable Telnet

; Drives
M569 P0.0 S1                              		   ; physical drive 0.0 goes forwards X
M569 P0.1 S1                               		   ; physical drive 0.1 goes forwards U
M569 P0.2 S1                                       ; physical drive 0.2 goes forwards Y
M569 P0.3 S1                                       ; physical drive 0.3 goes forwards Z
M569 P0.4 S1                                       ; physical drive 0.4 goes forwards E0
M569 P0.5 S1                                       ; physical drive 0.5 goes forwards E1

M584 X0.1 U0.0 Y0.2 Z0.3 E0.4:0.5                          	; set drive mapping
M350 X16 U16 Y16 Z16 E16:16 I1                              ; configure microstepping without interpolation
M92 X80.00 U80.00 Y80.00 Z640.00 E2700:250          		; set steps per mm
M566 X600.00 U600.00 Y600.00 Z60.00 E40.00:300              ; set maximum instantaneous speed changes (mm/min)
M203 X12000.00 U12000.00 Y12000.00 Z180.00 E1800.00:1000          ; set maximum speeds (mm/min)
M201 X1000.00 U1000.00 Y1000.00 Z20.00 E120.00:600                ; set accelerations (mm/s^2)
M906 X1200 U1200 Y1000 Z1000 E980:980 I45                    	; set motor currents (mA) and motor idle factor in per cent
M84 S30                                            				; Set idle timeout

M569 P0.0 V25 H25 D3
M569 P0.1 V25 H25 D3
M569 P0.2 V25 H25 D3

M915 P0.0 S3 R0 H134 T25 F1
M915 P0.1 S3 R0 H134 T25 F1
M915 P0.2 S3 R0 H134 T25 F1

; Axis Limits
M208 X-38 U41 Y0 Z0 S1                                   ; set axis minima
M208 X475 U439.5 Y400 Z375 S0                             ; set axis maxima

; Endstops
M574 X1 S1 P"!^io1.in"                             ; configure active-high endstop for low end on X via pin !^io2.in
M574 U2 S1 P"!^io2.in"                             ; configure active-high endstop for high end on U via pin !^io1.in
M574 Y1 S1 P"io5.in"                             ; configure active-high endstop for low end on Y via pin !^io3.in
M574 Z1 S1 P"!^io4.in"                             ; configure active-high endstop for low end on Z via pin !^io4.in

; Z-Probe
M558 P0 H5 F120 T6000                              ; disable Z probe but set dive height, probe speed and travel speed
M557 X15:215 Y15:195 S20                           ; define mesh grid

; Heaters
M308 S0 P"temp0" Y"thermistor" T100000 B3974       ; configure sensor 0 as thermistor on pin temp0
M950 H0 C"out0" T0                                 ; create bed heater output on out0 and map it to sensor 0
M307 H0 B1 S1.00                                   ; enable bang-bang mode for the bed heater and set PWM limit
M140 H0                                            ; map heated bed to heater 0
M143 H0 S130                                       ; set temperature limit for heater 0 to 120C

M308 S1 P"temp1" Y"thermistor" T100000 B4725 C7.06e-8       ; configure sensor 1 as thermistor on pin temp2
M950 H1 C"out1" T1                                 ; create nozzle heater output on out1 and map it to sensor 1
M307 H1 B0 S1.00                                   ; disable bang-bang mode for heater  and set PWM limit
M143 H1 S280                                       ; set temperature limit for heater 1 to 280C

M308 S2 P"temp2" Y"thermistor" T100000 B4725 C7.06e-8       ; configure sensor 1 as thermistor on pin temp2
M950 H2 C"out2" T2                                 ; create nozzle heater output on out1 and map it to sensor 1
M307 H2 B0 S1.00                                   ; disable bang-bang mode for heater  and set PWM limit
M143 H2 S280                                       ; set temperature limit for heater 1 to 280C

M307 H0 A110 C180 D5 B1 						   ; Bed slow temperature rise

; Fans
M950 F0 C"out7" Q500                               ; create fan 0 on pin out7 and set its frequency
M106 P0 S0 H-1                                     ; set fan 0 value. Thermostatic control is turned off
M950 F1 C"out8" Q500                               ; create fan 1 on pin out8 and set its frequency
M106 P1 S0 H-1                                     ; set fan 1 value. Thermostatic control is turned off

; Tools ################################################
;M563 P2 D0:1 H1:2 X0:3 F1:1                                  ; define tool 0
;G10 P2 R0 S0 X50 U-50 Y0 Z0

; tool 0, X-axis
M563 P0 D0 H1 X0 F0                                 ; define tool 0
G10 P0 R0 S0 X0 Y0 Z0                                    ; set tool 0 axis offsets
; tool 1, U-axis
M563 P1 D1 H2 X3 F1
G10 P1 R0 S0 Y0 U0 Z0                                      ; set initial tool 1 active and standby temperatures to 0C

; Custom settings are not defined

; Miscellaneous
M575 P1 S1 B57600                                  ; enable support for PanelDue
M911 S10 R11 P"M913 X0 Y0 G91 M83 G1 Z3 E-5 F1000" ; set voltage thresholds and actions to run on power loss

T0													; select tool
Issues:
-During dual tool print when the other tool/extruder print starts the other tool/extruder does not move out of the way. I copied tpost and tfree files from dozuki IDEX guide.
- When pausing dual extruder/tool print, one tool is chosen and jogging X or U axis moves only this axis.
Also when this happens X and U coordinates are the same if I home those axes. Homing move of X and U axis is normal and does move as it is suppose to but does not set position correctly
-Tool 1 heater can't be set active (for example heater to 180C) if homing is not done prior to it.
Error message: "T1" "Error: G0/G1 insufficient axes homed".-When trying to heat up tools, The machine waits until the other tool has reached its temperature before the other tool can start to heat up. Shouldn't they be able to heat up concurrently?
-When switching heating off/on I get message:
"T-1 Warning: Obsolete use of S parameter on G1 command. Use H parameter instead." - When pausing dual extruder/tool print, one tool is chosen and jogging X or U axis moves only this axis.
-
Post your tool change files as well please.
What firmware version? 3.2?
-
@Phaedrux
Firmware version is 3.2-RC2.tfree0.g
M83 				; relative extruder movement
;G1 E-2 F3600 		; retract 2mm
M106 S0           	; turn off our print cooling fan
G91 				; relative axis movement
G1 Z3 F500 			; up 3mm
G90 				; absolute axis movement
G1 S2 X-48 F6000 	; park the X carriage at -37mm
tfree1.g
M83 						; relative extruder movement
;G1 E-2 F3600 				; retract 2mm
M106 S0           			; turn off our print cooling fan
G91 						; relative axis movement
G1 Z3 F500 					; up 3mm
G90 						; absolute axis movement
G1 S2 U440 F6000 			; park the U carriage at +440mm
tfree2.g
M83 							; relative extruder movement
;G1 E-2 F3600 					; retract 2mm
M106 S0           				; turn off our print cooling fan
G91 							; relative axis movement
G1 Z3 F500 						; up 3mm
G90 							; absolute axis movement
G28 X U 						; home the X and U carriages
tpost0.g
M106 R2           		; restore print cooling fan speed
M116 P0 				; wait for tool 0 heaters to reach operating temperature
M83 					; relative extruder movement
;G1 E2 F3600 			; extrude 2mm
tpost1.g
M106 R2           	; restore print cooling fan speed
M116 P1 			; wait for tool 1 heaters to reach operating temperature
M83 				; relative extruder movement
;G1 E2 F3600 		; extrude 2mm
tpost2.g
M106 R2 ; restore print cooling fan speed M116 P2 ; wait for tool 2 heaters to reach operating temperature M83 ; relative extruder movement M567 P2 E1:1 ; set tool mix ratio M568 P2 S1 ; turn on mixing G1 E2 F3600 ; extrude 2mm from both extruders -
3.2 final is available now. Please update by uploading the zip file to the system tab: https://github.com/Duet3D/RepRapFirmware/releases/download/3.2/Duet2and3Firmware-3.2.zip
Or if using the SBC and unstable branch use the instructions here: https://github.com/Duet3D/RepRapFirmware/releases/tag/3.2
@Visionary said in Problems with IDEX printer configuring:
-When switching heating off/on I get message:
"T-1 Warning: Obsolete use of S parameter on G1 command. Use H parameter instead."This is because your tool change files are using G1 S moves instead of G1 H.
@Visionary said in Problems with IDEX printer configuring:
G1 S2 X-48 F6000 ; park the X carriage at -37mm
@Visionary said in Problems with IDEX printer configuring:
Error message: "T1" "Error: G0/G1 insufficient axes homed".
This is likely because you have G28 X Y in your tol change files, but your homex and homey likely also have Z movements that occur when the Z axis isn't yet homed?
Post your homing files.
-
homeall.g
; Haq xy homing X,U,Y,Z-axes:
G91
G1 H2 Z7 F200 					; raise head 7mm to keep it clear of the bed
G1 H1 X-405 U405 Y-405 F3000 ;S1 ; coarse home X, Y and U
G1 H2 X5 Y5 U-5 F600              ; move 4mm away from the homing switches
G1 H1 X-10 U10 Y-10     ;S1      ; fine home X, Y and U
G1 H1 Z-380 F360                ; move Z down stopping at the endstop
G90

; Uncomment the following lines to lift Z after probing
;G91                    ; relative positioning
;G1 Z5 F100             ; lift Z relative to current position
;G90                    ; absolute positioning
homeu.g
G91 			  ; relative positioning

G1 H2 Z5 F2000    ; lift Z relative to current position
G1 H1 U475 F1800 ; move quickly to X axis endstop and stop there (first pass)
G1 U5 F6000       ; go back a few mm
G1 H1 U475 F600  ; move slowly to X axis endstop once more (second pass)
G1 H2 Z-0.5 F6000   ; lower Z again
G90               ; absolute positioning
homex.g
G91 			  ; relative positioning

G1 H2 Z5 F2000    ; lift Z relative to current position
G1 H1 X-475 F1800 ; move quickly to X axis endstop and stop there (first pass)
G1 X5 F2000       ; go back a few mm
G1 H1 X-475 F600  ; move slowly to X axis endstop once more (second pass)
G1 H2 Z-5 F6000   ; lower Z again
G90               ; absolute positioning
homey.g
G91

G1 H2 Z5 F6000    ; lift Z relative to current position
G1 H1 Y-405 F1800 ; move quickly to Y axis endstop and stop there (first pass)
G1 Y5 F6000       ; go back a few mm
G1 H1 Y-405 F600  ; move slowly to Y axis endstop once more (second pass)
G1 H2 Z-5 F6000   ; lower Z again
G90               ; absolute positioning
homez.g
G91               ; relative positioning
G1 H2 Z5 F6000    ; lift Z relative to current position
G1 H1 Z-380 F1800 ; move Z down until the endstop is triggered
G92 Z0            ; set Z position to axis minimum (you may want to adjust this)

; Uncomment the following lines to lift Z after probing
;G91              ; relative positioning
;G1 Z5 F100       ; lift Z relative to current position
;G90              ; absolute positioning
The homing files do have z-movement.
-
They do, but they correctly use H2 so that's not the source of the errors. So that narrows it down to the G1 S2 commands and probably the G1 Z commands.
-
I got rid of the errors (at least those that are given in normal use), but still got a few problems/unclear things to me:
-
Paneldue jogging doesn't work the same as DWC jogging: DWC works as intended but paneldue moves sometimes axes back to previous position (home) when trying to jog another axis. When trying to move those axes that went to previous position even by 1mm they move back to position where they were before going back.
-
When using tool 2 (U-axis extruder) to print DWC shows tool 2 coordinates as X-axis position instead of as U-axis position. Is this how it should work?
-
Standby temperatures set in Cura are not used during dual material/color printing. Instead standby temperatures are set to printing temperatures for both extruders for entire print job. I got around this by adding extruder start G-codes that set standby temperatures to extruders each time tool is changed. This though mean that standby temperatures are constant and are used with both extruders even when both extruders are not used.
-
-
What paneldue firmware version are you using?
For the cura standby temps, it might make more sense to set the standby temp with G10 and then use your tool change macros instead of relying on cura to set the temps.
-
@Phaedrux
I'm not sure which version paneldue firmware is, but I got it from Reprap configurator 1,5 - 3,5 months ago. Is there way to check it? -
Yes you can check the PanelDue firmware version in the setup page on the PanelDue.
And update it like this
https://duet3d.dozuki.com/Wiki/PanelDue_Firmware_update -
I got the printer working otherwise but:
-
X-axis positions relation between extruders seems to change randomly. This is seen as offset on dual color/material prints. Something seems to affect homing accuracy.
-
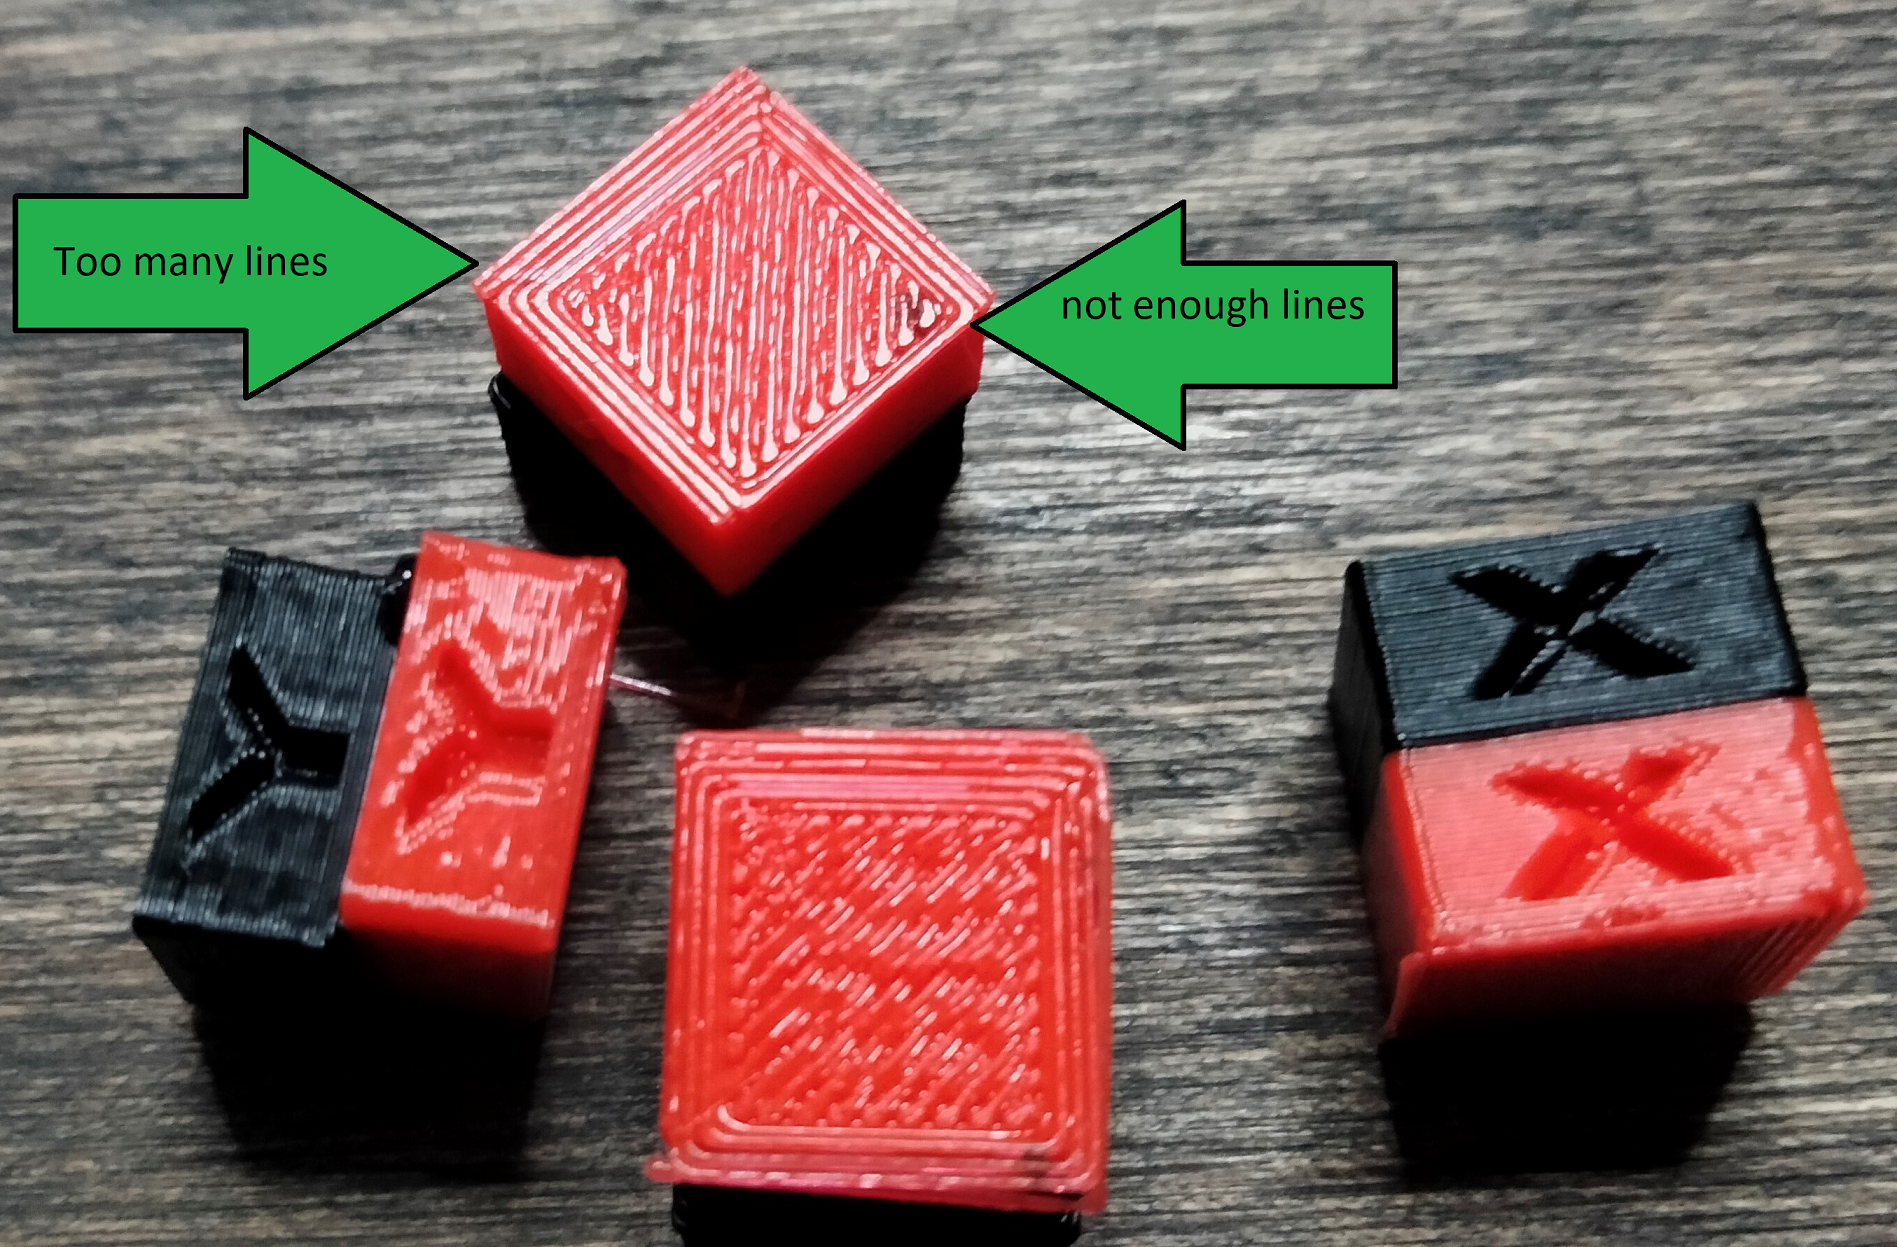
Something caused offset on print bottom infill in relation to walls of the print. The other side of the print has more outer walls than the other even though they slicer shows the same amount of lines.
-
I need stealthchop tune move macro
-
-
Is the Z axis intentionally compressed for shorter prints?
Maybe try some IDEX calibration prints to get it tuned in?
There are many variations. Here is one.
https://www.thingiverse.com/thing:4565745 -
The print objects are compressed on purpose to shorten print time and minimize print material usage. I've tried printing "proper" dual calibration models but those are hard to check for alignment because the tips of the spikes are often quite nonuniform (especially when prints don't seem to stick well to my print bed that is made of glass). Printing two cubes with the other on top the other allows feeling the edges of the cubes on each side. It should be accurate.
I just found a post that explains possible causes of inaccurate homing:
@dc42 said in Z homing fails often after update from 3.1.1 to 3.2:
It's as I expected. If two endstops are triggered with a delay of about 2.2ms between them, only the first one is registered until another input changes. When the delay is shortened to 1ms or lengthened to 5ms, the problem does not occur.
Now I can test fixes.
So I changed homingall.g move distances so that each axis is home slightly different time than the others. I'm still testing if this is the case.
-
Repeating same print job without changing offsets in config or changing any slicer settings resulted with two prints that had different offsets on X/U-axis. The difference was 0,5 mm.
I also tested repeatability of X- and U-axis endstops by homing them and moving back 10 to 100mm and homing again and repeating. They seemed to be fine as difference for each measurement was within 0,05 mm.
I'm not sure what causes this. Position of Y-axis doesn't matter and Z-axis moves very slowly and it too has variance with position, but that is most likely just because heat expansion.
-
I solved the issue with first layers (brim) not aligning with body of the part. It was caused by lost steps when tools are switched and the other extruder went to its minimum axis location and hit the other extruder slightly. This only happens with first layer and not with higher layers.
I still have problems with setting offsets. If I calibrate the extruders with any calibration object to correct offsets, offsets on prints will eventually change to something else and a new calibrations is required. This happens relatively randomly and I got about 10 print jobs done with one calibration and after that even the calibration was hard as correcting the values did not give the results it should have.
-
I think found the issue: printed parts (ABS) on X- and U-gantries were attached by M3 bolts were loose. The printed part had given in slightly. Weird thing is that it didn't seem to affect one extruder printing (no shifted layers during printing).

-
I'm glad you solved it. Nice frog print!
-
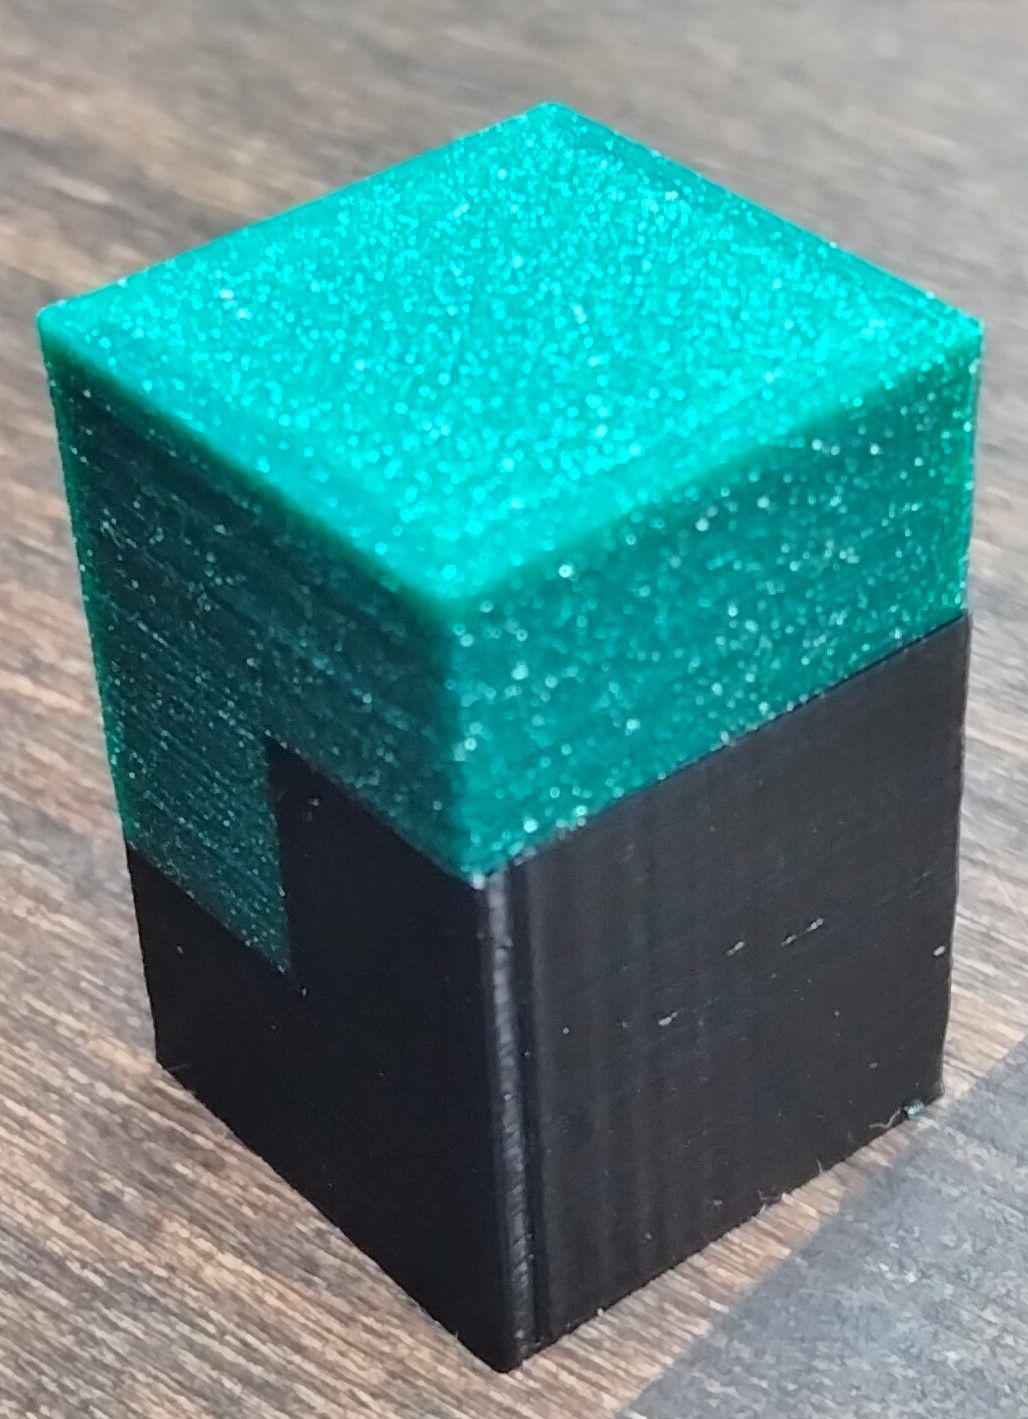
Thanks. I still need to do some tuning, but I think I'm getting close. It is possible to see some inconsistencies in black parts of the frog (green glitter hides those inconsistencies). I had line width set
to low (0,38) on the frog, which probably causes the issue along with not quite right extrusion multipliers.I'll probably post more detailed description on my machine on "my Duet controlled machine" -section when I got the time.
-
FWIW I printed the same frog some time ago.

-