First layer wont stick, need some help with my config
-
Hello my friends,
i have a huge problem with my ender 5, the first layer wont stick anymore.
To explain how it all happened. I printed something and when it was finished I wanted to take it off the heatbed and tore it too much, since nothing want stuck on the heatbed.I tried leveling and it really did at least 20 times, then I bought this and it didn't help either. I also exchanged the BLTouch without success.
Then I updated the firmware and since then the belt is skipping some gears when homeing.
I added a Z-axis to the Ender 5 and the automatic adjustment of G32 doesn't work, so I put the second Z-motor on Z2 and adjusted it manually.
It would be nice if someone looks at my configuration, maybe I did something wrong. Would be really nice.
My setup
Printer: Ender 5
Z-Probe: BLTouch
Z-Axis : 2
Hotend: Micro-Swiss All Metal Hotend
Extruder: BMG ExtruderStart G-Code
G28 XY
M561 ; Clear bed transforms
G28 Z ; Home Z
G29 S1 ; Load mesh leveling from SD card
G92 E0 ; reset extrusion distance
G1 Z0.2 F1000.0
G1 X60.0 E9.0 F1000.0 ; priming
G1 X125.0 E12.5 F1000.0 ; priming
G1 Z0.5 F1000.0
G92 E0 ; reset extrusion distance
End G-Code
G10 P0 R-273.15 S-273.15     ; Turn off Tool0
G10 P1 R-273.15 S-273.15     ; Turn off Tool1
M140 S-273.15                ; Turn off Bed
M106 S0                      ; Object fan off
G1 Z210                      ; Move Z to Z210
G92 E0                       ; Zero Extruder
G1 E-2 F300                  ; Retract 2mm
G92 E0                       ; Zero Extruder
G28 XY                       ; Home XY
M84                          ; All motors Off
Config Files
retractprobe.g
homez.g
homey.g
homex.g
homeall.g
heightmap.csv
deployprobe.g
config-override.g
config.g
bed.g -
Hi,
Please post all of your configuration files using the </> tag like you did for you start and end code.
Others everyone has to download each file.
Frederick
-
Are you trying to do automatic tilt correction with dual z axis?
You would need to have each Z motor on it's own stepper driver and you would need to add a M671 command to config.g that defines the position each lead screw, and then in your bed.g you would need to define a point to probe close to each lead screw.
That's all described here: https://duet3d.dozuki.com/Wiki/Bed_levelling_using_multiple_independent_Z_motors
This is separate from mesh compensation which maps out the surface of the bed and adjusts the Z height for the entire bed area. That is done by configuring M557 and running G29.
https://duet3d.dozuki.com/Wiki/Using_mesh_bed_compensation
So let us know what you want to achieve.
As you currently have it I think part of the problem might be a bad mesh. So remove the G29 S1 you have from your homing files. It only really needs to be loaded in your start gcode after all axis are homed, which it is.
In order to get a good first layer the bed must be mechanically leveled by hand first while hot. Then your probe trigger height needs to be measured and set. Then you should create a mesh with G29.
So maybe go through this calibration process for the bed and extruder first. Since that's the foundation of a good layer.
https://duet3d.dozuki.com/Guide/Ender+3+Pro+and+Duet+Maestro+Guide+Part+4:+Calibration/40
Then setup your probe offsets.
https://duet3d.dozuki.com/Wiki/Test_and_calibrate_the_Z_probe
Then create a mesh and show us what the resulting map looks like.
Setting up tilt correction is a good idea to keep your motors in sync. Otherwise they will drift out of alignment over time.
The correct order of operations would be
G28 to home all axis
G32 to run bed.g and correct for tilt
G28 Z again to set Z0 again to accoutn for any change in tilt
G29 to run a mesh of the bed surface -
Thank you @Phaedrux , i made every step you said, and now the first layer sticks on the bed.
I swear i leveled the whole printer about 20 times...
Nevermind, it works now and im really happy")
Thank you again
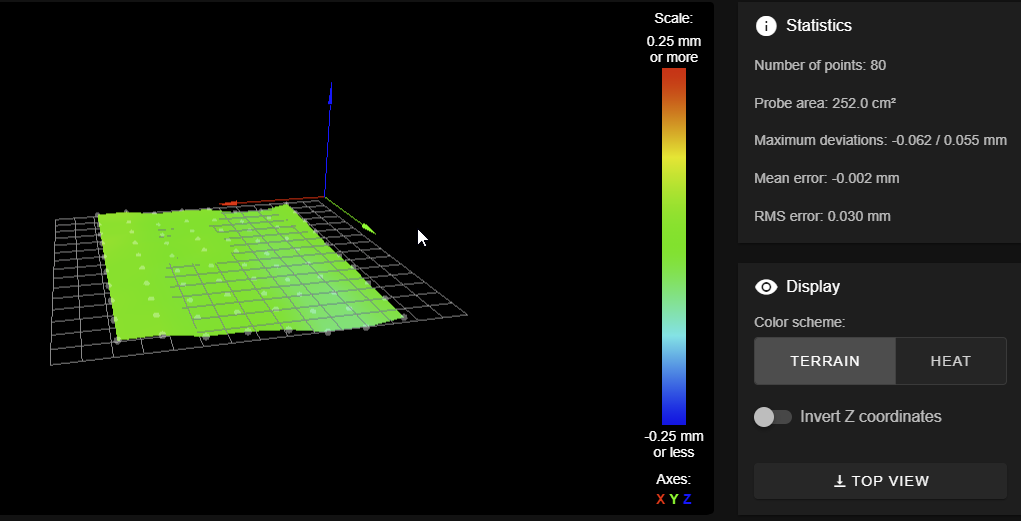
Is my heightmap okay, or should i optimize it a bit more?
I have currently one problem, the True Bed Leveling (G32) doesnt move on my leadscrew positions.
When it should move to the first leadscrew (X70 Y10) it moves to (X23 Y26), why does this happen?; Configuration file for Duet WiFi (firmware version 3) ; executed by the firmware on start-up ; ; generated by RepRapFirmware Configuration Tool v3.2.3 on Sat Mar 06 2021 14:18:36 GMT+0100 (Mitteleuropäische Normalzeit) ; General preferences G90 ; send absolute coordinates... M83 ; ...but relative extruder moves M550 P"Ender 5" ; set printer name ; Network M552 S1 ; enable network M586 P0 S1 ; enable HTTP M586 P1 S0 ; disable FTP M586 P2 S0 ; disable Telnet ; Drives M569 P0 S1 ; physical drive 0 goes backwards M569 P1 S1 ; physical drive 1 goes backwards M569 P2 S0 ; physical drive 2 goes forwards M569 P3 S1 ; physical drive 3 goes backwards M569 P4 S0 ; physical drive 3 goes backwards M584 X0 Y1 Z2:4 E3 ; set drive mapping M350 X16 Y16 Z16 E16 I1 ; configure microstepping with interpolation M92 X80.00 Y80.00 Z400.00 E385.00 ; set steps per mm M566 X1200.00 Y1200.00 Z24.00 E300.00 ; set maximum instantaneous speed changes (mm/min) M203 X9000.00 Y9000.00 Z180.00 E6000.00 ; set maximum speeds (mm/min) M201 X500.00 Y500.00 Z100.00 E6000.00 ; set accelerations (mm/s^2) M906 X850 Y800 Z800 E1000 I50 ; set motor currents (mA) and motor idle factor in per cent M671 X70:70 Y10:200 S0.5 ; leadscrews at left (connected to Z) and right (connected to E1) of X axis M84 S30 ; Set idle timeout ; Axis Limits M208 X0 Y0 Z0 S1 ; set axis minima M208 X220 Y220 Z300 S0 ; set axis maxima ; Endstops M574 X1 S1 P"xstop" ; configure active-high endstop for high end on X via pin xstop M574 Y1 S1 P"ystop" ; configure active-high endstop for high end on Y via pin ystop M574 Z1 S2 ; configure Z-probe endstop for low end on Z ; Z-Probe M950 S0 C"exp.heater3" ; create servo pin 0 for BLTouch M558 P9 C"^zprobe.in" H5 F120 T6000 ; set Z probe type to bltouch and the dive height + speeds G31 P500 X44 Y-17 Z1.85 ; set Z probe trigger value, offset and trigger height M557 X15:195 Y15:195 S20 ; define mesh grid ; Heaters M308 S0 P"bedtemp" Y"thermistor" B4092 R4700 ; configure sensor 0 as PT1000 on pin bedtemp M950 H0 C"bedheat" T0 ; create bed heater output on bedheat and map it to sensor 0 M307 H0 R0.310 C384.6 D1.73 S1.00 V23.5 ; disable bang-bang mode for the bed heater and set PWM limit M140 H0 ; map heated bed to heater 0 M143 H0 S120 ; set temperature limit for heater 0 to 120C M308 S1 P"e0temp" Y"thermistor" B4092 R4700 ; configure sensor 1 as PT1000 on pin e0temp M950 H1 C"e0heat" T1 ; create nozzle heater output on e0heat and map it to sensor 1 M307 H1 R3.417 C47.1 D3.33 S1.00 V24.0 ; disable bang-bang mode for heater and set PWM limit M143 H1 S275 ; set temperature limit for heater 1 to 275C ; Fans M950 F0 C"fan0" Q500 ; create fan 0 on pin fan0 and set its frequency M106 P0 S0 H-1 ; set fan 0 value. Thermostatic control is turned off M950 F1 C"fan1" Q500 ; create fan 1 on pin fan1 and set its frequency M106 P1 S1 H1 T45 ; set fan 1 value. Thermostatic control is turned on M950 F2 C"fan2" Q500 ; create fan 2 on pin fan2 and set its frequency M106 P2 S1 H1:0 T45 ; set fan 2 value. Thermostatic control is turned on ; Tools M563 P0 D0 H1 F0 ; define tool 0 G10 P0 X0 Y0 Z0 ; set tool 0 axis offsets G10 P0 R0 S0 ; set initial tool 0 active and standby temperatures to 0C ; Custom settings are not defined ; BLTouch startup G4 S2 ; Pause a couple seconds M280 P64 S160 ; Clear any alarms G4 S2 ; Pause a couple seconds M402 ; retract pin just in case M912 P0 S-11 ; CPU Temp Calib -
@TiToMoskito its taking your probe offsets into account.
So you ask for a nozzle position of X70 Y10 and it moves so the probe is over that position, which is X23 Y26