Z-Offset changes suddenly during first layer
-
Hello,
I have a weird and seemingly random issue during the first layer of my custom E3D based toolchanger.
Sometimes, it appears that during the first layer the nozzle suddenly gets way too close to the bed (I would guess Z <= 0), fully blocking the nozzle and making the extruder skip.
This usually happens while printing a brim, but sometimes also in other places.
I've managed to record a very specific occurence of this. I'm printing a tool-offset calibration STL from E3D, the specifics don't matter much, the interesting part is that most of the first layer printed fine and suddenly right before a travel move the nozzle contacted the bed, ripped through an already printed piece at that specific location and went off trying to print something else.
Here are some images:
Overview:
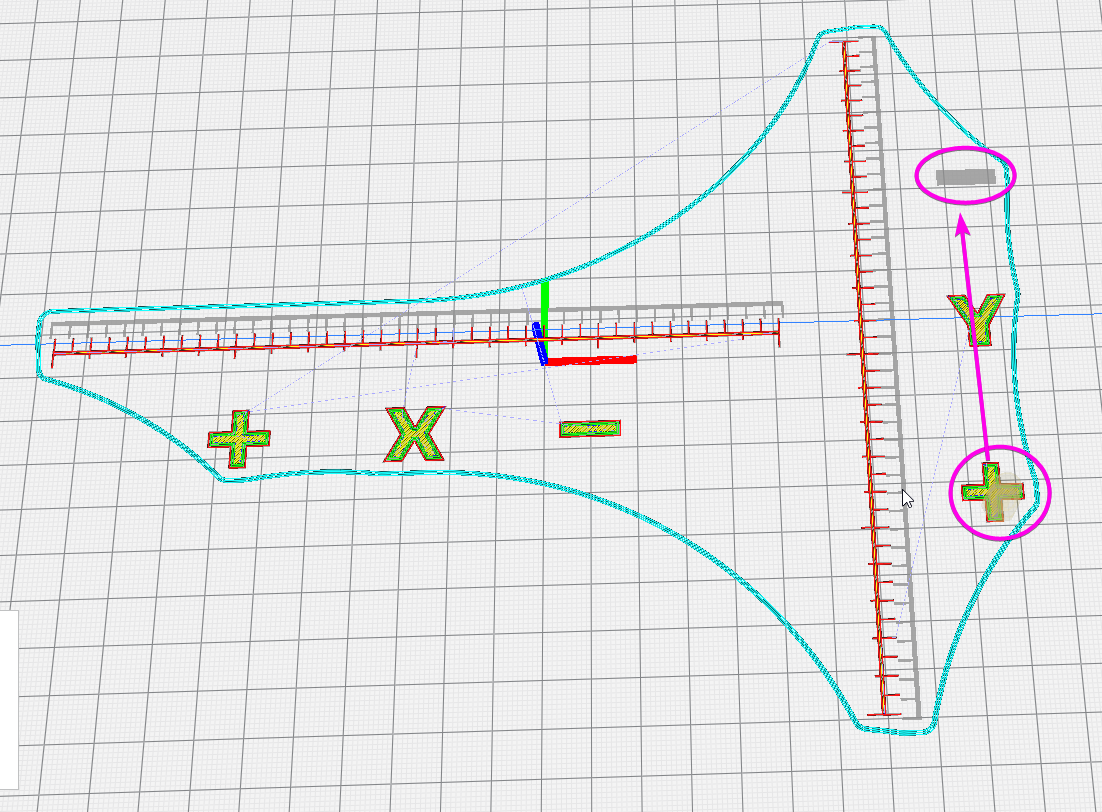
The part of interest is the + and - sign on the right, the - is the last piece for that tool on the first layer, the + is printed right before that.
Here's a view of what the tool is doing on the +:
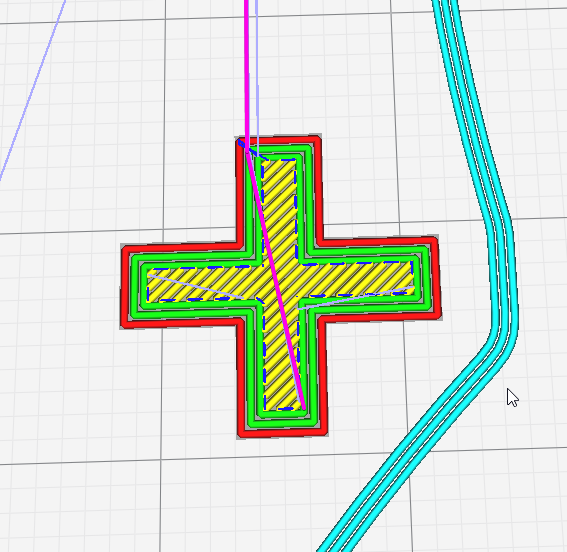
The pink lines are the travel moves when leaving that area. This is the part where the issue occured, right before the travel moves, the nozzle dug into the already printed + and then moved through it.
This is the result:

Notice how the gash through the printed part is exactly the travel move from before. It's a small part, so the layer is not super nice, but rest assured, the area where the nozzle moved through the part is much much thinner than anything else around it.
The last part for that tool (the -) is then basically non existant anymore because the nozzle was so close to the bed.
Everything else on there printed just fine, it's literally just this last travel move and the last piece that show the issue.
Other times when it happens while printing a brim, it prints like 5-10 lines alright and then suddenly is too close to the bed and again fails...
My setup heavily relies on a mesh probing because the bed is far from ideal. However, I know 100% that the Duet can handle handle this as I have been printing on this bed, with this set of electronics before I converted it to a toolchanger.
I have two possible assumptions of where this comes from:
-
The old setup used a BLTouch, the new one uses E3D's toolhead with the Omron microswitch, maybe the BLTouch was a lot more accurate?
-
Previously I just had a single fixed "tool" with no tool offsets, so a lot less stuff to worry about, but then again, the first layer works fine most of the way and then suddenly fails...
-
Maybe the Duet suddenly decides to use the Z-offset from a different tool? Is that even possible?
Long story short, has anyone ever seen such a behavior before? Any ideas what could be going on?
Hardware:
- Duet 2 Wifi + Duex5
- CoreXY with 3 independent Z motors, Z=0 is at the top, bed then moves down from there
- E3D toolchanger head + toolplates
Software:
- Firmware 3.2.2
- Tools configured like E3D toolchanger (Z-Probe has 0 offsets, only tools have offsets in X/Y/Z)
- 3 point bed leveling
- 10x10 point mesh probing
Things I've checked so far:
- Print G-Code does not contain unwated Z-changes
- Mesh compensation is actually doing "something", aka works as far as I can tell
- Tool Z offsets do "something" as well, changing them makes for different thicknesses of the first layer
The weirdest part now... It doesn't happen all the time. Sometimes prints work flawlessly, most of the time, they don't. I could not see any corelation to other factors yet.
For completeness, here's my config.g
; Configuration file for Duet WiFi (firmware version 3)
; executed by the firmware on start-up
;
; generated by RepRapFirmware Configuration Tool v2.1.8 on Sun May 10 2020 15:03:19 GMT+0200 (Mitteleuropäische Sommerzeit)

; General preferences
;M929 S3                                        ;enable debug logging
M575 P1 S1 B57600                               ;Enable PanelDue Port
G90                                             ; send absolute coordinates...
M83                                             ; ...but relative extruder moves
M550 P"V-Core Pro"                              ; set printer name

M669 K1                                         ; select CoreXY mode

; Network
M552 S1                                         ; enable network

; Drives
M569 P0 S0                                      ; physical drive 0 goes forwards X/Y
M569 P1 S0                                      ; physical drive 1 goes forwards X/Y
M569 P2 S0                                      ; physical drive 1 goes forwards Coupler
M569 P3 S0                                      ; physical drive 2 goes forwards E1
M569 P4 S0                                      ; physical drive 2 goes forwards E2
M569 P7 S0                                      ; physical drive 3 goes forwards Z1
M569 P8 S0                                      ; physical drive 3 goes forwards Z2
M569 P9 S0                                      ; physical drive 3 goes forwards Z3

M584 X0 Y1 C2 Z7:8:9 E3:4                       ; set drive mapping (motion system)
M584 E3:4                                       ; set drive mapping (extruders)

; Axis Limits
M208 X-146:159 Y-149:72 C0:250 Z0:290           ; set axis minima & maxima
M671 X-161:4:189 Y-118:177:-118 S20             ; set Z leadscrew positions

M92 X160.00 Y160.00 C200.00 Z800.00             ; set steps per mm
M350 X16 Y16 C16 Z16 I1                         ; configure microstepping with interpolation
M566 X500 Y500 C2 Z50                           ; set maximum instantaneous speed changes (mm/min)
M203 X30000 Y30000 C10000 Z2000                 ; set maximum speeds (mm/min)
M201 X3000 Y3000 C500 Z300                      ; set accelerations (mm/s^2)

M906 X1800 Y1800 C500 I30                       ; set motor currents (mA) and motor idle factor in per cent
M906 Z1400 I100                                 ; set motor currents (mA) and motor idle factor in per cent
M906 E1100:1100 I100                            ; set motor currents (mA) and motor idle factor in per cent (Flex3Drive)
M84 S30                                         ; Set idle timeout
;M204 P1500 T3000
;M593 F40  ; cancel ringing

;=================== Flex3Drive ======================
M92 E8600:8600                                  ; set steps per mm
M350 E8:8 I0                                    ; configure microstepping
M566 E10:10                                     ; set maximum instantaneous speed changes (mm/min)
M203 E4000:4000                                 ; set maximum speeds (mm/min)
M201 E150:150                                   ; set accelerations (mm/s^2)
;====================================================

; Endstops
M574 X2 S1 P"xstop"                             ; configure active-high endstop for high end on X via pin xstop
M574 Y1 S1 P"ystop"                             ; configure active-high endstop for high end on Y via pin ystop
M574 Z0                                         ; No Z-Endstop (use as probe instead)
M574 C1 S3                                      ; Stall detect coupler at low end of its range

; Z-Probe
M558 P8 C"zstop" H2 F1000 T15000                ; set Z probe type to bltouch and the dive height + speeds
G31 X0 Y0 Z0 P200                               ; set Z probe trigger value, offset and trigger height
M557 X-146:150 Y-149:72 P10                     ; define mesh grid

;Stall Detection
M915 C S6 F0 H200 R0                            ; Coupler

; Heaters
M308 S0 P"bedtemp" Y"thermistor" T100000 B3950  ; configure sensor 0 as thermistor on pin bedtemp
M950 H0 C"bedheat" T0                           ; create bed heater output on bedheat and map it to sensor 0
M143 H0 S121                                    ; set temperature limit for heater 0 to 121C
M307 H0 A305.7 C444 D2.9 V24.2 B0               ; Bed PID Tuning
M140 H0                                         ; map heated bed to heater 0

M308 S1 P"e0_temp" Y"thermistor" T100000 B4725 C7.06e-8  ; configure sensor 1 as thermistor on pin e0temp
M950 H1 C"e0heat" T1                            ; create nozzle heater output on e0heat and map it to sensor 1
M143 H1 S301                                    ; set temperature limit for heater 1 to 301C

M308 S2 P"e1_temp" Y"thermistor" T100000 B4725 C7.06e-8  ; configure sensor 2 as thermistor on pin e1temp
M950 H2 C"e1heat" T2                            ; create nozzle heater output on e1heat and map it to sensor 2
M143 H2 S301                                    ; set temperature limit for heater 2 to 301C

M302 S120 R120                                  ;Cold extrusion settings

M307 H1 R4.065 C157.9 D2.14 S1.00 V24.2         ; PID Tuning T0

M376 H20                                        ; Set bed correction taper

; Fans
M950 F0 C"duex.fan3"                            ; Hotend Fan Tool 1
M106 P0 S255 L255 H1 T50                        ; Hotend Fan Tool 1
M950 F1 C"duex.fan4" Q50                        ; Layer Fan Tool 1
M106 P1 S0 H-1                                  ; Layer Fan Tool 1

M950 F2 C"duex.fan5"                            ; Hotend Fan Tool 2
M106 P2 S255 L255 H2 T50                        ; Hotend Fan Tool 2
M950 F3 C"duex.fan6" Q50                        ; Layer Fan Tool 1
M106 P3 S0 H-1                                  ; Layer Fan Tool 1

; Tools
M563 P0 D0 H1 F1                                ; define tool 0
G10 P0 X-9 Y39 Z-5.24                           ; set tool 0 axis offsets
G10 P0 R0 S0                                    ; set initial tool 0 active and standby temperatures to 0C

M563 P1 D1 H2 F3                                ; define tool 1
G10 P1 X-8.9 Y38.35 Z-5.37                      ; set tool 1 axis offsets
G10 P1 R0 S0                                    ; set initial tool 1 active and standby temperatures to 0C

;Dock present switches
M950 J0 C"duex.e2stop"                          ; Tool 0 Dock switch
M950 J1 C"duex.e3stop"                          ; Tool 1 Dock switch

M950 P1 C"duex.e5heat"                          ;Light switch PWM
;M591 D0 P1 C"e0stop" S1                        ;Filament Sensor E0


;Pressure Advance
;M572 D0 S0.2

; Miscellaneous
M98 P"/macros/Misc/Lights/On"
and my bed.g
M564 S1
M561 ; clear any bed transform
if !move.axes[0].homed || !move.axes[1].homed || !move.axes[2].homed
  G28

T-1

while true

    G30 P1 X-30 Y-147 Z-99999 ; probe near a leadscrew
    G30 P0 X30 Y-147 Z-99999 ; probe near a leadscrew
    G30 P2 X0 Y72 Z-99999 S3; probe near a leadscrew

    if move.calibration.initial.deviation <= 0.03
        echo "Leveling successful. Deviation: " ^ move.calibration.initial.deviation ^ "mm"
        break
    if iterations >= 10
        break
    echo "Repeating leveling because deviation is too high (" ^ move.calibration.initial.deviation ^ "mm)"

G28 Z
G29 S0
And a picture of the horrors of my bed:
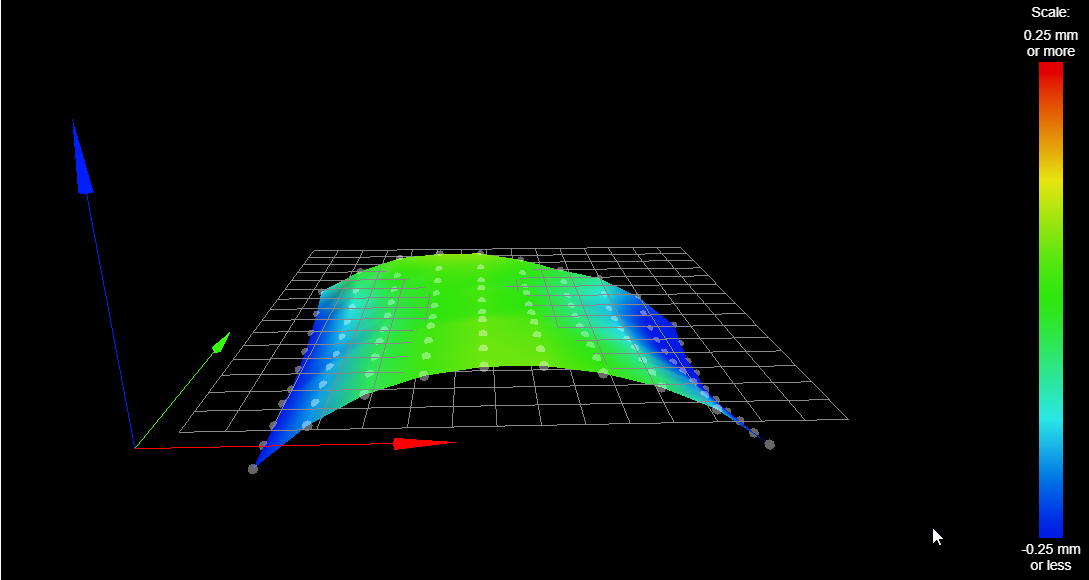
If you made it this far, thank you for reading and maybe someone has seen something similar to this already....

-
-
Can you post your homeall, slicer start gcode, etc and your tool change files?
-
It's all distributed over a bunch of macros, I've compiled them into one file each for easier reading:
homeall:
; homeall.g
; called to home all axes

;M98 P"homey.g"			; Home Y first, so that a head that is currently in one of the tool docks home correctly
G91               ; relative positioning
G1 Z5 F1000 H2    ; lift Z relative to current position
G1 H1 Y-400 F10000 ; move quickly to Y axis endstop and stop there (first pass)
G1 Y5 F10000       ; go back a few mm
G1 H1 Y-400 F360  ; move slowly to Y axis endstop once more (second pass)
G90               ; absolute positioning


;M98 P"homex.g"			; Home X
G91               ; relative positioning
;M564 H0
G1 Z5 F1000 H2    ; lift Z relative to current position
G1 H1 X400 F10000 ; move quickly to X axis endstop and stop there (first pass)
G1 X-5 F10000       ; go back a few mm
G1 H1 X400 F360  ; move slowly to X axis endstop once more (second pass)
G90               ; absolute positioning


;check if any tool is undocked
;not relevant here, the issue at hand happens no matter if this code was executed or not
if sensors.gpIn[0].value = 0 || sensors.gpIn[1].value = 0 ;|| sensors.gpIn[2].value = 0 || sensors.gpIn[3].value = 0
	echo "Not all tools docked, docking tool before homing!"
	M98 P"/macros/Toolchanging/Advanced/DockUnknownToolEmergency"


;M98 P"homec.g"			; Home C (ToolHead)
if sensors.gpIn[0].value = 0 || sensors.gpIn[1].value = 0 ;|| sensors.gpIn[2].value = 0 || sensors.gpIn[3].value = 0
	M291 S1 T5 P"Please return tool to dock before homing coupler" R"Can't home coupler"
	abort

G91
M400
M913 C60		; C MOTOR TO 60% CURRENT
G1 H2 C-300 F10000
G92 C0
G90
M400
M913 C100			; C MOTORS TO 100% CURRENT

;M98 P"/macros/Toolchanging/Coupler - Unlock"		; open coupler
if !move.axes[3].homed ;abort if C is not homed
	abort

M564 S0
G90
G1 C120 F50000
M564 S1


;M98 P"homez.g"			; Home Z
if sensors.gpIn[0].value = 0 || sensors.gpIn[1].value = 0 ;|| sensors.gpIn[2].value = 0 || sensors.gpIn[3].value = 0
	M291 S1 T5 P"Please return tool to dock before homing Z" R"Can't home Z"
	abort

G91               ; relative positioning
G90               ; absolute positioning
G1 X0 Y0 F15000 ; go to first probe point
G30               ; home Z by probing the bed


G1 X400 Y-400 F15000		; Park
slicer start: (Cura 4.8)
M190 S{material_bed_temperature_layer_0} ;Wait for bed to reach temp before proceeding
G10 P{initial_extruder_nr} S{material_print_temperature_layer_0} R{material_print_temperature_layer_0}

;M98 P"/macros/Misc/PrePrintCalibrate"
;M98 P"/macros/Misc/Lights/On"
M42 P1 S255
;M98 P"/macros/Toolchanging/Advanced/HomeIfNotHomed"
if !move.axes[0].homed || !move.axes[1].homed || !move.axes[2].homed || !move.axes[3].homed
  G28
T-1
G32


T{initial_extruder_nr}
M109 S{material_print_temperature_layer_0} ;Wait for extruder to reach temp before proceeding
Note on the start code: Cura ALWAYS inserts a T command first before your start code, which makes zero sense with a toolchanger that can't home with a tool attached. So there's a gcode post-processor in palce that removes that initial T command and my start code contains the relevant T after homing and bed probing.
tpre0
; tpre0.g
; called before tool 0 is selected

;M98 P"/macros/Toolchanging/Advanced/HomeIfNotHomed"
if !move.axes[0].homed || !move.axes[1].homed || !move.axes[2].homed || !move.axes[3].homed
  G28

;WARNING! WARNING! WARNING! WARNING! WARNING! WARNING! WARNING! WARNING! WARNING! WARNING! WARNING! WARNING!
;if you are using non-standard length hotends ensure the bed is lowered enough BEFORE undocking the tool!
G91
G1 Z10 F3000
G90
M400
tpost0
; tpost0.g
; called after tool 0 has been selected
M703 ;restore filament settings

M564 S0 ; allow movement outside the normal limits

;M98 P"/macros/Toolchanging/Coupler - Unlock"	; unlock Coupler
if !move.axes[3].homed ;abort if C is not homed
	abort

M564 S0
G90
G1 C120 F50000
M564 S1


;M98 P"/macros/Toolchanging/Advanced/MoveToDock/T0"
M564 S0
G90
G53 G1 X-80 Y100 F25000			; Move in front of dock at safe Y
G53 G1 Y145 F25000				; Quickly move in
G53 G1 Y153.4 F3000				; Slowly approach final Y position


;M98 P"/macros/Toolchanging/Coupler - Lock"	; close Coupler
if !move.axes[3].homed ;abort if C is not homed
	abort

M564 S0
G90
G1 C230 F50000
M564 S1


;heatup
M116 P0

;M98 P"/macros/Toolchanging/Advanced/MoveToDock/MoveOut"
M564 S0
G91
G1 Y-80 F10000
G90


M400 ;wait for toolchange moves to finish
if sensors.gpIn[0].value = 1
	echo "Tool 0 is not loaded correctly, aborting..."
	M98 P"/macros/Toolchanging/Advanced/HandleToolchangeFault"

;M208 Y66						; set Y max for this tool
M564 S1 						; apply the normal limits again


;M98 P"/macros/Toolchanging/Advanced/PrimeBrush"
if state.currentTool < 0
	echo "Can't Prime & Brush, no tool selected!"
	M99

if heat.heaters[tools[state.currentTool].heaters[0]].current > heat.coldExtrudeTemperature
	M564 S0
	G90
	G53 G1 X-150 Y100 F25000		; Move in front of brush at safe Y
	G53 G1 Y145 F25000				; Quickly move in
	G53 G1 Y155 F3000				; Slowly approach final Y position

	M83
	G1 E10 F300
	G10

	G91
	G1 Y-20 F25000 ; start of brush
	G1 Y-20 F20000
	G1 Y20 F20000
	G1 Y-20 F20000
	G1 Y20 F20000
	G1 Y-20 F20000; end of brush

	G1 Y-50 F25000
	G1 X10 F25000

	G90
	M564 S1
else
	echo "Skipping Prime & Brush due to unheated tool"


M106 R1	; restore print cooling fan speed
tfree:
; tfree0.g
; called when tool 0 is freed

G10 ;retract some

G91
G1 Z4 F3000							; drop the bed
G90
M400

M564 S0								; allow movement outside the normal limits

;M98 P"/macros/Toolchanging/Advanced/MoveToDock/T0"
M564 S0
G90
G53 G1 X-80 Y100 F25000			; Move in front of dock at safe Y
G53 G1 Y145 F25000				; Quickly move in
G53 G1 Y153.4 F3000				; Slowly approach final Y position


;M98 P"/macros/Toolchanging/Coupler - Unlock"		; open coupler
if !move.axes[3].homed ;abort if C is not homed
	abort

M564 S0
G90
G1 C120 F50000
M564 S1


;M98 P"/macros/Toolchanging/Advanced/MoveToDock/MoveOut"
M564 S0
G91
G1 Y-80 F10000
G90


M400 ;wait for toolchange moves to finish
if sensors.gpIn[0].value = 0
	echo "Tool 0 is not docked correctly, aborting..."
	M98 P"/macros/Toolchanging/Advanced/HandleToolchangeFault"

M106 P2 S0							; fan off
M564 S1								; apply the normal limits again
As you can see, the tool pickup happens in tpost, because that way I can heat up the tool while it's still docked. My tools have their nozzles blocked while docked by some piece of silicone sheet under them, so I want to heat them up while they can't ooze.
The t1 files look the same as the t0 ones, just with different pickup locations of course. Note: the issue also happens with single tool prints, it does not appear to be tool change related.
-
@Diamondback said in Z-Offset changes suddenly during first layer:
M703 ;restore filament settings
What do you have in your filament specific config?
Only other thing I can think of is that there is a problem with the coordinate system and the 0,0 points for the actual bed amd where it thinks the bed is on the mesh don't match. If you catch my meaning.
-
For example this:
M207 S0.6 F3000 Z0.0    ;firmware retraction settings for PETG
M302 S220 R220         	;Cold extrusion settings
Different values for different filaments of course, but overall just these settings.
Is there any chance I can debug potential offsets of what mesh bed is doing vs what it should do?
-
Most direct way is to print a first layer test print once with it enabled and once with it disabled. You should be able to tell if it's working as expected or not.
bedlevel_nozzle_0.4_200x200-0.3-0.8.stl
Can you post the results of M122 just for the sake of completeness?
-
I'm trying to print a dual color print atm and while the first layer worked fine, it's now really squishing things and digging through already printed filament on the following layers...
Here's an M122 while printing:
=== Diagnostics ===
RepRapFirmware for Duet 2 WiFi/Ethernet version 3.2.2 running on Duet WiFi 1.02 or later + DueX5
Board ID: 08DGM-917NK-F2MS4-7J9F2-3S86N-TYTWF
Used output buffers: 3 of 24 (21 max)
=== RTOS ===
Static ram: 23460
Dynamic ram: 75220 of which 80 recycled
Never used RAM 13320, free system stack 95 words
Tasks: NETWORK(ready,161) HEAT(blocked,308) DUEX(blocked,31) MAIN(running,378) IDLE(ready,20)
Owned mutexes: WiFi(NETWORK)
=== Platform ===
Last reset 00:19:11 ago, cause: software
Last software reset at 2021-03-24 02:28, reason: User, GCodes spinning, available RAM 13980, slot 1
Software reset code 0x0003 HFSR 0x00000000 CFSR 0x00000000 ICSR 0x0041f000 BFAR 0xe000ed38 SP 0x00000000 Task MAIN Freestk 0 n/a
Error status: 0x10
Aux0 errors 0,0,0
MCU temperature: min 30.5, current 35.4, max 35.8
Supply voltage: min 23.7, current 24.1, max 24.5, under voltage events: 0, over voltage events: 0, power good: yes
Driver 0: position -12343, ok, SG min/max 0/1023
Driver 1: position 6131, ok, SG min/max 0/1023
Driver 2: position 4549, standstill, SG min/max 0/511
Driver 3: position 46000, ok, SG min/max 0/1023
Driver 4: position 0, standstill, SG min/max 0/1023
Driver 5: position 0, standstill, SG min/max not available
Driver 6: position 0, standstill, SG min/max not available
Driver 7: position 0, ok, SG min/max 0/1023
Driver 8: position 0, ok, SG min/max 0/1023
Driver 9: position 0, ok, SG min/max 0/1023
Driver 10: position 0
Driver 11: position 0
Date/time: 2021-03-24 02:48:11
Cache data hit count 1315166420
Slowest loop: 139.34ms; fastest: 0.17ms
I2C nak errors 0, send timeouts 0, receive timeouts 0, finishTimeouts 0, resets 0
=== Storage ===
Free file entries: 9
SD card 0 detected, interface speed: 20.0MBytes/sec
SD card longest read time 1.7ms, write time 212.2ms, max retries 0
=== Move ===
DMs created 83, maxWait 85022ms, bed compensation in use: mesh, comp offset 0.000
=== MainDDARing ===
Scheduled moves 18369, completed moves 18330, hiccups 29, stepErrors 0, LaErrors 0, Underruns [0, 0, 0], CDDA state 3
=== AuxDDARing ===
Scheduled moves 0, completed moves 0, hiccups 0, stepErrors 0, LaErrors 0, Underruns [0, 0, 0], CDDA state -1
=== Heat ===
Bed heaters = 0 -1 -1 -1, chamberHeaters = -1 -1 -1 -1
Heater 0 is on, I-accum = 0.1
Heater 1 is on, I-accum = 0.4
=== GCodes ===
Segments left: 1
Movement lock held by null
HTTP is idle in state(s) 0
Telnet is idle in state(s) 0
File is doing "G1 X-23.903 Y-16.126 E0.0159" in state(s) 0
USB is idle in state(s) 0
Aux is idle in state(s) 0
Trigger is idle in state(s) 0
Queue is idle in state(s) 0
LCD is idle in state(s) 0
Daemon is idle in state(s) 0
Autopause is idle in state(s) 0
Code queue is empty.
=== Network ===
Slowest loop: 213.79ms; fastest: 0.00ms
Responder states: HTTP(0) HTTP(0) HTTP(0) HTTP(0) FTP(0) Telnet(0), 0 sessions
HTTP sessions: 1 of 8
- WiFi -
Network state is active
WiFi module is connected to access point
Failed messages: pending 0, notready 0, noresp 0
WiFi firmware version 1.25
WiFi MAC address b4:e6:2d:52:f2:a9
WiFi Vcc 3.43, reset reason Power up
WiFi flash size 4194304, free heap 26848
WiFi IP address 192.168.1.31
WiFi signal strength -59dBm, mode 802.11n, reconnections 0, sleep mode modem
Clock register 00002002
Socket states: 0 0 0 0 0 0 0 0
=== DueX ===
Read count 14, 0.73 reads/min
I'm trying to let it run through, maybe the printed part gives some hints...
-
@Diamondback
Your Z motors are on the DUEX5, maybe you have some problem with the board connector? Interference or bad contact.
To evaluate it, you could trade places with Coupler and Extruders. -
Yes, the three Z motors are on the Duex. I have been running this specific Z setup since about a year (with just a single fixed hotend rather than toolchanging) with no issues, so I would rule out any "design" issues.
However, I will check all the connectors again, that could certainly be an issue. -
My Moai print completed overnight and there are various distinct issues:
- It appears that after a really clean first layer (I watched that live) the Z is not dropping enough in the next layers, the first mm or so it really squishes the filament into the previous layer. After 5 or so layers, it works fine, probably because it finally adjusted to the "wrong" Z.
- The squish only happens on T0. T1 is not affected. That's in line with another dual color print from a few days ago where the same issue showed.
- In addition, any other layer than the first shows a weird Y axis offset. First layer is ok, everything after that not so much.
To me it appears that for some reason, the tool offsets are not used correctly...
I'm calibrating my tool offsets in X, Y and Z with the E3D vernier scale print.
-
Here's a scan of the underside of the Moai.
What you can see here is the following:- The thin green line indicates the normal outer perimeters (3 lines à 0.3mm for copper, 3 lines à 0.4mm for dark grey) I watched these lines lay down during the first layer and they were as good as I can hope for
- Everything past the green line is filament that squished down from the following layers, it wasn't there when the first layer finished.
- There is no meaningful offset in X or Y between the two filaments in the first layer, while later in the print there is
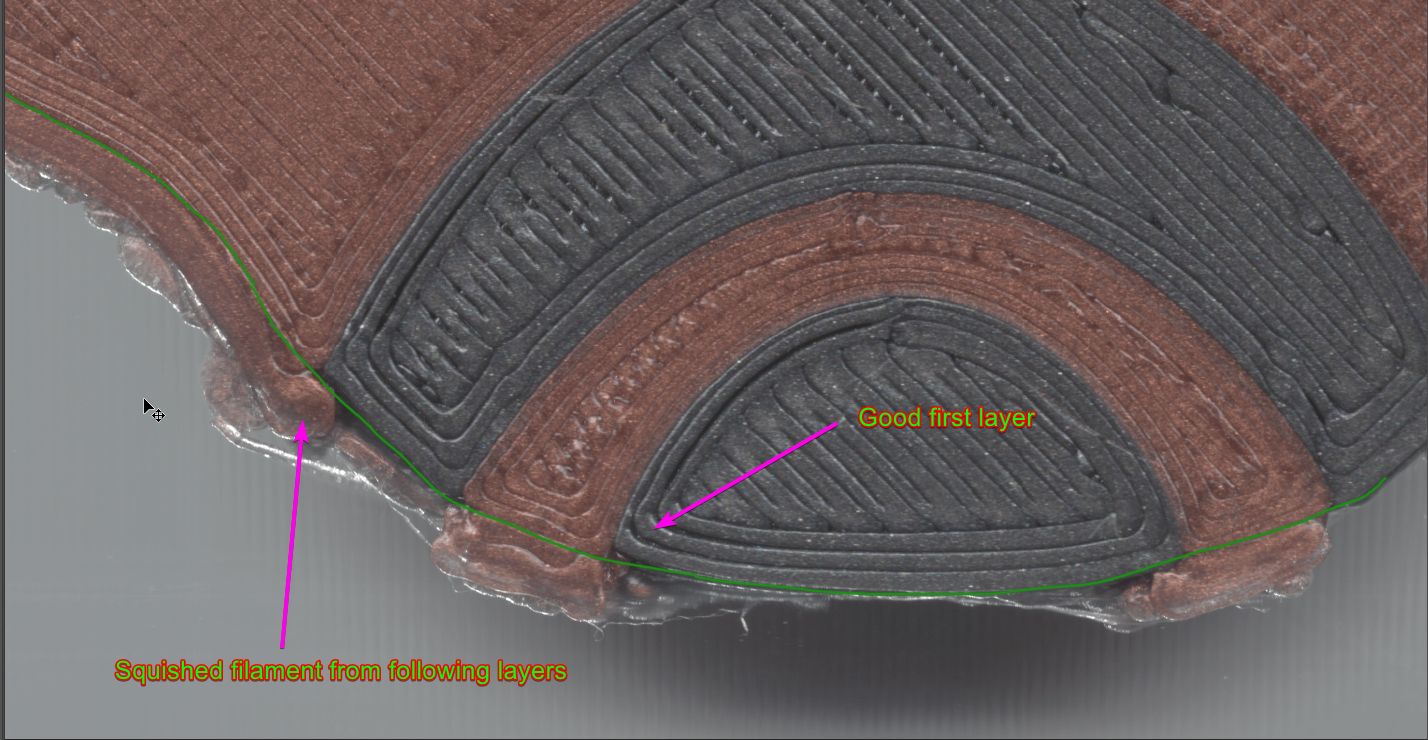
Squished first layers
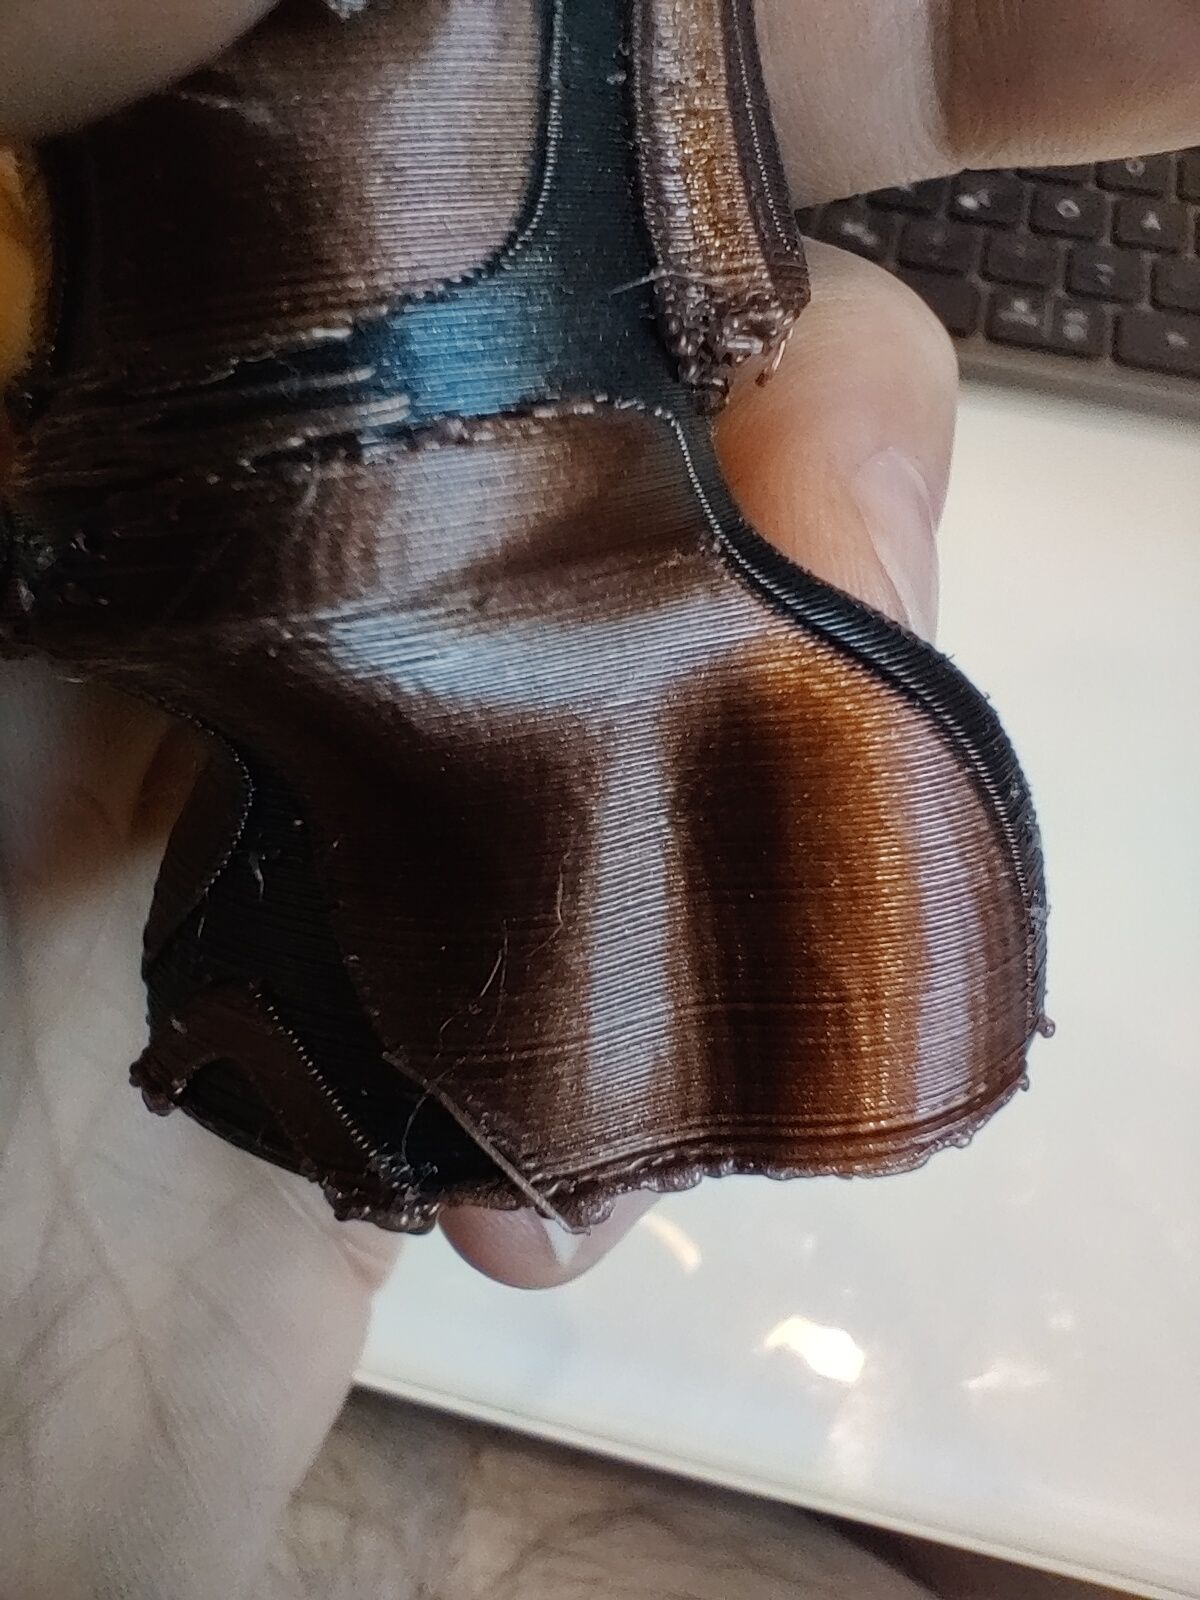
Offset in Y (see the gap next to the ear)

Filament being squished out the front

-
@Diamondback
Does the gap reflect your y-offset, but in the wrong direction?
I've just started with dual tool stuff and was surprised to read that eg. for copy mode the offsets have reversed signs.
Meaning, the X-axis left from center gets a positive offset (although it's on the lower side), the U axis is on the right off the center and has a neg. offset.
Not sure about Z offset, but if you've set your offsets wrong, it would explain a lot. (but not the Random factor) -
What surprises me is that the E3D offset calibration print works perfectly fine in terms of X/Y calibration. (In case you don't know that, it's basically a vernier scale that you print and then you can easily see what offsets there are currently)
Looks like this:
And of course that the X/Y offsets work fine for the first layer...
-
@Diamondback why not use TAMV? much easier for nozzle X/Y calibration https://github.com/HaythamB/TAMV
-
@jay_s_uk Yea that's supposed to be the next step, but I really think something is fundamentally wrong with my setup and the vernier print should work just fine for getting things to print in a useful manner.
I mean, even single extruder prints don't work due to the Z issue... -
Have you checked that the 8 screws that hold the bed assembly to the linear rail slider are tight? I was getting wildly varying height maps, and the reason turned out to be loose screws.
EDIT: I see from an earlier post that you gave 3 Z motors, so it is not an E3D TC and the above probably doesn't apply.
-
@dc42 Yep, custom motion system, will check all the Z mountings anyway, good idea

-
I've just printed a portion of the Moai with switched extruders, so what was previously printed by T0 is now T1 and vice versa.
Observations:
- T0 Z-Offset worked for about 3/4 of its layer, then it blocked the nozzle, I let it continue because T0 was the accents so no huge harm
- T1 Z-Offset is spot on, first layer consistently looks as good as it used to look before the toolchanging hardware
- T1 following layers are all perfectly aligned in X, Y and Z, this makes me think that my motion system itself is fine (ie no huge Z backlash issues or head positional issues)
- T0 following layers show the known problem, not aligned properly, squishing in all directions...
This leads me to the following possible causes:
- T0 tool is somehow broken or damaged and behaves differently than what is expected
- T0 offsets are being messed with in software somehow
-
Oh wow, I think i finally figured out what's going on. At least something that is going on.
My hotend holder is deforming under the pressure from the extruder... This tilts the whole hotend, moving the nozzle in Y and Z.
I just noticed this very extremely when going from first to second layer, the first layer is fairly slow (30m/s) and the second is twice as fast.
The higher speed deformed the holder a lot more, giving an explanation for the perfect first layer and then the sudden issue with layer 2.I'm not sure yet why it would cause issues during the first layer as it still sometimes does, but right now I'm printing beefier holders and then see if that helps.
T1 was also less affected since it's using a 0.4mm nozzle vs the 0.3mm on T0...Fingers crossed that this is purely a hardware issue on my side and no obscure firmware thing

-
Yea, I think this was indeed the problem. After installing much stronger parts for the hotend holder, the nozzle does not dive anymore. (Btw these weren't stupidly small parts or bad filament, they were printed in carbon fiber reinforced nylon, which is much stiffer than anything else I have around, so that really wasn't on my radar...)
