two motors for x-axis connect to Duet2 Wifi
-
I discovered that I couldn't get by with one motor for my x-axis (750mm), but needed a motor on both sides. Can I simply connect 2 motors in parallel at the x output or does that not produce enough power... what's the best way to do that?
-
you're best off using a spare driver if you have one
-
@jay_s_uk I don't understand that...I would like to find a solution via the Duet2 Wifi Board....i.e. parallel, in series or is there another possible connection...how could I solve this via the second extruder motor connection? then the x-axes are still addressed?
-
@axiom it's the same principle as this https://docs.duet3d.com/en/User_manual/Connecting_hardware/Z_probe_auto_levelling
You would just need an endstop per motor if not connected by a beltOr you could swap z to another driver and use the dual outputs on that driver
-
@axiom you can add a second motor to an axis in a number of different ways. As @jay_s_uk suggests, if you have a spare motor driver, you can connect a motor to that, and then define the axis as having two motors with M584 in config.g. You can also wire the motors together in series or in parallel, and use a single driver output.
A couple of caveats; if you wire motors in parallel, you halve the resistance per phase, so half the current goes to each motor, but at the same voltage. To overcome this, you have to double the current supplied, which, if you have larger stepper motors, may be over the limit the stepper driver can supply. We recommend wiring stepper motors in series, which halves the voltage each motor receives, though they receive the same current, but the stepper driver is able to adjust the voltage to meet the current (ie amps) requirement. On Duet 2 boards the Z driver has two outputs, which are wired in series when two motors are connected.
The other caveat is that no matter how you wire it, the two motors should be identical, because steps per mm, acceleration, jerk, and current are all defined by the axis, not the motor.
Ian
Bed-slinger - Mini5+ WiFi/1LC | RRP Fisher v1 - D2 WiFi | Polargraph - D2 WiFi | TronXY X5S - 6HC/Roto | CNC router - 6HC | Tractus3D T1250 - D2 Eth
-
@droftarts I still have the E1 driver available. How do I have to design the M584 command so that the x-axes (2 motors) are addressed at the same time via the E1 driver and the x-motor driver? That's a little different than with the z-motors, where I have 2 driver outputs?
-
@axiom If you use two motors on one driver (either by using the two outputs on the Z axis, or by wiring the motors together and connecting them to the single output on any driver), that driver will have to work a bit harder, but so long as these aren't particularly big motors, or trying to go very fast, it should be fine. Ideally you'll be using a 24V power supply.
With the motors on separate drivers, you are spreading the load, and the motors can even be controlled independently. That's why people often use them for the Z axis, because the axis can then be levelled automatically. People with CNC routers often have two motors on Y, and put these on separate drivers, which allows them to square the X gantry to the Y axis. Normal commands to the axis are carried out by both motors unison. Though this isn't a particular advantage in the way you want to use them, as your motors are connected to the same belt.
I'm assuming you're using RepRapFirmware 3.x. If you are older firmware, please post your current config.g and the response to M116.
X motors connected to different drivers
If you connect the second motor to E1 (driver 4), you should add an M569 to set that motor driver. So add something like this to config.g:
M569 P4 S1               ; physical drive 4 goes forwards
M584 X0:4 Y1 Z2 E3 ; set drive mapping
If the extra X motor turns the wrong way, change
M569 P4 S1toM569 P4 S0. There's also an example on this page https://docs.duet3d.com/User_manual/Connecting_hardware/Motors_configuring#using-more-than-one-motor-on-an-axis-with-a-separate-driver-for-each-motorX motors connected to Z driver
If you connect both X motors to the two Z driver outputs (the labels don't really matter, the Z driver is driver 2), it's probably easiest to swap the Z motor onto the X driver (driver 0), assuming you only have one Z motor. This leaves your E1 driver still available:
M584 X2 Y1 Z0 E3 ; set drive mappingIf the extra X motor turns the wrong way, you'll need to adjust the wiring of the motor, and swap the two wires of one of the phases in the plug. See https://docs.duet3d.com/en/User_manual/Connecting_hardware/Motors_connecting#using-the-internal-drivers for an explanation of the motor phases. Lower on that page is a description of connecting two motors to the ZA and ZB connector.
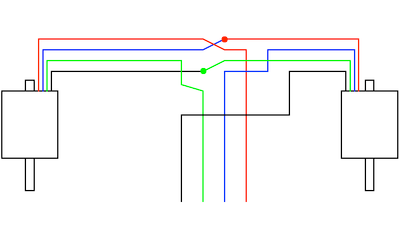
X motors wired together in series, connected to the X driver
Alternatively, you can wire the motors themselves in series to one plug, and connect it to the X driver. You won't have to change M584 for this:
If you're still not sure, please post your current config.g and the response to M116, so I can see what firmware you are on.
Ian