Ender 5 plus with Duet3d mini5+ PD7i and E3D Hemera config help
-
Hello,
Like the title is mentioning i have a :
- Ender 5 plus (New to me, but not completely new)
- Equipped with Duet3d Mini 5+ Enet board
- Equipped with a Paneldue 7i
- And with a E3D Hemera Bowden Extruder
It's working/Alive but im not getting completely through how i think it should work after lots of reading.
So its up and running, its connected and everything is working. But i think i need to finetune it, but before i start messing i would like some pointers to make my life easier.
It homes to the right back corner(where the microswitches are) It also thinks that there is the X0 Y0 position is.
For what i have read and think, is that it homes correctly, but the XY zero cordinaties should be on the front left side?
Ill attach my config, so i hope some 1 can scan it and give some pointers. Because i did found some other configs from enders 5 plus and duets but its not make sense for me.
I dont have the privellage yet for uploading so i put the config in here:
; Configuration file for Duet 3 Mini 5+ (firmware version 3.3) ; executed by the firmware on start-up ; ; generated by RepRapFirmware Configuration Tool v3.3.16 on Tue Aug 08 2023 14:15:35 GMT+0200 (Central European Summer Time) ; General preferences M575 P1 S1 B57600 ; enable support for PanelDue G90 ; send absolute coordinates... M83 ; ...but relative extruder moves M550 P"Ender 5 Plus" ; set printer name ; Network M552 P192.168.178.96 S1 ; enable network and set IP address M553 P255.255.255.0 ; set netmask M554 P192.168.178.1 ; set gateway M586 P0 S1 ; enable HTTP M586 P1 S0 ; disable FTP M586 P2 S0 ; disable Telnet ; Drives M569 P0.0 S1 ; physical drive 0.0 goes forwards M569 P0.1 S1 ; physical drive 0.1 goes forwards M569 P0.2 S0 ; physical drive 0.2 goes backwards M569 P0.3 S0 ; physical drive 0.3 goes backwards M569 P0.4 S0 ; physical drive 0.4 goes backwards M584 X0.0 Y0.1 Z0.2 E0.3:0.4 ; set drive mapping M350 X16 Y16 Z16 E16:16 I1 ; configure microstepping with interpolation M92 X80.00 Y80.00 Z800.00 E150.00:150.00 ; set steps per mm M566 X900.00 Y900.00 Z60.00 E120.00:120.00 ; set maximum instantaneous speed changes (mm/min) M203 X6000.00 Y6000.00 Z180.00 E1200.00:1200.00 ; set maximum speeds (mm/min) M201 X500.00 Y500.00 Z20.00 E250.00:250.00 ; set accelerations (mm/s^2) M906 X800 Y800 Z800 E800:800 I30 ; set motor currents (mA) and motor idle factor in per cent M84 S30 ; Set idle timeout ; Axis Limits M208 X0 Y0 Z0 S1 ; set axis minima M208 X350 Y320 Z400 S0 ; set axis maxima ; Endstops M574 X1 S1 P"!io5.in" ; configure switch-type (e.g. microswitch) endstop for low end on X via pin !io5.in M574 Y1 S1 P"!io6.in" ; configure switch-type (e.g. microswitch) endstop for low end on Y via pin !io6.in M574 Z1 S2 ; configure Z-probe endstop for low end on Z ; Z-Probe M950 S0 C"io3.out" ; create servo pin 0 for BLTouch M558 P9 C"io3.in" H2 F120 T6000 ; set Z probe type to bltouch and the dive height + speeds G31 P500 X45 Y0 Z2.3 ; set Z probe trigger value, offset and trigger height M557 X25:325 Y25:320 S50 ; define mesh grid ; Heaters M308 S0 P"temp0" Y"thermistor" T98801 B4185 ; configure sensor 0 as thermistor on pin temp0 M950 H0 C"out0" T0 ; create bed heater output on out0 and map it to sensor 0 M307 H0 B1 S1.00 ; enable bang-bang mode for the bed heater and set PWM limit M140 H0 ; map heated bed to heater 0 M143 H0 S120 ; set temperature limit for heater 0 to 120C M308 S1 P"temp1" Y"thermistor" T100000 B4138 ; configure sensor 1 as thermistor on pin temp1 M950 H1 C"out1" T1 ; create nozzle heater output on out1 and map it to sensor 1 M307 H1 B0 S1.00 ; disable bang-bang mode for heater and set PWM limit M143 H1 S280 ; set temperature limit for heater 1 to 280C ; Fans M950 F0 C"out3" Q500 ; create fan 0 on pin out3 and set its frequency M106 P0 C"Part" S0 H-1 ; set fan 0 name and value. Thermostatic control is turned off ; Tools M563 P0 D0 H1 F0 ; define tool 0 G10 P0 X0 Y0 Z0 ; set tool 0 axis offsets G10 P0 R0 S0 ; set initial tool 0 active and standby temperatures to 0C ; Custom settings M570 H0 P600 ; for heater 0, it will wait 600 seconds for the temperature anomaly to persist before raising a heater fault. G31 P500 X45 Y0 Z4[bestaande config jeroen.g](/assets/uploads/files/1702210977918-bestaande-config-jeroen.g) -
@Jeronimo88 said in Ender 5 plus with Duet3d mini5+ PD7i and E3D Hemera config help:
It homes to the right back corner(where the microswitches are)
Isn't this a high end of the axis?
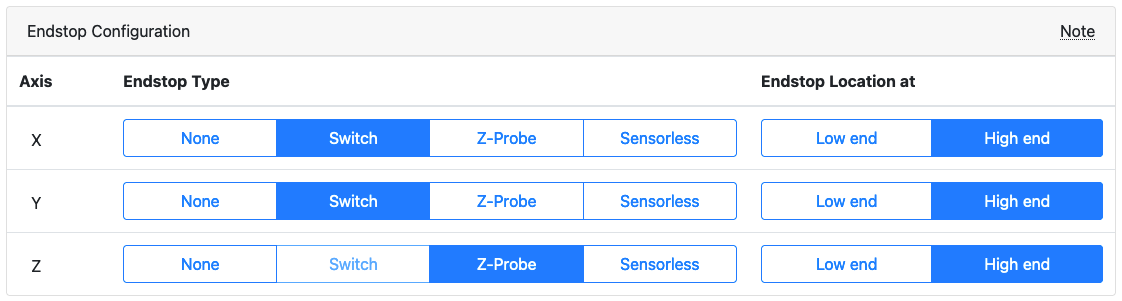
Did you try moving the axes after home? (not sure it's a good idea to do it unattended)I think than for high end end-stops, you M574 must use "2" on the axis, not "1"
something like this:... ; Endstops M574 X2 S1 P"!io5.in" ; configure switch-type (e.g. microswitch) endstop for high end on X via pin !io5.in M574 Y2 S1 P"!io6.in" ; configure switch-type (e.g. microswitch) endstop for high end on Y via pin !io6.incode_text .... -
this can be useful:
https://docs.duet3d.com/en/How_to_guides/Commissioning
or more specific from section 8, 9 and 10 of it -
Thanks for the reply, so i jumped the gun and changed those 2 values. X and Y homed, but when Z is getting homed it sounds like a coffee machine.
Pressed the emergency, and looked at it. Ive tryed also to put the Z on highend but that does the same.
When i go back to the X1 and Y1 it works with out the hard grinding noise.Any pointers on that perhaps? Also reading the documentation(again haha)
In the mean time i also played with ! signal en the homing x script. Because of the values.
When i changed to X2 it did said after homing X it was on 350. But then when i try to move it to "zero" it tries to go to the right(through the microswitch). SO i thought perhaps removing the ! will make the switch between right and left, but then it runs to the other side without homing. SO for extra advice i also upload my homings.Also added a photo;
Green cirkel is where the switches are for X and Y. and where it homes now.
REd cirkel is where i beleven the X0 and Y0 point should be?
Blue is the front of the bed
R=Right side(X350)
L=Left side?(X0)?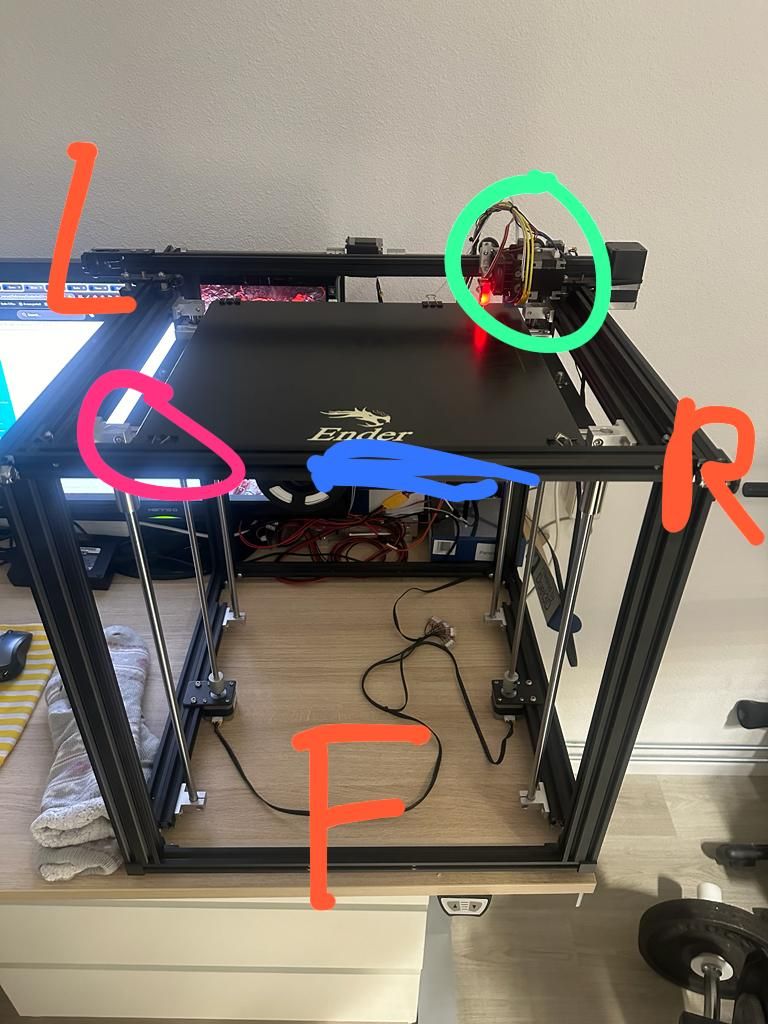
-
@Jeronimo88 If you have recently set your printer up, and used the configuration tool (at https://configtool.reprapfirmware.org/Start) to do it, and haven't made any (or many) changes to it, it may be easier to load your config.json file (it's in the zip file you download from the configuration tool) into the configuration tool, and change the X and Y endstops to 'High end' there, eg
Create a new set of configuration files. It will then generate correct homing gcode files, which you can then upload.Otherwise, you will need to change config.g, homeall.g, homex.g and homey.g. if you want to do it manually, see my post here: https://forum.duet3d.com/post/316016
Ian
Bed-slinger - Mini5+ WiFi/1LC | RRP Fisher v1 - D2 WiFi | Polargraph - D2 WiFi | TronXY X5S - 6HC/Roto | CNC router - 6HC | Tractus3D T1250 - D2 Eth
-
Hello Ian, thanks for the reply. I'll look in to it, but i bought it like this. Can i download the json file from the duet web-interface on the same place as where i can download/edit the configs? Im currently at work, but i will check it later.
Otherwise ill go for option 2 and look in to the topic you said and see if i can figure it out.
-
@Jeronimo88 Because your config was generated by the configuration tool (it says that at the top of the config.g file you posted) the config.json file is probably in the /sys folder. Download this and upload it to the firmware configuration tool.
Ian
Bed-slinger - Mini5+ WiFi/1LC | RRP Fisher v1 - D2 WiFi | Polargraph - D2 WiFi | TronXY X5S - 6HC/Roto | CNC router - 6HC | Tractus3D T1250 - D2 Eth
-
Ive did the changes, X went good, but the Y goes now to the front side(but there is no switch). i'm wondering why that it. It would be weird if the X would be X2 and the Y would be a Y1 right?
Am i looking at this wrong? Upper right corner should be X350-Y-320 and the xyz absolute cordinate would be at the front left corner(Diagonal oppisite of the X-Y end switched "top right corner"
Ive uploaded the new files.
(Is there a way that i can test/verify that my x and y motor are going the rightway-are connected proparly? So X350 is upper right, so when i go -x 5 it should go X345? -
I fixed it, i changed the motor direction to S0 instead of S1 for x and y and now its all good, with the changes for the high end stops.
Thx! - Solved.
-
 undefined Phaedrux marked this topic as a question
-
undefined Phaedrux has marked this topic as solved