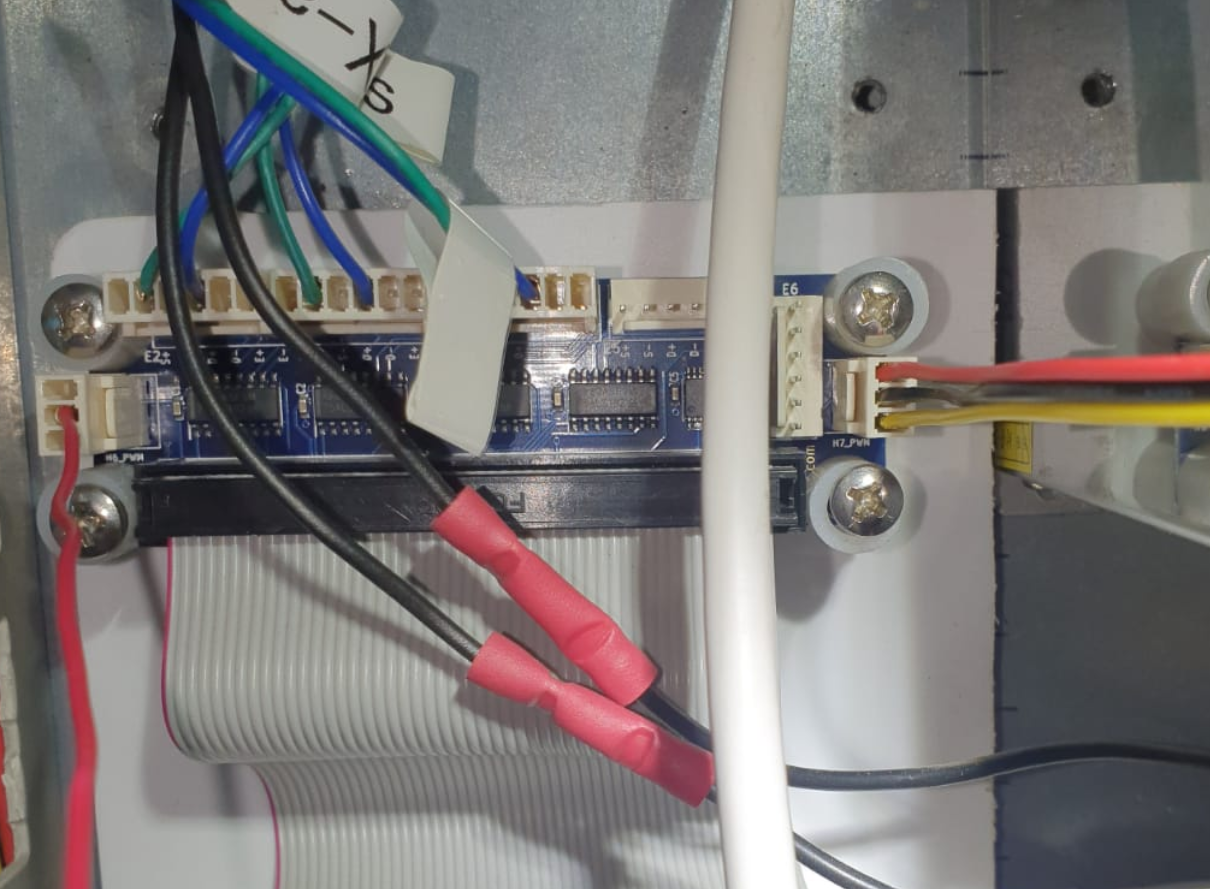
@bearer @Phaedrux Apparently the hotend heating element wires touched each other, resulting in a blown fuse (the 7.5A). I noticed when powered by USB, there was still no current to the extruder heater when set on active. Waiting on my new fuse.
Best posts made by peterartechno
-
RE: Duet wifi module only works when connected to USBposted in Duet Hardware and wiring
-
RE: problems while probingposted in Tuning and tweaking
@jay_s_uk
ThanksI use 2 X-motors, 1 Y-moor and 2 Z-motors, all with external stepper drivers but that particular one is the only one with problems. I am going to try it right now!
-
RE: Multi heater bedquestionsposted in Duet Hardware and wiring
I would take into account that you have 4x1300W of power. Do you have a heavy duty power group? Normally the fuse would snap with this wattage.
I use two silicone mats that are put in parallel which give 530W each.
If you have a 1m2 bed with 5200W of power, that is more than enough. I have a bed of 1.4m2 with 1060W which gets my bed up to 50 degrees.I would suggest doing it in parallel as that does not change the voltage of your flow for each heater. If one of your heaters fail and it is in series, they all stop. Also I don't know if your heater can work on 30V (120/4) when placed in series?
-
RE: problems while probingposted in Tuning and tweaking
Thank you so much! It worked! Finally worked out the problem I encountered weeks ago!
You have both made my daykind regards,
Peter
Latest posts made by peterartechno
-
RE: [Solved] Set z endstop as a trigger.posted in Gcode meta commands
@Fatalis22
I recently switched to a BLTouch as well. My first thought is that when activating S2 (define Z to use probe), the Zstop is not activated.I take that you also have your deploy and retract macros that you have uploaded to your Duet?
You could use the pinheaders on the connection hub for the EBOB. There are multiple PWM pins that you can use to use an extra endstop.also, what is the J1 doing in your M581 command?
-
RE: Multi heater bedquestionsposted in Duet Hardware and wiring
@Tpmoses You take the amperage value of the heater when they are all in series. When you use series-parallel, that would make it 20A right? Not 10. Still the heater has to be able to work at 60V. I don't know if you have an isolated heater but I got electrocuted once by my aluminium heated bed so make sure you have it grounded.
I have a 10mm aluminium plate which takes up to 30 min to reach 50 degrees.
@o_lampe If he says so, 5200W is a lot of heating power.
@Tpmoses Why above 5000mm2? It is just a matter of the amount of power that you put combined with the thermal energy consumption of your material. I have my heaters set so I can decide if I want both heaters or just one. Waste of energy to power them both if I only use half the area.
-
RE: Multi heater bedquestionsposted in Duet Hardware and wiring
I would take into account that you have 4x1300W of power. Do you have a heavy duty power group? Normally the fuse would snap with this wattage.
I use two silicone mats that are put in parallel which give 530W each.
If you have a 1m2 bed with 5200W of power, that is more than enough. I have a bed of 1.4m2 with 1060W which gets my bed up to 50 degrees.I would suggest doing it in parallel as that does not change the voltage of your flow for each heater. If one of your heaters fail and it is in series, they all stop. Also I don't know if your heater can work on 30V (120/4) when placed in series?
-
RE: BLTouch not responding to codeposted in Duet Hardware and wiring
@droftarts That would be a big help for anybody who has the EBOB!
-
RE: Z-Motors don't drive powered by external stepper driverposted in Duet Hardware and wiring
I use Leadshine D808 stepper drivers and I had a problem of the pulselength of my signals. They required to be a minimum of 5.0 us. Right now you have M569 P* T2.5:2.5:5:5, you could try that. It also recommends that in the manual of your stepper driver: https://www.damencnc.com/userdata/file/1750-1_DM556_datasheet.pdf
When using external stepper drivers, the M305 does not do anything since you use the dipswitches on your driver.
what is your wiring setup, do you have power-sourcing or sinking? I have all my + pins (EN+, DIR+, PUL+) powered on 5V, where I use the - pins for pulses.
Did you check the fuses on your board?
I would really like to see a picture of your printer if possible! I have one of X900 Y1400 Z400 and thought that was already massive!
I also use the expansion breakout board and that gives me 3.3V but using the 5V setup as previously explained, I can change the difference in voltage which makes a switch.
-
RE: BLTouch not responding to codeposted in Duet Hardware and wiring
Thank you! That did the trick
(such a simple answer can be so frustrating haha) -
BLTouch not responding to codeposted in Duet Hardware and wiring
Re: using BLtouch when using Duet Breakout Expansion Board
As can be read in the topic above, I want to use a BLTouch for my printer.
I use a Duet wifi + Breakout expansion board.
Of all the expansion boards and manuals, this particular board has no manual on the wiki unfortunately.M115: FIRMWARE_NAME: RepRapFirmware for Duet 2 WiFi/Ethernet FIRMWARE_VERSION: 3.1.1 ELECTRONICS: Duet WiFi 1.02 or later FIRMWARE_DATE: 2020-05-19b2
DWC 2.0.7What I did:
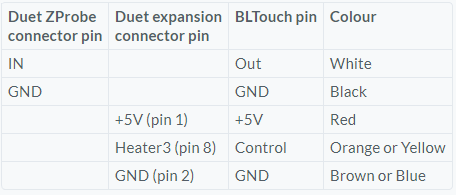
I used this website (https://duet3d.dozuki.com/Wiki/Connecting_a_Z_probe) to set my BLTouch.

Since I do not have a Duex I used this setup. Because I use the Expansion Breakout board (EBOB), the pins in this table are not available.I used the H7_PWM on the EBOB where:
Heater3 becomes exp.heater7
+5V is +5V (on H7_PWM)
GND is GND (on H7_PWM)

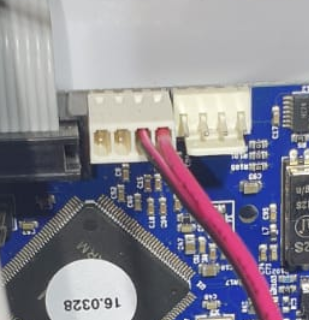
Z probe in and GND are for the white and black cable.

Don't mind the colors of the cables, they are correct. I double checked all the cablesWhen I start the printer, the BLTouch does deploy and retract two times. From that, I conclude that the cables are correct.
My problem is with the software implementation. I followed all the instructions on every page I could find, tried the troubleshooter but it does not react to my commands.
My config.g file:
; General preferences
G90                                            ; send absolute coordinates...
M83                                            ; ...but relative extruder moves
M550 P"Artechno Printer"                       ; set printer name

; Network
M551 P"Artechno"                               ; set password
M552 S1                                        ; enable network
M586 P0 S1                                     ; enable HTTP
M586 P1 S0                                     ; disable FTP
M586 P2 S0                                     ; disable Telnet

; Drives
M569 P5 R1 S1 T5.0:5.0:5:5                                 ; physical drive 0 goes forwards
M569 P6 R1 S0 T5.0:5.0:5:5                                 ; physical drive 1 goes forwards
M569 P7 R1 S0 T5.0:5.0:5:5                                 ; physical drive 2 goes forwards
M569 P8 R1 S1 T5.0:5.0:5:5                                 ; physical drive 3 goes forwards
M584 X5 Y6 Z7 E3                               ; set drive mapping
M350 E16 I0                                    ; configure microstepping without interpolation
M92 X80.00 Y80.00 Z320.00 E410                 ; set steps per mm
M566 X900.00 Y900.00 Z12.00 E120.00            ; set maximum instantaneous speed changes (mm/min)
M203 X9000.00 Y9000.00 Z180.00 E1200.00        ; set maximum speeds (mm/min)
M201 X1000.00 Y1000.00 Z20.00 E200.00            ; set accelerations (mm/s^2)
M906 X800 Y800 Z800 E800 I30                   ; set motor currents (mA) and motor idle factor in per cent
M84 S30                                        ; Set idle timeout

; Axis Limits
M208 X0 Y0 Z0 S1                               ; set axis minima
M208 X1200 Y900 Z400 S0                       ; set axis maxima

; Endstops
M574 X1 S1 P"!xstop"                            ; configure active-high endstop for low end on X via pin xstop
M574 Y1 S1 P"!ystop"                            ; configure active-high endstop for low end on Y via pin ystop
M574 Z1 S2                                     ; configure Z-probe endstop for low end on Z
M950 S0 C"exp.heater7"
M558 P9 C"^zprobe.in" H5 F100 T2000				; BLTouch probe type
G31 X-26 Y24 Z5.0 P25							; Probe offsets
M557 X15:215 Y15:195 S50                        ; define mesh grid
M307 H7 A-1 C-1 D-1
M581 T1 S1 P"e1stop"							; When motor stalls, pause print

; Z-Probe


; Heaters
M308 S0 P"bedtemp" Y"thermistor" T100000 B4138 ; configure sensor 0 as thermistor on pin bedtemp
M950 H0 C"bedheat" T0                          ; create bed heater output on bedheat and map it to sensor 0
M307 H0 A199.0 C962.6 D60 B0                   ; enable bang-bang mode for the bed heater and set PWM limit
M140 H0                                        ; map heated bed to heater 0
M143 H0 S120                                   ; set temperature limit for heater 0 to 120C
M308 S1 P"e0temp" Y"thermistor" T100000 B4138  ; configure sensor 1 as thermistor on pin e0temp
M950 H1 C"e0heat" T1                           ; create nozzle heater output on e0heat and map it to sensor 1
M307 H1 B0 S1.00                               ; disable bang-bang mode for heater  and set PWM limit

; Fans
M950 F0 C"fan0" Q500                           ; create fan 0 on pin fan0 and set its frequency
M106 P0 S0 H-1                                 ; set fan 0 value. Thermostatic control is turned off
M950 F1 C"fan1" Q500                           ; create fan 1 on pin fan1 and set its frequency
M106 P1 S1 H1 T45                              ; set fan 1 value. Thermostatic control is turned on

; Tools
M563 P0 D0 H1 F0                               ; define tool 0
G10 P0 X0 Y0 Z0                                ; set tool 0 axis offsets
G10 P0 R0 S0                                   ; set initial tool 0 active and standby temperatures to 0C

; Custom settings are not defined
I also have a deployprobe.g:
M280 P0 S10
and a retractprobe.g:
M280 P0 S90
I tried with and without the I1, no difference.I tried different values for P as long as they corresponded with the P/S from my M950 command (as it suggests on the manual pages), no difference.
My M401 and M402 don't do anything.
I read that the M307 H7 A-1 C-1 D-1 does not do anything but I tried it with and without, no difference.
I also read that you should check your config-override.g but apparantly I do not have one.I think something is wrong in my code but I can't figure out why. I followed the instructions of @Phaedrux in the previous topic but somewhere I must have missed something.
I hope that somebody can help me.
Thanks in advance.
-
RE: using BLtouch when using Duet Breakout Expansion Boardposted in Duet Hardware and wiring
@Phaedrux Thanks, can I use my heater6 or heater7 pins for my BLtouch endstop?
-
RE: using BLtouch when using Duet Breakout Expansion Boardposted in Duet Hardware and wiring
@Phaedrux Can I use those for an end stop and/or an emergency button? If so, how do I put this in my config code correctly?
-
using BLtouch when using Duet Breakout Expansion Boardposted in Duet Hardware and wiring
Hello,
I have a Duet Wifi (3.1.1) where I added a expansion breakout board for external stepper drivers.
I have reached the limitation of missing pins multiple times right now:
- When I want to make an emergency button to activate M112
- When I want to use a BL touch.
I already have the expansion breakout board and need it for my external stepper drivers. Since the board uses a 50 pin cable, the pins within are not useable anymore.
Is there a way to combine the expansion breakout board and still have these options?
Thanks in advance