No, I gave up the investigation. Something about the simulation isn't accurate. Something about the real print time isn't right either.
Posts made by garethky
-
RE: slicer printing time vs real printing timeposted in General Discussion
-
RE: Resonance, spreadCycle and stealthChopposted in Tuning and tweaking
Try the motors, its worth a shot. What you showed in the video its very similar to how the Toolchanger behaved a certain speeds. The frame itself isn't a source of vibration, it can only resonate. For my case its clear the motors are adding the vibration to the system.
StealthChop is another way to prove its the motors/drivers adding the noise. Maybe it wouldn't achieve your performance goals but it would be a good data point to show that the mechanical system can indeed be quiet.
-
RE: Resonance, spreadCycle and stealthChopposted in Tuning and tweaking
So the StepperOnline 17HS19-2004S1, I'll admit I was skeptical. It doesn't sound any quieter in Stealth Chop mode, if anything its noisier. But in Spread Cycle, its significantly quieter and smoother than the Moons. So quiet that I think I could live with them in Spread Cycle mode in general and leave them on the printer. That's a big deal if you are on the Duet 2 and don't have access to Stealth Chop.
The other big difference is the low frequency rumble is greatly reduced.
I don't know why any of this is so?
The moons are 1.04 Ohm and 2.2mH
The Stepper Online motor is 1.4Ohm and 3.0mH -
RE: slicer printing time vs real printing timeposted in General Discussion
I tried printing the 100mm/s test and the printer prints at the requested speed.
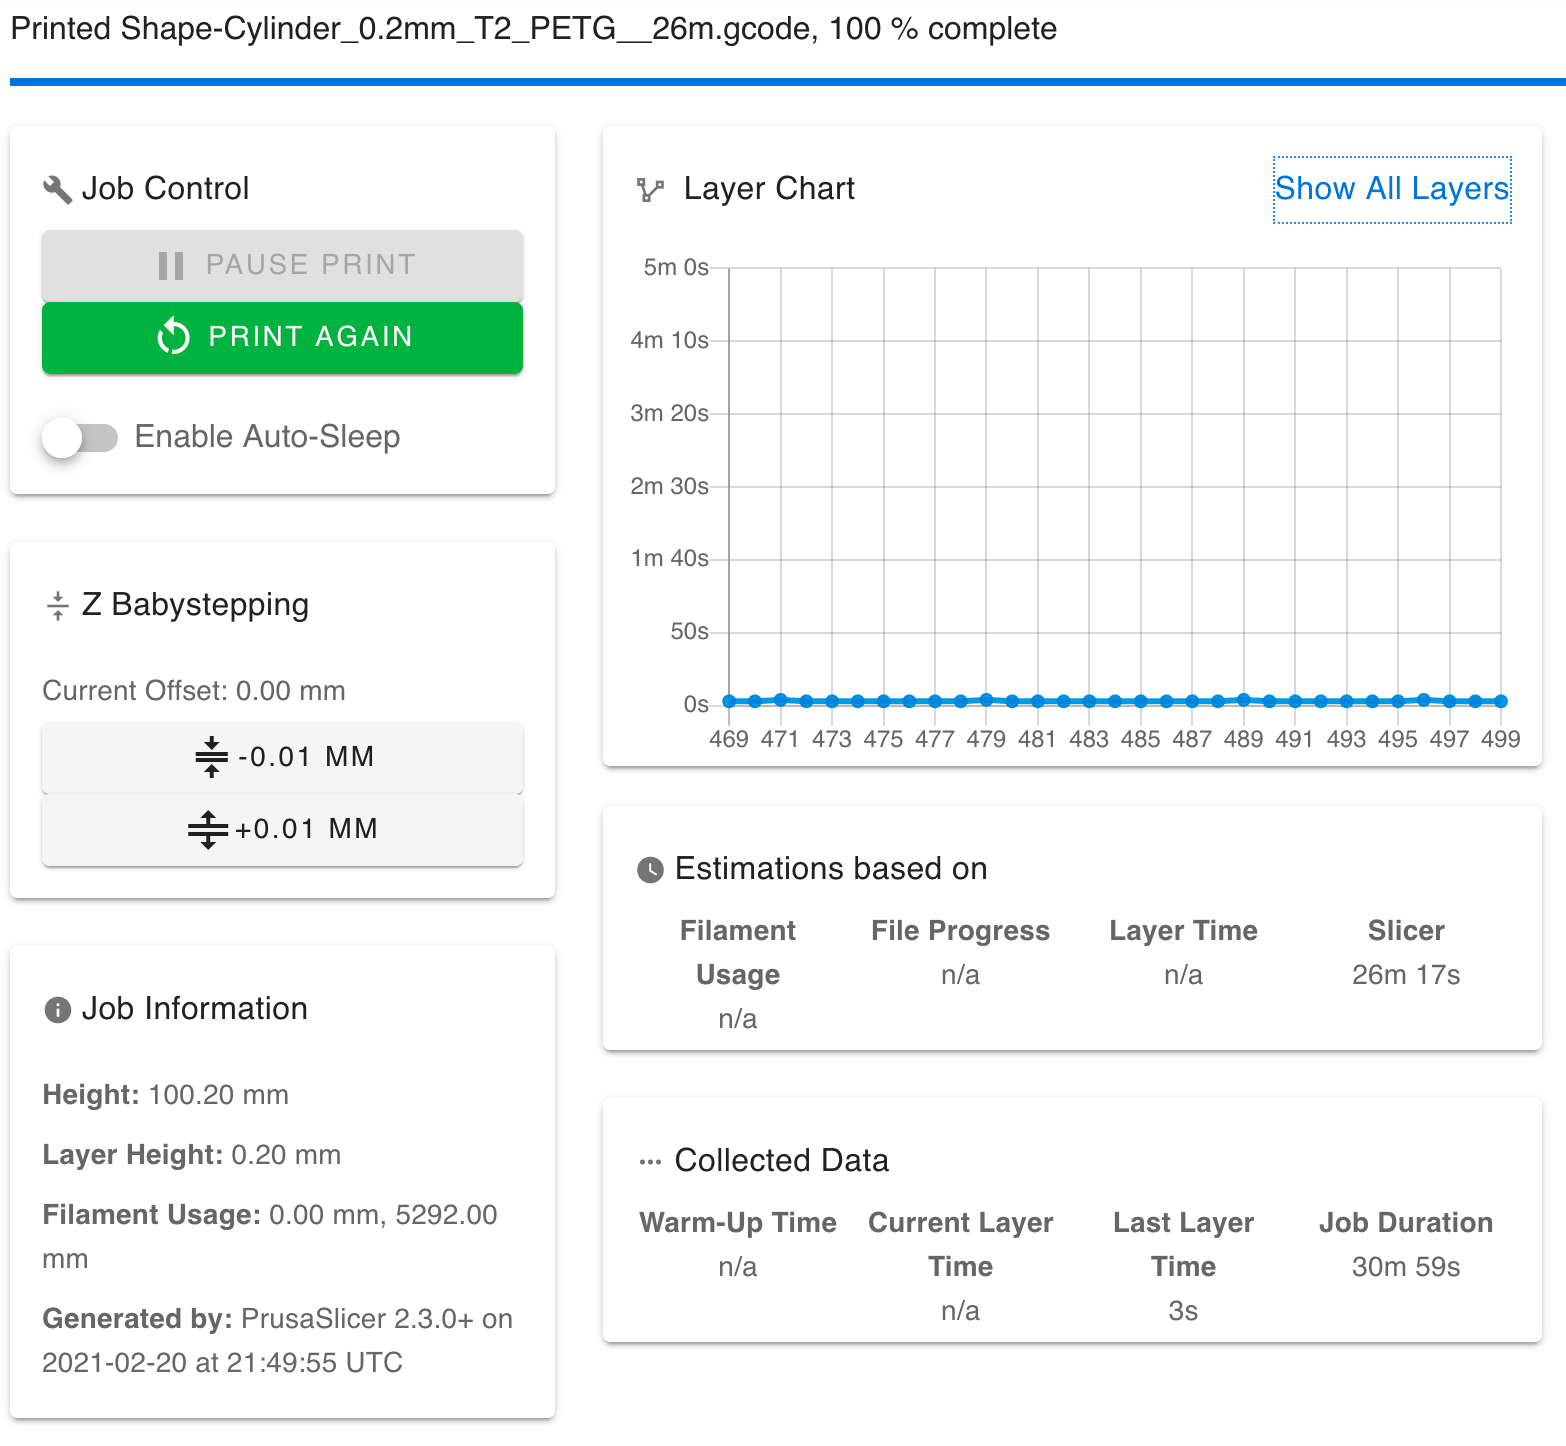
Also note that the time for individual layers in perfectly consistent as expected. Its the simulation that is wrong in this case.
My guess is my real speed issue is related to Z or E as I originally suspected but I'm unable to see that from the simulation.
-
RE: slicer printing time vs real printing timeposted in General Discussion
Oh and here is a cube for comparison, same vase mode, 100mm/s perimeters etc:

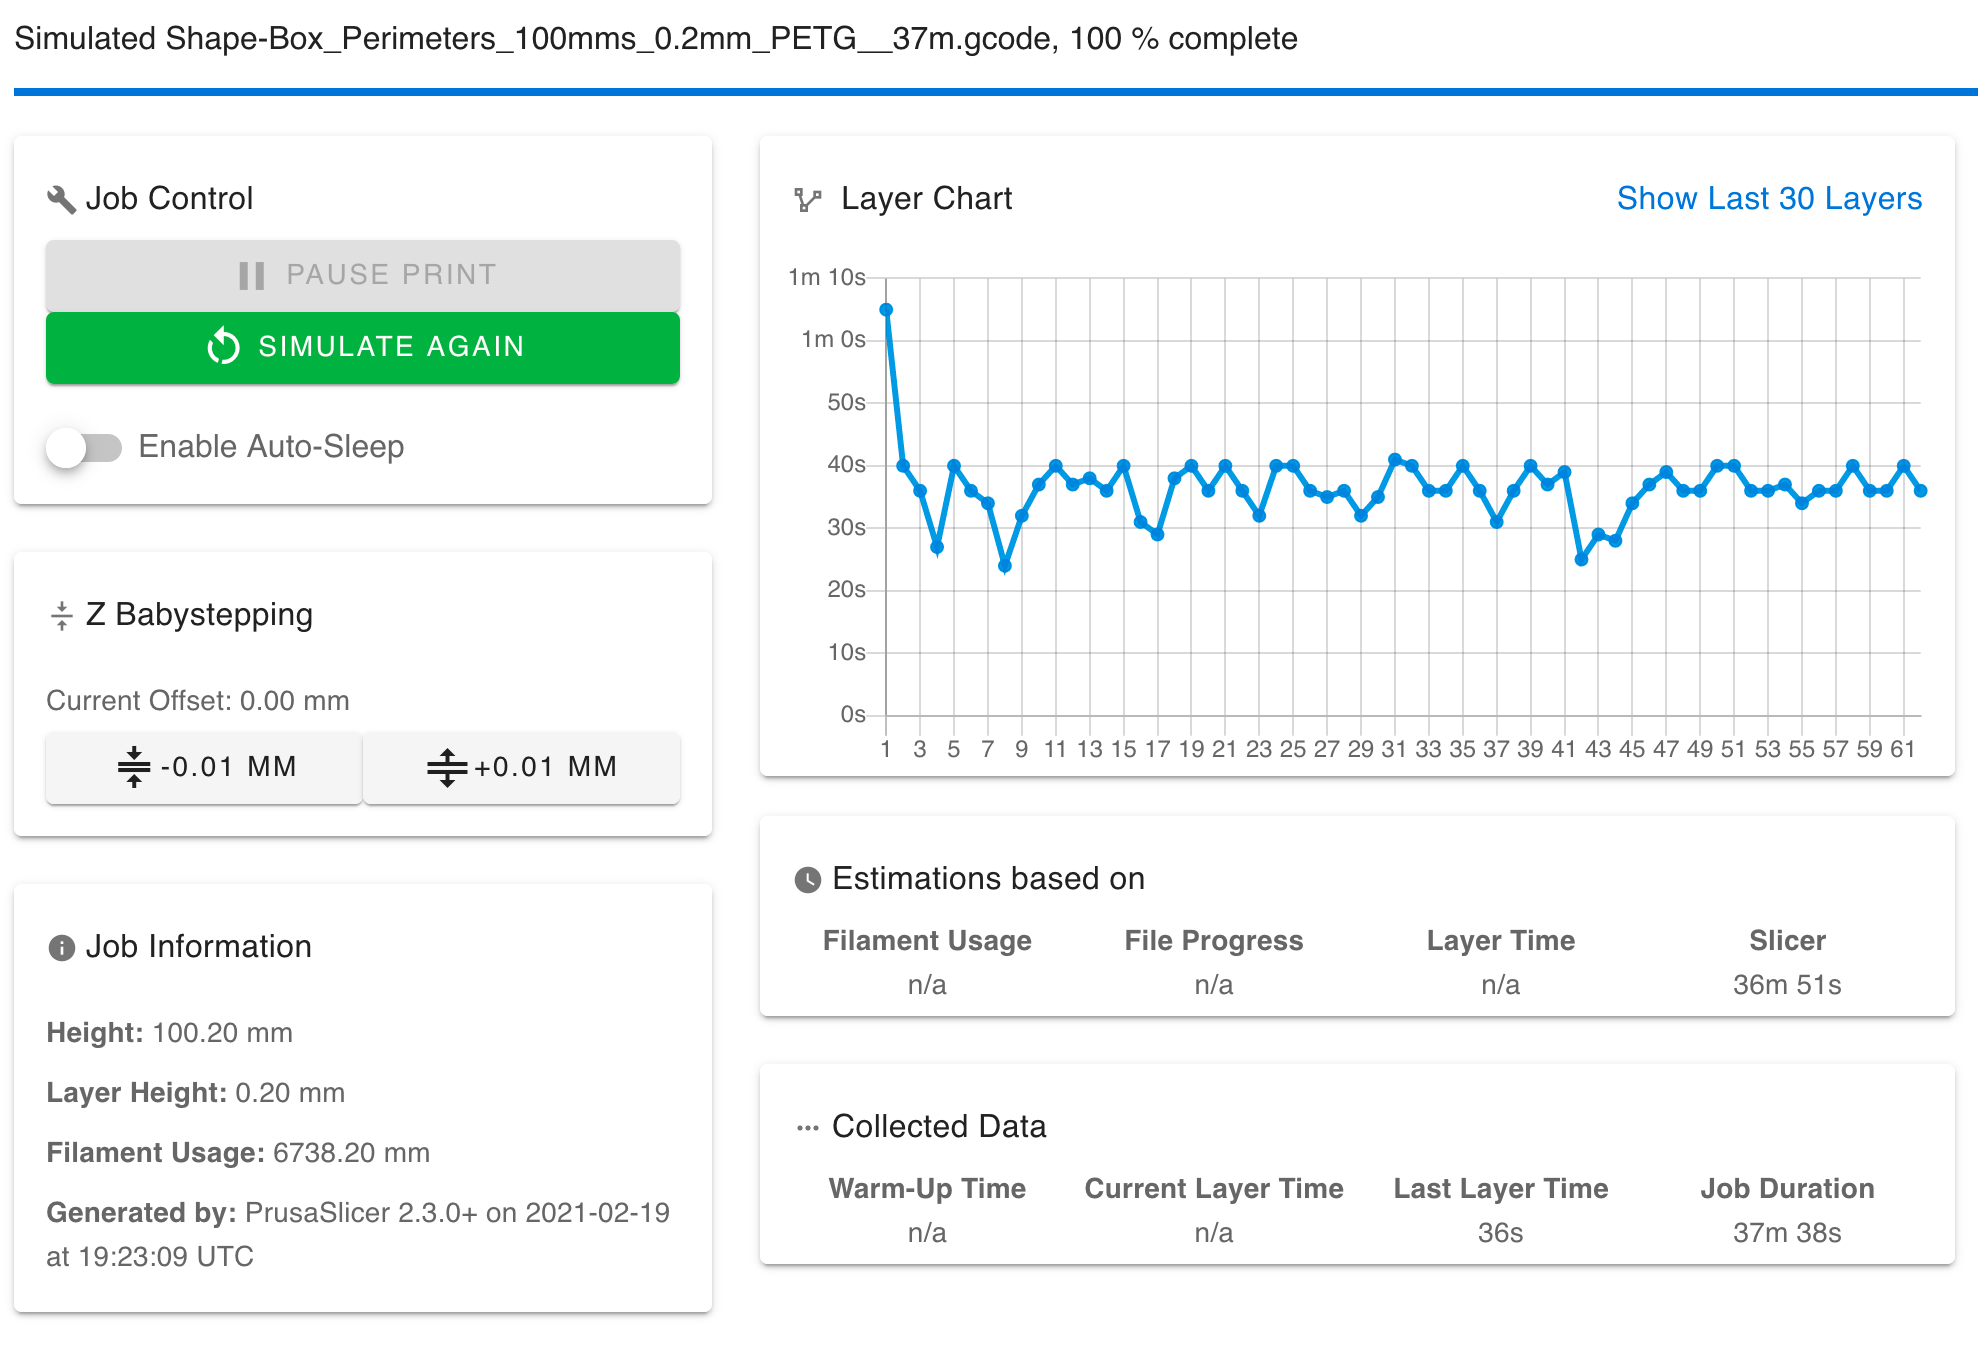
The printer is happy to do 100mm/s and take square corners that fast. Its not a printer settings issue. My computed speed estimate for that is 88.6mm/s.
-
RE: slicer printing time vs real printing timeposted in General Discussion
@T3P3Tony said in slicer printing time vs real printing time:
do you have a min layer time set in the "cooling" settings (that may be different)?
Yes, but even so, the slicer would include that in its estimate, it knows what it did. But I'm going to disable it for this test because its irrelevant.
@Phaedrux said in slicer printing time vs real printing time:
Not sure if you've tested this yet, but can you try using firmware retraction instead to see if it changes the outcome?
I can tell you from prior experience it wont but I will go one better, lets eliminate all retracts from the test print. We can do that with spiral vase mode. No retracts the whole way up, no travel moves other pauses, just plain circles. This is simple enough that we can make an estimate of print time based on the radius (50mm), height (100mm) and print speed of 35mm/s:
2π * 50 = 314.2 circumference
100mm / 0.2 = 500 layers
500 * 314.2 = 160600 mm traveled
160600 / 35mm/s = 1h 16m approximatelyThe slicers estimate is 1 hour 24 minutes which is pretty close to our estimate. You can also see see the slicer is emitting moves for a 35mm/s speed (this is the configured outer perimeter speed):

Then simulate it on the Duet:
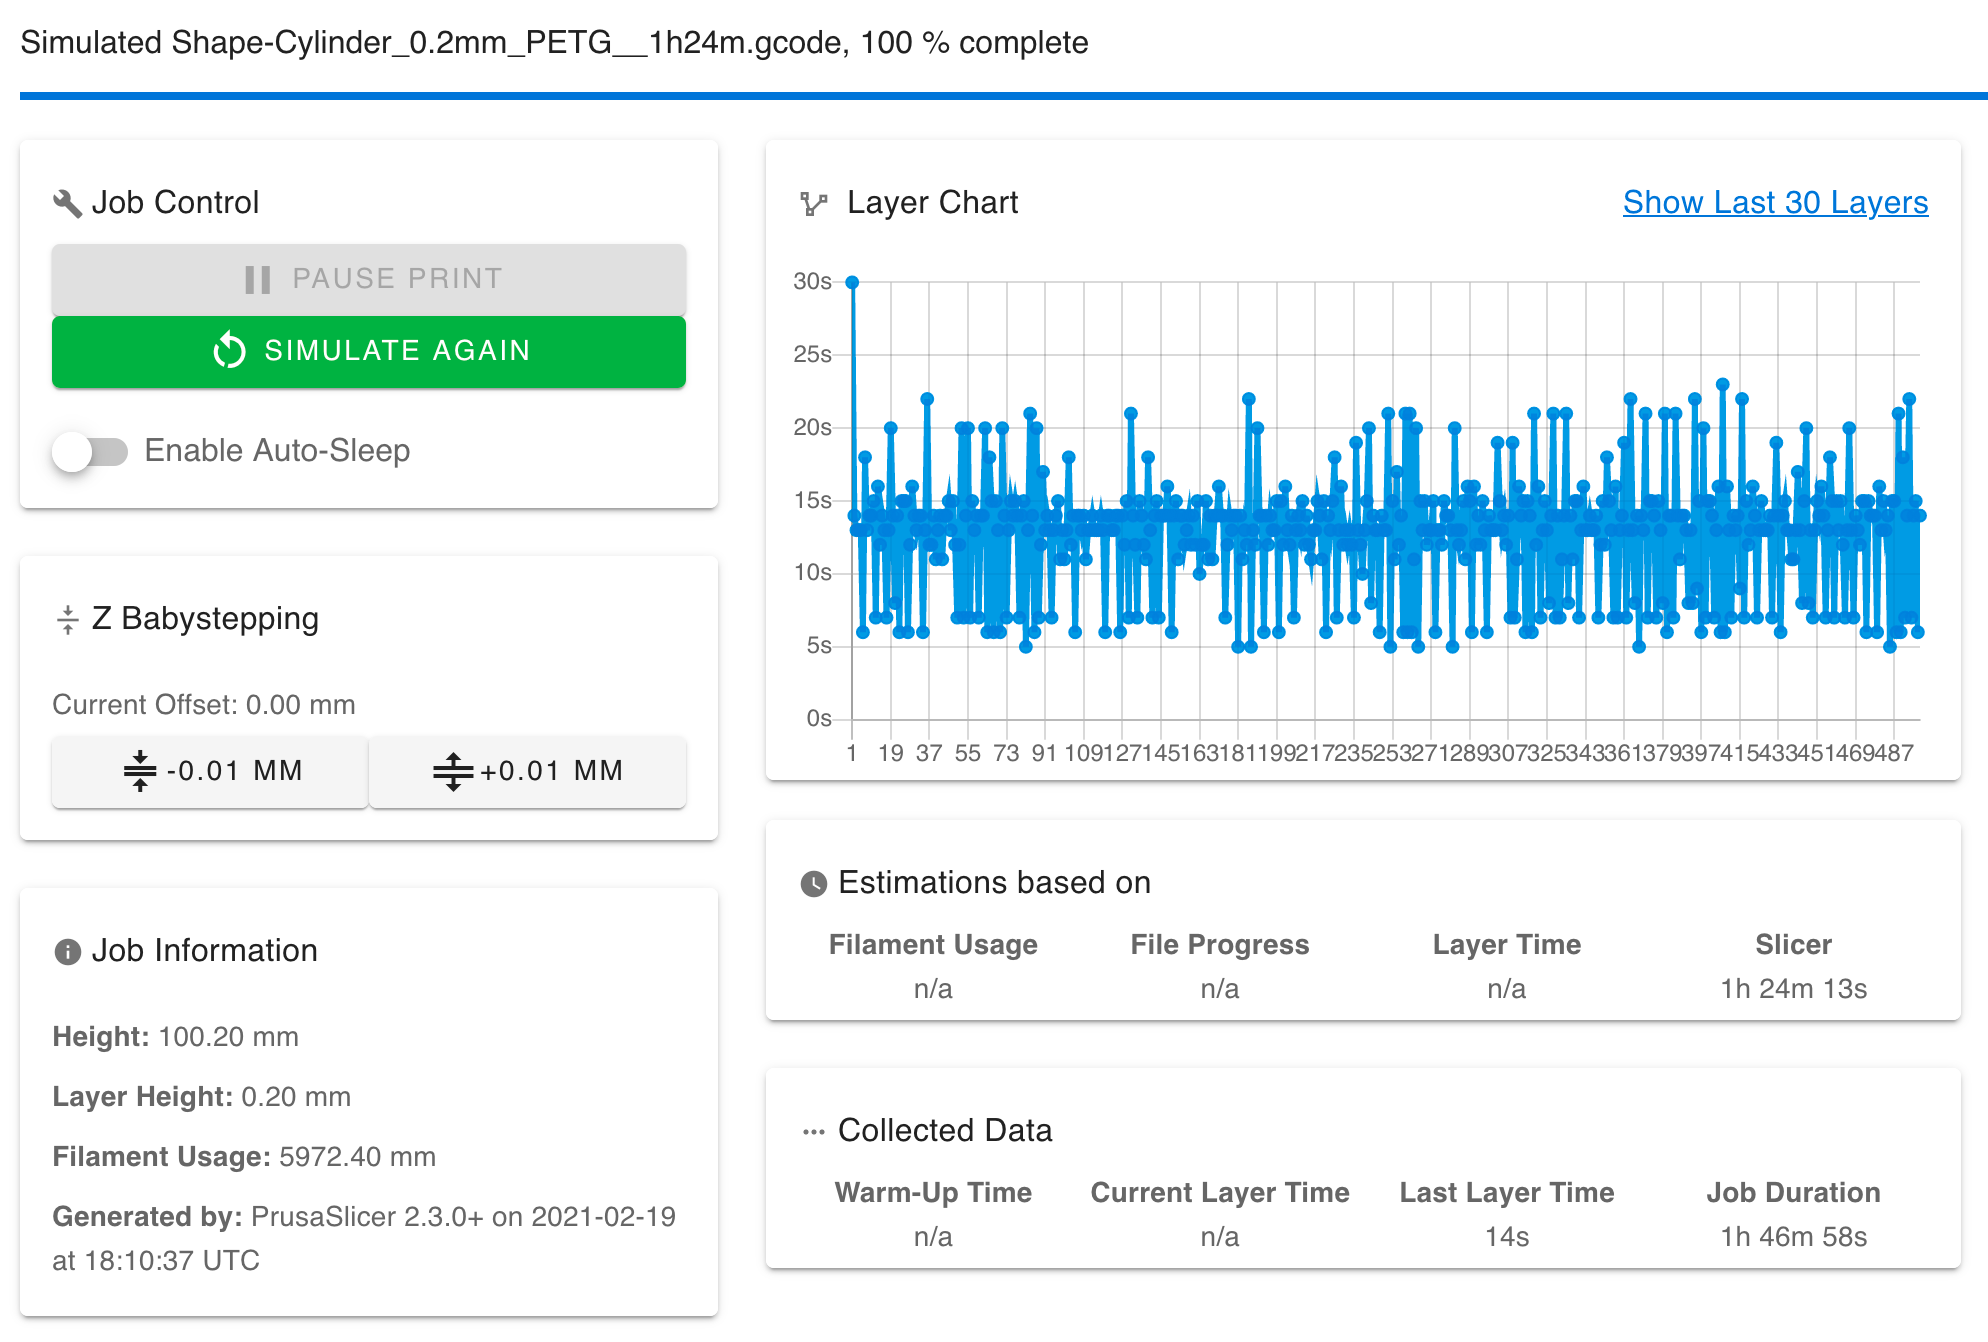
We can then estimate the Duets actual achieved speed as 160600 / 1h 46m 58s = 25.02mm/s
That's a loss of 10mm/s from the desired speed.And just out of curiosity, what happens if the outer wall speed were a lot faster? Say 100mm/s? Is the effect linear or constant?
This is where my Jaw hit the floor. Its not a constant effect, going faster makes it worse:

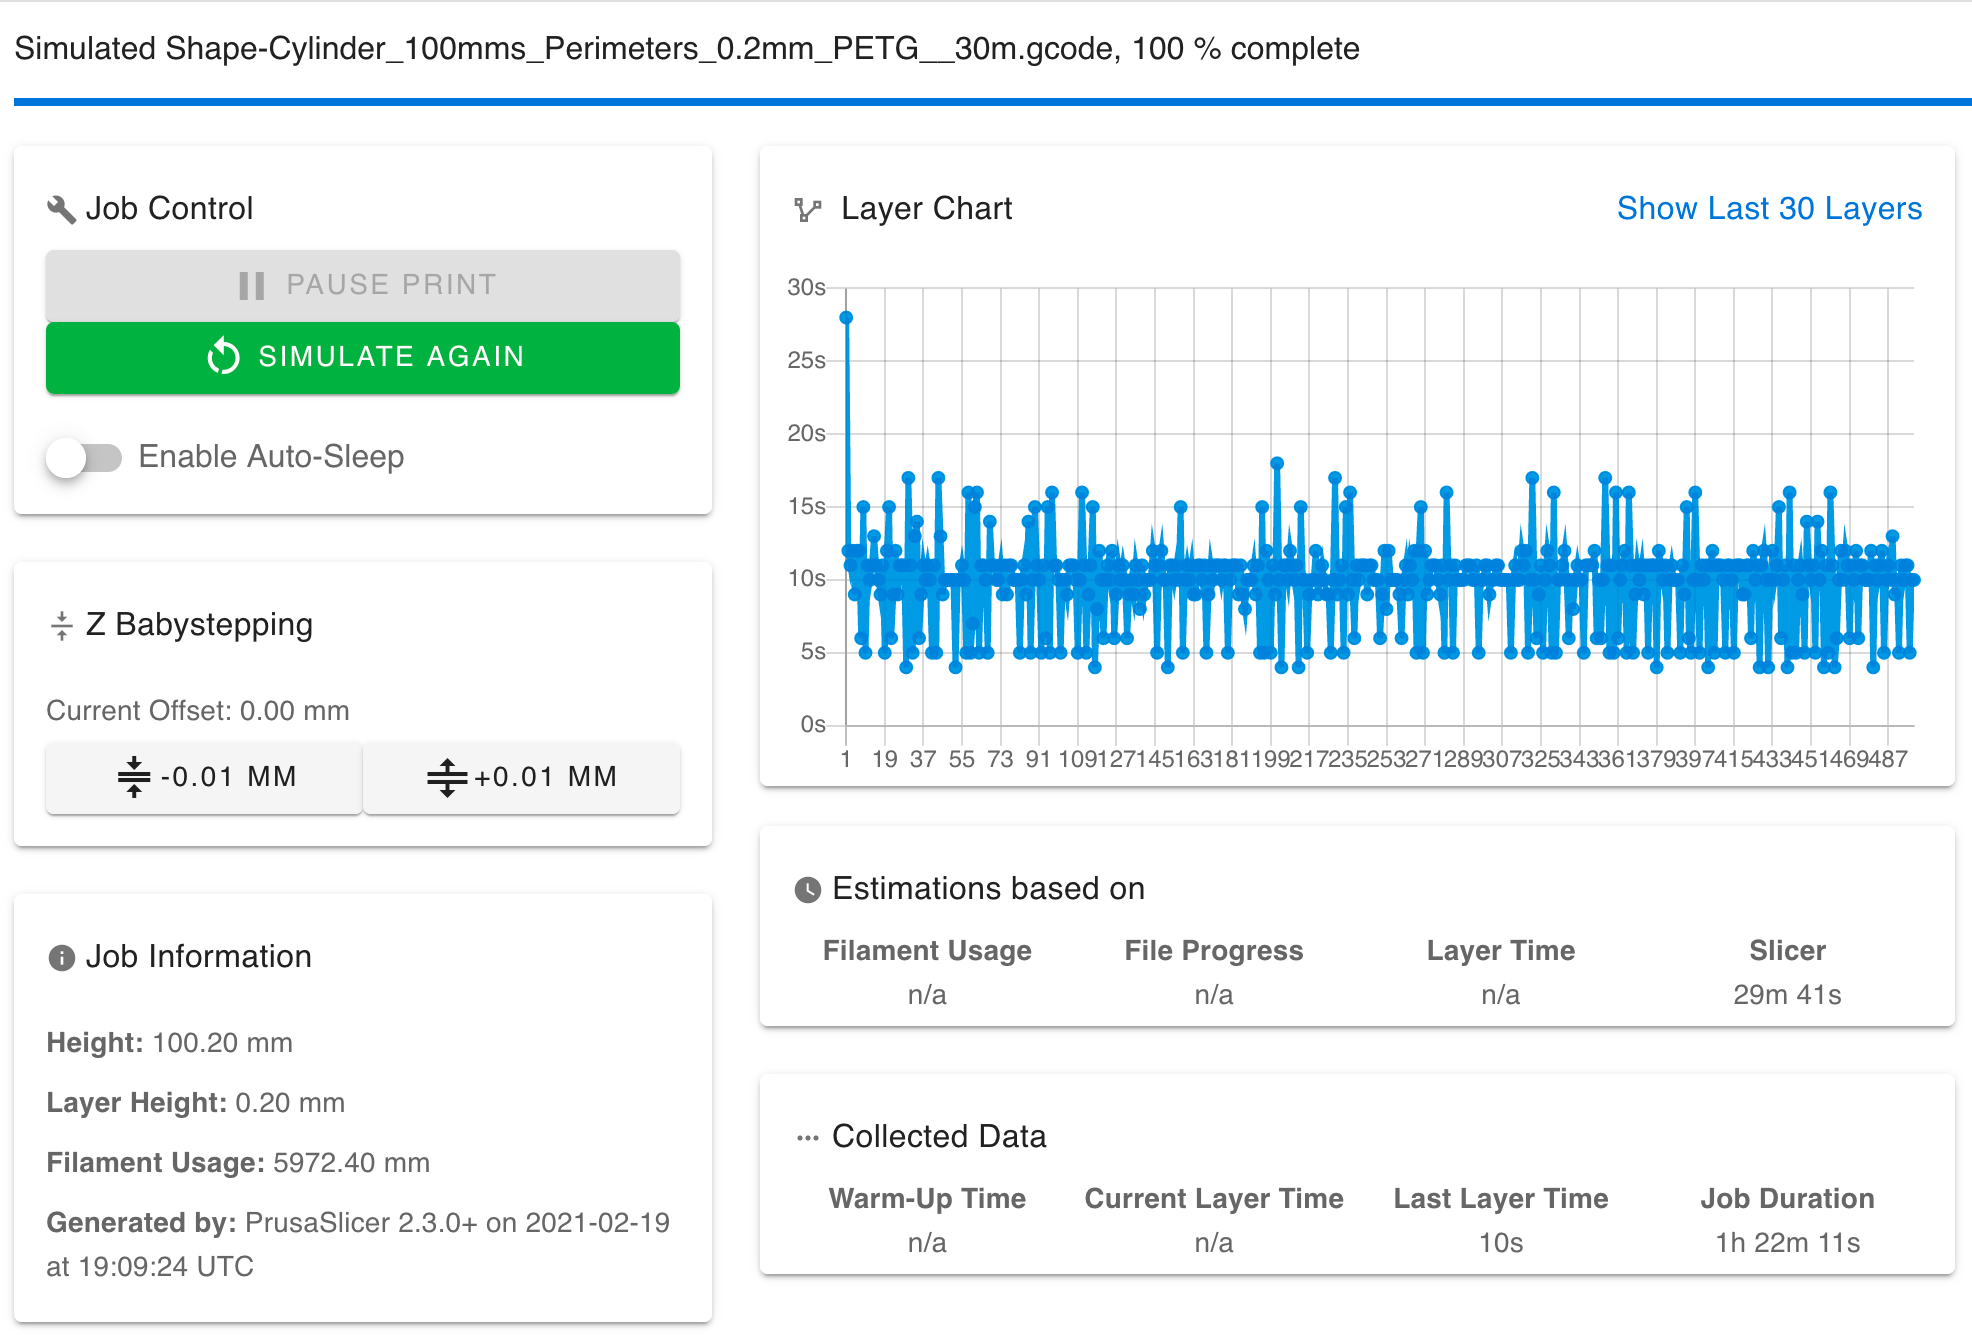
So that's 160600 / 1h 22m 11s = 32.5mm/s
-
RE: slicer printing time vs real printing timeposted in General Discussion
I tried slicing simpler shapes.
A 100mm cube with no infill, printed square and at 45 degrees to the printers axes, no top or bottom layers. Both simulations are within 2 minutes of the slicer's predictions.
100mm diameter cylinder, 100mm tall, no infill, no top or bottom layers. Seems the problem is with curves:

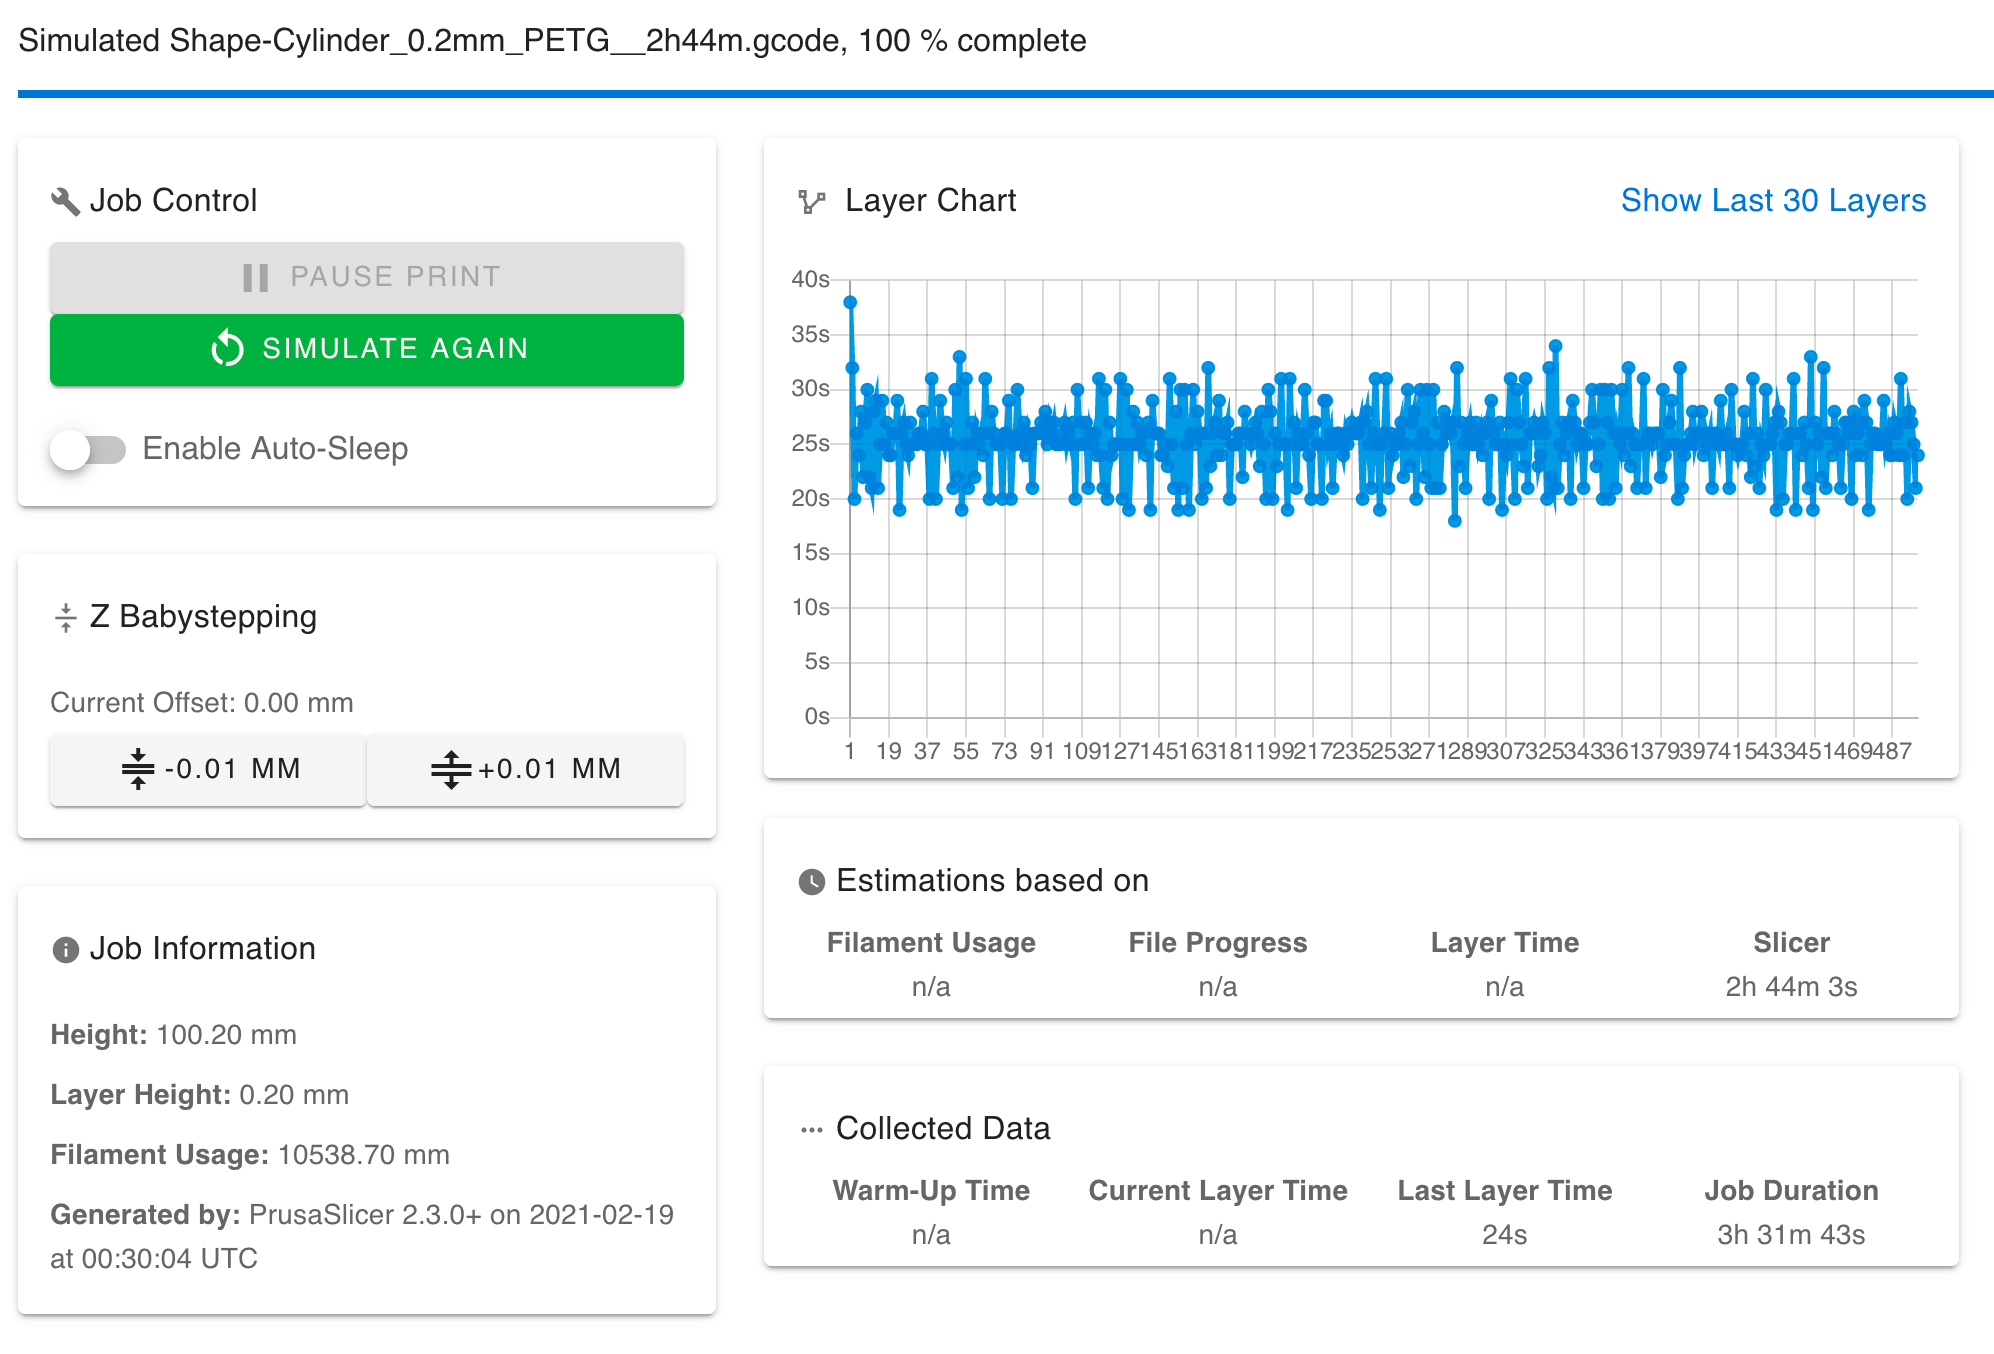
First of all, extruder and z settings are not the root cause here. There are just as many retractions in the square test so that should have impacted both shapes equally. This is about X/Y moves. That's the same conclusion I came to in previous tests.
Second the variance in layer time here is bizarre. Min layer time is 19s and max layer time (not first layer!) is 34s. All the layers are basically the same. There are no travel moves.
So what, if anything, can fix this?
- Doubling speeds to 360mm/s: no impact
- Doubling accelerations to 4000mm/s: no impact
- Raising jerk by 10x to 20mm/s: no impact
- Raising jerk to 100mm/s: no impact
- 10x speed, accel and jerk on X,Y,Z & E: no impact
Cool! So its not my config or


The gcode asks for a specific speed and acceleration that is well within the printers configured limits. The firmware thinks it achieved those requested speeds and accelerations. But the print time is almost an hour longer than the slicer's estimate.
Can we call this a bug now?
-
RE: slicer printing time vs real printing timeposted in General Discussion
@T3P3Tony Diffing the files is an excellent suggestion, thank you!
The two profiles have differing retract lengths distances. But unfortunately this was in the favor of the Duet printer, it is set to 0.4mm and the MK3S is set to 1.4mm. Other than that the two slices make the same moves with the same speeds.
I set up a profile that the two printers could share so they can slice under exactly the same settings. The only diff I can find is this:
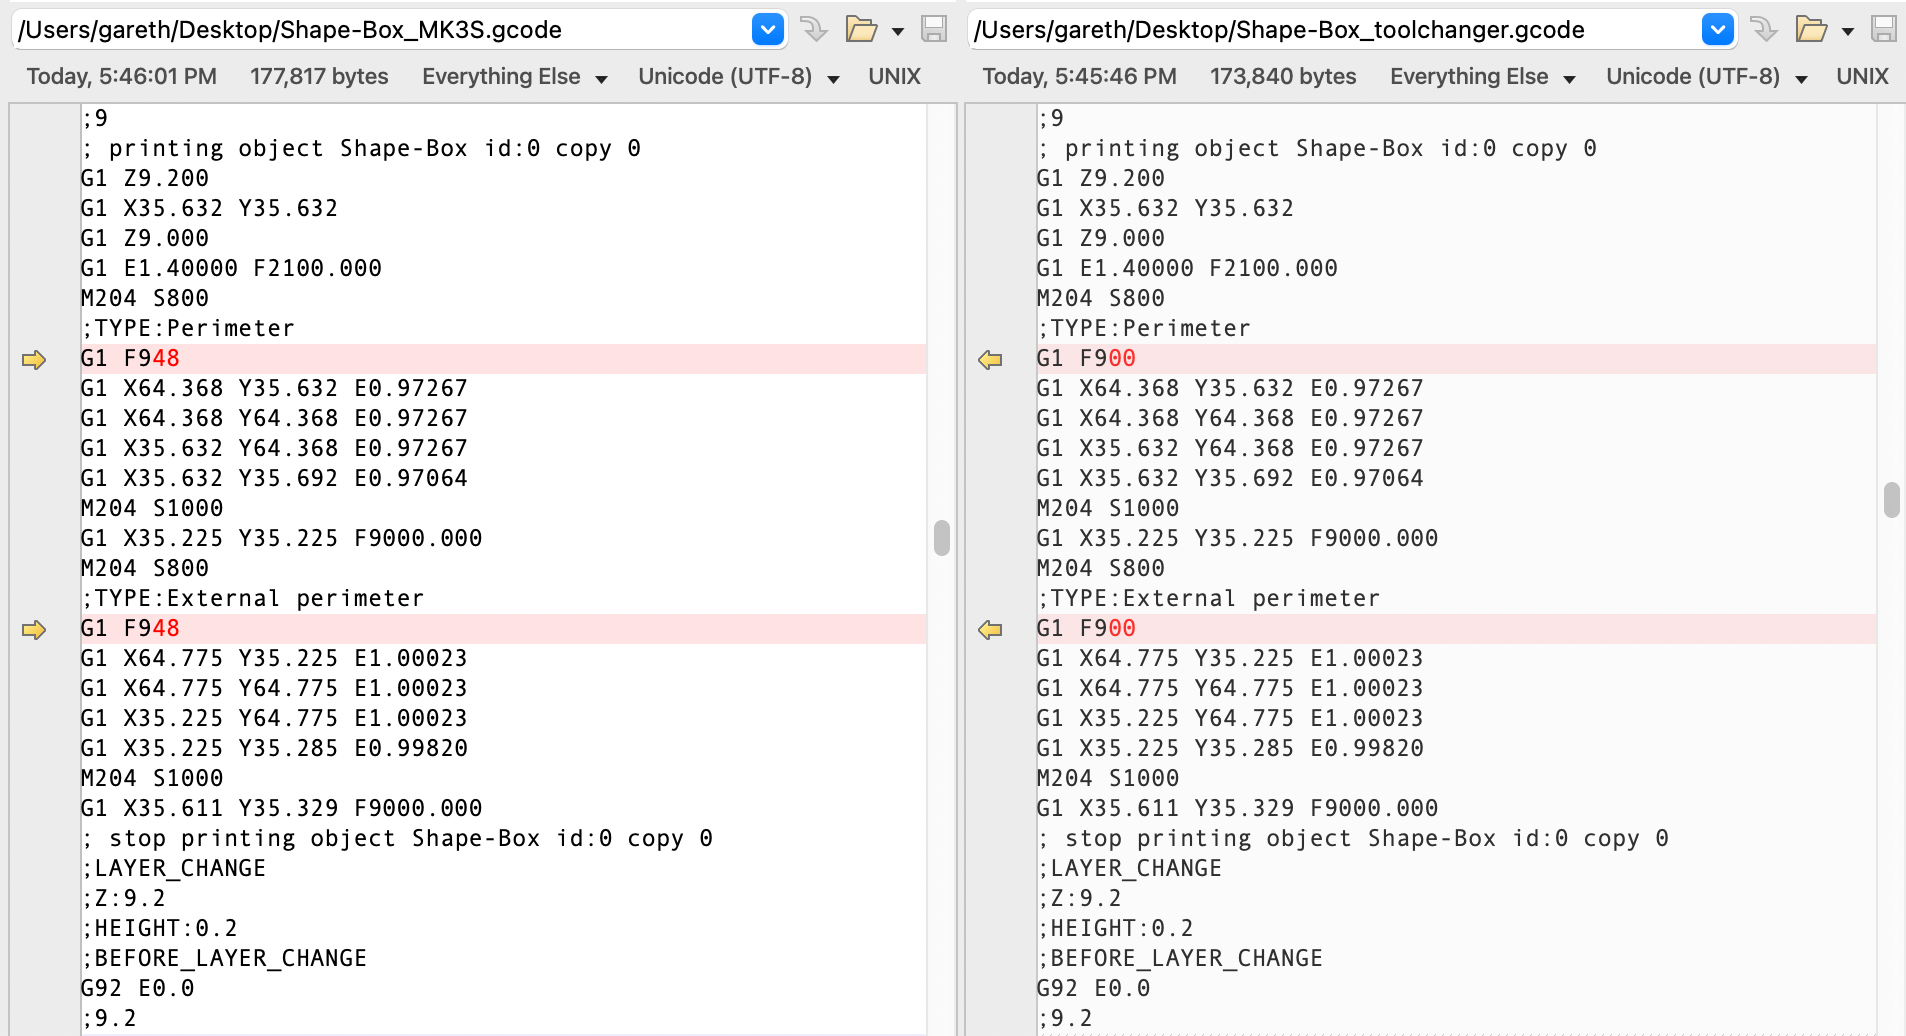
For some perimeters, the MK3S gets a slightly higher feed rate. I actually can't find the setting that controls that?
But I can force 10mm/s higher perimeter speeds on the Duet machine to compensate and run the simulation. Its still about the same amount slower, as reported above, in my simulations.
-
RE: slicer printing time vs real printing timeposted in General Discussion
This is the most relevant thread to my observations so here goes:
Prusa Slicer says that Duet is slower than Marlin. Sometimes a lot slower.
Here are the baseline speed related settings we are working with:
M203 X{300 * 60} Y{300 * 60} Z{10 * 60} C{300 * 60}  E3600:3600:3600:3600    ; Max speeds (mm/min)
M201 X2000       Y2000       Z240       C400         E3000:3000:3000:3000    ; Max accelerations (mm/s^2)
M566 X{10 * 60}  Y{10 * 60}  Z{2 * 60}  C{0.6 * 60}  E600:600:600:600        ; Max instantaneous speed changes/Jerk (mm/min)
These limits have been entered into the slicer. My Duet printer has a lower top speed than the my Prusa MK3S (170mm/s vs 200mm/s). This means it cant hit the 180mm/s travel speeds in the default 0.2mm Quality profile. So that has been reduced in the slicer to be 150mm/s. Both printers have acceleration limits higher than the highest requested acceleration of 1500mm/s^2. I have further tweaked the profiles so I'm asking both printers to print the file at the same speeds. But I have given the Duet the benefit of the higher jerk limits in the slicer.
I have also tested by printing and I am sure that:
- The Prusa Slicer estimate is accurate and a Prusa MK3S will print these jobs in the time estimated.
- The Duet's simulation is accurate. Real print time reported in DWC matches the estimates closely.
I'm slicing and testing 2 models, one is the Benchy and the other is a bunch of parts for my extruder. since the Duet's simulation is accurate I should just be able to tweak settings and simulate until the two estimates line up, right?
Benchy slicer time estimate: 1h 33m 22s
Extruder Parts slicer time estimate: 5h 53m 57sNow the Duet simulation times:
| What settings were tested?                             | Benchy     | Extruder Parts |
----------------------------------------------------------------------------------------
| stock settings                                         | 1h 46m 52s | 7h 13m 37s     |
| pressure advance off                                   | 1h 47m 7s  | 7h 16m 48s     |
| Jerk Policy 1 `M566 P1`                                | 1h 45m 55s | 7h  9m 53s     |
| Raise X/Y/Z/E Acceleration by 10x                      | 1h 40m 24s | 6h 50m 42s     |
| Raise X/Y/Z/E Jerk by 10x                              | 1h 38m 46s | 6h 30m 6s      |
| Raise X/Y/Z/E Accel & Jerk to 10x, Jerk Policy P1      | 1h 31m 0s  | 6h 3m 49s      |
So I was able to get very close to the slicer estimates, but I had to set incredibly high jerk and accelerations to do it. This is discouraging, because I cant operate a printer with (checks notes) 100mm/s of jerk in X and Y (on the MK3 its just 8mm/s!).
But I tried anyway! Starting at 20mm/s of x/y jerk the printer is positively violent. There is no way I would operate a printer like that.
The X/Y Jerk was the variable with the most impact on print time. This is not what I expected when I started the investigation. I thought my Z or E was killing me.
I don't understand this at all!


I don't think jerk is the right answer. Looking at both printers, they look similar in terms of how snappy they are. So I'm left to wonder:
- Is the clock in the duet is broken? It reports 7 hours of printing time but maybe the real time is less and we wont find this out without using an external timer?
- Is there a bug in the Core X/Y kinematics that fails to apply the speeds and/or accelerations requested?
- Aliens?


-
RE: Request for Filament Tweaksposted in Firmware wishlist
@chrishamm awesome! I will make both PRs. I don't think its very complicated at all, and from what I read in the C code there wont be any side effects. It doesn't cause a memory leak or anything like that.
-
RE: request for auto mesh probe resizingposted in Firmware wishlist
If the slicer can emit the X/Y extents of the print this should be possible now.
M557 X[slicer_minX]:[slicer_maxX] Y[slicer_minY]:[slicer_maxY] S10If the slicer cannot emit those numbers you can post-process the Gcode file with Python and extract them by looking for the min/max coordinated in
G1commands. Then insert the required line into the Gcode file (maybe by replacing a special comment in the startup gcode). -
RE: RRF3 seems to ignore PrusaSlicer Acceleration Controlposted in Tuning and tweaking
Just ran into this while debugging a print time discrepancy. There is an issue open with Prusa Slicer so hopefully it gets fixed soon: https://github.com/prusa3d/PrusaSlicer/issues/5599
-
RE: Request for Filament Tweaksposted in Firmware wishlist
No one replied and I'm not keen on wasting my time building and testing a change that the maintainers will not accept because it conflicts with your future plans for the software.
Going by whats written there: https://duet3d.dozuki.com/Wiki/Filaments#Section_Loading_filaments
". You can only load one filament at once. The current filament mechanism is intended to reflect your spools and the underlying mechanism will be likely enhanced to include some usage statistics as well."
My PR would be to expressly remove this idea. If you want to track filament usage per-spool then you should add that as a separate feature for spool tracking. I don't think the two ideas are incompatible, If you add spool tracking as an extension to filaments you can make the individual spool the thing that can only be loaded into 1 extruder. But we don't have that yet, and even if we did, I don't see why I would copy my filament config for every spool of filament that I buy. Nor would I want the filament selection menu cluttered with dozens of spools of filament. Config for a filament type and tracking data for an individual spool are two different concepts.
You can keep a file for spools in the filament directory with per-spool statistics. Making a new spool of PETG wouldn't require copying a filament, its just a new line in the stats file. After you select a filament you can then, optionally, select an individual spool if you want to do spool tracking. This de-clutters the main selection menu.
Can I get a response so I can move forward on this @dc42 or @chrishamm?
-
RE: Resonance, spreadCycle and stealthChopposted in Tuning and tweaking
@matt3o said in Resonance, spreadCycle and stealthChop:
@garethky said in Resonance, spreadCycle and stealthChop:
I'm going to try the 1.8 degree 2 Amp steppers that the Voron community are recommending.
if they are the Moons 1.8° 2A, don't do it, I have them, they are good but they don't solve the issue (you just move the resonance to a different frequency). Also to be really fair, I get a much better surface texture with 0.9° on my corexy.
I have the Moons now. The Voron recommendation is the Stepper Online 17HS19-2004S1. I'm going with 1.8 because top speed is related to steps/second in the driver. I don't hold out much hope but it was cheap to try.
-
RE: Resonance, spreadCycle and stealthChopposted in Tuning and tweaking
@matt3o said in Resonance, spreadCycle and stealthChop:
I read your interesting report and it's exactly my experience. In real life printing I can't use switching from stealth to spread, jolts and lost steps... it's a nightmare. At "high" speed stealth is not usable, not just for the noise but it loses steps. Unfortunately that happens already at around 130mm/s (with my motors).
So honestly I don't know what else to do apart throwing more money into motors or trying a corexyuv.
Long story short, I don't think this is an issue that can be solved with stealthchop
Agreed. I'm happy that I got it to work but unhappy with being limited to 150mm/sec. I'd like to see 300 max when loaded with a tool and maybe 500 when no tool is loaded.
I'm going to try the 1.8 degree 2 Amp steppers that the Voron community are recommending. But that is the last stepper I'm going to mess with. Seeing the StealthChop results we know its not the mechanical system that's at fault.
-
RE: Resonance, spreadCycle and stealthChopposted in Tuning and tweaking
@dc42 I think the documentation is confusing people, me included, so I went to he source code:
Setting the T param on the 22XX chips does nothing:
https://github.com/Duet3D/RepRapFirmware/blob/7c571137d68a1a2de0d79e2dc1741793a96c7279/src/Movement/StepperDrivers/TMC22xx.cpp#L611Only the 51XX chip family writes the register:
https://github.com/Duet3D/RepRapFirmware/blob/7c571137d68a1a2de0d79e2dc1741793a96c7279/src/Movement/StepperDrivers/TMC51xx.cpp#L513The register it writes to is
TCOOLTHRSsee here. The documentation for M915 says that T sets the "CoolStep control register", which I think a whole lot of users assumed was the "CoolStep config register" referenced here. The config register is written to but only via the set stall detect threashold and set stall detection filer.So the calculator that people are using doesn't do what they think it does. There is no way to write all the bits of the CoolStep config registers with M915. Any large values supplied to the T parameter get truncated to 20 bits and shoved into
TCOOLTHRS. I don't think anyone pointed out this confusion.I think the documentation here and here should be updated to say that T writes to
TCOOLTHRS. The only accurate description of how this works is here.Also, my Duet3 board has 5160's, verified by inspection.
-
RE: Resonance, spreadCycle and stealthChopposted in Tuning and tweaking
@gloomyandy I'm using the Duet 3 with the
TMC2160TMC5160@dc42 removing the T5 parameter breaks the tuning! Nothing I have ever tried worked properly till I tried that suggestion.
WARNING: its smarter me from the future, everything below this line is WRONG! Leaving it here to demonstrate the confusion:
I'm technical
 . But even better, @Kolbi made a spreadsheet so we can have visual aids:
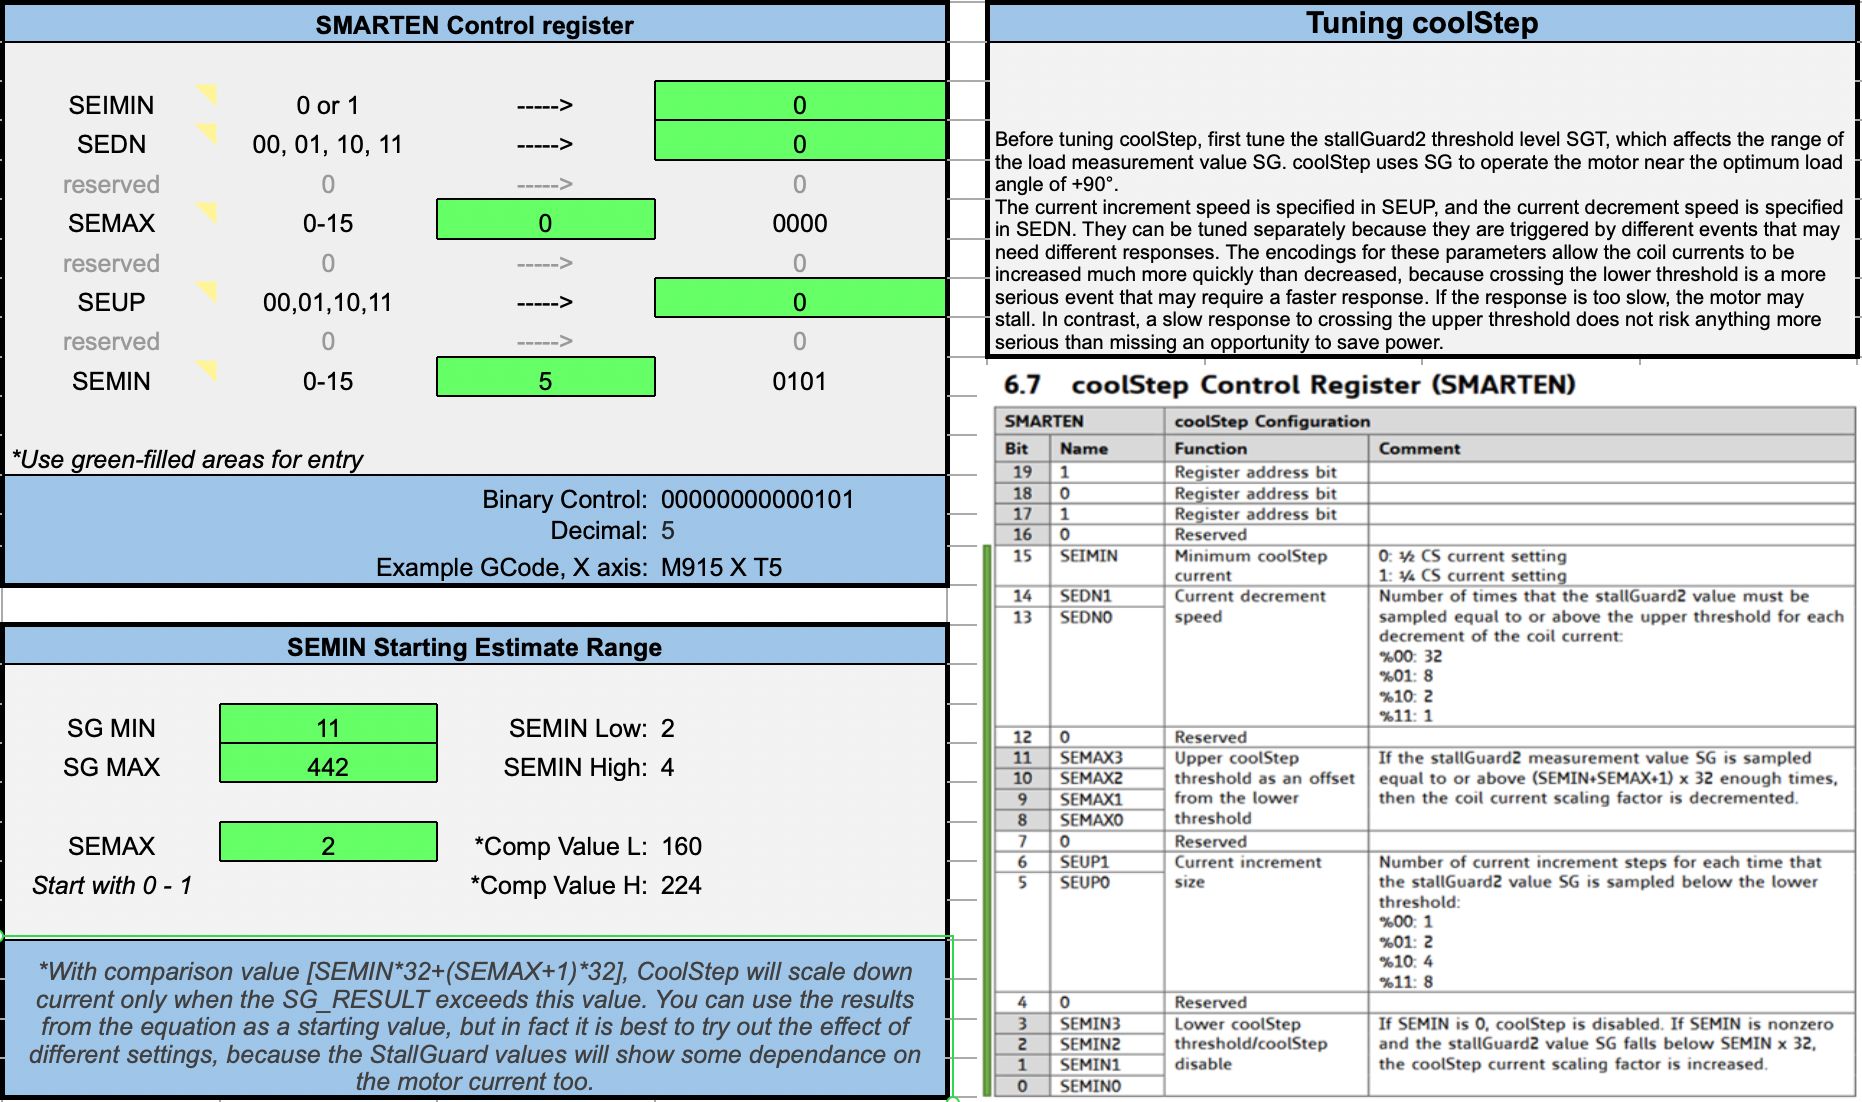
T5sets all of the bits related to Stall Guard to 0/off. But it sets SEMIN to 5 or really 160. My guess is that the important part is assigning all the stall guard fields to 0. The value 5 is probably something that should be tuned.My machine config has no other calls to M915 except for the C axis. So there is some voodoo here about writing zeros to that register that I don't see documented in the manual. Maybe its TMC2160 specific?
-
RE: Resonance, spreadCycle and stealthChopposted in Tuning and tweaking
@dc42 thanks! Can you say what
T5inM915 P0 T5is actually doing? -
RE: Resonance, spreadCycle and stealthChopposted in Tuning and tweaking
After some more testing this is a mixed bag. So tantalizing but still imperfect. I tested with different speeds to perform the auto tuning and different move lengths. I tried switching between StealthChop and Spread Cycle at different speeds. And I tried going back to 1.8 degree motors.
With the 0.9 degree motor I found:
- With tuned StealthChop slow moves are pretty much silent
- With tuned StealthChop speeds between about 110mm/sec and 170mm/sec are incredibly noisy. Much worse than Spread Cycle.
- Trying to switch between StealthChop and Spread Cycle at 100mm/sec causes the machine to loose steps.
- The best performance was switching from StealthChop to Spread Cycle at ~57mm/sec. But there were scary "popping" noises near the transition speed that I could not get rid of.
Knowing what I know now, I figure I have never heard tuned Stealth Chop on the 1.8 degree motors, so back on the Tool Changer they went:
- Slow moves are very quiet but with a low pitched rumble that wasn't there with the 0.9's
- Moves in tuned StealthChop above about 180mm/sec screech badly.
- I can tune the cut over from StealthChop to SpreadCycle to a higher speed, ~75mm/sec
- With that setting test sweeps from 50mm/sec to 200mm/sec in 10mm/sec increments don't turn up any objectionable screeching
But (and there is always a but right?) when you print with this setup it becomes apparent that the drivers do the StealthChop/SpreadCycle switch every time there is a hard change of direction. This causes a loud jerk/bang noise which isn't acceptable. Forcing StealthChop for printing works great until there is a rapid move and it screeches.
When it is quiet, its truly quiet, way quieter than it ever was with the 1.8 motors. It is quieter than my Prusa for some moves! The cheap/easy answer then is to run it in StealthChop all the time and limit all moves to a max speed of ~150mm/sec. Maybe put the printer on a big block of foam to damp out the rumble.
This is the script that I'm using. In my HomeAll.g I home X & Y, then run this, then home X, Y, Z, C.
; StelthChop Calibration

G91                     ; use relative positioning

M18                     ; cut all motor power
M915 P0 T5              ; set coolstep threshold (disables stall detection)
M915 P1 T5              ; set coolstep threshold (disables stall detection)
M569 P0 D3 H16 V16      ; set stealthChop mode, set tpwmthrs and thigh
M569 P1 D3 H16 V16      ; set stealthChop mode, set tpwmthrs and thigh

; log driver state after reset
M569 P0
M569 P1

M564 H0                 ; disable safe moves

; apply current to the motors
G1 Y0.02 F1000

; dwell for at least 130ms
G4 P250

; For CoreX/Y: move Y by at least 400 full steps, this moves both motors
; The move needs to be made fairly fast
G1 Y100 F6000

; dwell for at least 130ms
G4 P250

; move back to the starting location to speed up homing
G1 Y-100 F6000

; log driver state after tuning
M569 P0
M569 P1

M564 H1                 ; enable safe moves
G90                     ; back to absolute positioning
If you run
M569 P0and yourpwmGradAutovalue is0, you haven't auto-tuned and you are not getting the benefits of StealthChop.I don't fully understand what
M915 P0 T5does.T5should set the Coolstep control register to the value 5 in binary. But I also see documentation saying this is some sort of speed. Leaving it out breaks the tuning.And I'm not saying I won't still put servo's on it... in just doing my due diligence first

-
RE: Resonance, spreadCycle and stealthChopposted in Tuning and tweaking
Yep, I was doing it wrong! @DC42 to the rescue:
So we need to kill the motor power with
M18, then make a tiny move.So now I get real tuning values in my logs!!

# (log truncated to make it easy to read)
Drive 0 pwmScaleSum 22, pwmScaleAuto 0, pwmOfsAuto 23, pwmGradAuto 22, pos 632
Drive 1 pwmScaleSum 23, pwmScaleAuto 0, pwmOfsAuto 27, pwmGradAuto 19, pos 600
And I can hear the difference! My 55mm/second resonance is gone. Its not gone at every step frequency but its an improvement. @matt3o do you have something like this in your homing script??