@jay_s_uk said in Core XZ - Motors Configuration:
M669 K2 X1:0:1 Y0:1:0 Z1:0:-1
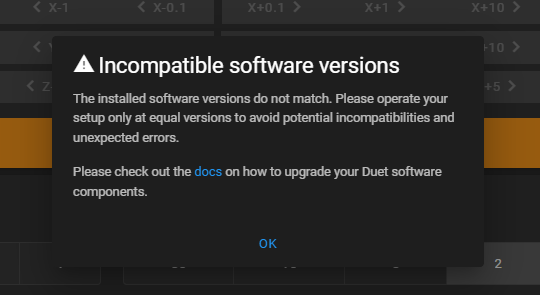
HI, thank you for assisting. Same, or similar result, a downwards or upwards diagonal movement. Just incase I have done something real dumb, I have attached the config.g below
; General
M575 P1 S1 B57600 ;Enable PanelDue
G90 ; absolute coordinates
M83 ; relative extruder moves
M550 P"Godzilla" ; set hostname
; Network
;M551 P"reprap" ; set UI password
; Wait a moment for the CAN expansion boards to become available
G4 S2
; Smart Drivers
M569 P0.0 S1 D2 ; driver 0.1 goes forwards (X axis)
M569 P0.2 S0 D2 ; driver 0.2 goes backwards (Y axis)
M569 P0.1 S0 D2 ; driver 0.0 goes forwards (Z axis)
M569 P0.3 S1 D2 ; driver 0.3 goes forwards (extruder 0)
; Motor Idle Current Reduction
M906 I30 ; set motor current idle factor
M84 S30 ; set motor current idle timeout
; Axes
M584 X0.0 Y0.2 Z0.1 ; set axis mapping
M350 X16 Y16 Z16 I1 ; configure microstepping with interpolation
M906 X800 Y800 Z800 ; set axis driver currents
M92 X80 Y80 Z400 ; configure steps per mm
M208 X0:200 Y0:200 Z0:200 ; set minimum and maximum axis limits
M566 X900 Y900 Z12 ; set maximum instantaneous speed changes (mm/min)
M203 X6000 Y6000 Z180 ; set maximum speeds (mm/min)
M201 X500 Y500 Z20 ; set accelerations (mm/s^2)
; Extruders
M584 E0.3 ; set extruder mapping
M350 E16 I1 ; configure microstepping with interpolation
M906 E1000 ; set extruder driver currents
M92 E420 ; configure steps per mm
M566 E120 ; set maximum instantaneous speed changes (mm/min)
M203 E3600 ; set maximum speeds (mm/min)
M201 E250 ; set accelerations (mm/s^2)
; Kinematics
;M669 K2 ; configure CoreXZ kinematics
M669 K2 X1:0:1 Y0:1:0 Z1:0:-1
; Probes
M558 K0 P1 C"io4.in" H5 F120 T6000 ; configure analog probe via slot #0
G31 P500 X0 Y0 Z0.7 ; set Z probe trigger value, offset and trigger height
; Endstops
;M574 X1 S4 ; configure X axis endstop
;M574 Y1 S3 ; configure Y axis endstop
;M574 Z1 S4 ; configure Z axis endstop
; Endstops
; M574 X1 S3 ; configure sensorless endstop for low end on X
; M574 Y1 S3 ; configure sensorless endstop for low end on Y
M574 X1 Y1 S3 ; configure sensorless endstop for low end on X & Y
M574 Z1 S2 ; configure Z-probe endstop for low end on Z
M915 X Y S1 F0 R0 H400 ; configure stall detection for X and Y sensorless homing
; Mesh Bed Compensation
M557 X25:175 Y25:175 S40:40 ; define grid for mesh bed compensation
; Sensors
M308 S0 P"temp0" Y"thermistor" A"Heated Bed" T100000 B4725 C7.06e-8 ; configure sensor #0
M308 S1 P"121.temp0" Y"thermistor" A"Nozzle" T100000 B4725 C7.06e-8 ; configure sensor #1
; Extruder Heater
M950 H1 C"121.out1" T1 ; create heater #1
M143 H1 P0 T1 C0 S285 A0 ; configure heater monitor #0 for heater #1
M307 H1 R2.43 D5.5 E1.35 K0.56 B0 ; configure model of heater #1
; Heated bed
M950 H0 C"out0" T0 ;create heater #0
M140 P0 H0 ; configure heated bed #0
M307 H0 R0.248 K0.335:0.000 D11.58 E1.35 S1.00 B0 ; PID completed 27/07/2024 21:93hrs
M143 H0 S100 ; set temperature limit for heater 0 to 100C
; Fans
M950 F0 C"out3" ; create fan #0
M106 P0 S0 L0 X1 B0.1 ; configure fan #0
M950 F1 C"out4" ; create fan #1
M106 P1 S0 B0.1 H1 T45 ; configure fan #1
; Case Fans
M950 F2 C"out7" Q10 ;Rear Case Fan
M106 P2 S0.45 C"Rear Skirt Fan"
; Tools
M563 P0 D0 H1 F0 ; create tool #0
M568 P0 R0 S0 ; set initial tool #0 active and standby temperatures to 0C

")