Duet3D Logo Duet3D
    • Tags
    • Documentation
    • Order
    • Register
    • Login
    1. Home
    2. sunToxx
    3. Posts
    • Profile
    • Following 0
    • Followers 0
    • Topics 8
    • Posts 72
    • Best 8
    • Controversial 0
    • Groups 0

    Posts made by sunToxx

    • RE: Mesh Compensation Overcompensating a bit?

      @infiniteloop said in Mesh Compensation Overcompensating a bit?:

      You can lower the limit to any value you find reasonable for your printer. As long as you supply reliable data from the mesh, you don’t risk to damage either nozzle, print bed, or both. To be safe, you could lower the Z limit only for the time of a print - else, you might ram the head into the bed with DWC’s machine movement controls.

      Reasonable would be the lowest number necessary, wouldn't it? 😉 I have done quite a bit of testing and can't seem to find any confirmation of this working. Is there any documentation about this or has one of the responsible coders mentioned this? (is this compensation reprap oder duet3d code?)

      The thing is that i haven't found any indication yet, that lowering the limit down to -4 has any effect and the keychain already has strong visual changes at about 0.02mm change on z. Neither does it seem to affect adhesion on the lower parts of the bed on normal prints.

      posted in Tuning and tweaking
      sunToxxundefined
      sunToxx
    • RE: Mesh Compensation Overcompensating a bit?

      @infiniteloop said in Mesh Compensation Overcompensating a bit?:

      For you: a problem, for others: a feature to get a uniform surface 😀

      Well, it does help a lot up to .1mm deviation 😉

      Think of the axes limits as safeguard to protect our hardware. That’s why they are absolute. If you want to exceed the limits, you have to actively permit it.

      I would have expected that G29 already permits it and only as much as is necessary for the bed in question. Or is there a reason why you trust your probe to compensate convex parts of your bed, but not concave ones? Is the risk higher?

      Do you have to lower the limit by the amount of bed deviation to compensate (-0.340mm in my case) or do you also have to take the G31 z probe offset or anything else into account?

      The need for a heightmap itself proofs the existence of a, let’s say: less than perfect bed.

      That's one way to put it. It sucks would describe my bed with .5mm deviation well too though, I suppose 😂

      If manual editing is needed on top, I would talk of a major mechanical problem.

      However, your keychains are really special - to repeat myself: you are pushing the limits. In such a situation, it’s absolutely fine to try all tricks you can imagine. The alternative would be to buy a printer in the range of 10k bucks or so, and even that will not be perfect without tweaks.

      The filaprint precision bed unfortunately won't work with my printer. I guess I will try the silicone mod for prusa mk3s+ and see how that improves things. It's a shame. The printer can handle those tight tolerances without breaking a sweat and with a better bed he could do it across the entire print surface. Lets hope the mod can get most of the bed below .1mm deviation.

      posted in Tuning and tweaking
      sunToxxundefined
      sunToxx
    • RE: Mesh Compensation Overcompensating a bit?

      One thing I am wondering. When you guys say that you always get a perfect first layer and don't understand why it doesn't work for me, do we mean the same thing? That means, can you level your nozzle to the bed so that at its G31 value, it is set to z 0 (=touching the bed without a paper in between) and then always print a perfect layer on a bed (that has a bad of about .5 deviance or so), without using a z probe offset (ie with m290 at 0 and not changing G31)?

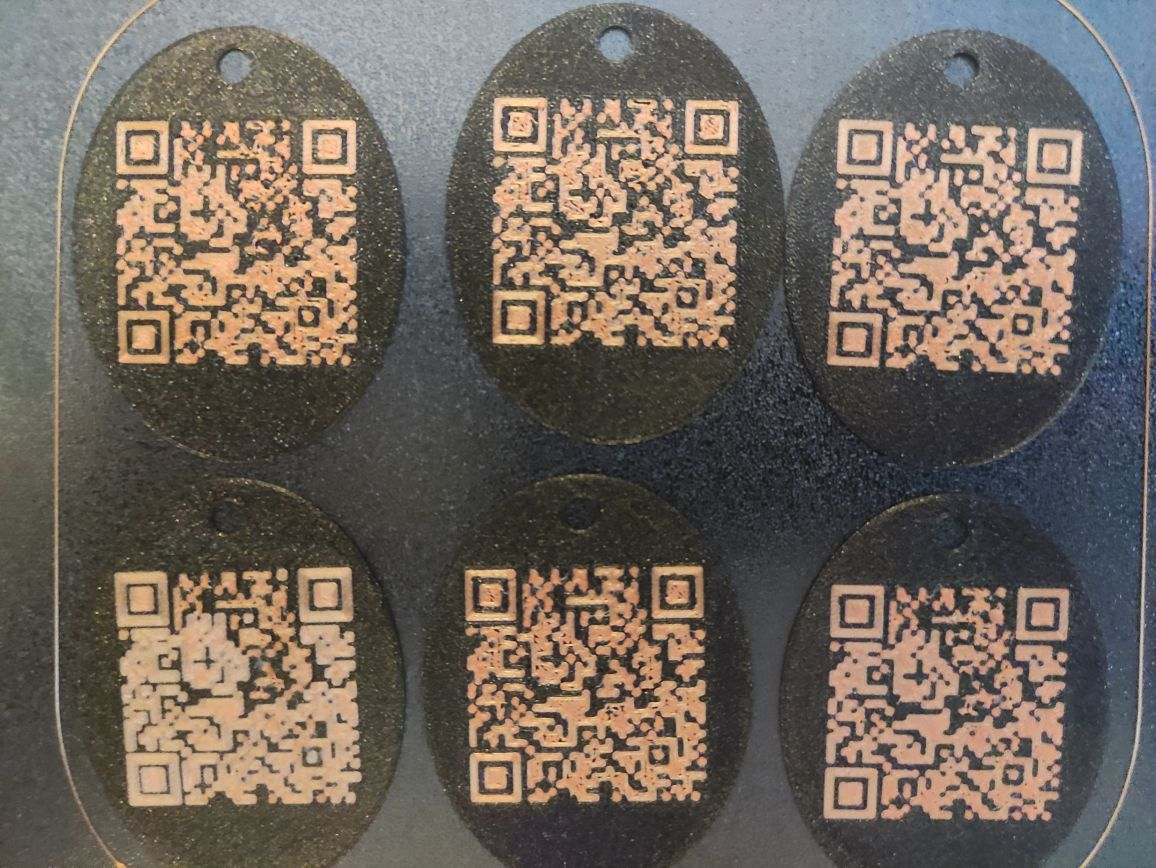
      Because my problem is not that i am not able to squish irregularities out of the first layer with a negative z probe offset, the problem is that with a negative z offset, the first layer does not perfectly maintain the extrusion width, which negatively affects the QR Code embedded into the first layer. Which I believe is probably a major difference. I got the impression, that on a bed with more than .1mm deviation, you can not perfectly maintain the extrusion width on the first layer of a print with multiple colors on the first layer.

      @engikeneer said in Mesh Compensation Overcompensating a bit?:

      @suntoxx a couple of extra thoughts for you from my experiences with mesh comp...

      First obvious question is have you double checked that mesh compensation is active during the print? I appreciate its a silly question, but a stray M561 has sent me nuts before...

      Yes, it's working. Only got M561 in my leveling macro and and got G29 in my startcode.

      What is your min z height allowed in config? You'll need to allow a small negative amount so that it can reach the low points on your bed.

      I have tried down to -4, but various first layer prints showed no difference between 0, -2 and -4. Would't it be a strange thing if the programmers allowed the mesh compensation to end at 0, when most of its job is to compensate below 0?

      Have you checked that the BLTouch trigger height is consistent across the bed? Could be that any small gantry sag/tilt could be affecting it in some areas? Even just the eight of the wiring and filament feed could flex things a few micron. One option for testing this is to manually edit a heightmap in excel to make it compensate more in the areas you are seeing issues. There's a couple of bed levelling stls on thingiverse that work quite well for this kind of thing

      I believe this shouldnt be a problem. It is a CaribouDuet with 10mm Misumi rods, carriage has LHBB10 aluminium bearing blocks and Igus energy chains. Printer came preassembled and calibrated.

      Also, there are no signs of tolerances. If I optimize somethingto print in one place of the bed, it reproduces it there without any variance.

      However, as some of the keychains themselves, when copied around the bed, seem fairly consistent, an offset for each of them might actually improve the performance of the mesh compensation, I believe. But manually editing the heigtmap won't proof that the printer is at fault, will it?

      posted in Tuning and tweaking
      sunToxxundefined
      sunToxx
    • RE: Mesh Compensation Overcompensating a bit?

      @fcwilt said in Mesh Compensation Overcompensating a bit?:

      A replacement bed sounds like a grand idea.

      Yes, I wrote to Filaprint and will see what amount of money and effort this would take and then I will decide wether to do it or not. The numbers i print now i can do with printing two at a time, so for now I am not forced to do it. I also preordered the Prusa XL, so if i can wait until then, the possibility to switch nozzle sizes in prints will probably make quite a difference for this too.

      And as much as I complain about the mesh compensation, even in my "sweet spot" where i can print two at the same time, i got 0.1mm deviation. Without the compensation, i probably wouldnt even there get the result i do now.

      posted in Tuning and tweaking
      sunToxxundefined
      sunToxx
    • RE: Mesh Compensation Overcompensating a bit?

      @fcwilt the z offset only works as good as I need it to be in this project, for a narrow margin of heights. Unfortunately this 8x9cm area in the middle of my bed seems to be the only area with a suitable height range. There i got maximum deviations of about 0.1mm and i can print two instead of one of the qr code keychains. I identified its coords via a P21 heightmap.

      That's why i was looking at the precision bed from Filafarm, which is supposed to have around 0.05 deviations. When it's no problem to just level down and squish the unevenness away, it's ok. But if i want to maintain the perfect look of the .3mm extrusion width lines, it's a different matter, as I have to maintain a positive offset. On the center of my bed, for the 2 keychains, I now use 0.01 offset.

      posted in Tuning and tweaking
      sunToxxundefined
      sunToxx
    • RE: Mesh Compensation Overcompensating a bit?

      @fcwilt yes, but on the rest of the bed, even 441 is not enough to print more than one at a time. On this part of the bed, 49 points gives a close to perfect result for two keychains at once. It's pretty much the center of the bed.

      So it appears to me that something around 0.1mm deviation is more less the limit of what the mesh compensation can handle, if you expect more than adhesion.

      Edit:"not enough" i meant 😉

      posted in Tuning and tweaking
      sunToxxundefined
      sunToxx
    • RE: Mesh Compensation Overcompensating a bit?

      @blacksheep99 i tried a .25 nozzle and it did work much better, but I had warping issues with this keychain size. A slightly smaler size did print very nicely though. Unfortunately i need this size. I could try it again though, as when I had the warping issues, I wasn't aware yet, that cleaning with iso and a shiny and clean surface, don't necessarily mean perfect adhesion. Now that i also use windex and water on top, adhesion is stronger. But i got most of the keychains printed already. I would still like to solve this problem though. Looking at a filafarm precision bed atm, but not sure if I can use that on a caribou.

      And a little update: I got a 8x9cm surface area, that is close to perfect, and i can print 2 perfect keychains simultaneously on it 😂

      688e9104-e275-4aef-8459-a0ff771364a7-grafik.png

      posted in Tuning and tweaking
      sunToxxundefined
      sunToxx
    • RE: Mesh Compensation Overcompensating a bit?

      @blacksheep99 yes, they are two sided.

      posted in Tuning and tweaking
      sunToxxundefined
      sunToxx
    • RE: Mesh Compensation Overcompensating a bit?

      @fcwilt yes, it's a MK52 with the Mk-52-block carriage, with LHBB10 aluminium bearing blocks.

      posted in Tuning and tweaking
      sunToxxundefined
      sunToxx
    • RE: Mesh Compensation Overcompensating a bit?

      @fcwilt it must be this one https://www.prusa3d.com/product/magnetic-heatbed-mk52-24v-assembly/

      posted in Tuning and tweaking
      sunToxxundefined
      sunToxx
    • RE: Mesh Compensation Overcompensating a bit?

      @fcwilt it seems to be the standard Prusa mk3s heatbed.

      posted in Tuning and tweaking
      sunToxxundefined
      sunToxx
    • RE: Mesh Compensation Overcompensating a bit?

      @fcwilt said in Mesh Compensation Overcompensating a bit?:

      What about you current bed prevents it from being leveled?

      Taking it apart and readjusting it every once in a while. Or is there a more permanent solution than the Nylock mod.

      @fcwilt said in Mesh Compensation Overcompensating a bit?:

      Can you elaborate a bit?

      If the probed coordinates would be used as absolute values at those exact coordinates, they should be perfect in regard to z offset, getting more imperfect (on average) the further away from the probed point. The squished keychain i think proves this right.

      Is there a way to set a "per stl" z offset? The keychains itself seem fairly uniform.

      @stephen6309 said in Mesh Compensation Overcompensating a bit?:

      @suntoxx Have you a low mesh compenstaion taper?
      https://docs.duet3d.com/User_manual/Reference/Gcodes#m376-set-bed-compensation-taper

      Never heard of it, going to look at it, thanks.

      Edit: If i understand it correctly, I would need the opposite of this command. For depths instead of height.

      posted in Tuning and tweaking
      sunToxxundefined
      sunToxx
    • RE: Mesh Compensation Overcompensating a bit?

      Since I started 3d printing a couple months ago, when doing fine adjustments to prints, I kept having the impression that even the coordinates that are actually measured, are not used as absolute values.

      Now the fact that the Keychain on the lowest part of the print area keeps being the most squished one, seems to confirm that perception. What is the reason behind this?

      Would it result in a recognizable pattern to use the measured coordinates as absolute values and because of that, all absolute points get relativated and that can result in less adhesion on the lowest areas and to counter it, a "force into one direction" (downwards) approach is applied to those areas, which is what I keep seeing in the squished, bottom left Keychain?

      With those Keychains, I would actually prefer that pattern. It could even be used, like the archimedic arcs on the top layer, or the way gyroid infill can look nice on certain occasions, shining through the perimeters. Some probing patterns to choose from.

      If im right about this, is there a way (for someone who has no idea about coding) to switch from this "relative mode" to an absolute mode, in which only the areas between probed points get interpolated/relativated?

      @dc42 is that impression more less correct?

      @fcwilt that looks good, thanks! I will try to integrate that, once i come to a conclusion about how i use the mesh compensation to my best advantage. Maybe i will have to find a way to level my bed?

      posted in Tuning and tweaking
      sunToxxundefined
      sunToxx
    • RE: Mesh Compensation Overcompensating a bit?

      Seems i was a bit overconfident this morning (or more likely too comatose). There is still quite a difference in between them. This time i did 6 keychains (only the first layers), 21x21 points only on the needed area, resulting in something like 7mm distance between probes. The most striking difference is the bottom left keychain, which is squished (again), while the others could use some more squishing. The keychain first layers are in position on the foto, but flipped, so the underside can be seen.

      13f87ca4-8c6c-4ecb-a39c-2ea263863244-grafik.png

      e439c890-37a9-4327-aff1-8b16d3ed4c60-grafik.png

      @fcwilt I dont know how much power the duet has, but just scanning the first layer for the outer dimensions, shouldnt require much power if done in a smart way, i would think. Plus, couldnt DWC handle that, if it really needs more power than available? Then it has full access to the desktop cpu and ram.

      Do you think it is possible to have a window pop up when starting to print, triggered by the custom startcode in Prusaslicer? Something like do you want to probe your bed? Yes will use the line i posted above, for automated mesh probing coordinates, and no/cancel will instead call for a saved 21x21 heightmap (which you refresh via a macro regularely)?

      posted in Tuning and tweaking
      sunToxxundefined
      sunToxx
    • RE: Mesh Compensation Overcompensating a bit?

      @infiniteloop said in Mesh Compensation Overcompensating a bit?:

      @suntoxx It’s a bit late for a comprehensive reply, but I will try my best …

      Without the use of a preprocessor, I don’t know a way to automatically confine the mesh to an area used by the actual print.

      Check out the Prusaslicer startcode i found last night. It works nicely! Just wish that Duet would handle it and not that you got to adjust it according to each slicer.

      Maybe you could try some faster acceleration, 100 for Z looks quite moderate to me.

      Z acceleration seems moderate in comparison to the other axis? What would that improve? I guess not much in terms of time. Less stringing?

      Your Edits prove the value of a narrow mesh. However, mechanical precision of a printer is limited (not only by the BLTouch or the steppers), so it’s worth to take a look at first layer adhesion, too. To improve this, you could play with print speed, bed and hotend temperatures.

      Yes, i am quite far up in temperature I think, using 70° and 235° for PLA for this print. I actually did have an adhesion problem too on this print, at least on some print positions. I did not know that Iso and paper is not enough. Using dishwasher or window cleaner now on top and adhesion on the king sheet is sufficient for this more difficult print.

      Edit: Adjusted z by 0.01mm and result is consistent and perfect now! 😄 😎

      posted in Tuning and tweaking
      sunToxxundefined
      sunToxx
    • RE: Mesh Compensation Overcompensating a bit?

      @fcwilt that would be worth a try, although if a tiny piece of filament gets under the sheet, i suppose that could cause a problem.

      It seems your suggestion worked perfectly, thanks! The higher number of probe points does even things out. I did not expect that. I expected the surface to be uneven, but in a more rolling slope way. Seems to be pretty rough terrain though.

      The startcode for prusaslicer i posted, works like a charm. It automatically calculates the needed mesh compensation area and adds it to the print. However, i believe this is actually something that the Duet should do and not the slicer. Is there a way to have Duet calculate the extends of the printed object, without the need to add code to the different slicers (that on top needs to be compatible with the slicer in question)?

      And what do you believe is the lowest distance between probe points that makes sense? I used 8mm and it works nicely. Would more yield the same result? Is there a point where decreasing it makes no sense technically (angles can't be too steep I suppose?)

      posted in Tuning and tweaking
      sunToxxundefined
      sunToxx
    • RE: Mesh Compensation Overcompensating a bit?

      @infiniteloop Thanks for the response. Yes, it does feel like im hitting some limits here. Is there a way to easily (automated?) extract the coordinates used by a print and use them to reduce the probed area for the print? It seems a bit overkill and time intensive to maximize the heightmap for the entire bed, when only using a small portion of it.

      The probe is a BL Touch, so according to their 0.001mm or so claim, that should be ok?

      I am not really familiar with building and calibrating printers and relatively new to printing. Is this what you are referring to:

      M350 X16 Y16 Z16 E16 I1                                ; configure microstepping with interpolation
      M92 X200.00 Y200.00 Z400.00 E400.00                    ; set steps per mm
      

      And acceleration is

      M201 X500.00 Y500.00 Z100.00 E500.00
      

      I will try to 400 points approach next run.

      Edit: I print the first layer at 20mms
      Edit 2: Did a quick print of only the top right one with a custom mesh only around that one, with 81 points. Result is much better! Doing 4 now, also with custom mesh and 225 points on the 4 of them.
      Edit 3: Too late for this run, but next one i will try M557 X{first_layer_print_min[0]}:{first_layer_print_max[0]} Y{first_layer_print_min[1]}:{first_layer_print_max[1]} S8 in PS startcode.

      posted in Tuning and tweaking
      sunToxxundefined
      sunToxx
    • Mesh Compensation Overcompensating a bit?

      I am printing keychains with a 3.5x3.5cm QR Code, embedded into the first layer, on a CaribouDuet. After a lot of finetuning and troubleshooting, I can still not reproduce the keychain reliably in all positions on the heatbed. I can perfectly reproduce it in certain positions though.

      On the foto you see the keychains in the positions they are being printed in, but each one flipped so you can see the bottom.

      The top left one and bottom right one look fine and work fine. As intended.

      The bottom left one is a bit squished. Nozzle tiny bit too low.

      The top right one lacks a tiny bit of adhesion, due to needing the nozzle to be about 0.02mm lower.

      On the heightmap you can see that the top right one is actually in a higher area of the heatbed, despite needing the nozzle to be closer and you see that the bottom left one is actually on the lower area of the heatbed, despite being a bit squished.

      Nozzle is 0.4, extrusion width for first layer is 0.3. I tried different numbers of heightmap mesh points. Right now I am at the highest I tried, being 144 points. So it is a 3.5cm QR code and a 1.8 cm distance between mesh points.

      Is the mesh compensation overcompensating a bit? Is there anything I can do about it?

      4 arosa anhänger mesh compensation.jpg

      c0d7bff0-5a12-4a67-ab78-a1fb64388c49-grafik.png

      posted in Tuning and tweaking
      sunToxxundefined
      sunToxx
    • RE: Strange Z error

      @fcwilt said in Strange Z error:

      I honestly don't know. The biggest factor I found for first layer adhesion has been speed.

      In which way? I experienced, that a keychain i did in various sizes and with different layer thickness and nozzles, started to warp very easily, when using the .25 nozzle and a certain size and thickness. The smallest version printed fine, the 20% bigger version, started to warp, despite strong layer adhesion. Not sure if it is the longer print time that caused it, or maybe the number of layers and the way they cool down being that thin. Maybe they are just super prone to moving air, when the layers are that thin (was .12mm layers).

      What speed to you use? By now I always left it at the default 20mms. I only once had layer adhesion problems that were not z offset related, and solved them by increasing bed and nozzle temp beyond the temperatures recommended by the manufacturer. (was Fillamentum Vertigo Space and used 235° 70°C, then even fine outlines would stick).

      If I was going to implement a temperature change feature it would involve using the slicer feature that allows invoking custom code on each layer change. It would be easy to have the filament specific config.g file set some global variables holding different temperatures and layer counts. Then the layer change custom code would use those values to determine what temperature to be using for the current layer.

      I am going to try that just to see what sort of effect changing bed temp might have.

      Setting variables would be probably much cleaner. I was thinking of using the echo command to create for example an "Additional-Filamentsettings.g" makro and add a sort of "if layer>1 then execute Additional-Filamentsettings.g" in the layer change custom code.

      So I would just have to copy and paste that echo section into each filament config.g and simply set the desired values there and every time I use DWC or M701 to change the type of filament, the echo command would overwrite the Additional-Filamentsettings.g with the current values.

      posted in Using Duet Controllers
      sunToxxundefined
      sunToxx
    • RE: Strange Z error

      @fcwilt well, it seems to be a standard feature in slicers. At least Prusaslicer and Cura got it and in Prusaslicer most presets seem to make use of it. Different layer height, extrusion width, nozzle temperature and bed temperature in order to enhance first layer adhesion appears to be quite common.

      Not sure, but I was guessing that for example with PLA, because 70 bed temp for first layer is sometimes usefull, going back down to 60 might be good in order to reduce the likelhood of warping, as it causes the bottom to be less soft.

      I thought PLA would rarely warp, but found that especially with very fine layers and 0.25mm nozzle, PLA starts to be quite tricky on some prints. I didnt quite come to a final conclusion yet, but doesnt a different first layer temp have quite an impact in certain situations?

      So my idea was to add a command to the filament specific config.g, that overwrites an "other layer temperature" macro, depending on the M701 material in use. That macro then should be possible to be called with custom gcode in the slicer. Maybe on layer change with an if statement, so it does not activate on first layer. Something like that.

      @phaedrux in your z probe offset macro, can any problem appear if i return to normal motor currents by simply setting it back to 100%? Like on a power loss or anything? Or would that be a perfectly save approach?

      posted in Using Duet Controllers
      sunToxxundefined
      sunToxx