BL-Touch and the Duex 5
-
Does anyone have had a similar problem with the PWM´s?
-
It sounds to me that the BLTouch isn't getting +5V from the DueX. Have you checked that you have connected it correctly?
-
15 times I checked it.. (see the pic a little above, with a spare BLTouch direct connected)
Yes.. what I´m wondering... I can´t messure the 5V at the Duex5Is the Board partial damaged??? .. But this sounds strange for me... because all other functions are running.
I think I start a Test with Fans.. or so.. to check if the Problem bigger or not.
-
I found with search funktion this Thread... very interesting for me.
https://forum.duet3d.com/topic/6876/bltouch-on-fan-or-heater-pins-on-duet-wifi/5So I tested it.. and now.. the BLTouch has power.. thats OK and LED is going on.
But only at the first power on, the BLTouch doing a selftest.. pin-down and pin-up.After I change the configuration as described, no function.. no more pin-down and no selftest.
But if I start a command, the BLTouch is directly blinking all the time.What about the:
M558 P9 H7 F500 T9000 X0 Y0 Z1:U1:V1:W1 ; Set Z probe type 9 to bltouch (P5 as Betrue3D) and the heater (7) height + speeds (+ B1)
Or should it change to
M558 P9 P22 F500 T9000 X0 Y0 Z1:U1:V1:W1 ??I Do so.. and I´m able to start Macro´s and the BLTouch is going up and down. (M280 P22 I1 S10 / M280 P22 I1 S90)
But Alarm rest + Pinup didn´t work now (M280 P22 I1 S160)Maybe you have here a solution for me?
Here may Config:; Mapping of Driver for X,Y, Z1-3, E1-3
M584 X0 Y1 Z5:6:7 U5 V6 W7 E3:4:8 ; three Z motors connected to driver outputs 5, 6 and 7 (U,V,W), driver 8 for E2
M667 S1 ; Select CoreXY mode; BLTouch - Heater 7
;M307 H7 A-1 C-1 D-1 ; Disable heater 7 to free up PWM channel 5 on the Duex board.
M106 P2 I-1 ; Disable Fan2 Duet to free up PWM channel 22 on the Duex board.; Define the X and Y coordinates of the leadscrews.
; Must come after M584 (Set drive mapping), M667 (Select CoreXY Mode) and M669 (Choosing Kinematics type)
; Motor order: Front right (1), front left (2), rear center (3).
; Snn Maximum correction in mm to apply to each leadscrew (optional, default 1.0)
;
M671 X0:320:162 Y0:0:320 S3; Drives
M569 P0 S0 ; Drive 0 goes backwards X
M569 P1 S0 ; Drive 1 goes backwards Y
M569 P3 S0 ; Drive 3 goes backwards E0 (E1)
M569 P4 S0 ; Drive 4 goes backwards E1 (E2)
M569 P5 S0 ; Drive 5 goes backwards Z1/U
M569 P6 S0 ; Drive 6 goes backwards Z2 V
M569 P7 S0 ; Drive 7 goes backwards Z3 W
M569 P8 S0 ; Drive 8 goes backwards E2M350 X16 Y16 Z16:16:16 U16 V16 W16 E16:16:16 I1 ; Configure microstepping with interpolation
M92 X80 Y80 Z800:800:800 U800 V800 W800 E93:93:93 ; Set steps per mm
M566 X900 Y900 Z12:12:12 U12 V12 w12 E120:120:120 ; Set maximum instantaneous speed changes (mm/min)
M203 X12000 Y12000 Z800:800:800 U800 V800 w800 E1200:1200:1200 ; Set maximum speeds (mm/min)
M201 X500 Y500 Z300:300:300 U300 V300 W300 E250:250:250 ; Set accelerations (mm/s^2)
M906 X950 Y950 Z1800:1800:1800 U1800 V1800 W1800 E950:950:950 I30 ; Set motor currents (mA) and motor idle factor in per cent
M84 S30 ; Set idle timeout; Axis Limits
M208 X0 Y0 Z0 U0 V0 W0 S1 ; Set axis minima
M208 X324 Y324 Z355 U355 V355 W355 S0 ; Set axis maxima; Endstops
M574 X1 Y2 S1 ; Set X=low end Y= high end active high endstops; Z-Probe
M574 Z1 S2 ; Define Z1 to use Probe at low End. Home to Min. S2 = Z probe
; M558 P9 H7 F500 T9000 X0 Y0 Z1:U1:V1:W1 ; Set Z probe type 9 to bltouch (P5 as Betrue3D) and the heater (7) height + speeds (+ B1)
M558 P5 P22 F500 T9000 X0 Y0 Z1:U1:V1:W1 ; Set Z probe type 5 at bltouch (P5 as Betrue3D) and the FAN2-PWM height + speeds (+ B1)
; G31 P25 X+33 Y0 Z0.894 ; Set Z probe trigger value (1-25, not 500), offset and trigger height (3fach-PH noMixing)
G31 P25 X+26.4 Y15.8 Z0.894 ; Set Z probe trigger value (1-25, not 500), offset and trigger height (Diamond-org)
M557 X45:325 Y25:325 S30 ; Define mesh grid; Heaters
M305 P0 T100000 B4138 C0 R4700 ; Set thermistor + ADC parameters for heater 0 (Bed)
M143 H0 S125 ; Set temperature limit for heater 0 to 125C
M305 P1 T100000 B4138 C0 R4700 ; Set thermistor + ADC parameters for heater 1 (Nozzle)
M143 H1 S285 ; Set temperature limit for heater 1 to 285C
;M140 S35 ; set Bed-Temp to 35C at Starttime; Fans
M106 P0 S0.5 I0 F500 H1 T105 ; Set fan 0 value, PWM signal inversion and frequency. Thermostatic control is turned on
M106 P1 S1 I0 F500 H1 T105 ; Set fan 1 value, PWM signal inversion and frequency. Thermostatic control is turned on
;M106 P2 S0.3 I0 F500 H1 T105 ; Set fan 2 value, PWM signal inversion and frequency. Thermostatic control is turned on / (off=H-1)But for a first Result.. the BLTouch working now... LED is on.. Z-Axis stop at BLT is triggering.. great..
Last point seem so... the Alarm + PinUp still didn´t work .
I don´t know why?Z-Probe-Type 9 didn´t work at my printer.. only 5.
-
After first Test to print...this problem:
2. The third Extruder didn´t working. (drive 8 at DueX)Here my relevant config:
; Mapping of Driver for X,Y, Z1-3, E1-3
M584 X0 Y1 Z5:6:7 E3:4:8 ; three Z motors connected to driver outputs 5, 6 and 7 (U,V,W), driver 8 for E2
M667 S1 ; Select CoreXY mode; BLTouch - Heater 7
M106 P2 I-1 ; Disable Fan2 Duet to free up PWM channel 22 on the Duet board.; Define the X and Y coordinates of the leadscrews.
; Must come after M584 (Set drive mapping), M667 (Select CoreXY Mode) and M669 (Choosing Kinematics type)
; Motor order: Front right (1), front left (2), rear center (3).
; Snn Maximum correction in mm to apply to each leadscrew (optional, default 1.0)
;
M671 X0:326:162 Y326:326:0 S3; Drives
M569 P0 S0 ; Drive 0 goes backwards X
M569 P1 S0 ; Drive 1 goes backwards Y
M569 P3 S0 ; Drive 3 goes backwards E0 (E1)
M569 P4 S0 ; Drive 4 goes backwards E1 (E2)
M569 P5 S0 ; Drive 5 goes backwards Z1/U
M569 P6 S0 ; Drive 6 goes backwards Z2 V
M569 P7 S0 ; Drive 7 goes backwards Z3 W
M569 P8 S0 ; Drive 8 goes backwards E2M350 X16 Y16 Z16:16:16 E16:16:16 I1 ; Configure microstepping with interpolation
M92 X80 Y80 Z800:800:800 E93:93:93 ; Set steps per mm
M566 X900 Y900 Z12:12:12 E120:120:120 ; Set maximum instantaneous speed changes (mm/min)
M203 X12000 Y12000 Z800:800:800 E1200:1200:1200 ; Set maximum speeds (mm/min)
M201 X500 Y500 Z300:300:300 E250:250:250 ; Set accelerations (mm/s^2)
M906 X950 Y950 Z1800:1800:1800 E950:950:950 I30 ; Set motor currents (mA) and motor idle factor in per cent
M84 S30 ; Set idle timeout; Axis Limits
M208 X0 Y0 Z0 S1 ; Set axis minima
M208 X328 Y328 Z390 S0 ; Set axis maxima; Endstops
M574 X1 Y2 S1 ; Set X=low end Y= high end active high endstops; Z-Probe
M574 Z1 S2 ; Define Z1 to use Probe at low End. Home to Min. S2 = Z probe
M558 P5 P22 F500 T9000 X0 Y0 Z1 ; Set Z probe type 5 at bltouch (P5 as Betrue3D) and the FAN2-PWM height + speeds (+ B1)
G31 P25 X+26.4 Y15.8 Z1.289 ; Set Z probe trigger value (1-25, not 500), offset and trigger height (Diamond-org)
M557 X45:325 Y25:325 S30 ; Define mesh grid; Heaters
M305 P0 T100000 B4138 C0 R4700 ; Set thermistor + ADC parameters for heater 0 (Bed)
M143 H0 S125 ; Set temperature limit for heater 0 to 125C
M305 P1 T100000 B4138 C0 R4700 ; Set thermistor + ADC parameters for heater 1 (Nozzle)
M143 H1 S285 ; Set temperature limit for heater 1 to 285C; Fans
M106 P0 S0.5 I0 F500 H1 T105 ; Set fan 0 value, PWM signal inversion and frequency. Thermostatic control is turned on
M106 P1 S1 I0 F500 H1 T105 ; Set fan 1 value, PWM signal inversion and frequency. Thermostatic control is turned on; Tools
M563 P0 D0 H1 ; Define tool 0
G10 P0 X0 Y0 Z0 ; Set tool 0 axis offsets
G10 P0 R0 S0 ; Set initial tool 0 active and standby temperatures to 0C
M563 P1 D1 H1 ; Define tool 1
G10 P1 X0 Y0 Z0 ; Set tool 1 axis offsets
G10 P1 R0 S0 ; Set initial tool 1 active and standby temperatures to 0C
M563 P2 D2 H1 ; Define tool 2
G10 P2 X0 Y0 Z0 ; Set tool 2 axis offsets
G10 P2 R0 S0 ; Set initial tool 2 active and standby temperatures to 0CStartcode in Slicer (Simply3D)
G91 ; Relative Positioning
G1 Z-1 ; Move Z down 1mm
G90 ; Absolute Positioning
G28 XY ; Home XY
M561 ; Clear any bed transform
G1 X104.5 Y153 ; Move Probe to middle of bed
G32 ; Start 3-point probe sequence
M375 P"GlasPlate.csv" ; Load my custom heightmap. Otherwise use G29 S1
G1 Z10.0 F6000 ; Move Z to 10
G1 X5 Y310 ; Move Head to front right
G92 E0 ; Zero Extruder
;G1 F200 E20 ; Prime the extruder
;G92 E0 ; Zero Extruder; Drucker von dem Probepunkt auf die Vordere Kante fahren für Testlinie
G1 X20 Y320;hier startet die Initiale Testlinie
G92 E0 ; filamentwegreset
G92 E1 ; filamentwegreset
G1 F300 E-0.5
G1 F800 E13.5
G1 X20 Y320 Z0.32 F1000 ; startpunkt
G1 X150 Y320 E30 ; linie 1
G1 X150 Y318 ; versatz
G1 X20 Y318 E60 ; linie 2
G1 X0 Y320 Z10 ; Zwischen Fahrweg
G92 E0 ; filamentwegreset
G92 20 ; filamentwegresetG1 Z10.0 F9000 ; Move Z to 10
My Bed.g
M561 ; clear any bed transform
G29 S2; Clear bed height map; Probe 3-point
M98 Pdeployprobe.g ; deploy mechanical Z probe
M401 ; Deploy probe - deployprobe.g
G30 P0 X3 Y320 Z-9999 ; Front Right
G30 P1 X320 Y320 Z-9999 ; Front Left
G30 P2 X160 Y5 Z-9999 S3 ; Center Rear
M402 ; Retract Probe - retractprobe.gMy deployprobe.g
M280 P22 I1 S10My retractprobe.g
M280 P22 I1 S90; Homez.g
G90 ; Make sure we are in absolute mode
G1 X150 Y150 F8000 ; move probe to bed center. Adjust to make the probe be in the center of the bed. Note that X and Y must be homed first.
G30 ; Do a single probe to home our Z axis
G90 ; Make sure we are in absolute mode
G1 Z10 F8000 S2 ; Rapidly move the Z axis to Z=10
G1 X0 Y325 ; return to home position. Adjust as needed.Does anyone know what the Problem is?
-
OOh.. damn.. I see.. a tools without filament didn´t work...
So after I set a Filament at the 3rd extruder.. it works...
So.. now the first really Testprint
Now I strugeling with wraping.. . I think thats only a question of time.. to solve this too.
-
So.. my Printer is now working really good.
Wrapping is also solved.Only the right parameters for Sienoc ABS.. thats may problem.. with wrapping.. needs more experience.
PLA works very good.If anyone needs my Config´s and so on.. give me a notice.. I will poste it with pic´s of wiring.
A big Thanks at the supporters here.. helps a lot.
Great Forum/Blog. -
@justd, thanks for updating us! I'm glad to hear is is working well.
-
It´s a workaround... the Duex5 PWM Channels 1-5 still not working..
I don´t know why...??But for now.. it´s working.. and I´m all the time printing..
") this day´s.
this day´s. -
What have you done that is a workaround?
-
Teh workaround is.. I´m using the FAN-PWM at the Duet2 instead of the Duex5 PWM 5 for the BLTouch probing..
like this Thread
https://forum.duet3d.com/topic/10978/bltouch-isn-t-working-after-change-to-duex-5So the Duex5 is still not working 100% .. but for the Moment (and I need the printer) .. it is printing.. thats ok OK for the next weeks..
After this.. I will check it again.. to find the really problem with the Heater-PWM Channel 1-5..
I miss the 5V Power for the BLTouch -
The differences between using a Duet fan connector vs. using a DueX5 connector are:
- Using the fan connector, you will need the I1 parameter (that's letter-i followed by digit-one) in the M280 commands that control the BLTouch. Using one of the PWM connectors on the DueX, you must not use the i1 parameter.
- The way you free up the connector for use as the PWM control pin is different: M106 P# I-1 for the fan connector, and M307 H# A-1 C-1 D-1 for the DueX output.
-
@dc42 said in BL-Touch and the Duex 5:
M106 P# I-1
I used as following
; Mapping of Driver for X,Y, Z1-3, E1-3
M584 X0 Y1 Z5:6:7 E3:4:8 ; three Z motors connected to driver outputs 5, 6 and 7 (U,V,W), driver 8 for E2
; BLTouch
M106 P2 I-1 ; Disable Fan2 Duet to free up PWM channel 22 on the Duet board.; Z-Probe
M574 Z1 S2 ; Define Z1 to use Probe at low End. Home to Min. S2 = Z probe
M558 P5 P22 F500 T9000 X0 Y0 Z1 ; Set Z probe type 5 at bltouch (P5 as Betrue3D) and the FAN2-PWM height + speeds (+ B1)
G31 P25 X+24.5 Y+5 Z1.345 ; Set Z probe trigger value (1-25, not 500), offset and trigger height (3fach-PH noMixing)
; Fans
M106 P0 S0.5 I0 F500 H0:-1 T175 C"Objekt-Fan-175" ; Set fan 0 value, PWM signal inversion and frequency. Thermostatic control is turned off
M106 P1 S1.0 I0 F500 H0:-1 T90 C"Tool-Fan-90" ; Set fan 1 value, PWM signal inversion and frequency. Thermostatic control is turned off
;M106 P2 S0.3 I0 F500 H0:1 T105 ; Set fan 2 value, PWM signal inversion and frequency. Thermostatic control is turned on / (off=H-1) -
In case someone comes to this issue also (even when the thread is already some months old).
I had exactly the same behaviour that was driving me crazy. It took a while to recognize that the PWM 5V+ Aux needs a jumper to be set.
It should default to use internal 5V. But on my Duex5 board there was no jumper set. For that reason the PWM5 port did not get 5V+.
I marked it green on the following image.
I hope this can help some users to get rid of that source of problems.
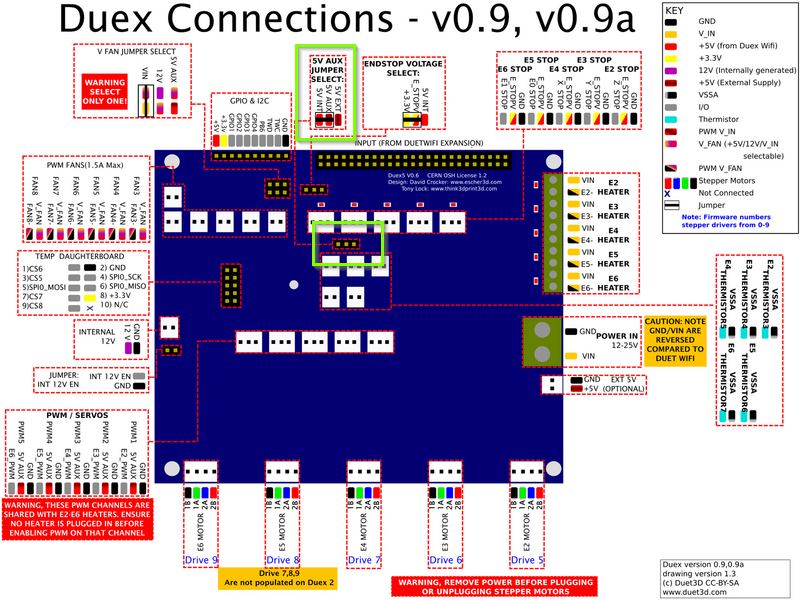
Credits: Original image from here: https://duet3d.dozuki.com/Wiki/Duex_wiring_diagrams
-
Hi Hugo, thanks for this Input, sounds good.
I will check it in the next 2-3 Weeks (some other work).
But great if this would work also for me.
Thanks. -
I´f checkt it.. and .. Tata... YES.. it´s working now.. Great
Now my BL-Touch is running at PWM5, Heater 7
my Object-FAN is working and the control in Web-Control, a little different as I expected.. but it´s working.Thanks for the final inspiration with 5V for BLT.
-
Hi,
Can you just share your config.zip file, your setup is very close to mine but I'm struggling with similar issues:
- wobbling on the z axis with 3 independent steppers/drivers
- a bltouch that tests but doesn't deploy when homing Z axis
Best regards,
Pedro Viana -
@pmviana Start a new thread for your issues. Send M115 and post response, post your config.g and any relevant homing files.
Ian
-
 undefined alankilian referenced this topic
-
 undefined Miasmictruth referenced this topic