Duet3D Logo Duet3D
    • Tags
    • Documentation
    • Order
    • Register
    • Login

    CR-10S5 Firmware

    Scheduled Pinned Locked Moved Unsolved
    Firmware installation
    15
    145
    8.2k
    Loading More Posts
    • Oldest to Newest
    • Newest to Oldest
    • Most Votes
    Reply
    • Reply as topic
    Log in to reply
    This topic has been deleted. Only users with topic management privileges can see it.
    • Gost101undefined
      Gost101
      last edited by

      Can anyone upload there sys folder for the cr-10s5. I'm having trouble using the reprap firmware tool. Mainly because I barley understand any of it. Lol.

      T3P3Tonyundefined 1 Reply Last reply Reply Quote 0
      • T3P3Tonyundefined
        T3P3Tony administrators @Gost101
        last edited by

        @Gost101 I would follow these guides. While it's not the same printer it's similar and the principles are the same:
        https://forum.duet3d.com/topic/11909/pid-tuning-number-of-cycles/26

        www.duet3d.com

        1 Reply Last reply Reply Quote 0
        • PaulHewundefined
          PaulHew
          last edited by

          May I suggest you start with this guide, I still use it for my Ender 3 and there are some useful items that I use on my RailCore too.
          https://duet3d.dozuki.com/Guide/Ender+3+Pro+and+Duet+Maestro+Guide+Part+2:+Configuration/38
          Ender3 and CR10 are simillar.

          HTH. Paul.

          RailCore II - Duet Mini + 1LC, Voron V0.1 - Duet Mini
          Voron 2.4 disassembled..... Waiting for the RailCore Mini....

          1 Reply Last reply Reply Quote 0
          • Gost101undefined
            Gost101
            last edited by Gost101

            Lol, I've still had no luck. I feel as if I'm braking my printer, RIP.

            1 Reply Last reply Reply Quote 0
            • PaulHewundefined
              PaulHew
              last edited by

              Please post your config.g

              RailCore II - Duet Mini + 1LC, Voron V0.1 - Duet Mini
              Voron 2.4 disassembled..... Waiting for the RailCore Mini....

              1 Reply Last reply Reply Quote 0
              • Phaedruxundefined
                Phaedrux Moderator
                last edited by

                What specifically are you stuck on? The CR10S and Ender3 are very very similar. The guides that Paul linked cover a lot of the basics.

                Z-Bot CoreXY Build | Thingiverse Profile

                1 Reply Last reply Reply Quote 0
                • Gost101undefined
                  Gost101
                  last edited by

                  In the image shows the end stop locations however Y end stop is next to the motor (opposite side to where it is drawn)
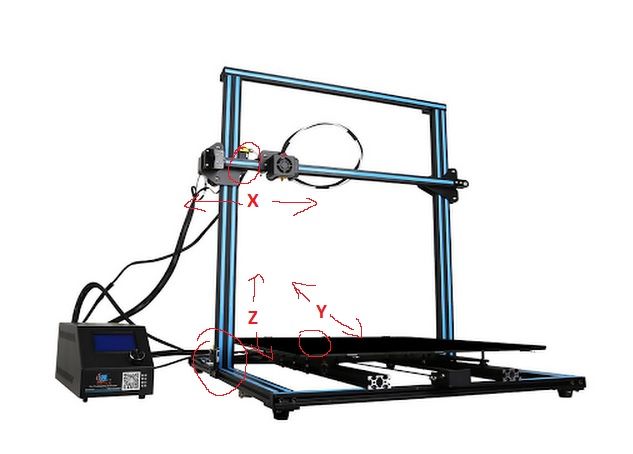
 Untitled.jpg.

                  Z: I'm having trouble syncing my z axis, they will not move and x moves instead going left then right.

                  Y: Will move X to the right and move Z backwards away from the endstop.

                  X: Will move away from the end end stop and back.

                  Note: NONE of the end stops are working.

                  Attached is my config and each axis home:config.g homez.g homey.g homex.g homeall.g

                  1 Reply Last reply Reply Quote 0
                  • Gost101undefined
                    Gost101
                    last edited by

                    Also I can get my bed to heat up, but my hotend dosenot display.

                    1 Reply Last reply Reply Quote 0
                    • Gost101undefined
                      Gost101
                      last edited by

                      15682578869273428413861689583037.jpg 15682579109134673584236942172796.jpg 15682579243062572054472203498673.jpg

                      In addition to all of those other problem, I can't get my hotend fan to spin up.

                      1 Reply Last reply Reply Quote 0
                      • Phaedruxundefined
                        Phaedrux Moderator
                        last edited by

                        There's a few problems in this section of your config.g

                        M584 X0 Y1 ZA2:ZB2 ; two Z motors connected to driver outputs Z and E1
                        M671 X-20:220 Y0:0 S0.5 ; leadscrews at left (connected to Z) and right (connected to E1) of X axis
                        

                        First, the M584 command must come earlier. You already have one up earlier in your config, so you can modify that one. https://duet3d.dozuki.com/Wiki/Gcode#Section_M584_Set_drive_mapping

                        Order dependence

                        M584 must come earlier in config.g than any M350 and M906 commands. If it creates new axes, it must also be earlier than any M92, M201, M203, M208, M350, M566, M574 , M667 and M669 commands.

                        But the command you have M584 X0 Y1 ZA2:ZB2 isn't quite right either. ZA2:ZB2 isn't right. Are you trying to drive each Z axis independently for leveling? It doesn't look like you have a Z probe at the moment, so that could actually prove a little difficult.

                        For the time being it might be easier to just have the Z axis motors connect to the 2 z axis ports and get the machine running first. You can then add in X axis leveling when you have a Z probe. https://duet3d.dozuki.com/Wiki/Bed_levelling_using_multiple_independent_Z_motors

                        The next is the bed size commands. You've got two of them. I believe the CR10S is 500x500 so the second set of commands should be right? If so, delete the first one.

                        M208 X-5:205 Y0:200 ; X carriage moves from -5 to 205, Y bed goes from 0 to 200
                        
                        ; Axis Limits
                        M208 X0 Y0 Z0 S1                        ; set axis minima
                        M208 X500 Y500 Z500 S0                  ; set axis maxima
                        

                        I suggest you follow these commissioning steps to test your motors and endstops.

                        https://duet3d.dozuki.com/Guide/Ender+3+Pro+and+Duet+Maestro+Guide+Part+3:+Commissioning/39

                        Z-Bot CoreXY Build | Thingiverse Profile

                        1 Reply Last reply Reply Quote 0
                        • PaulHewundefined
                          PaulHew
                          last edited by

                          No disrespect @Phaedrux, because he is using S0 and S1with his M208, it is correct....but...

                          A neater way of setting your maxima and minima is like this

                          M208 X0:500 Y0:500 Z0:500

                          It makes it easier to read and diagnose.

                          Also your M667 I think is incorrect. Your printer is a Cartesian, not Core XY
                          Remove M667, Use M669 K0, if you are using RRF2.03 or later, this is the new command and K0 defines your printer as a Cartesian.

                          Also, you say that your 'Hotend' does not display. Are you talking about the cooling fan?

                          Also as mentioned you need a Z Probe like a BL Touch to do levelling.
                          If you buy a BL Touch, get an original not a clone, tooo many problems with clones.

                          As we have both mentioned, read the Ender3 documentation, it will help get the base correct. It is not easy upgrading to a new board and it is a steep learning curve, but a fun one.

                          HTH. Paul.

                          RailCore II - Duet Mini + 1LC, Voron V0.1 - Duet Mini
                          Voron 2.4 disassembled..... Waiting for the RailCore Mini....

                          Phaedruxundefined 1 Reply Last reply Reply Quote 1
                          • A Former User?
                            A Former User
                            last edited by

                            If I was you I would also move one z axis motor cables to the spare extruder output and map that to the second z axis motor which would allow you to sync the z axis motors and this would allow you better control of getting the bed perpendicular to the nozzle. (if you have an "auto-level" sensor of course)

                            1 Reply Last reply Reply Quote 0
                            • Phaedruxundefined
                              Phaedrux Moderator @PaulHew
                              last edited by

                              @PaulHew said in CR-10S5 Firmware:

                              No disrespect @Phaedrux, because he is using S0 and S1with his M208, it is correct....but..

                              I didn't mean the format was wrong. I was referring to the fact that he's using both formats with different size values. Just saying it should be verified and cleaned up.

                              Z-Bot CoreXY Build | Thingiverse Profile

                              1 Reply Last reply Reply Quote 0
                              • Gost101undefined
                                Gost101
                                last edited by

                                @PaulHew thanks for the help. However the Y motor seems to be fighting against itself (it vibrates/slightly turns in one direction then reverses). As for Z moving slightly will allow the axis to move together, however when Y+10 the motors stair step (Only one axis moves upwards while the other stays in place then they reverse direction).

                                A Former User? 1 Reply Last reply Reply Quote 0
                                • Gost101undefined
                                  Gost101
                                  last edited by

                                  Also none of the endstops are working.

                                  1 Reply Last reply Reply Quote 0
                                  • PaulHewundefined
                                    PaulHew
                                    last edited by

                                    Current config.g please
                                    Lets see if we can assist further to get the endstops working.
                                    Its nearly midnight here in the UK!

                                    RailCore II - Duet Mini + 1LC, Voron V0.1 - Duet Mini
                                    Voron 2.4 disassembled..... Waiting for the RailCore Mini....

                                    1 Reply Last reply Reply Quote 0
                                    • A Former User?
                                      A Former User @Gost101
                                      last edited by A Former User

                                      @Gost101 said in CR-10S5 Firmware:

                                      @PaulHew thanks for the help. However the Y motor seems to be fighting against itself (it vibrates/slightly turns in one direction then reverses). As for Z moving slightly will allow the axis to move together, however when Y+10 the motors stair step (Only one axis moves upwards while the other stays in place then they reverse direction).

                                      If the Y axis motor is doing that, it's more than likely that it is not wired up properly, you need to find the base pairs for coil A and B to find the base pair unplug the connector and you can probe the connector using a multimeter set to continuity probe two wires when you get a beep you have found one pair, the other two wires are the second pair, if i was you I would find the base pairs on all the motors to be on the safe side.

                                      1 Reply Last reply Reply Quote 0
                                      • Gost101undefined
                                        Gost101
                                        last edited by

                                        ; Configuration file for Duet WiFi (firmware version 2.03)
                                        ; executed by the firmware on start-up
                                        ;
                                        ; generated by RepRapFirmware Configuration Tool v2.0.3 on Wed Sep 11 2019 20:24:24 GMT-0600 (Mountain Daylight Time)
                                        
                                        ; General preferences
                                        G90                                     ; send absolute coordinates...
                                        M83                                     ; ...but relative extruder moves
                                        M550 P"A.C.E."                          ; set printer name
                                        
                                        M669 K0                                 ; select Cartesian mode
                                        
                                        ; Network
                                        M551 P"12345"                           ; set password
                                        M552 S1                                 ; enable network
                                        M586 P0 S1                              ; enable HTTP
                                        M586 P1 S0                              ; disable FTP
                                        M586 P2 S0                              ; disable Telnet
                                        
                                        ; Drives
                                        M569 P0 S1                              ; X physical drive 0 goes forwards
                                        M569 P1 S1                              ; Y physical drive 1 goes forwards
                                        M569 P2 S0                              ; Z physical drive 2 goes backwards
                                        
                                        M569 P3 S1                              ; E physical drive 3 goes forwards
                                        M584 X0 Y1 Z2 E3                        ; set drive mapping
                                        M350 X16 Y16 Z16 E16 I1                 ; configure microstepping with interpolation
                                        M92 X80.00 Y80.00 Z4000.00 E420.00      ; set steps per mm
                                        M566 X900.00 Y900.00 Z12.00 E120.00     ; set maximum instantaneous speed changes (mm/min)
                                        M203 X6000.00 Y6000.00 Z180.00 E1200.00 ; set maximum speeds (mm/min)
                                        M201 X500.00 Y500.00 Z20.00 E250.00     ; set accelerations (mm/s^2)
                                        M906 X800 Y800 Z800 E800 I30            ; set motor currents (mA) and motor idle factor in per cent
                                        M84 S30                                 ; Set idle timeout
                                        
                                        ; Axis Limits
                                        M208 X0 Y0 Z0 S1                        ; set axis minima
                                        M208 X0:500 Y0:500 Z0:500               ; set axis maxima
                                        
                                        ; Endstops
                                        M574 X1 Y1 Z1 S0                        ; set active low and disabled endstops
                                        
                                        ; Z-Probe
                                        M558 P0 H5 F120 T6000                   ; disable Z probe but set dive height, probe speed and travel speed
                                        M557 X15:215 Y15:195 S20                ; define mesh grid
                                        
                                        ; Heaters
                                        M305 P0 T100000 B4138 R4700             ; set thermistor + ADC parameters for heater 0
                                        M143 H0 S120                            ; set temperature limit for heater 0 to 120C
                                        M305 P1 T100000 B4138 R4700             ; set thermistor + ADC parameters for heater 1
                                        M143 H1 S280                            ; set temperature limit for heater 1 to 280C
                                        
                                        ; Fans
                                        M106 P0 S0 I0 F500 H-1                  ; set fan 0 value, PWM signal inversion and frequency. Thermostatic control is turned off
                                        M106 P1 S1 I0 F500 H1 T45               ; set fan 1 value, PWM signal inversion and frequency. Thermostatic control is turned on
                                        
                                        ; Tools
                                        M563 P0 D0 H1 F0                        ; define tool 0
                                        G10 P0 X0 Y0 Z0                         ; set tool 0 axis offsets
                                        G10 P0 R0 S0                            ; set initial tool 0 active and standby temperatures to 0C
                                        
                                        ; Custom settings are not defined


                                        Phaedruxundefined 1 Reply Last reply Reply Quote 0
                                        • Phaedruxundefined
                                          Phaedrux Moderator @Gost101
                                          last edited by

                                          @Gost101 said in CR-10S5 Firmware:

                                          ; Axis Limits
                                          M208 X0 Y0 Z0 S1 ; set axis minima
                                          M208 X0:500 Y0:500 Z0:500 ; set axis maxima

                                          You've still got two competing formats here for the minima and maxima. Just delete the first line with the S1 since the second line includes both the minima and maxima range in one line.

                                          You can use this procedure to determine the phases of the motor wiring. https://duet3d.dozuki.com/Wiki/Choosing_and_connecting_stepper_motors#Section_Identifying_the_stepper_motor_phases

                                          Z-Bot CoreXY Build | Thingiverse Profile

                                          1 Reply Last reply Reply Quote 1
                                          • Gost101undefined
                                            Gost101
                                            last edited by

                                            Still having trouble getting the Y motor to work. Its wired just as all the other motors. In addition could someone send me to the appropriate link for endstop switch gcode. Acording to this guide: https://duet3d.dozuki.com/Guide/Ender+3+Pro+and+Duet+Maestro+Guide+Part+3:+Commissioning/39 "If the values for X, Y, and Z show "Yes" by default, and "No" when triggered, you chose the wrong switch type in the configurator." I'm doing it wrong.

                                            1 Reply Last reply Reply Quote 0
                                            • First post
                                              Last post
                                            Unless otherwise noted, all forum content is licensed under CC-BY-SA