CR-10S5 Firmware
-
Which command is that?
-
That's the F parameter of the G1 moves
-
Here is the latest config files.
I need to print the BLTouch mount before I can begin using it.
Everything heats up, however I'm having trouble with the e3D Volcano extruding (I just bough a Bondtech Extruder to hopeful solve this as the stock extruder is skipping. I will try to see if the hotend is clogged, I don't think it is due to being a e3D nozzle X.
Everything works at the moment, so I will attempt a benchy.Config.g: config.g
;config.g
; Created by Gost101 on Saturday, September 28th, 2019 at 18:00 MST (6:00PM for Civs).
; This firmware discussion can be found on duet fourm: https://forum.duet3d.com/topic/11964/cr-10s5-firmware/37
; Contact gost1017@gmail.com for more help.

; General preferences
G90                                      ; send absolute coordinates...
M83                                      ; ...but relative extruder moves
M550 P"A.C.E."                           ; set printer name
M669 K0                                  ; select Cartesian mode

; Network
M551 P"12345"                            ; set password
M552 S1                                  ; enable network
M586 P0 S1                               ; enable HTTP
M586 P1 S0                               ; disable FTP
M586 P2 S0                               ; disable Telnet

; Drives
M569 P0 S1                               ; X physical drive 0 goes forwards
M569 P1 S1                               ; Y physical drive 1 goes forwards
M569 P2 S0                               ; Z physical drive 2 goes backwards
M569 P2 S0                               ; Z physical drive 2 goes backwards
M569 P3 S1                               ; E physical drive 3 goes forwards
M584 X0 Y1 Z2 E3                         ; set drive mapping
M350 X16 Y16 Z16 E16 I1                  ; configure microstepping with interpolation
M92 X80.00 Y78.00 Z400.00 E420.00        ; set steps per mm
M566 X900.00 Y900.00 Z1400.00 E120.00    ; set maximum instantaneous speed changes (mm/min)
M203 X6000.00 Y6000.00 Z1400.00 E1200.00 ; set maximum speeds (mm/min)
M201 X500.00 Y500.00 Z1400.00 E250.00    ; set accelerations (mm/s^2)
M906 X800 Y800 Z8000 E800 I30            ; set motor currents (mA) and motor idle factor in per cent
M84 S30                                  ; Set idle timeout

; Axis Limits
M208 X0:500 Y0:500 Z0:500                ; set axis maxima

; Endstops
M574 X1 Y1 Z1 S1                         ; set active high endstops

; Z-Probe
M558 P0 H5 F120 T6000                    ; disable Z probe but set dive height, probe speed and travel speed
M557 X15:215 Y15:195 S20                 ; define mesh grid

; Heaters
M305 P0 T100000 B4138 R4700              ; set thermistor + ADC parameters for heater 0
M143 H0 S120                             ; set temperature limit for heater 0 to 120C
M305 P1 T100000 B4138 R4700              ; set thermistor + ADC parameters for heater 1
M143 H1 S280                             ; set temperature limit for heater 1 to 280C

; Fans
M106 P0 S0 I0 F500 H-1                   ; set fan 0 value, PWM signal inversion and frequency. Thermostatic control is turned off
M106 P1 S1 I0 F500 H1 T45                ; set fan 1 value, PWM signal inversion and frequency. Thermostatic control is turned on

; Tools
M563 P0 D0 H1 F0                         ; define tool 0
G10 P0 X0 Y0 Z0                          ; set tool 0 axis offsets
G10 P0 R0 S0                             ; set initial tool 0 active and standby temperatures to 0C

; Custom settings are not defined
Home All: homeall.g
; homeall.g
; Created by Gost101 on Saturday, September 28th, 2019 at 18:00 (6:00PM for Civs).
; This firmware discussion can be found on duet fourm: https://forum.duet3d.com/topic/11964/cr-10s5-firmware/37
; Contact gost1017@gmail.com for more help.
; Y-Axis
G91                ; relative positioning
G1 S1 Y-505 F3000  ; move quickly to Y axis endstop and stop there (first pass)
G1 Y5 F1000        ; go back a few mm
G1 S1 Y-505 F360   ; move slowly to Y axis endstop once more (second pass)
G90                ; absolute positioning
; X-Axis
G91                ; relative positioning
G1 S1 X-505 F1800  ; move quickly to X axis endstop and stop there (first pass)
G1 X5 F6000        ; go back a few mm
G1 S1 X-505 F360   ; move slowly to X axis endstop once more (second pass)
G90                ; absolute positioning
; Z-Axis
G91                ; relative positioning
G1 S1 Z-505 F10000 ; move Z down until the endstop is triggered
G92 Z0             ; set Z position to axis minimum (you may want to adjust this)
G1 Z3 F800         ; go back a few mm
G1 S1 Z-505 F80    ; move slowly to X axis endstop once more (second pass)
G90                ; absolute positioning
Home X: homex.g
; homex.g
; Created by Gost101 on Saturday, September 28th, 2019 at 18:00 MST (6:00PM for Civs).
; This firmware discussion can be found on duet fourm: https://forum.duet3d.com/topic/11964/cr-10s5-firmware/37
; Contact gost1017@gmail.com for more help.
G91               ; relative positioning
G1 S1 X-505 F1800 ; move quickly to X axis endstop and stop there (first pass)
G1 X5 F6000       ; go back a few mm
G1 S1 X-505 F360  ; move slowly to X axis endstop once more (second pass)
G90               ; absolute positioning
Home Y: homey.g
; homey.g
; Created by Gost101 on Saturday, September 28th, 2019 at 18:00 MST (6:00PM for Civs).
; This firmware discussion can be found on duet fourm: https://forum.duet3d.com/topic/11964/cr-10s5-firmware/37
; Contact gost1017@gmail.com for more help.
G91               ; relative positioning
G1 S1 Y-505 F3000 ; move quickly to Y axis endstop and stop there (first pass)
G1 Y5 F1000       ; go back a few mm
G1 S1 Y-505 F360  ; move slowly to Y axis endstop once more (second pass)
G90               ; absolute positioning
Home Z: homez.g
; homez.g ; Created by Gost101 on Saturday, September 28th, 2019 at 18:00 MST (6:00PM for Civs). ; This firmware discussion can be found on duet fourm: https://forum.duet3d.com/topic/11964/cr10s5-firmware/37 ; Contact gost1017@gmail.com for more help. G91 ; relative positioning G1 S1 Z-505 F10000 ; move Z down until the endstop is triggered G92 Z0 ; set Z position to axis minimum (you may want to adjust this) G1 Z3 F800 ; go back a few mm G1 S1 Z-505 F80 ; move slowly to X axis endstop once more (second pass) G90 ; absolute positioning ; Uncomment the following lines to lift Z after probing ;G91 ; relative positioning ;G1 S2 Z5 F100 ; lift Z relative to current position ;G90 ; absolute positioning -
Your thermistor settings are wrong for both your bed and hotend.....The bed should be M305 P0 T100000 B3950 R4700 and the volcano if it has the E3D cartridge thermistor should be M305 P1 T100000 B4725 C7.060000e-8 R4700
-
Thanks, I changed that before this print: ![alt text]

-
I've got a lot of tweaking to do.
-
It's not... THAT bad... I guess.
-
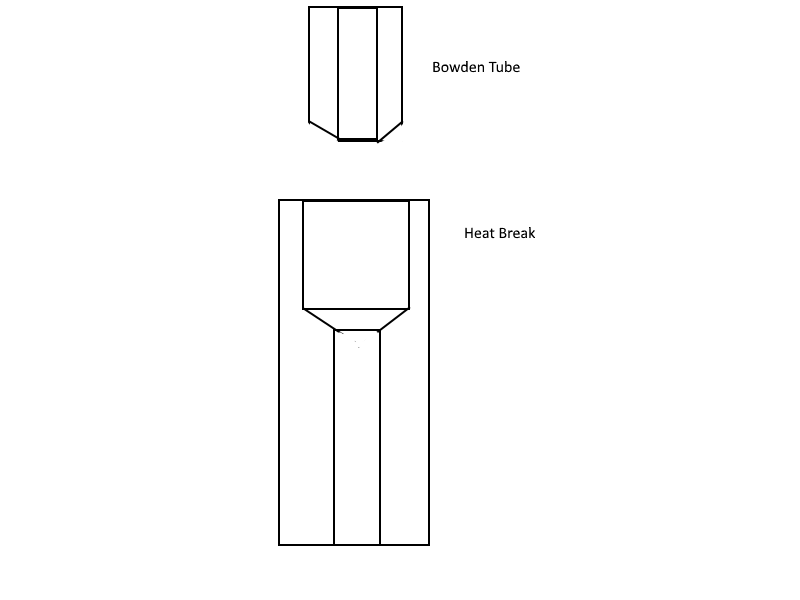
The e3D volcano keeps getting clogged. In between the nozzle and the Capricorn tube there is a little gap that wont close and the filament expands into that and wont let me extrude. I purchased the bontech extruder to hopefully overpower the clog. Any thoughts on what to do?
-
When holding the bowden tube firmly in place, fit the little clip. This should prevent the bowden tube from moving and the gap opening.
If you don't have a clip, fit a tie wrap to keep the bowden fitting in the heat sink in its highest position. -
I have a clip, however this dose not work. Confusion?????
-
I had an instance where the bowden tube wasn't seating correctly in my volcano. I ended up shaving the end of the tube to give it the same angle as the bottom of the hole in the heat break so it sat further down.
-
I was think of doing that, but have been to lazy to do anything today. Latterly been sleeping all day and playing CIV VI. I did add the bondtech extruder today, so I wasn't as lay as I wanted. I had to take the X-Axis arm off just to switch one bolt around, took about 4 hours of laziness away
 . I will post pictures and the new config code for the bondtech hopefully tomorrow. Then I will start the second print. May the odds ever be in my favor.
 -
I will post the code later, I just purchased a new z nut as the one on the right is very hard to use. (All the weight is on the right). The right Z-Axis motor is tough to turn now, lol.

-
@Gost101 I'm done trying to use the volcano, I'm going to try to return it. It always clogs, I've tried tapering the Capricorn tube, it always clogs even mid print if I can get it started. I've tried putting a bontech extruder on this. I'm very frustrated and pissed off.
-
Lol, it prints slow. I cannot increase the speed. Can anyone help?
-
Just as an additional data point: I also use a Volcano system and I have no problems now. It was frustrating to set up initially but it's working nicely now. Too much retraction was an issue with me but the one thing that stumped me for the longest time was the fact that I had the heatbreak too far out of the heatsink (Chimera setup). The necked down section of the heatbreak must be located within about 2 mm of the heatsink bottom otherwise the heat travels up too far in the heatbreak and can cause clogs where the capricorn tube meets the heat break.
The Chimera setup has no threads on the heatbreak section that goes into the heatsink and with the heater and thermistor in the cramped space above the heat block, I just ended up having everything just a tad too far out of the heatsink. It was a real pain to figure this out because sometimes everything worked, sometimes it would clog on retraction, sometimes it would clog when the filament was pushed through too slow - it was a nightmare.
Heat paste on the heatbreak section that is in the heatsink is also highly advisable. -
In addition, I did a test print once going back to the original hotend. It was very slow and would stop after every move and leave a little blob. I cannot speed it up through the g.code files, or the web interface. I will post a video shortly of what is happening.
-
Here is the video link: Print Video
-
Can you post your current config.g and a sample sliced gcode file?
-
Hey @Gost101, I can't think of anything that would clog a volcano, but here are the things that I'd check (in case you haven't already)
-
kinked tube, obstruction in filament path
-
vastly oversized filament
-
burr or debris in the nozzle
-
insufficient stepper current or other mechanical cold end issue
I was seeing an irregular print surface on one side, I pulled the nozzle off, used a propane torch to clean it out, and a 5/64" drill bit by hand to check the barrel for burrs and other obstructions.
-