Duet3D Logo Duet3D
    • Tags
    • Documentation
    • Order
    • Register
    • Login

    Fan on second heater output

    Scheduled Pinned Locked Moved
    Duet Hardware and wiring
    5
    19
    1.1k
    Loading More Posts
    • Oldest to Newest
    • Newest to Oldest
    • Most Votes
    Reply
    • Reply as topic
    Log in to reply
    This topic has been deleted. Only users with topic management privileges can see it.
    • peterfrostaundefined
      peterfrosta
      last edited by

      need help for this:

      https://duet3d.dozuki.com/Wiki/Connecting_and_configuring_fans

      "Alternatively, if you have a spare heater output and you are using firmware 2.02 or later then you can use the heater output as an additional fan output (see later). You must always use a flyback diode if you connect a brushed DC motor to a heater output."

      how can I set the second heater output as Fan for the print colling fan (pwm)?

      i tried to use 42W airpump. i wanted to use the normal fan1 output with external MOSFET but there is no access to the FAN1 PWM signal. - just the FAN1 Output. I could user this Output with pull-resistor and external MOSFET but the logik ist reversed.

      I dont like jumping air pumps at on switching the machine 😉

      thank u in advance!

      deckingmanundefined dc42undefined 2 Replies Last reply Reply Quote 0
      • deckingmanundefined
        deckingman @peterfrosta
        last edited by

        @peterfrosta I'm not sure that I fully understand the problem but for info, it's the negative side that gets switched to provide PWM (the positive side will always be at whatever voltage the heater runs at).

        Ian
        https://somei3deas.wordpress.com/
        https://www.youtube.com/@deckingman

        1 Reply Last reply Reply Quote 0
        • A Former User?
          A Former User
          last edited by

          @peterfrosta said in Fan on second heater output:

          how can I set the second heater output as Fan for the print colling fan (pwm)?

          guessing you're still using 2.x firmware since you're asking?

          1 Reply Last reply Reply Quote 0
          • dc42undefined
            dc42 administrators @peterfrosta
            last edited by

            @peterfrosta, if you are running firmware 2.x then you must first disable that heater using M307, then move a fan to it using the M106 A parameter. With firmware 3.x you just use M950 to create a new fan on that output.

            Duet WiFi hardware designer and firmware engineer
            Please do not ask me for Duet support via PM or email, use the forum
            http://www.escher3d.com, https://miscsolutions.wordpress.com

            1 Reply Last reply Reply Quote 0
            • peterfrostaundefined
              peterfrosta
              last edited by

              Thank for your replies.

              I got not notification, so i noticing it just now.

              @deckingman said in Fan on second heater output:

              @peterfrosta I'm not sure that I fully understand the problem but for info, it's the negative side that gets switched to provide PWM (the positive side will always be at whatever voltage the heater runs at).

              that is clear but thanks!

              @bearer said in Fan on second heater output:

              guessing you're still using 2.x firmware since you're asking?
              @dc42 said in Fan on second heater output:
              @peterfrosta, if you are running firmware 2.x then you must first disable that heater using M307, then move a fan to it using the M106 A parameter. With firmware 3.x you just use M950 to create a new fan on that output.

              that's right. in the meanwhile i did update with:
              https://github.com/dc42/RepRapFirmware/releases/download/3.0/Duet2CombinedFirmware.bin
              https://github.com/dc42/RepRapFirmware/releases/download/3.0/DuetWiFiServer.bin

              Result:
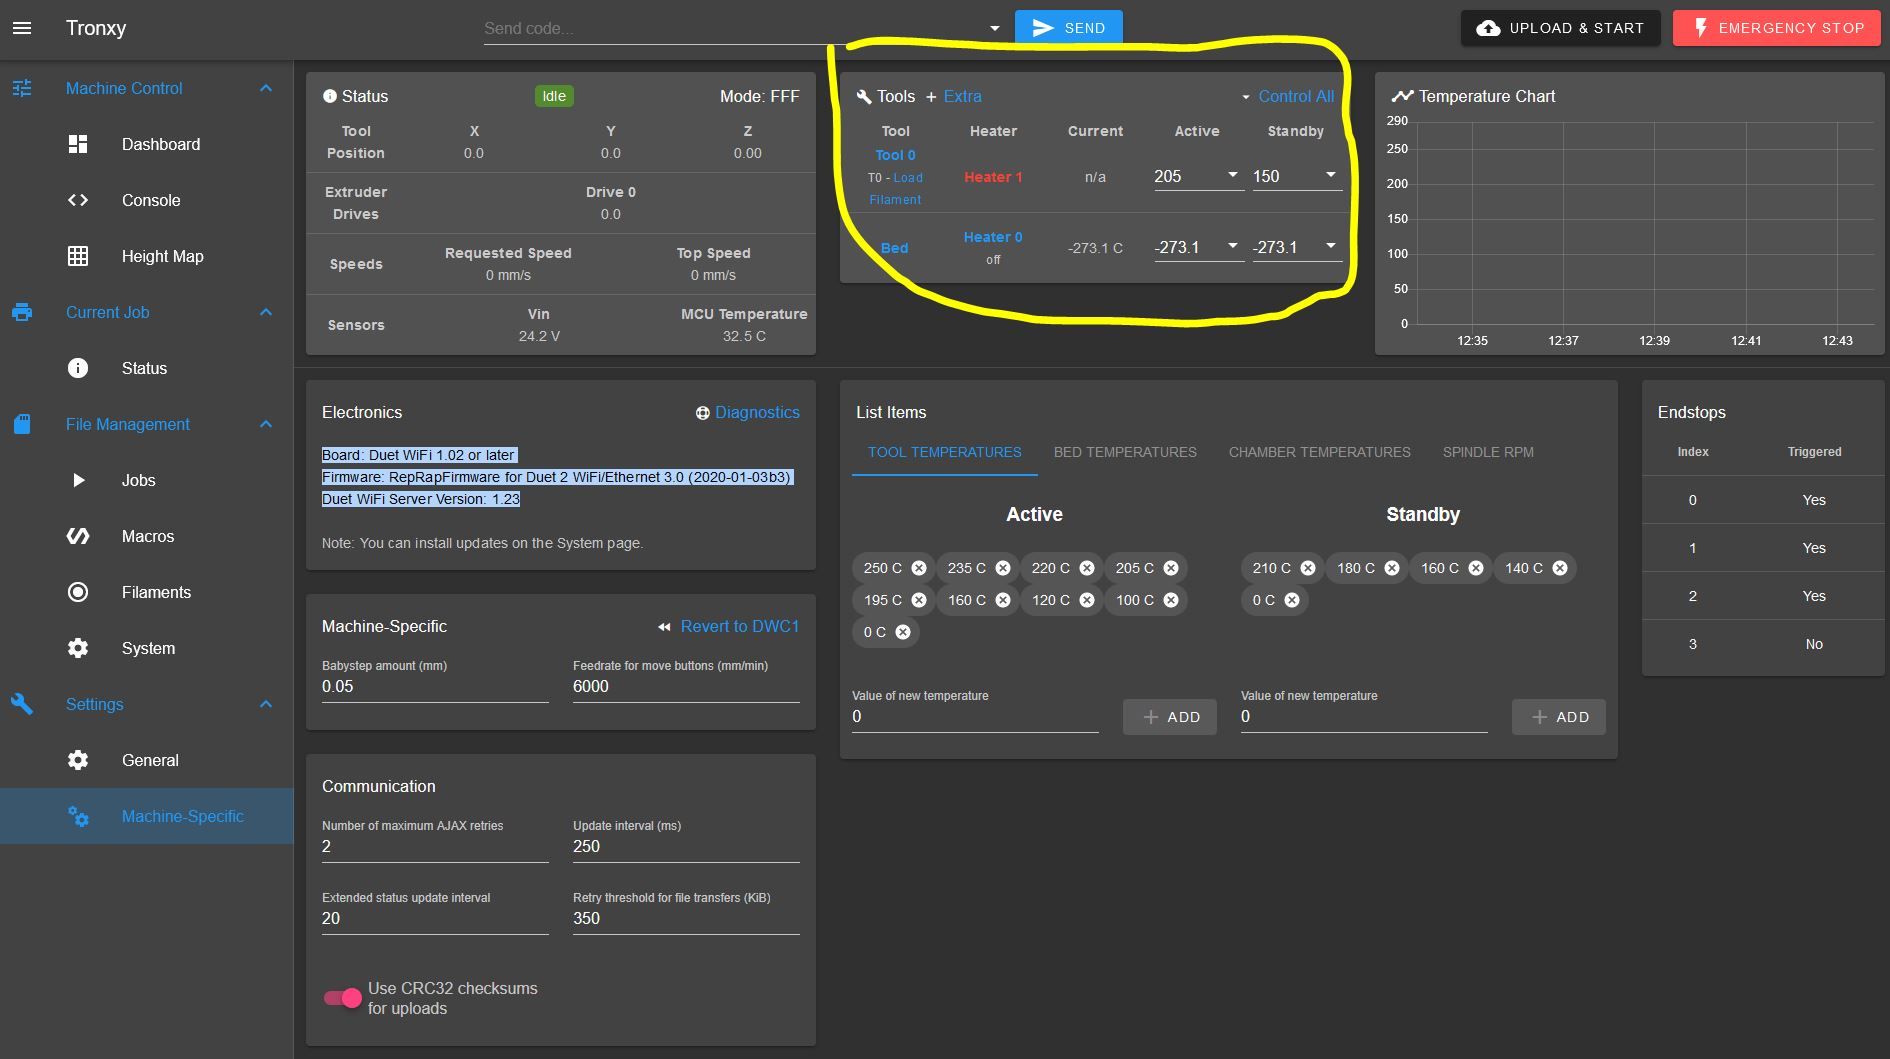
              Board: Duet WiFi 1.02 or later
              Firmware: RepRapFirmware for Duet 2 WiFi/Ethernet 3.0 (2020-01-03b3)
              Duet WiFi Server Version: 1.23

              But know i ran in other problems.
              My Heater (Hotend and Bed) don't work anymore.
              duet_update_result.JPG

              i guess i have to do a new thread at first?

              @dc42 thank for this information. Actually i don't know the exact howto but i hope i will check it with the gcode references and your M950 tip.

              thanks!

              1 Reply Last reply Reply Quote 0
              • jay_s_ukundefined
                jay_s_uk
                last edited by

                Add M140 H0 to your config

                Owns various duet boards and is the main wiki maintainer for the Teamgloomy LPC/STM32 port of RRF. Assume I'm running whatever the latest beta/stable build is

                peterfrostaundefined 1 Reply Last reply Reply Quote 0
                • peterfrostaundefined
                  peterfrosta @jay_s_uk
                  last edited by

                  ah mistake.. the tempsensors not the heater...

                  tempsens from heater is n/a.
                  The tempsens from the bed is -273,1 °C. Welcome in new physics xD

                  @jay_s_uk said in Fan on second heater output:

                  Add M140 H0 to your config
                  How would this help? Thats set a temperature for the heater?!

                  jay_s_ukundefined 1 Reply Last reply Reply Quote 0
                  • jay_s_ukundefined
                    jay_s_uk @peterfrosta
                    last edited by

                    @peterfrosta Can you provide your latest config.g?

                    Owns various duet boards and is the main wiki maintainer for the Teamgloomy LPC/STM32 port of RRF. Assume I'm running whatever the latest beta/stable build is

                    peterfrostaundefined 1 Reply Last reply Reply Quote 0
                    • peterfrostaundefined
                      peterfrosta @jay_s_uk
                      last edited by

                      @jay_s_uk sure.

                      i did not change anything after updateing or short before...
                      config.g

                      1 Reply Last reply Reply Quote 0
                      • jay_s_ukundefined
                        jay_s_uk
                        last edited by

                        @peterfrosta

                        You have a lot of changes to make around your heaters, fans and zprobe code.

                        I would suggest using the RRF config tool to generate a new file and then modify it to match your old config.

                        Owns various duet boards and is the main wiki maintainer for the Teamgloomy LPC/STM32 port of RRF. Assume I'm running whatever the latest beta/stable build is

                        peterfrostaundefined 1 Reply Last reply Reply Quote 0
                        • peterfrostaundefined
                          peterfrosta @jay_s_uk
                          last edited by

                          @jay_s_uk thx for tip.
                          it seems that Version 3 need a new V3 compatible config.
                          Now ihave the temp values.

                          Unluckily i got new problems.
                          When i try to home one axis (eg X) it set the x value insteadly to the lower X limit (-7mm).
                          If i click a second one on the X home button i set x Value to -413 and got the error msg:
                          "G28 X
                          G0/G1: insufficent axes homed"

                          i tried active low and active high - same result.
                          M574 X1 S0 P"xstop"
                          M574 X2 S0 P"xstop"

                          1 Reply Last reply Reply Quote 0
                          • peterfrostaundefined
                            peterfrosta
                            last edited by

                            ; homex.g
                            ; called to home the X axis
                            ;
                            ; generated by RepRapFirmware Configuration Tool v2.1.8 on Fri Jan 17 2020 14:46:51 GMT+0100 (Mitteleuropäische Normalzeit)
                            G91               ; relative positioning
                            G1 H2 Z5 F6000    ; lift Z relative to current position
                            G1 H1 X-405 F2400 ; move quickly to X axis endstop and stop there (first pass)
                            G1 X5 F6000       ; go back a few mm
                            G1 H1 X-405 F360  ; move slowly to X axis endstop once more (second pass)
                            G1 H2 Z-5 F6000   ; lower Z again
                            G90               ; absolute positioning
                            
                            1 Reply Last reply Reply Quote 0
                            • peterfrostaundefined
                              peterfrosta
                              last edited by

                              ; Configuration file for Duet WiFi (firmware version 3)
                              ; executed by the firmware on start-up
                              ;
                              ; generated by RepRapFirmware Configuration Tool v2.1.8 on Fri Jan 17 2020 14:46:51 GMT+0100 (Mitteleuropäische Normalzeit)
                              
                              ; General preferences
                              G90                                                    ; send absolute coordinates...
                              M83                                                    ; ...but relative extruder moves
                              M550 P"Tronxy"                                         ; set printer name
                              
                              M667 S1                                                ; select CoreXY mode
                              
                              ; Network
                              M552 S1                                                ; enable network
                              M586 P0 S1                                             ; enable HTTP
                              M586 P1 S1                                             ; enable FTP
                              M586 P2 S1                                             ; enable Telnet
                              
                              ; Drives
                              M569 P0 S1                                             ; physical drive 0 goes forwards
                              M569 P1 S1                                             ; physical drive 1 goes forwards
                              M569 P2 S1                                             ; physical drive 2 goes forwards
                              M569 P3 S1                                             ; physical drive 3 goes forwards
                              M584 X0 Y1 Z2 E3                                       ; set drive mapping
                              M350 X16 Y16 Z16 E16 I1                                ; configure microstepping with interpolation
                              M92 X80.66 Y80.32 Z397.61 E389.00                      ; set steps per mm
                              M566 X1500.00 Y1500.00 Z180.00 E348.00                 ; set maximum instantaneous speed changes (mm/min)
                              M203 X18000.00 Y18000.00 Z1980.00 E9000.00             ; set maximum speeds (mm/min)
                              M201 X1500.00 Y1500.00 Z200.00 E1000.00                ; set accelerations (mm/s^2)
                              M906 X1000 Y1000 Z1000 E1200 I35                       ; set motor currents (mA) and motor idle factor in per cent
                              M84 S30                                                ; Set idle timeout
                              
                              ; Axis Limits
                              M208 X-8 Y-17 Z0 S1                                       ; set axis minima
                              M208 X400 Y360 Z390 S0                                 ; set axis maxima
                              
                              ; Endstops
                              M574 X1 S0 P"xstop"                                    ; configure active-low endstop for low end on X via pin xstop
                              M574 Y1 S0 P"ystop"                                    ; configure active-low endstop for low end on Y via pin ystop
                              M574 Z1 S2                                             ; configure Z-probe endstop for low end on Z
                              
                              ; Z-Probe
                              M558 P1 C"zprobe.in+zprobe.mod" H5 F120 T6000          ; set Z probe type to unmodulated and the dive height + speeds
                              G31 P500 X-30 Y5 Z1.6                                  ; set Z probe trigger value, offset and trigger height
                              M556 S50 X0 Y0 Z0                                      ; set orthogonal axis compensation parameters
                              M557 X52:350 Y30:350 S20                               ; define mesh grid
                              
                              ; Heaters
                              M308 S0 P"bedtemp" Y"thermistor" T102400 B4138         ; configure sensor 0 as thermistor on pin bedtemp
                              M950 H0 C"bedheat" T0                                  ; create bed heater output on bedheat and map it to sensor 0
                              M143 H0 S120                                           ; set temperature limit for heater 0 to 120C
                              M307 H0 B0 S1.00                                       ; disable bang-bang mode for the bed heater and set PWM limit
                              M140 H0						       ; map heated bed to heater 0
                              
                              M308 S1 P"e0temp" Y"thermistor" T100000 B4725 C7.06e-8 ; configure sensor 1 as thermistor on pin e0temp
                              M950 H1 C"e0heat" T1                                   ; create nozzle heater output on e0heat and map it to sensor 1
                              M143 H1 S280                                           ; set temperature limit for heater 1 to 280C
                              M307 H1 B0 S1.00                                       ; disable bang-bang mode for heater  and set PWM limit
                              
                              ; Fans
                              M950 F0 C"fan0" Q500                                   ; create fan 0 on pin fan0 and set its frequency
                              M106 P0 S0 H-1                                         ; set fan 0 value. Thermostatic control is turned off
                              M950 F1 C"fan1" Q500                                   ; create fan 1 on pin fan1 and set its frequency
                              M106 P1 S1 H1 T45                                      ; set fan 1 value. Thermostatic control is turned on
                              
                              ; Tools
                              M563 P0 D0 H1 F0:1                                     ; define tool 0
                              G10 P0 X0 Y0 Z0                                        ; set tool 0 axis offsets
                              G10 P0 R0 S0                                           ; set initial tool 0 active and standby temperatures to 0C
                              
                              ; Custom settings
                              ;Tappering
                              M376 H10			                                            ; Bettkompensation läuft über 10mm Linear aus


                              1 Reply Last reply Reply Quote 0
                              • peterfrostaundefined
                                peterfrosta
                                last edited by

                                If i understand this correctly
                                https://duet3d.dozuki.com/Wiki/FAQ#Section_I_get_this_error_message_Error_G0_G1_insufficient_axes_homed
                                i have two options, both need to change the fresh created config from the WebConfigurator,hm...

                                Option 1:
                                change in the homex.g

                                G1 H1 X-405 F2400 ; move quickly to X axis endstop and stop there (first pass)
                                

                                to

                                G1 S1 X-405 F2400 ; move quickly to X axis endstop and stop there (first pass)
                                

                                Option 2:
                                add "M564 H0"
                                at the begin of homex.g

                                Am i right?

                                dc42undefined 1 Reply Last reply Reply Quote 0
                                • peterfrostaundefined
                                  peterfrosta
                                  last edited by

                                  ok.
                                  Option 1 ist no option.

                                  I got this warning and same situation about x value (set to -8mm - and no movment)

                                  G28 X
                                  Warning: Obsolete use of S parameter on G1 command. Use H parameter instead.
                                  Warning: Obsolete use of S parameter on G1 command. Use H parameter instead.
                                  
                                  1 Reply Last reply Reply Quote 0
                                  • peterfrostaundefined
                                    peterfrosta
                                    last edited by

                                    heating also not working 😞

                                    Error: Heating fault on heater 0, temperature rising much more slowly than the expected 1.8°C/sec
                                    

                                    what's happend with this update process?

                                    1 Reply Last reply Reply Quote 0
                                    • jay_s_ukundefined
                                      jay_s_uk
                                      last edited by

                                      @peterfrosta
                                      You'll need to PID tune your heaters (hotend and bed) using M303

                                      Owns various duet boards and is the main wiki maintainer for the Teamgloomy LPC/STM32 port of RRF. Assume I'm running whatever the latest beta/stable build is

                                      1 Reply Last reply Reply Quote 0
                                      • dc42undefined
                                        dc42 administrators @peterfrosta
                                        last edited by dc42

                                        @peterfrosta said in Fan on second heater output:

                                        If i understand this correctly
                                        https://duet3d.dozuki.com/Wiki/FAQ#Section_I_get_this_error_message_Error_G0_G1_insufficient_axes_homed
                                        i have two options, both need to change the fresh created config from the WebConfigurator,hm...

                                        Option 1:
                                        change in the homex.g

                                        G1 H1 X-405 F2400 ; move quickly to X axis endstop and stop there (first pass)
                                        

                                        to

                                        G1 S1 X-405 F2400 ; move quickly to X axis endstop and stop there (first pass)
                                        

                                        That won't help. You can use either S1 or H1, but in RRF3 you will get an warning if you use S1.

                                        Option 2:
                                        add "M564 H0"
                                        at the begin of homex.g

                                        A better solution is to find the move that you are doing before the corresponding axis is homed, and add the H2 parameter to that move. Typically it is something like: G1 Z5

                                        Duet WiFi hardware designer and firmware engineer
                                        Please do not ask me for Duet support via PM or email, use the forum
                                        http://www.escher3d.com, https://miscsolutions.wordpress.com

                                        1 Reply Last reply Reply Quote 0
                                        • peterfrostaundefined
                                          peterfrosta
                                          last edited by peterfrosta

                                          i got run.

                                          i was not firm with the ne config/gcode that expected from V3.
                                          Unlucky, that the config generator does not import the most settings from my old config.

                                          the problem with movement was the missing inverting from endstops (motor movement was also not inverted as needed).
                                          I tried with line from old config but they doesn't work anymore.

                                          Using new invert style for endstops and i was checking the effects.

                                          M574 X1 S1 P"!xstop"  
                                          

                                          thanks to all

                                          1 Reply Last reply Reply Quote 0
                                          • First post
                                            Last post
                                          Unless otherwise noted, all forum content is licensed under CC-BY-SA