calculate the positions of switch, low and high
-
If a negative move goes towards a switch, then the switch is considered to be at the low end of the axis. Conversely, if a positive move goes towards a switch, then the switch is considered to be at the high end of the axis. Does that answer your question?
-
I would say define the switch locations based on the right hand rule, if the motors happen to move in the other direction then reverse the motors but keep the switches according to the right hand rule.
-
@chris4 'Low' means 'MIN', ie when the axis is at 0 or negative (if nozzle stops at endstop when off the bed). 'High' means 'MAX' axis position, in your example axis is at 230 or greater.
In your picture, all endstops are MIN (so 'Low'). Y Stop says MAX, but it is not, it is MIN. See below.
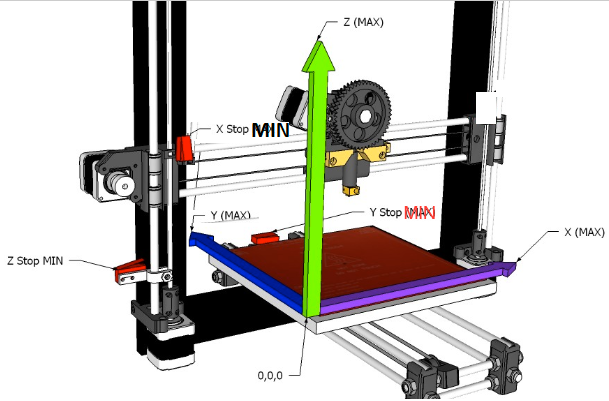
Edit: It looks weird because the arrows from (0,0,0) on the bed are moves RELATIVE TO THE NOZZLE, not of the bed itself. The green arrow is the nozzle moving up (on the Z axis), the purple one the nozzle move right (on the X axis). The blue one is the nozzle moving backwards, except it cannot; the bed moves forwards. So the bed at the back is Y MIN. I hope that explains it!
Ian
-
@chris4 said in calculate the positions of switch, low and high:
M350 X16 Y16 Z16 E16 I1 ; configure microstepping with interpolation
M92 X160.00 Y160.00 Z2560.00 E873.08 ; set steps per mm
M566 X900.00 Y900.00 Z12.00 E120.00 ; set maximum instantaneous speed changes (mm/min)
M203 X6000.00 Y6000.00 Z180.00 E1200.00 ; set maximum speeds (mm/min)
M201 X400.00 Y500.00 Z20.00 E250.00 ; set accelerations (mm/s^2)
M906 X800 Y800 Z800 E800 I30 ; set motor currents (mA) and motor idle factor in per cent
M84 S30 ; Set idle timeoutThanks for answer, does that mean my G-code is not correct? What should I change in G-code, if you have time to help me.
; Drives M569 P0 S1 ; physical drive 0 goes forwards M569 P1 S1 ; physical drive 1 goes forwards M569 P2 S0 ; physical drive 2 goes backwards M569 P3 S0 ; physical drive 3 goes backwards M584 X0 Y1 Z2 E3 ; set drive mapping M350 X16 Y16 Z16 E16 I1 ; configure microstepping with interpolation M92 X80.00 Y80.00 Z4000.00 E837.00 ; set steps per mm M566 X900.00 Y900.00 Z12.00 E120.00 ; set maximum instantaneous speed changes (mm/min) M203 X6000.00 Y6000.00 Z180.00 E1200.00 ; set maximum speeds (mm/min) M201 X500.00 Y500.00 Z20.00 E250.00 ; set accelerations (mm/s^2) M906 X800 Y800 Z800 E800 I30 ; set motor currents (mA) and motor idle factor in per cent M84 S30 ; Set idle timeout ; Axis Limits M208 X0 Y0 Z0 S1 ; set axis minima M208 X230 Y210 Z200 S0 ; set axis maxima ; Endstops M574 X1 Y1 Z1 S0 ; set active low and disabled endstops -
@chris4 Can you send M115 to your Duet and post response? Just to check you're on the correct firmware version to match your config.g. Also, I'm assuming you have a Cartesian printer like the picture, not a CoreXY or something else. Usually it's best to post your hole config.g, and a brief description of your printer; see https://forum.duet3d.com/topic/5909/guide-for-posting-requests-for-help
It's difficult for us to know which direction (forwards/backwards) to set motors, as it depends on wiring and which side of the pulley the belt runs. You have to test it. See https://duet3d.dozuki.com/Wiki/Test_axes_or_motors_individually
You currently have your endstops all as 'low' (or minimum) endstops (with X1 Y1 Z1), which should be correct from the picture. You do have them set to 'Active low' with S0. 'Active high' or 'Normally Closed', set with S1, is recommended, as it's less susceptible to noise, but it depends on the wiring of your endstop. See https://duet3d.dozuki.com/Wiki/Connecting_endstop_switches#Section_Microswitch
Test your endstops by looking at the DWC or sending M119. See https://duet3d.dozuki.com/Wiki/Connecting_endstop_switches#Section_Test_endstop_switches
Ian
-
@droftarts said in calculate the positions of switch, low and high:
Cartesian printer
I'll try it.
Yes is Cartesian printer and
Duet WiFi 1.02 or later
2.02(RTOS) (2018-12-24b1)Ihave this movement of the step motors
-the X step motor to move from the switch, left to right, go backwards = S0
-the Y step motor to move from the switch (back) to forward move backward = S0
-the ZA, ZB step motor to move from the switch up, move forward S = 1
-all the switch are NO connected -
@chris4 said in calculate the positions of switch, low and high:
-all the switch are NO connected
you'd be better off with NC, as it would prevent damage if you try to home in the event of a wire coming loose. (with NO it would never trigger, while NC it would already be triggered in the event of a fault)
-
@bearer said in calculate the positions of switch, low and high:
you'd be better off with NC, as it would prevent damage if you try to home in the event of a wire coming loose. (with NO it would never trigger, while NC it would already be triggered in the event of a fault)
should i change to NC for all switches? outermost contacts (1-2, NC-C connection)
-
@chris4 said in calculate the positions of switch, low and high:
should i change to NC for all switches? outermost contacts (1-2, NC-C connection)
As we've all said, it would be better/safer!
@chris4 said in calculate the positions of switch, low and high:
2.02(RTOS) (2018-12-24b1)
Update to the latest RepRapFirmware 2, which is 2.05.1, here: https://github.com/dc42/RepRapFirmware/releases/tag/2.05.1
To update firmware, see https://duet3d.dozuki.com/Wiki/Installing_and_Updating_FirmwareIan
Bed-slinger - Mini5+ WiFi/1LC | RRP Fisher v1 - D2 WiFi | Polargraph - D2 WiFi | TronXY X5S - 6HC/Roto | CNC router - 6HC | Tractus3D T1250 - D2 Eth
-
@droftarts
Thanks, do you have time to help me with config.g if it is correct?; Configuration file for Duet WiFi (firmware version 2.03) ; executed by the firmware on start-up ; ; generated by RepRapFirmware Configuration Tool v2.1.8 on Tue Feb 18 2020 18:56:18 GMT+0100 (centraleuropeisk normaltid) ; General preferences G90 ; send absolute coordinates... M83 ; ...but relative extruder moves M550 P"My Printer" ; set printer name ; Network M552 S1 ; enable network M586 P0 S1 ; enable HTTP M586 P1 S0 ; disable FTP M586 P2 S0 ; disable Telnet ; Drives M569 P0 S1 ; physical drive 0 goes backwards M569 P1 S1 ; physical drive 1 goes backwards M569 P2 S0 ; physical drive 2 goes forward M569 P3 S1 ; physical drive 3 goes backwards M584 X0 Y1 Z2 E3 ; set drive mapping M350 X16 Y16 Z16 E16 I1 ; configure microstepping with interpolation M92 X160.00 Y160.00 Z2560.00 E837.08 ; set steps per mm M566 X900.00 Y900.00 Z12.00 E120.00 ; set maximum instantaneous speed changes (mm/min) M203 X6000.00 Y6000.00 Z180.00 E1200.00 ; set maximum speeds (mm/min) M201 X400.00 Y500.00 Z20.00 E250.00 ; set accelerations (mm/s^2) M906 X800 Y800 Z800 E800 I30 ; set motor currents (mA) and motor idle factor in per cent M84 S30 ; Set idle timeout ; Axis Limits M208 X0 Y0 Z0 S1 ; set axis minima M208 X230 Y210 Z200 S0 ; set axis maxima ; Endstops M574 X1 Y1 Z1 S0 ; set active low and disabled endstops ; Z-Probe M558 P0 H5 F120 T6000 ; disable Z probe but set dive height, probe speed and travel speed M557 X15:215 Y15:195 S20 ; define mesh grid ; Heaters M305 P0 T100000 B4138 R4700 ; set thermistor + ADC parameters for heater 0 M143 H0 S120 ; set temperature limit for heater 0 to 120C M305 P1 T100000 B4138 R4700 ; set thermistor + ADC parameters for heater 1 M143 H1 S280 ; set temperature limit for heater 1 to 280C ; Fans M106 P0 S0 I0 F500 H-1 ; set fan 0 value, PWM signal inversion and frequency. Thermostatic control is turned off M106 P1 S1 I0 F500 H1 T45 ; set fan 1 value, PWM signal inversion and frequency. Thermostatic control is turned on ; Tools M563 P0 D0 H1 F0 ; define tool 0 G10 P0 X0 Y0 Z0 ; set tool 0 axis offsets G10 P0 R0 S0 ; set initial tool 0 active and standby temperatures to 0C ; Custom settings are not defined -
@chris4 Difficult to know if it's 'right'! Apart from saying it's a Cartesian printer, I know very little about the machine, eg motor, belt, leadscrew, hot end, thermistors etc etc. And I have no idea if you've wired it up correctly. If you've followed through the commissioning steps here https://duet3d.dozuki.com/Wiki/Step_by_step_guide#Section_Commissioning_tests you've got a good chance everything will be fine, and it's on to test prints and tuning.
Couple of notes:
M92 X160.00 Y160.00 Z2560.00 E837.08 ; set steps per mm
With these settings, I'd guess you were using GT2 belts and 0.9º motors on X and Y. Z2560 for Z implies 1.8º motors with M8 (1.25mm pitch) leadscrews. Probably a 0.9º extruder motor.
Your other motor settings look pretty default.M574 X1 Y1 Z1 S0
Your endtops are still set 'active low'.M305 P0 T100000 B4138 R4700 ; set thermistor + ADC parameters for heater 0
M305 P1 T100000 B4138 R4700 ; set thermistor + ADC parameters for heater 1
T100000 B4138 is the default thermistor setting, for a Honeywell 135-104QAD-J01 thermistor that shipped with hot ends from RepRapPro, who have been out of business for 4 years! So I doubt you have the correct thermistor settings, and likely the temperature your heaters are reporting is not accurate. All 100k ohm thermistors have a resistance of 100k ohms at 25C, and will be fairly accurate at room temperature, but they report very differently as they get hotter. So please check what thermistors you have in your bed and hot end, and set them correctly, then you have a chance of accurately setting extrusion temperature.That's all I can see from config.g. Whether your homing gcodes are accurate is another story!
Ian
-
@droftarts said in calculate the positions of switch, low and high:
another story
Thanks Ian, I have GT2 belts and 0.9º motors on X and Y and Z implies 1.8º motors with M8 (1.25mm pitch) lead screws. 0.9º extruder motor. Do you have time (another story homeall, homex, homey homez) if they are right? otherwise you can take when you have time for it.
I fixed to 2.05.1 (2020-02-09b1); homeall.g ; called to home all axes ; ; generated by RepRapFirmware Configuration Tool v2.1.8 on Tue Feb 18 2020 18:56:18 GMT+0100 (centraleuropeisk normaltid) G91 ; relative positioning G1 H2 Z5 F6000 ; lift Z relative to current position G1 H1 X-235 Y-215 F1800 ; move quickly to X and Y axis endstops and stop there (first pass) G1 H2 X5 Y5 F6000 ; go back a few mm G1 H1 X-235 Y-215 F360 ; move slowly to X and Y axis endstops once more (second pass) G1 H1 Z-205 F360 ; move Z down stopping at the endstop G90 ; absolute positioning G92 Z0 ; set Z position to axis minimum (you may want to adjust this) ; Uncomment the following lines to lift Z after probing ;G91 ; relative positioning ;G1 Z5 F100 ; lift Z relative to current position ;G90 ; absolute positioning ; homex.g ; called to home the X axis ; ; generated by RepRapFirmware Configuration Tool v2.1.8 on Tue Feb 18 2020 18:56:18 GMT+0100 (centraleuropeisk normaltid) G91 ; relative positioning G1 H2 Z5 F6000 ; lift Z relative to current position G1 H1 X-235 F1800 ; move quickly to X axis endstop and stop there (first pass) G1 H2 X5 F6000 ; go back a few mm G1 H1 X-235 F360 ; move slowly to X axis endstop once more (second pass) G1 H2 Z-5 F6000 ; lower Z again G90 ; absolute positioning ; homey.g ; called to home the Y axis ; ; generated by RepRapFirmware Configuration Tool v2.1.8 on Tue Feb 18 2020 18:56:18 GMT+0100 (centraleuropeisk normaltid) G91 ; relative positioning G1 H2 Z5 F6000 ; lift Z relative to current position G1 H1 Y-215 F1800 ; move quickly to Y axis endstop and stop there (first pass) G1 H2 Y5 F6000 ; go back a few mm G1 H1 Y-215 F360 ; move slowly to Y axis endstop once more (second pass) G1 H2 Z-5 F6000 ; lower Z again G90 ; absolute positioning ; homez.g ; called to home the Z axis ; ; generated by RepRapFirmware Configuration Tool v2.1.8 on Tue Feb 18 2020 18:56:18 GMT+0100 (centraleuropeisk normaltid) G91 ; relative positioning G1 H2 Z5 F6000 ; lift Z relative to current position G1 H1 Z-205 F1800 ; move Z down until the endstop is triggered G1 H2 Z5 F6000 ; go back a few mm G1 H1 Z0 F360 ; move slowly to Y axis endstop once more (second pass) G1 H2 Z-5 F360 ; lower Z again G92 Z0 ; set Z position to axis minimum (you may want to adjust this) ; Uncomment the following lines to lift Z after probing ;G91 ; relative positioning ;G1 Z5 F100 ; lift Z relative to current position ;G90 ; absolute positioning -
@chris4 Homing files look okay. Good luck with your first tests!
Ian
Bed-slinger - Mini5+ WiFi/1LC | RRP Fisher v1 - D2 WiFi | Polargraph - D2 WiFi | TronXY X5S - 6HC/Roto | CNC router - 6HC | Tractus3D T1250 - D2 Eth
-
@droftarts
Thanks Ian. -
@droftarts
HI again Ian,
I forgot about switch how should I connect for this configuration we talked about last time. Should I connect pin 1 and 2 (NC-C) as outermost pins on the switch on all 3 switches. And on the duet2wifi stop end 3 pin connector (pins 1 and 3) is that right?
Thanks again -
Crash....
with new connection NC switches have crashed.
How to be LEDs on the duet2wifi card when the switch is pressed.
Mine lights up when the switches are pressed. should they be so?
I can take my settings once. left side set front view is home to my printer -X step motor to go right, must rotate backwards.
-Ystep motor to go from home position to front must rotate backward.
-Z steper motors to go up from home position must rotate forward.
All axes in the hom position, the switches are pressed.
What am I doing wrong?
Now I have this configuration.
Hope you have time with an old man.
Thanks Christian; Configuration file for Duet WiFi (firmware version 2.03) ; executed by the firmware on start-up ; ; generated by RepRapFirmware Configuration Tool v2.1.8 on Fri Feb 28 2020 19:10:29 GMT+0100 (centraleuropeisk normaltid) ; General preferences G90 ; send absolute coordinates... M83 ; ...but relative extruder moves M550 P"My Printer" ; set printer name ; Network M552 S1 ; enable network M586 P0 S1 ; enable HTTP M586 P1 S0 ; disable FTP M586 P2 S0 ; disable Telnet ; Drives M569 P0 S0 ; physical drive 0 goes backwards M569 P1 S0 ; physical drive 1 goes backwards M569 P2 S1 ; physical drive 2 goes forwards M569 P3 S0 ; physical drive 3 goes backwards M584 X0 Y1 Z2 E3 ; set drive mapping M350 X16 Y16 Z16 E16 I1 ; configure microstepping with interpolation M92 X160.00 Y160.00 Z1600.00 E873.08 ; set steps per mm M566 X900.00 Y900.00 Z12.00 E120.00 ; set maximum instantaneous speed changes (mm/min) M203 X6000.00 Y6000.00 Z180.00 E1200.00 ; set maximum speeds (mm/min) M201 X500.00 Y500.00 Z20.00 E250.00 ; set accelerations (mm/s^2) M906 X800 Y800 Z800 E800 I30 ; set motor currents (mA) and motor idle factor in per cent M84 S30 ; Set idle timeout ; Axis Limits M208 X0 Y0 Z0 S1 ; set axis minima M208 X230 Y210 Z200 S0 ; set axis maxima ; Endstops M574 X1 Y1 Z1 S1 ; set active high endstops ; Z-Probe M558 P0 H5 F120 T6000 ; disable Z probe but set dive height, probe speed and travel speed M557 X15:215 Y15:195 S20 ; define mesh grid ; Heaters M305 P0 T100000 B4138 R4700 ; set thermistor + ADC parameters for heater 0 M143 H0 S120 ; set temperature limit for heater 0 to 120C M305 P1 T100000 B4092 R4700 ; set thermistor + ADC parameters for heater 1 M143 H1 S280 ; set temperature limit for heater 1 to 280C ; Fans M106 P0 S0 I0 F500 H-1 ; set fan 0 value, PWM signal inversion and frequency. Thermostatic control is turned off M106 P1 S1 I0 F500 H1 T45 ; set fan 1 value, PWM signal inversion and frequency. Thermostatic control is turned on ; Tools M563 P0 D0 H1 F0 ; define tool 0 G10 P0 X0 Y0 Z0 ; set tool 0 axis offsets G10 P0 R0 S0 ; set initial tool 0 active and standby temperatures to 0C ; Custom settings are not defined ; homeall.g ; called to home all axes ; ; generated by RepRapFirmware Configuration Tool v2.1.8 on Fri Feb 28 2020 19:10:29 GMT+0100 (centraleuropeisk normaltid) G91 ; relative positioning G1 H2 Z5 F6000 ; lift Z relative to current position G1 H1 X-235 Y-215 F1800 ; move quickly to X and Y axis endstops and stop there (first pass) G1 H2 X5 Y5 F6000 ; go back a few mm G1 H1 X-235 Y-215 F360 ; move slowly to X and Y axis endstops once more (second pass) G1 H1 Z-205 F360 ; move Z down stopping at the endstop G90 ; absolute positioning G92 Z0 ; set Z position to axis minimum (you may want to adjust this) ; Uncomment the following lines to lift Z after probing ;G91 ; relative positioning ;G1 Z5 F100 ; lift Z relative to current position ;G90 ; absolute positioning ; homex.g ; called to home the X axis ; ; generated by RepRapFirmware Configuration Tool v2.1.8 on Fri Feb 28 2020 19:10:29 GMT+0100 (centraleuropeisk normaltid) G91 ; relative positioning G1 H2 Z5 F6000 ; lift Z relative to current position G1 H1 X-235 F1800 ; move quickly to X axis endstop and stop there (first pass) G1 H2 X5 F6000 ; go back a few mm G1 H1 X-235 F360 ; move slowly to X axis endstop once more (second pass) G1 H2 Z-5 F6000 ; lower Z again G90 ; absolute positioning ; homey.g ; called to home the Y axis ; ; generated by RepRapFirmware Configuration Tool v2.1.8 on Fri Feb 28 2020 19:10:29 GMT+0100 (centraleuropeisk normaltid) G91 ; relative positioning G1 H2 Z5 F6000 ; lift Z relative to current position G1 H1 Y-215 F1800 ; move quickly to Y axis endstop and stop there (first pass) G1 H2 Y5 F6000 ; go back a few mm G1 H1 Y-215 F360 ; move slowly to Y axis endstop once more (second pass) G1 H2 Z-5 F6000 ; lower Z again G90 ; absolute positioning ; homez.g ; called to home the Z axis ; ; generated by RepRapFirmware Configuration Tool v2.1.8 on Fri Feb 28 2020 19:10:29 GMT+0100 (centraleuropeisk normaltid) G91 ; relative positioning G1 H2 Z5 F6000 ; lift Z relative to current position G1 H1 Z-205 F1800 ; move Z down until the endstop is triggered G92 Z0 ; set Z position to axis minimum (you may want to adjust this) ; Uncomment the following lines to lift Z after probing ;G91 ; relative positioning ;G1 Z5 F100 ; lift Z relative to current position ;G90 ; absolute positioning -
Prior to moving a machine that's had endstop configuration changes, verify switches by pressing with your finger and looking at the "Machine Specific" tab of the Web interface. You can see their triggered status go "Yes" or "No" in real time.
The lights help you know the switch is wired, and changing. The lights to NOT tell you if the firmware considers the switch triggered or not. The web interface does that.
-
@Danal
Thanks.
Have a little hard to understanding how is it with Endstop Location at low end high end. How can explain this to an old man.
If we take X axis in my case, I have home 0 for printer on left seen from the front.
X step motor to go right must rotate counterclockwise (backward).
The switch is to the left of the X axis, and connected to the NC.
How about the endstop which should i choose, low end or high end.
has drawn a sketch of it.

; Drives M569 P0 S0 ; physical drive 0 goes backwards M569 P1 S0 ; physical drive 1 goes backwards M569 P2 S1 ; physical drive 2 goes forwards M569 P3 S0 ; physical drive 3 goes backwards M584 X0 Y1 Z2 E3 ; set drive mapping M350 X16 Y16 Z16 E16 I1 ; configure microstepping with interpolation M92 X160.00 Y160.00 Z1600.00 E873.08 ; set steps per mm M566 X900.00 Y900.00 Z12.00 E120.00 ; set maximum instantaneous speed changes (mm/min) M203 X6000.00 Y6000.00 Z180.00 E1200.00 ; set maximum speeds (mm/min) M201 X500.00 Y500.00 Z20.00 E250.00 ; set accelerations (mm/s^2) M906 X800 Y800 Z800 E800 I30 ; set motor currents (mA) and motor idle factor in per cent M84 S30 ; Set idle timeout ; Axis Limits M208 X0 Y0 Z0 S1 ; set axis minima M208 X230 Y210 Z200 S0 ; set axis maxima ; Endstops M574 X1 Y1 Z1 S1 ; set active high endstops -
If moving the axis to bigger (positive) numbers makes it go toward the switch, the switch is at the high end.
If moving the axis to smaller (negative) numbers makes it go toward the switch, the switch is at the low end.
To keep from crashing things, do a very small move. This is easiest to do in relative mode, for example (you can enter these one at a time on the console):
M564 H0
G91
G1 F1000 X-10
The M564 allows movement without homing. The G91 is relative mode, and the G1 will move X 10 mm. Since it is negative, if X moves toward the homing switch, that switch is at the low end.
-
@Danal said in calculate the positions of switch, low and high:
f moving the axis to bigger (positive) numbers makes it go toward the switch, the switch is at the high end.
If moving the axis to smaller (negative) numbers makes it go toward the switch, the switch is at the low end.Where is located on an X axis low end and high end.
On the left or right of the shaft (0 home is on the left together with the switch and the stepper motor is going from left to right on the Xaxel to move the extruder carriage)
One question, stepmotor motion is against the switch or vice versa when setting stepmotor motion to in drivers.
very complicated for me. Must learn more about this.