Bed temperature offset
-
Hey, I have a question.
Because the sensor for my heated bed is integrated into the silicone heater the set temperature and the actual surface temperature is not the same. Is there way to modify the set temperature to another value to compensate for this? That way I could use "normal" slicer settings and let the duet do the thinking.
I've done some measurements of the actual surface temperature for different temperature set points, in a steady state. Based on the data points I created a linear function which would be used to calculate the required set temperature.
Here's an example for PLA:- Slicer: set_temp = 60°C
- Duet: mod_tmp = -0,202*set_tmp + 7,16
But I'm not sure how to achieve this.
-
You would be better off just installing a second sensor.
I have two sensors installed, only one is used as the actual sensor (the new one) but I graph both temperatures.
Your calculated offset will not work as things change when the build plate warms up.
There is no official support for a temperature offset, never mind a calculated offset. Having said that, if you are running RRF 1.03 or higher you possibly might find a way. If not now then possibly in a little while as the overall RRF model develops.I tweaked the sensor parameters to get a better match at the most used bed temperature.
The new sensor more accurately reflects the true bed temperature. -
As a bit of a workaround you could also add warm up time to your start gcode by adding a G4 S command to dwell for a number of seconds.
-
@jens55 Well yes reading the actual temperature would be ideal but I think this should be solvable with software. I also agree that that my solution won't work in a dynamic environment were the temperature needs to change rapidly. But since I only want to change the set value to achieve more accurate steady state conditions and because bed temperatures normally don't change much (if at all) during a print I think my idea is still valid.
@Phaedrux
That won't help because even if I wait indefinitely the surface temperature will never reach the temperature of the sensor wich is at the bottom of the silicone heater and used for the temperature control loop.So does any one else have any good ideas?
-
Honestly....if you know the difference in temperature, just set the bed temp that much higher so the print surface is at the temperature you want. No sense doing workarounds, just save the new temperatures in your slicer for each filament.
-
Here's a thermal image of my printer's bed - 8mm cast aluminum with a 0.7 mm layer of PEI, and 750W line powered heater covering the entire bottom side of the plate, set to 105C and allowed to stabilize for a few minutes:
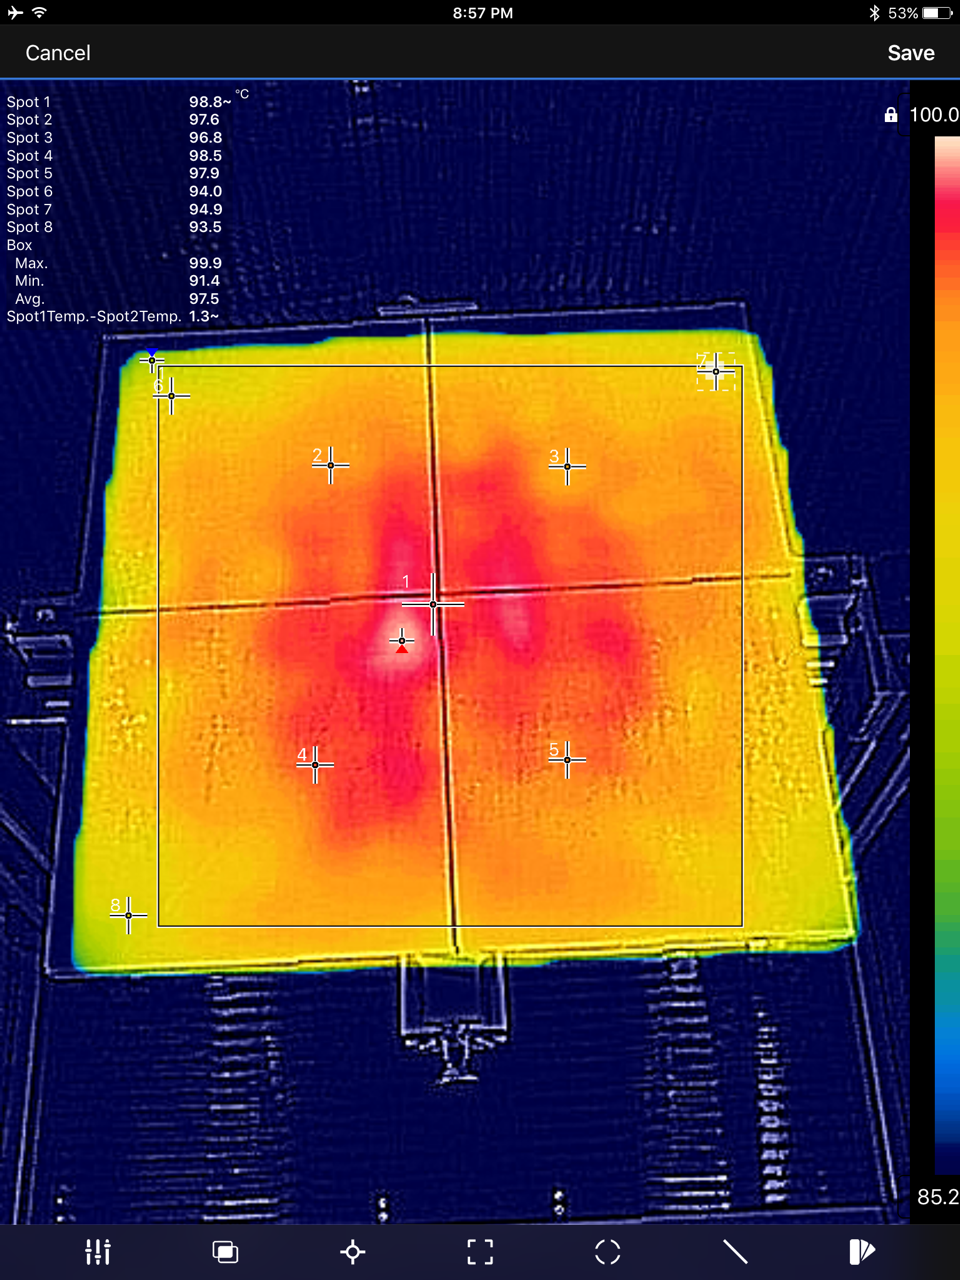
I can and do print ABS edge to edge on this.
Temperature sensors measure a single point.
Q: Which one point on the bed is the "correct" temperature?
A: It doesn't matter. Just run a few experiments and set a temperature that works. Fortunately, a few degrees variation in temperature across the bed is OK and the plastic will stick.