Duet 2 Wifi + BLtouch issues on Ender 5 pro
-
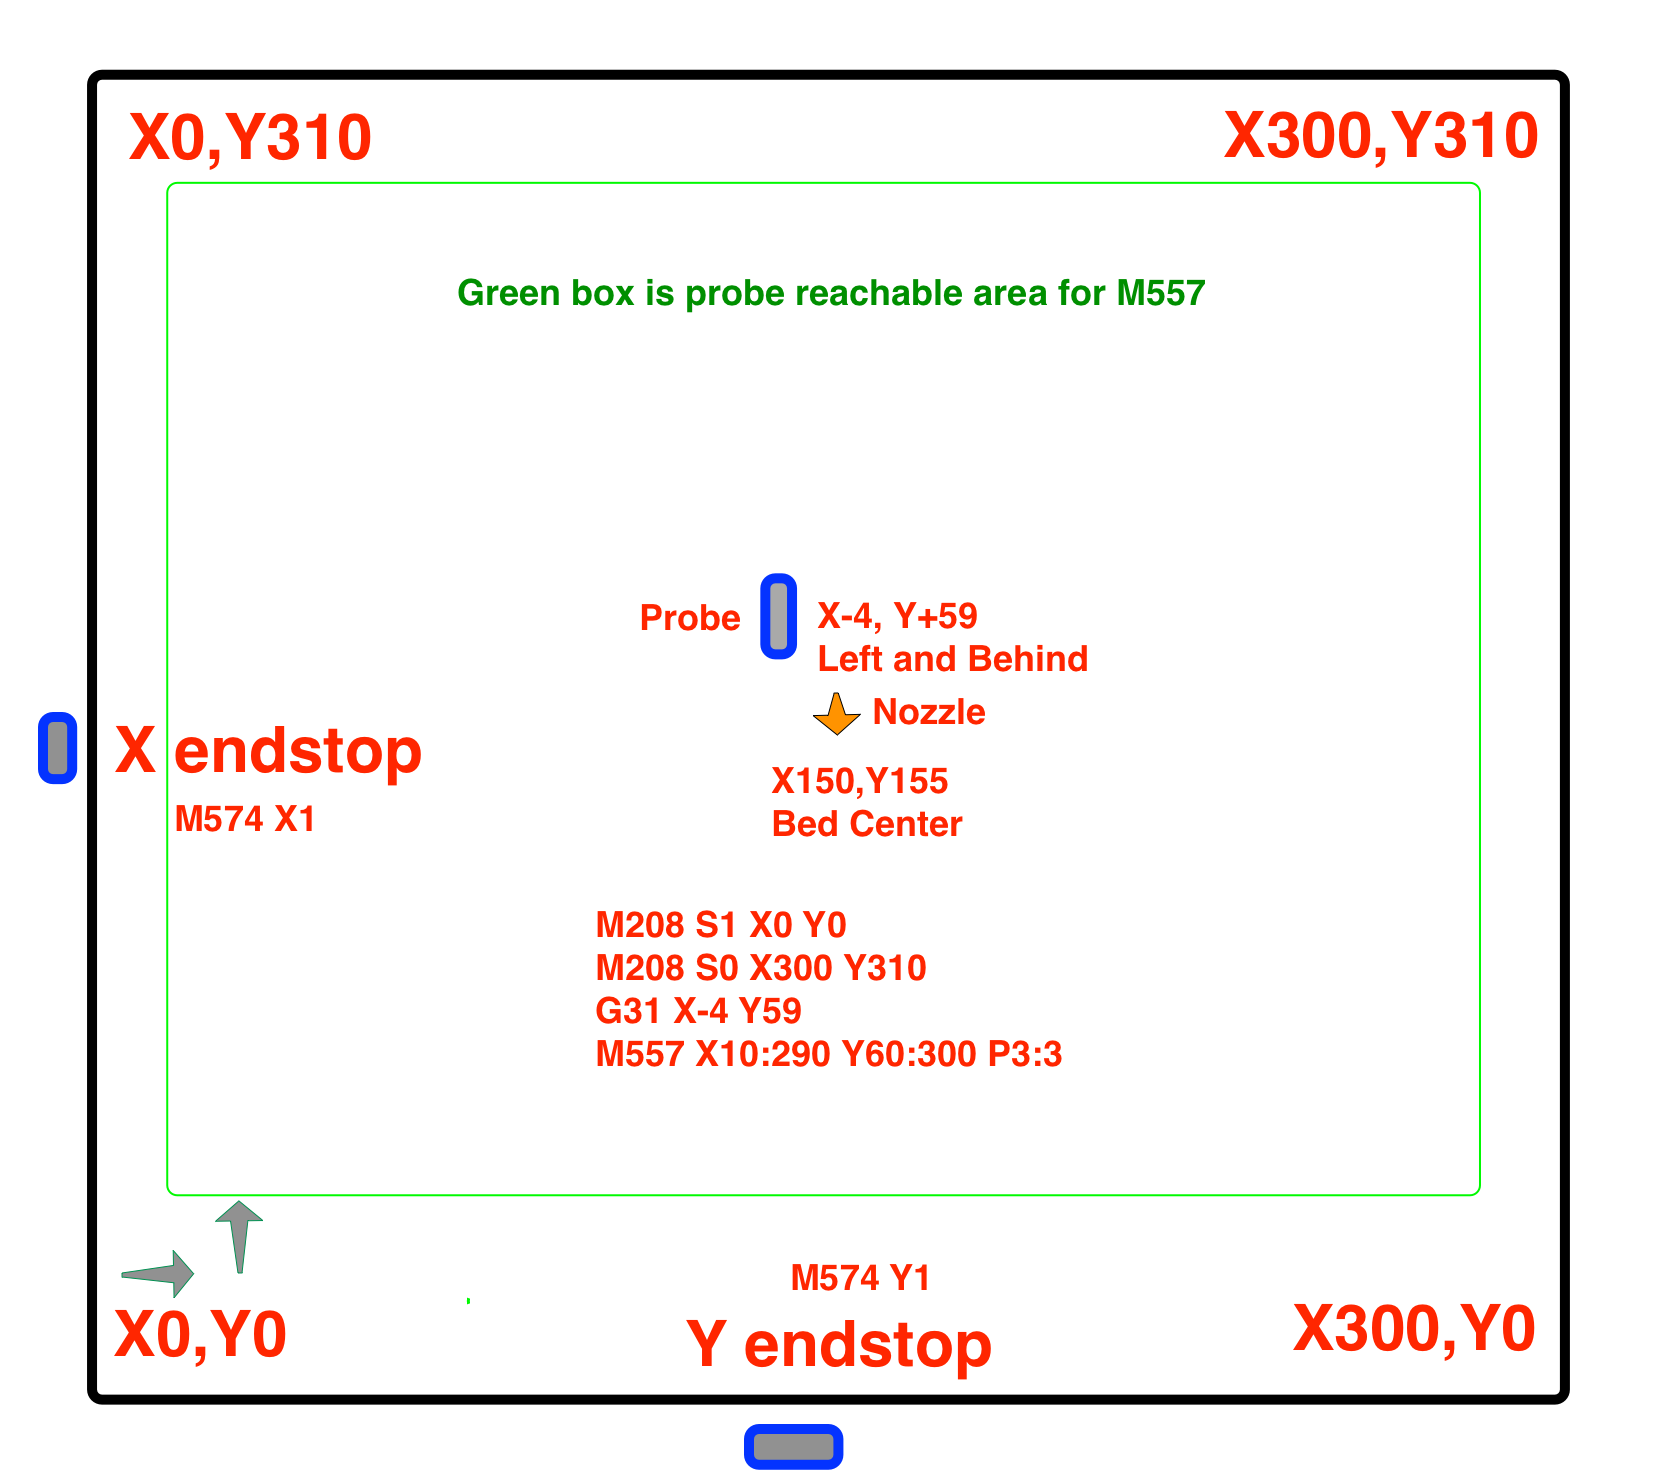
@alxndr I tend to use the P parameter rather than the S parameter with M557. This sets the number of points to probe, rather than the spacing between them. Then, if you change the probe area, it still probes the same number of points, evenly spaced, without having to calculate the probe spacing yourself. It's also quicker to change if you want to change the number of probe points in the mesh. So:
M557 X35:185 Y35:185 S50(which probes X and Y at 35, 85, 135 and 185, so 4 points in each axis for a total of 16 points)
becomes:
M557 X35:185 Y35:185 P4
To increase or decrease the number of probe points, you just change the P parameter.Ian
Bed-slinger - Mini5+ WiFi/1LC | RRP Fisher v1 - D2 WiFi | Polargraph - D2 WiFi | TronXY X5S - 6HC/Roto | CNC router - 6HC | Tractus3D T1250 - D2 Eth
-
@peter247 i just dont get something...if the physical bed is 235x235, why are my axis limits 220x220? I mean...dont i base my bed center off of the actual bed size? nowhere in the gcode shows the ACTUAL bed size of 235x235. Am i doing something wrong? because if i go from left to right, it goes from 0 to 220...
as for everything else, homing works and the bltouch works
") deploys and retracts properly! m401 and m402 confirmed working!!
deploys and retracts properly! m401 and m402 confirmed working!!what are the next steps? do i have to remove the lines for my z endstop?
-
@droftarts this is great to know! thank you!
-
@alxndr When you home X, then move to X0, is the nozzle on the edge of the bed? If it's over the bed, there will be some of the bed you cannot use. Same at the other end of the X axis, and for Y minimum and maximum. You can always adjust M208 to increase the axis limits, so long as the nozzle can physically reach the position.
If you home X, and X=0 is off the bed, you need to know how far it is to the edge of the bed. For example, if you jog the X axis 10mm for the nozzle to be over the bed, then you would set
M208 X-10 S1. This tells the firmware where the bed is in relation to the X endstop. Then move the X to the far side of the bed (with X0 on the edge of the bed) to see the full X axis limit; this might be X240, but the nozzle is off the bed on the other side, but is on the edge at X235. So setM208 X235 S0. Repeat for the Y axis. This should give you the maximum printable area.Use of M208 is explained more fully here: https://duet3d.dozuki.com/Wiki/Centering_the_bed_or_setting_the_bed_origin
Edit: when you are testing where the limits are, you may need to go beyond the current M208 limits. Send
M564 S0 H0, which will allow moves outside the print volume and before axes are homed. Use carefully!Ian
Bed-slinger - Mini5+ WiFi/1LC | RRP Fisher v1 - D2 WiFi | Polargraph - D2 WiFi | TronXY X5S - 6HC/Roto | CNC router - 6HC | Tractus3D T1250 - D2 Eth
-
@droftarts this is something ill have to check once i get home from work. I'm in EST time zone (Canada). So i'll only get to check this later today. thanks for the explanation. I dont fully understand but i do kind of understand lol i just dont see how the printer knows that the bed is 235 but only 220 is used. But ill test as you recommended and try to understand. I think it would be easier if i get to see it for myself.
-
@alxndr
o.k I'll have my go again at explaining it.( my example thought experiment)
The maximum travel is 400mm , but the print area is only 300mm eg the size of the glass is 300mm , but the maximum distance between the left and right end stops is 400mm.
if it homed left or right it would be 100mm from edge of the glass , So you would need to add a offset which would add or subtract 100mm so 0mm and 300mm was over glass.
BUT I THINK in your case, when your print homes it is 10mm from the right edge of the printer and say "I'm homed and set to 220mm" , now if you do a G1 X0 this would move it 220mm to the left and now the nozzle would be 15mm from the left edge.
SO IT DEPEND ON how it is homed, is it about 10-15mm from the edge of the bed or over it ?Ender 5 plus linear rail and hemera powered by duet 2 wifi , CR10s pro v1 with bltouch mostly stock , BLV mgn Cube slowly being built powered by duet 3 mini 5+
-
@alxndr said in Duet 2 Wifi + BLtouch issues on Ender 5 pro:
i just dont see how the printer knows that the bed is 235 but only 220 is used.
Well it doesn't, but if the endstop is off the edge of the bed, and you want 0,0 to be the corner of the printable area, the difference in negative movement from 0,0 to the endstop is captured by setting the M208 minima to a negative value, as droftarts showed above.
-
Visual aid. This shows the endstops coinciding with the printable area, but if the nozzle travels off the bed to hit tne endstop, that extra movement is captured by the negative M208 minima.
-
@peter247 so homing works fine now. Bltouch deploys and retracts with homeall and homez.
Do I need to remove the endstop line? M574 I think? Or am I ready to print? I have no macros set either so I'm not sure if I should have those.
-
@alxndr
Do I have to remove the end stop line for Z stop ?No you don't have to remove it , but it is not doing anything !!!
So the answer is :- do need to remove it No , Should I remove it Yes. -
@peter247 also i checked and basically the edge of the bed is where the endstop is at and that reads as 0 for both x and y. so thats good right?
second, is there a guide out there for easily configuring the z steps and making sure my nozzle is at the right height in relation to the bed? ive tried to search but cant seem to find anything specifically for this
-
@alxndr
Nope , 0mm left <> right 220mm , 0mm front , 220 backSo does it home to the right / back and did you use my homing files ?.
it should home right and say 220mm
Sound to me that the motor direction and the homing macro are running in the wrong direction too.
-
@peter247 it does home to the right back. yes i used your homing files. not sure what value it shows though as i dont remember. I would have to check tonight after work.
if i do need to fix it, is it an easy fix? just so that i have them ahead of time.
-
@alxndr
I'm lost want happening if it not showing 220 , 220 homed !!! .
I take it you are using more or less the config.g file you posted at the start.
**** o.k , just looked at your config.g and found the problem ****; Endstops M574 X1 S1 P"xstop" ; configure active-high endstop for low end on X via pin xstop M574 Y1 S1 P"ystop" ; configure active-high endstop for low end on Y via pin ystop M574 Z1 S1 P"zstop" ; configure active-high endstop for low end on Z via pin zstopM574 X1 S1 , what does this mean ?
Xnnn Position of X endstop: 1 = low end, 2 = high end.
Snnn Endstop type: 0 = active low endstop input, 1 = active high endstop inputS1 is correct for it works.
Now for the bit you have wrong X1 and Y1 , which means it homes to the left / front , X1,Y1 this need to be changed to X2,Y2 home to the right / back.**** IMPORTANT BIT ****
it is homing right and back because the motor directions are wrong like I said yesterday .; Drives M569 P0 S1 ; physical drive 0 goes forwards <---- M569 P1 S1 ; physical drive 1 goes forwards <---- M569 P2 S0 ; physical drive 2 goes backwards M569 P3 S1 ; physical drive 3 goes backwardsMake P0 and P1 motors S0 not S1 , like this.
; Drives M569 P0 S0 ; physical drive 0 goes forwards <---- M569 P1 S0 ; physical drive 1 goes forwards <---- M569 P2 S0 ; physical drive 2 goes backwards M569 P3 S1 ; physical drive 3 goes backwards -
@peter247 so for the x1 and y1 under endstops, i want them to be x2 and y2 ?
so they should be high end, active high?
the thing is that they do home to back right physically. so im not sure?
as for the important bit....making motors s0 would do what exactly? make them properly go forwards? ill be honest...im a little confused lol
so right now, when i home x and y, they go back end and right side. so back right. isnt that the way they should go? im sorry....im new to all this so im just trying to understand lol
-
so for the x1 and y1 under endstops, i want them to be x2 and y2 ?
so they should be high end, active high?Yes and yes ... Low end mean home left , High mean home right , it tell you machine where the end stops our.
making motors s0 would do what exactly? turn in the other direction.
Before it was told that the end stop was on the left , but went to the right and hit the end stop on the right .
in a way it would work as it was now , but you would get a mirror of it.
so right now, when i home x and y, they go back end and right side.
Yes , but it thinks it is going to the left and hitting a end stop on the left.
TWO WRONG ARE MAKING A RIGHT . -
@peter247 so i made the changes you recommended and both x and y crashed because they went towards the left side which has no endstops. had to panic

i played around with everything and ended up reverting back. even when i use the buttons for x and y to go left by 10 or wtv...when i click the left direction buttons, it goes right. i get that something isnt right. but no idea what to do. i tried your suggestion but it doesnt seem to work at all. just crashes so i have to shut down. when i go +10 it moves left and when i go -10 it moves right.....i just dont get it...i feel so discouraged. any ideas?
-
You're close. Here are a few rules that you must follow and then the one thing you might need to change to get it all to work.
X0 Y0 MUST be in the front left corner to match the slicer and CAD coordinate system. X- to the left, X+ to the right. Y- to the front, Y+ to the back. Doing otherwise is asking for mirrored prints.
The end stop position is physically located on your printer, so you have to have it configured correctly to match. You have the endstops at the high end of travel, because 0,0 is the front left, and the endstops are at the rear right. 235,235 (or whatever the max travel ends up being) so M574 MUST be X2 and Y2.
Now that we know where the endstops are located and which direction of travel things should be going, we can change the homing files to move towards the endstops. Since your endstops are at the high end, the homing moves MUST be in the positive direction.
Now that we have all those MUSTS out of the way, there is one thing left to change to make it all work. The direction of the motor rotation. Defined M569 S1 or S0.
To test which way they should go it's simple.
First, with the printer off, physically move the print head to the middle.
Turn on the printer and edit config.g and set it like so:
M569 P0 S0
M569 P0 S0Now when you reboot, go to the gcode console and send these commands
G92 X100 Y100 ; that tells it that the X and Y are basically in the center and will allow you to move them
Now send G1 X10
The print head should move 10mm to the right. If it doesn't, we need to change M569 P0 S0 to S1.
Now send G1 Y10
The print head should move 10mm to the back. If it doesn't we need to change M569 P1 S0 to S1.
And now after making any changes you should be able to home and it should move towards the endstops, stop, and set the position to whatever the max travel is.
The last thing to do will be to set your M208 maxima values to what they ACTUALLY are and not what creality has advertised.
To do that, turn off the printer. move the print head to the front left corner where you want 0,0 to be. The nozzle just at the corner of the printable area.
Now turn on the printer and send G92 X0 Y0
Now send G1 X300 H3
That will move the print head to the endstop and when it stops it, the current X coordinate should be what you use to set your M208 X maxima.
Now use G1 Y300 H3 to do the same for the Y axis.
-
@Phaedrux said in Duet 2 Wifi + BLtouch issues on Ender 5 pro:
You might find this series of guides helpful
https://duet3d.dozuki.com/Guide/Ender+3+Pro+and+Duet+Maestro+Guide+Part+3:+Commissioning/39By the way, pretty much everything I just said is found in this guide I linked to 2 days ago.
-
@alxndr
repost your config.g file / homeall.gYou haven't changed the motor direction like this ?
M569 P0 S0 ; physical drive 0 goes forwards  <----
M569 P1 S0 ; physical drive 1 goes forwards  <----
or you haven't set the homing file correct ?
My guess is you have chosen the Ender 3 configurator , But the ender 3 are like the cr10 , it home at 0:0 left , down .
So to home you say go minus upto 220mm left , but the ender 5 home right so homes with a plus value.
( A ) you are not using my Homing file
( B ) you haven't changed the motor direction .
( C ) Both