Duet3D Logo Duet3D
    • Tags
    • Documentation
    • Order
    • Register
    • Login

    BL Touch

    Scheduled Pinned Locked Moved
    Tuning and tweaking
    8
    126
    6.5k
    Loading More Posts
    • Oldest to Newest
    • Newest to Oldest
    • Most Votes
    Reply
    • Reply as topic
    Log in to reply
    This topic has been deleted. Only users with topic management privileges can see it.
    • Phaedruxundefined
      Phaedrux Moderator
      last edited by

      When you use M500 to save computed values, they go into config-override.g. M501 loads the config-override.g file. So add M501 to the end of config.g so that it gets loaded at startup.

      Z-Bot CoreXY Build | Thingiverse Profile

      1 Reply Last reply Reply Quote 0
      • Gost101undefined
        Gost101
        last edited by

        @Phaedrux Cool beans, I had to run it again as the 501 would not be in place until rebooting takes place it failed. But ill run it again. Ambient room temperature is at 35*C now so it will affect the calibration I dont know if i should change anything.

        1 Reply Last reply Reply Quote 0
        • Gost101undefined
          Gost101
          last edited by

          @Phaedrux It keeps failing Temp3.PNG

          1 Reply Last reply Reply Quote 0
          • Phaedruxundefined
            Phaedrux Moderator
            last edited by

            It succeeded once though didn't it? If you use m500 after it completed successfully once the values would be saved to config-override.g. do you see anything in that file?

            Z-Bot CoreXY Build | Thingiverse Profile

            1 Reply Last reply Reply Quote 0
            • Gost101undefined
              Gost101
              last edited by

              @Phaedrux I didn't have m501 in my config file. I sent m500 after I put it in but would not work because the printer said that m501 was not in the config file. So I had to reboot it. And now I can't get it to work.

              1 Reply Last reply Reply Quote 0
              • dc42undefined
                dc42 administrators
                last edited by

                Are you allowing the bed to cool right down to room temperature before you start the tuning process? That is essential.

                Duet WiFi hardware designer and firmware engineer
                Please do not ask me for Duet support via PM or email, use the forum
                http://www.escher3d.com, https://miscsolutions.wordpress.com

                1 Reply Last reply Reply Quote 0
                • Gost101undefined
                  Gost101
                  last edited by

                  @dc42 indeed.

                  droftartsundefined 1 Reply Last reply Reply Quote 0
                  • droftartsundefined
                    droftarts administrators @Gost101
                    last edited by

                    @Gost101 M500 saves the results of an autotune (and some other info) to config_override.g in the 'sys' folder on your SD card. An example of config_override.g:

                    ; config-override.g file generated in response to M500 at 2020-09-30 10:19
                    ; This is a system-generated file - do not edit
                    ; Heater model parameters
                    M307 H0 A215.5 C661.6 D5.8 S1.00 V11.6 B1
                    M307 H1 A341.8 C144.9 D4.6 S1.00 V12.2 B0
                    M307 H2 A341.8 C144.9 D4.6 S1.00 V12.2 B0
                    ; Workplace coordinates
                    G10 L2 P1 X0.00 Y0.00 Z0.00 U0.00
                    G10 L2 P2 X0.00 Y0.00 Z0.00 U0.00
                    G10 L2 P3 X0.00 Y0.00 Z0.00 U0.00
                    G10 L2 P4 X0.00 Y0.00 Z0.00 U0.00
                    G10 L2 P5 X0.00 Y0.00 Z0.00 U0.00
                    G10 L2 P6 X0.00 Y0.00 Z0.00 U0.00
                    G10 L2 P7 X0.00 Y0.00 Z0.00 U0.00
                    G10 L2 P8 X0.00 Y0.00 Z0.00 U0.00
                    G10 L2 P9 X0.00 Y0.00 Z0.00 U0.00
                    

                    You can then:

                    either open config_override.g, copy the M307 H0 ... line to your config.g, making sure you paste it in after, or in place of, any existing M307 H0 command,

                    or add M501 to the end of your config.g, which causes it to run config_override.g after config.g.

                    M500 and M501 are well-documented in the gcode dictionary: https://duet3d.dozuki.com/Wiki/Gcode?revisionid=HEAD#Section_M500_Store_parameters

                    Ian

                    Bed-slinger - Mini5+ WiFi/1LC | RRP Fisher v1 - D2 WiFi | Polargraph - D2 WiFi | TronXY X5S - 6HC/Roto | CNC router - 6HC | Tractus3D T1250 - D2 Eth

                    1 Reply Last reply Reply Quote 0
                    • Gost101undefined
                      Gost101
                      last edited by

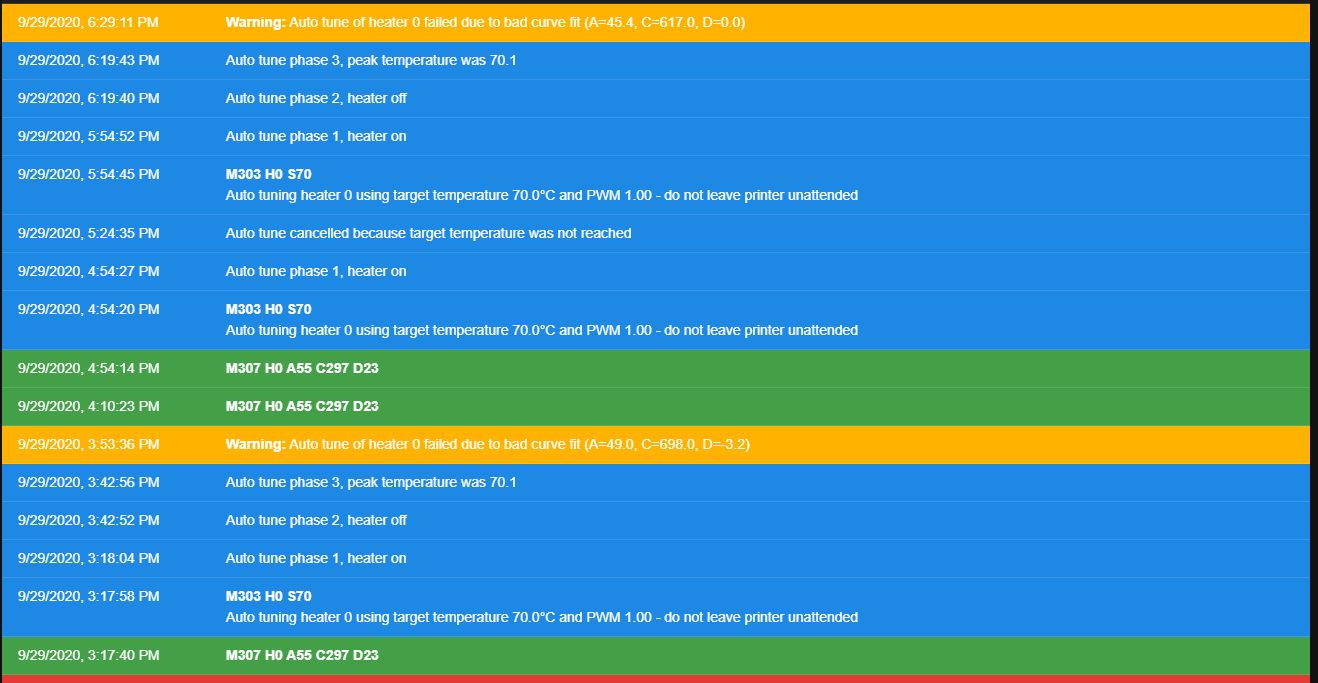
                      @droftarts Thanks. Also the printer just finished the M303 with another cancelled:

                      9/30/2020, 3:27:43 AM	Auto tune cancelled because target temperature was not reached
                      9/30/2020, 2:57:35 AM	Auto tune phase 1, heater on
                      9/30/2020, 2:57:29 AM	M303 H0 S70
                      Auto tuning heater 0 using target temperature 70.0°C and PWM 1.00 - do not leave printer unattended
                      9/30/2020, 2:57:22 AM	M307 H0 A55 C297 D23
                      
                      1 Reply Last reply Reply Quote 0
                      • Gost101undefined
                        Gost101
                        last edited by

                        @droftarts Is there a way to ignore the safety's and allow the bed to heat up to 70*C?

                        droftartsundefined 1 Reply Last reply Reply Quote 0
                        • droftartsundefined
                          droftarts administrators @Gost101
                          last edited by

                          @Gost101 It's going to be very difficult to tune the bed to the maximum temperature it can achieve, because sometimes it gets there, and sometimes it doesn't. There isn't anyway to disable the heater warning, because that would be unsafe. Try tuning to 60C.

                          Also, have you changed the thermistor setting in config.g to what they actually are? I've just checked the Creality CR10 S5 Marlin firmware source code. Your bed thermistor should be a 100k EPCOS, and so is your hotend as standard. For the hot end, you linked an E3D heater cartridge, not the thermistor! Are you still using the stock thermistor? If so, it's also a 100k EPCOS thermistor. If they are both standard, change these lines in config.g for (slightly) more accurate temperatures:

                          M308 S0 P"bedtemp" Y"thermistor" T100000 B4092 ; configure sensor 0 as thermistor on pin bedtemp
                          ...
                          M308 S1 P"e0temp" Y"thermistor" T100000 B4092  ; configure sensor 1 as thermistor on pin e0temp
                          

                          If you've changed the hot end thermistor, post what it is. Perhaps also post your current config.g.

                          Ian

                          Bed-slinger - Mini5+ WiFi/1LC | RRP Fisher v1 - D2 WiFi | Polargraph - D2 WiFi | TronXY X5S - 6HC/Roto | CNC router - 6HC | Tractus3D T1250 - D2 Eth

                          1 Reply Last reply Reply Quote 0
                          • Gost101undefined
                            Gost101
                            last edited by

                            I'm using this e3D thermistor for the hotend and the stock one for the bed. Granted I need to buy a higher temp one for the hotend. link text alt text

                            droftartsundefined 1 Reply Last reply Reply Quote 0
                            • droftartsundefined
                              droftarts administrators @Gost101
                              last edited by

                              @Gost101 Okay, so that's a Semitec 104NT (a drop-in replacement for the discontinued Semitec 104GT). Change config.g to:

                              M308 S1 P"e0temp" Y"thermistor" T100000 B4725 C7.06e-8 ; configure sensor 1 as thermistor on pin e0temp
                              

                              Ian

                              Bed-slinger - Mini5+ WiFi/1LC | RRP Fisher v1 - D2 WiFi | Polargraph - D2 WiFi | TronXY X5S - 6HC/Roto | CNC router - 6HC | Tractus3D T1250 - D2 Eth

                              1 Reply Last reply Reply Quote 0
                              • Gost101undefined
                                Gost101
                                last edited by

                                @droftarts Tunning for the bed failed again.

                                1 Reply Last reply Reply Quote 0
                                • Gost101undefined
                                  Gost101
                                  last edited by

                                  @droftarts Is there a way to increase the time before the heater faults for rising to slowly?

                                  fcwiltundefined 1 Reply Last reply Reply Quote 0
                                  • Gost101undefined
                                    Gost101
                                    last edited by Gost101

                                    ; Configuration file for Duet WiFi (firmware version 3)
                                    ; executed by the firmware on start-up
                                    ;
                                    ; generated by RepRapFirmware Configuration Tool v3.1.4 on Mon Sep 28 2020 07:45:49 GMT-0600 (Mountain Daylight Time)
                                    
                                    ; General preferences
                                    G90                                                ; send absolute coordinates...
                                    M83                                                ; ...but relative extruder moves
                                    M550 P"A.C.E."                                     ; set printer name
                                    M918 P1 E4 F2000000                                ; configure direct-connect display
                                    
                                    ; Network
                                    M551 P"SpaceForceHu2020!!"                         ; set password
                                    M552 S1                                            ; enable network
                                    M586 P0 S1                                         ; enable HTTP
                                    M586 P1 S0                                         ; disable FTP
                                    M586 P2 S0                                         ; disable Telnet
                                    
                                    ; Drives
                                    M569 P0 S1                                         ; X physical drive 0 goes backwards
                                    M569 P1 S1                                         ; Y physical drive 1 goes backwards
                                    M569 P2 S0                                         ; Z One physical drive 2 goes forwards
                                    M569 P2 S0                                         ; Z One physical drive 2 goes forwards
                                    M569 P3 S0                                         ; E physical drive 3 goes backwards
                                    M584 X0 Y1 Z2 E3                                   ; set drive mapping
                                    M350 X16 Y16 Z16 E16 I1                            ; configure microstepping with interpolation
                                    M92 X80.00 Y80.00 Z400.00 E415.00                  ; set steps per mm
                                    M566 X1200.00 Y1200.00 Z24.00 E300.00              ; set maximum instantaneous speed changes (mm/min)
                                    M203 X9000.00 Y9000.00 Z180.00 E6000.00            ; set maximum speeds (mm/min)
                                    M201 X500.00 Y500.00 Z100.00 E5000.00              ; set accelerations (mm/s^2)
                                    M906 X800 Y800 Z800 E1000 I50                      ; set motor currents (mA) and motor idle factor in per cent
                                    M84 S30                                            ; Set idle timeout
                                    
                                    ; Axis Limits
                                    M208 X0 Y0 Z0 S1                                   ; set axis minima
                                    M208 X500 Y500 Z500 S0                             ; set axis maxima
                                    
                                    ;Filiment Out Sensor
                                    M591 D0 P1 C"e0stop" S1                            ; filiment out sensor
                                    
                                    
                                    ; Endstops
                                    M574 X1 S1 P"xstop"                                ; configure active-high endstop for low end on X via pin xstop
                                    M574 Y1 S1 P"ystop"                                ; configure active-high endstop for low end on Y via pin ystop
                                    M574 Z1 S2                                         ; configure Z-probe endstop for low end on Z
                                    
                                    ; Z-Probe
                                    M950 S0 C"exp.heater7"                             ; create servo pin 0 for BLTouch
                                    M558 P9 C"^zprobe.in" H5 F600 T9000                ; set Z probe type to bltouch and the dive height + speeds
                                    G31 P500 X37 Y0 Z2.150                               ; set Z probe trigger value, offset and trigger height
                                    M557 X30:470 Y30:470 S25                           ; define mesh grid
                                    
                                    ; Heaters
                                    M308 S0 P"bedtemp" Y"thermistor" T100000 B4092     ; configure sensor 0 as thermistor on pin bedtemp
                                    M950 H0 C"bedheat" T0                              ; create bed heater output on bedheat and map it to sensor 0
                                    M307 H0 A340.0 C140.0 D600 S1.00 V0.0 B1           ; enable bang-bang mode for the bed heater and set PWM limit
                                    M140 H0                                            ; map heated bed to heater 0
                                    M143 H0 S72                                        ; set temperature limit for heater 0 to 72C
                                    M308 S1 P"e0temp" Y"thermistor" T100000 B4725 C7.06e-8   ; configure sensor 1 as thermistor on pin e0temp
                                    M950 H1 C"e0heat" T1                               ; create nozzle heater output on e0heat and map it to sensor 1
                                    M307 H1 B0 S1.00                                   ; disable bang-bang mode for heater  and set PWM limit
                                    
                                    ; Fans
                                    M950 F0 C"fan0" Q500                               ; create fan 0 on pin fan0 and set its frequency
                                    M106 P0 S1 H-1                                     ; set fan 0 value. Thermostatic control is turned off
                                    M950 F1 C"fan1" Q500                               ; create fan 1 on pin fan1 and set its frequency
                                    M106 P1 S1 H1 T45                                  ; set fan 1 value. Thermostatic control is turned on
                                    M950 F2 C"fan2" Q500                               ; create fan 2 on pin fan2 and set its frequency
                                    M106 P2 S1 H1:0 T45                                ; set fan 2 value. Thermostatic control is turned on
                                    
                                    ; Tools
                                    M563 P0 S"Hot end" H1 D0 F1:2                      ; define tool 1
                                    G10 P0 X0 Y0 Z0                                    ; set tool 1 axis offsets
                                    G10 P0 R0 S0                                       ; set initial tool 1 active and standby temperatures to 0C
                                    
                                    
                                    ; Custom settings are not defined
                                    
                                    ; Miscellaneous
                                    M911 S10 R11 P"M913 X0 Y0 G91 M83 G1 Z3 E-5 F1000" ; set voltage thresholds and actions to run on power loss
                                    
                                    
                                    1 Reply Last reply Reply Quote 0
                                    • fcwiltundefined
                                      fcwilt @Gost101
                                      last edited by

                                      @Gost101 said in BL Touch:

                                      @droftarts Is there a way to increase the time before the heater faults for rising to slowly?

                                      From the docs:

                                      If auto tuning fails with a message that the temperature is not rising fast enough, this indicates that either you are using too low a P value in the M303 command, or the dead time in the existing model is much too low for your heater. You can increase the dead time using the M307 command. For example, sending M307 H0 D30 will increase the dead time to 30 seconds. The actual dead time will be known after a successful auto tuning.

                                      Frederick

                                      Printers: a small Utilmaker style, a small CoreXY and a E3D MS/TC setup. Various hotends. Using Duet 3 hardware running 3.4.6

                                      1 Reply Last reply Reply Quote 0
                                      • Gost101undefined
                                        Gost101
                                        last edited by

                                        @peter247 @droftarts @fcwilt @Phaedrux @jay_s_uk @dc42 @Veti Everything works now. Here is the files for them: !!Update I'm unable to upload anything to this form for some reason so the code will be here instead!!
                                        Config:

                                        ; Configuration file for Duet WiFi (firmware version 3)
                                        ; executed by the firmware on start-up
                                        ;
                                        ; generated by RepRapFirmware Configuration Tool v3.1.4 on Mon Sep 28 2020 07:45:49 GMT-0600 (Mountain Daylight Time)
                                        
                                        ; General preferences
                                        G90                                                ; send absolute coordinates...
                                        M83                                                ; ...but relative extruder moves
                                        M550 P"A.C.E."                                     ; set printer name
                                        M918 P1 E4 F2000000                                ; configure direct-connect display
                                        
                                        ; Network
                                        M551 P"SpaceForceHu2020!!"                         ; set password
                                        M552 S1                                            ; enable network
                                        M586 P0 S1                                         ; enable HTTP
                                        M586 P1 S0                                         ; disable FTP
                                        M586 P2 S0                                         ; disable Telnet
                                        
                                        ; Drives
                                        M569 P0 S1                                         ; X physical drive 0 goes backwards
                                        M569 P1 S1                                         ; Y physical drive 1 goes backwards
                                        M569 P2 S0                                         ; Z One physical drive 2 goes forwards
                                        M569 P2 S0                                         ; Z One physical drive 2 goes forwards
                                        M569 P3 S0                                         ; E physical drive 3 goes backwards
                                        M584 X0 Y1 Z2 E3                                   ; set drive mapping
                                        M350 X16 Y16 Z16 E16 I1                            ; configure microstepping with interpolation
                                        M92 X80.00 Y80.00 Z400.00 E415.00                  ; set steps per mm
                                        M566 X1200.00 Y1200.00 Z24.00 E300.00              ; set maximum instantaneous speed changes (mm/min)
                                        M203 X9000.00 Y9000.00 Z180.00 E6000.00            ; set maximum speeds (mm/min)
                                        M201 X500.00 Y500.00 Z100.00 E5000.00              ; set accelerations (mm/s^2)
                                        M906 X800 Y1200 Z800 E1000 I50                      ; set motor currents (mA) and motor idle factor in per cent
                                        M84 S30                                            ; Set idle timeout
                                        
                                        ; Axis Limits
                                        M208 X0 Y0 Z0 S1                                   ; set axis minima
                                        M208 X500 Y500 Z500 S0                             ; set axis maxima
                                        
                                        ;Filiment Out Sensor
                                        M591 D0 P1 C"e0stop" S1                            ; filiment out sensor
                                        
                                        
                                        ; Endstops
                                        M574 X1 S1 P"xstop"                                ; configure active-high endstop for low end on X via pin xstop
                                        M574 Y1 S1 P"ystop"                                ; configure active-high endstop for low end on Y via pin ystop
                                        M574 Z1 S2                                         ; configure Z-probe endstop for low end on Z
                                        
                                        ; Z-Probe
                                        M950 S0 C"exp.heater7"                             ; create servo pin 0 for BLTouch
                                        M558 P9 C"^zprobe.in" H5 F600 T9000                ; set Z probe type to bltouch and the dive height + speeds
                                        G31 P500 X37 Y0 Z2.150                               ; set Z probe trigger value, offset and trigger height
                                        M557 X30:470 Y30:470 S25                           ; define mesh grid
                                        
                                        ; Heaters
                                        M308 S0 P"bedtemp" Y"thermistor" T100000 B4092     ; configure sensor 0 as thermistor on pin bedtemp
                                        M950 H0 C"bedheat" T0                              ; create bed heater output on bedheat and map it to sensor 0
                                        M307 H0 A340.0 C140.0 D600 S1.00 B1           ; enable bang-bang mode for the bed heater and set PWM limit
                                        M140 H0                                            ; map heated bed to heater 0
                                        M143 H0 S72                                        ; set temperature limit for heater 0 to 72C
                                        M308 S1 P"e0temp" Y"thermistor" T100000 B4725 C7.06e-8   ; configure sensor 1 as thermistor on pin e0temp
                                        M950 H1 C"e0heat" T1                               ; create nozzle heater output on e0heat and map it to sensor 1
                                        M307 H1 B0 S1.00                                   ; disable bang-bang mode for heater  and set PWM limit
                                        
                                        ; Fans
                                        M950 F0 C"fan0" Q500                               ; create fan 0 on pin fan0 and set its frequency
                                        M106 P0 S1 H-1                                     ; set fan 0 value. Thermostatic control is turned off
                                        M950 F1 C"fan1" Q500                               ; create fan 1 on pin fan1 and set its frequency
                                        M106 P1 S1 H1 T45                                  ; set fan 1 value. Thermostatic control is turned on
                                        M950 F2 C"fan2" Q500                               ; create fan 2 on pin fan2 and set its frequency
                                        M106 P2 S1 H1:0 T45                                ; set fan 2 value. Thermostatic control is turned on
                                        
                                        ; Tools
                                        M563 P0 S"Hot end" H1 D0 F1:2                      ; define tool 1
                                        G10 P0 X0 Y0 Z0                                    ; set tool 1 axis offsets
                                        G10 P0 R0 S0                                       ; set initial tool 1 active and standby temperatures to 0C
                                        
                                        
                                        ; Custom settings are not defined
                                        
                                        ; Miscellaneous
                                        M911 S10 R11 P"M913 X0 Y0 G91 M83 G1 Z3 E-5 F1000" ; set voltage thresholds and actions to run on power loss


                                        bed:

                                        ![0_1601478305928_be382bf7-6196-4141-a7b8-e83585cb6c91-image.png](Uploading 100%) code_text
                                        

                                        home all:

                                        ; homeall.g
                                        ; called to home all axes
                                        ;
                                        ; generated by RepRapFirmware Configuration Tool v3.1.4 on Mon Sep 28 2020 07:45:49 GMT-0600 (Mountain Daylight Time)
                                        G91                      ; relative positioning
                                        G1 H2 Z5 F9000           ; lift Z relative to current position
                                        G1 H1 X-505 Y-505 F21600 ; move quickly to X and Y axis endstops and stop there (first pass)
                                        G1 H2 X5 Y5 F9000        ; go back a few mm
                                        G1 H1 X-505 Y-505 F7200  ; move slowly to X and Y axis endstops once more (second pass)
                                        G90                      ; absolute positioning                     
                                        G1 X250 Y250 F9000       ; go to first bed probe point and home Z
                                        G30                      ; home Z by probing the bed
                                        G1 Z10                   ; raise Z 10mm
                                        
                                        ; Uncomment the following lines to lift Z after probing
                                        ;G91                     ; relative positioning
                                        ;G1 Z5 F150              ; lift Z relative to current position
                                        ;G90                     ; absolute positioning
                                        

                                        home z:

                                        ; homez.g
                                        ; called to home the Z axis
                                        ;
                                        ; generated by RepRapFirmware Configuration Tool v3.1.4 on Mon Sep 28 2020 07:45:49 GMT-0600 (Mountain Daylight Time)
                                        G91              ; relative positioning
                                        G1 H2 Z5 F9000   ; lift Z relative to current position
                                        G90              ; absolute positioning
                                        G1 X15 Y15 F9000 ; go to first probe point
                                        G30              ; home Z by probing the bed
                                        
                                        ; Uncomment the following lines to lift Z after probing
                                        ;G91             ; relative positioning
                                        ;G1 Z5 F150      ; lift Z relative to current position
                                        ;G90             ; absolute positioning
                                        

                                        home x:

                                        ; homex.g
                                        ; called to home the X axis
                                        ;
                                        ; generated by RepRapFirmware Configuration Tool v3.1.4 on Mon Sep 28 2020 07:45:49 GMT-0600 (Mountain Daylight Time)
                                        G91                ; relative positioning
                                        G1 H2 Z5 F9000     ; lift Z relative to current position
                                        G1 H1 X-505 F21600 ; move quickly to X axis endstop and stop there (first pass)
                                        G1 H2 X5 F9000     ; go back a few mm
                                        G1 H1 X-505 F7200  ; move slowly to X axis endstop once more (second pass)
                                        G1 H2 Z-5 F9000    ; lower Z again
                                        G90                ; absolute positioning
                                        

                                        home y:

                                        ; homey.g
                                        ; called to home the Y axis
                                        ;
                                        ; generated by RepRapFirmware Configuration Tool v3.1.4 on Mon Sep 28 2020 07:45:49 GMT-0600 (Mountain Daylight Time)
                                        G91                ; relative positioning
                                        G1 H2 Z5 F9000     ; lift Z relative to current position
                                        G1 H1 Y-505 F21600 ; move quickly to Y axis endstop and stop there (first pass)
                                        G1 H2 Y5 F9000     ; go back a few mm
                                        G1 H1 Y-505 F7200  ; move slowly to Y axis endstop once more (second pass)
                                        G1 H2 Z-5 F9000    ; lower Z again
                                        G90                ; absolute positioning
                                        

                                        Time to break it more lol. I'm now trying to use both z axis independent of each other to calibrate them with a BL Tocuh.
                                        I have read this: Bed levelling using multiple independent Z motors and the following code is what I have created for it. However the printer will home all as it would before. How do I level each axis via the BL Touch not only as part of Home All & Home Z but also as just a macro to level it.
                                        config:

                                        ; Configuration file for Duet WiFi (firmware version 3)
                                        ; executed by the firmware on start-up
                                        ;
                                        ; generated by RepRapFirmware Configuration Tool v3.1.4 on Mon Sep 28 2020 07:45:49 GMT-0600 (Mountain Daylight Time)
                                        
                                        ; General preferences
                                        G90                                                ; send absolute coordinates...
                                        M83                                                ; ...but relative extruder moves
                                        M550 P"A.C.E."                                     ; set printer name
                                        M918 P1 E4 F2000000                                ; configure direct-connect display
                                        
                                        ; Network
                                        M551 P"SpaceForceHu2020!!"                         ; set password
                                        M552 S1                                            ; enable network
                                        M586 P0 S1                                         ; enable HTTP
                                        M586 P1 S0                                         ; disable FTP
                                        M586 P2 S0                                         ; disable Telnet
                                        
                                        ; Drives
                                        M569 P0 S1                                         ; X physical drive 0 goes backwards
                                        M569 P1 S1                                         ; Y physical drive 1 goes backwards
                                        M569 P2 S0                                         ; Z One physical drive 2 goes forwards
                                        M569 P3 S0                                         ; E physical drive 3 goes backwards
                                        M569 P4 S0                                         ; Z Two physical drive 2 goes forwards
                                        M584 X0 Y1 Z2:4 E3                                 ; set drive mapping
                                        M671 X-23:523. Y0:0 S0.5;
                                        M350 X16 Y16 Z16 E16 I1                            ; configure microstepping with interpolation
                                        M92 X80.00 Y80.00 Z400.00 E415.00                  ; set steps per mm
                                        M566 X1200.00 Y1200.00 Z24.00 E300.00              ; set maximum instantaneous speed changes (mm/min)
                                        M203 X9000.00 Y9000.00 Z180.00 E6000.00            ; set maximum speeds (mm/min)
                                        M201 X500.00 Y500.00 Z100.00 E5000.00              ; set accelerations (mm/s^2)
                                        M906 X800 Y1200 Z800 E1000 I50                      ; set motor currents (mA) and motor idle factor in per cent
                                        M84 S30                                            ; Set idle timeout
                                        
                                        ; Axis Limits
                                        M208 X30:470 Y0:250                                ; X carriage moves from 30 to 470, Y bed goes from 0 to 250
                                        M208 X0 Y0 Z0 S1                                   ; set axis minima
                                        M208 X500 Y500 Z500 S0                             ; set axis maxima
                                        
                                        ;Filiment Out Sensor
                                        M591 D0 P1 C"e0stop" S1                            ; filiment out sensor
                                        
                                        
                                        ; Endstops
                                        M574 X1 S1 P"xstop"                                ; configure active-high endstop for low end on X via pin xstop
                                        M574 Y1 S1 P"ystop"                                ; configure active-high endstop for low end on Y via pin ystop
                                        M574 Z1 S2                                         ; configure Z-probe endstop for low end on Z
                                        
                                        ; Z-Probe
                                        M950 S0 C"exp.heater7"                             ; create servo pin 0 for BLTouch
                                        M558 P9 C"^zprobe.in" H5 F600 T9000                ; set Z probe type to bltouch and the dive height + speeds
                                        G31 P500 X37 Y0 Z2.150                             ; set Z probe trigger value, offset and trigger height
                                        M557 X30:470 Y30:470 S25                           ; define mesh grid
                                        
                                        ; Heaters
                                        M308 S0 P"bedtemp" Y"thermistor" T100000 B4092     ; configure sensor 0 as thermistor on pin bedtemp
                                        M950 H0 C"bedheat" T0                              ; create bed heater output on bedheat and map it to sensor 0
                                        M307 H0 A340.0 C140.0 D600 S1.00 B1                ; enable bang-bang mode for the bed heater and set PWM limit
                                        M140 H0                                            ; map heated bed to heater 0
                                        M143 H0 S72                                        ; set temperature limit for heater 0 to 72C
                                        M308 S1 P"e0temp" Y"thermistor" T100000 B4725 C7.06e-8   ; configure sensor 1 as thermistor on pin e0temp
                                        M950 H1 C"e0heat" T1                               ; create nozzle heater output on e0heat and map it to sensor 1
                                        M307 H1 B0 S1.00                                   ; disable bang-bang mode for heater  and set PWM limit
                                        
                                        ; Fans
                                        M950 F0 C"fan0" Q500                               ; create fan 0 on pin fan0 and set its frequency
                                        M106 P0 S1 H-1                                     ; set fan 0 value. Thermostatic control is turned off
                                        M950 F1 C"fan1" Q500                               ; create fan 1 on pin fan1 and set its frequency
                                        M106 P1 S1 H1 T45                                  ; set fan 1 value. Thermostatic control is turned on
                                        M950 F2 C"fan2" Q500                               ; create fan 2 on pin fan2 and set its frequency
                                        M106 P2 S1 H1:0 T45                                ; set fan 2 value. Thermostatic control is turned on
                                        
                                        ; Tools
                                        M563 P0 S"Hot end" H1 D0 F1:2                      ; define tool 1
                                        G10 P0 X0 Y0 Z0                                    ; set tool 1 axis offsets
                                        G10 P0 R0 S0                                       ; set initial tool 1 active and standby temperatures to 0C
                                        
                                        
                                        ; Custom settings are not defined
                                        
                                        ; Miscellaneous
                                        M911 S10 R11 P"M913 X0 Y0 G91 M83 G1 Z3 E-5 F1000" ; set voltage thresholds and actions to run on power loss
                                        

                                        bed:

                                        ; bed.g
                                        ; called to perform automatic bed compensation via G32
                                        ;
                                        ; generated by RepRapFirmware Configuration Tool v3.1.4 on Mon Sep 28 2020 07:45:49 GMT-0600 (Mountain Daylight Time)
                                        M561 ; clear any bed transform
                                        G29  ; probe the bed and enable compensation
                                        G30 P0 X30 Y250 Z-505 ; probe near a leadscrew, half way along Y axis
                                        G30 P1 X470 Y250 Z-505 S2 ; probe near a leadscrew and calibrate 2 motors


                                        I've read older topic on this. The z axis lead screws are located at about -23 and 530. However if a leveling is performed it would be best to do it at 30 and 470 while the bed is centered at 250.

                                        1 Reply Last reply Reply Quote 0
                                        • fcwiltundefined
                                          fcwilt
                                          last edited by

                                          Hi,

                                          Going from the docs I think you want to remove the G29 and add a G28.

                                          On my printer, instead of using homing, I just set the Z=0 datum using G1 to move to the center of the bed and G30 to probe.

                                          Frederick

                                          Printers: a small Utilmaker style, a small CoreXY and a E3D MS/TC setup. Various hotends. Using Duet 3 hardware running 3.4.6

                                          1 Reply Last reply Reply Quote 0
                                          • Gost101undefined
                                            Gost101
                                            last edited by

                                            @fcwilt tried what you said didn't do what it was supposed to do. I think there is a lot more code that is involved in this.

                                            fcwiltundefined Phaedruxundefined 2 Replies Last reply Reply Quote 0
                                            • First post
                                              Last post
                                            Unless otherwise noted, all forum content is licensed under CC-BY-SA