New to the duet COMPLETE NEWBIE
-
Ive been trying to update the config for my duet via RRF config and I am just having the harderst two days of my life. I know some people this may be very simple and are able to grasp this quickly but im just constantly FAILING and im getting frustrated at this point, i dont understand anything and the more that i study the more i find myself getting things wrong, could someone please help me with this config. . i have no more tools to display after this config. i dont know what more to do rather than take a hammer and trash this whole printer. im So frustated, ive cried for the third time today. everyone i ask for help on other sites are quite mean and very passive when asking for information. i am a visual learner and I am trying to balance fixing this with dealing with my two children under 7.. please help
at this point i dont know what anything is anymore, i GIVE UP as of NOW, until i get help that is.; Configuration file for Duet WiFi (firmware version 2.03)
; executed by the firmware on start-up
;
; generated by RepRapFirmware Configuration Tool v3.2.1 on Mon Jan 18 2021 16:53:55 GMT-0500 (Eastern Standard Time); General preferences
G90 ; send absolute coordinates...
M83 ; ...but relative extruder moves
M550 P"Creola" ; set printer name; Network
M552 S1 ; enable network
M586 P0 S1 ; enable HTTP
M586 P1 S0 ; disable FTP
M586 P2 S0 ; disable Telnet; Drives
M569 P0 S1 ; physical drive 0 goes forwards
M569 P1 S1 ; physical drive 1 goes forwards
M569 P2 S1 ; physical drive 2 goes forwards
M569 P3 S1 ; physical drive 3 goes forwards
M584 X0 Y1 Z2 E3 ; set drive mapping
M350 X16 Y16 Z16 E16 I1 ; configure microstepping with interpolation
M92 X80.00 Y80.00 Z400.00 E420.00 ; set steps per mm
M566 X900.00 Y900.00 Z60.00 E120.00 ; set maximum instantaneous speed changes (mm/min)
M203 X6000.00 Y6000.00 Z180.00 E1200.00 ; set maximum speeds (mm/min)
M201 X500.00 Y500.00 Z20.00 E250.00 ; set accelerations (mm/s^2)
M906 X800 Y800 Z800 E800 I30 ; set motor currents (mA) and motor idle factor in per cent
M84 S30 ; Set idle timeout; Axis Limits
M208 X0 Y0 Z0 S1 ; set axis minima
M208 X300 Y300 Z400 S0 ; set axis maxima; Endstops
M574 X1 Y1 S1 ; set active high endstops
M574 Z1 S2 ; set endstops controlled by probe; Z-Probe
M558 P1 H5 F120 T6000 ; set Z probe type to unmodulated and the dive height + speeds
G31 P500 X0 Y0 Z2.5 ; set Z probe trigger value, offset and trigger height
M557 X15:215 Y15:195 S20 ; define mesh grid; Heaters
M305 P0 T1 B4138 R4700 ; set thermistor + ADC parameters for heater 0
M143 H0 S90 ; set temperature limit for heater 0 to 90C
M305 P1 T1 B4138 R4700 ; set thermistor + ADC parameters for heater 1
M143 H1 S280 ; set temperature limit for heater 1 to 280C; Fans
M106 P0 S0 I0 F500 H T45 ; set fan 0 value, PWM signal inversion and frequency. Thermostatic control is turned on
M106 P1 S1 I0 F500 H1 T45 ; set fan 1 value, PWM signal inversion and frequency. Thermostatic control is turned on; Tools
M563 P0 S"Extruder" D0 H1 F0 ; define tool 0
G10 P0 X0 Y0 Z0 ; set tool 0 axis offsets
G10 P0 R0 S0 ; set initial tool 0 active and standby temperatures to 0C
M563 P1 S"Bed" F-1 ; define tool 1
G10 P1 X0 Y0 Z0 ; set tool 1 axis offsets
G10 P1 R0 S0 ; set initial tool 1 active and standby temperatures to 0C; Custom settings are not defined
-
If you're setting up a new 3D printer and you're just getting into RRF, I definitely advise upgrading to RRF3.2
If you still have access to DWC. Upload these 3 zip files, one at a time. Don't extract them. Reboot after each.
https://github.com/Duet3D/RepRapFirmware/releases/download/2.05.1/Duet2Firmware-2.05.1.zip
https://github.com/Duet3D/RepRapFirmware/releases/download/3.0/Duet2and3Firmware-3.0.zip
https://github.com/Duet3D/RepRapFirmware/releases/download/3.2/Duet2and3Firmware-3.2.zip
That will get your firmware and DWC up to date.
https://configtool.reprapfirmware.org/Start
For your config, might be a good idea to run through the configurator tool and generate a fresh set for RRF3. -
@jay_s_uk thank you, Im about to now.
-
once you've regenerated your firmware, repost your config and we can help you out.
Also, if its an off the shelf printer, tell it what it is so we can have a bit more info.
If you had it running under marlin, make sure you have your previous config available so we can ask questions -
@jay_s_uk I went into cura and found this config for my printer, idk if this is the old config for it. I have a CR-10 . .
M201 X500.00 Y500.00 Z100.00 E5000.00 ;Setup machine max acceleration
M203 X500.00 Y500.00 Z10.00 E50.00 ;Setup machine max feedrate
M204 P500.00 R1000.00 T500.00 ;Setup Print/Retract/Travel acceleration
M205 X8.00 Y8.00 Z0.40 E5.00 ;Setup Jerk
M220 S100 ;Reset Feedrate
M221 S100 ;Reset FlowrateG28 ;Home
G92 E0 ;Reset Extruder
G1 Z2.0 F3000 ;Move Z Axis up
G1 X10.1 Y20 Z0.28 F5000.0 ;Move to start position
G1 X10.1 Y200.0 Z0.28 F1500.0 E15 ;Draw the first line
G1 X10.4 Y200.0 Z0.28 F5000.0 ;Move to side a little
G1 X10.4 Y20 Z0.28 F1500.0 E30 ;Draw the second line
G92 E0 ;Reset Extruder
G1 Z2.0 F3000 ;Move Z Axis upEND GCODE
G91 ;Relative positioning
G1 E-2 F2700 ;Retract a bit
G1 E-2 Z0.2 F2400 ;Retract and raise Z
G1 X5 Y5 F3000 ;Wipe out
G1 Z10 ;Raise Z more
G90 ;Absolute positionningG1 X0 Y{machine_depth} ;Present print
M106 S0 ;Turn-off fan
M104 S0 ;Turn-off hotend
M140 S0 ;Turn-off bedM84 X Y E ;Disable all steppers but Z
Idk if this is exactly what you need, i still dont know how to find my old config . .
-
@gabrealek this is from when i printer from the stock CR-10 motherboard V1.1.4
-
@gabrealek said in New to the duet COMPLETE NEWBIE:
M201 X500.00 Y500.00 Z100.00 E5000.00 ;Setup machine max acceleration
M203 X500.00 Y500.00 Z10.00 E50.00 ;Setup machine max feedrate
M204 P500.00 R1000.00 T500.00 ;Setup Print/Retract/Travel acceleration
M205 X8.00 Y8.00 Z0.40 E5.00 ;Setup JerkRemove that from the cura start gcode for starters.
-
@gabrealek said in New to the duet COMPLETE NEWBIE:
I am trying to balance fixing this with dealing with my two children under 7.. please help
at this point i dont know what anything is anymore, i GIVE UP as of NOW, until i get help that is.Don't despair. You've come to the right place. We can't help you with your children, but I'm quite confident we can get your printer sorted. Then maybe print them some toys.
-
What state are you currently at? I mean with the printer, not mentally.
Is it all wired up? Do you have the Duet Web Control interface up?
Assuming you do, please send M122 in the console tab and post the results. Assuming the firmware updates worked you should be running 3.2
The format of your config.g is for RRF2 though, so you'll need to generate a fresh config file set using the online tool.
https://configtool.reprapfirmware.org/Start
Enter the information as best you can and then download the resulting zip file and upload that to the system tab in DWC.
Then post your config.g, homeall, homex, homey, homez here.
-
@Phaedrux Okay, So im wired up and in the DWC interface. I just updated
"FIRMWARE_NAME: RepRapFirmware for Duet 2 WiFi/Ethernet FIRMWARE_VERSION: 3.2 ELECTRONICS: Duet WiFi 1.02 or later FIRMWARE_DATE: 2021-01-05"Im in the RRF config now. . You guys have already made me feel so much better and secure. . i was loosing my marbles!!

-
Okay so for everything i was unsure about, I left it at default.
Here is the config i just finished
; Configuration file for Duet WiFi (firmware version 3)
; executed by the firmware on start-up
;
; generated by RepRapFirmware Configuration Tool v3.2.1 on Mon Jan 18 2021 18:02:52 GMT-0500 (Eastern Standard Time); General preferences
G90 ; send absolute coordinates...
M83 ; ...but relative extruder moves
M550 P"Creola" ; set printer name; Network
M552 S1 ; enable network
M586 P0 S1 ; enable HTTP
M586 P1 S0 ; disable FTP
M586 P2 S0 ; disable Telnet; Drives
M569 P0 S1 ; physical drive 0 goes forwards
M569 P1 S1 ; physical drive 1 goes forwards
M569 P2 S1 ; physical drive 2 goes forwards
M569 P3 S1 ; physical drive 3 goes forwards
M584 X0 Y1 Z2 E3 ; set drive mapping
M350 X16 Y16 Z16 E16 I1 ; configure microstepping with interpolation
M92 X80.00 Y80.00 Z400.00 E420.00 ; set steps per mm
M566 X900.00 Y900.00 Z60.00 E120.00 ; set maximum instantaneous speed changes (mm/min)
M203 X6000.00 Y6000.00 Z180.00 E1200.00 ; set maximum speeds (mm/min)
M201 X500.00 Y500.00 Z20.00 E250.00 ; set accelerations (mm/s^2)
M906 X800 Y800 Z800 E800 I30 ; set motor currents (mA) and motor idle factor in per cent
M84 S30 ; Set idle timeout; Axis Limits
M208 X0 Y0 Z0 S1 ; set axis minima
M208 X300 Y300 Z400 S0 ; set axis maxima; Endstops
M574 X1 S1 P"xstop" ; configure active-high endstop for low end on X via pin xstop
M574 Y1 S1 P"ystop" ; configure active-high endstop for low end on Y via pin ystop
M574 Z1 S1 P"!zstop" ; configure active-high endstop for low end on Z via pin !zstop; Z-Probe
M558 P1 C"zprobe.in" H5 F120 T6000 ; set Z probe type to unmodulated and the dive height + speeds
G31 P500 X0 Y0 Z2.5 ; set Z probe trigger value, offset and trigger height
M557 X15:215 Y15:195 S20 ; define mesh grid; Heaters
M308 S0 P"e0temp" Y"thermistor" T100000 B4138 ; configure sensor 0 as thermistor on pin e0temp
M950 H0 C"e0heat" T0 ; create nozzle heater output on e0heat and map it to sensor 0
M307 H0 B0 S1.00 ; disable bang-bang mode for heater and set PWM limit
M143 H0 S245 ; set temperature limit for heater 0 to 245C
M308 S1 P"bedtemp" Y"thermistor" T100000 B4138 ; configure sensor 1 as thermistor on pin bedtemp
M950 H1 C"bedheat" T1 ; create bed heater output on bedheat and map it to sensor 1
M307 H1 B1 S1.00 ; enable bang-bang mode for the bed heater and set PWM limit
M140 H1 ; map heated bed to heater 1
M143 H1 S80 ; set temperature limit for heater 1 to 80C; Fans
M950 F0 C"fan0" Q500 ; create fan 0 on pin fan0 and set its frequency
M106 P0 S0 H1 T45 ; set fan 0 value. Thermostatic control is turned on
M950 F1 C"fan1" Q500 ; create fan 1 on pin fan1 and set its frequency
M106 P1 S1 H-1 ; set fan 1 value. Thermostatic control is turned off; Tools
M563 P0 S"Extruder" D0 H1 F0:1 ; define tool 0
G10 P0 X0 Y0 Z0 ; set tool 0 axis offsets
G10 P0 R0 S0 ; set initial tool 0 active and standby temperatures to 0C
M563 P1 S"Bed" F0 ; define tool 1
G10 P1 X0 Y0 Z0 ; set tool 1 axis offsets
G10 P1 R0 S0 ; set initial tool 1 active and standby temperatures to 0C; Custom settings are not defined
My printer model is a stock CR-10. no modifications. .
-
Maybe take a look at this guide series that goes through the whole process. Might give you some ideas. It's for an ender 3 and RRF2, which is pretty similar to the CR-10 actually. All Creality printers are similar.
https://duet3d.dozuki.com/Guide/Ender+3+Pro+and+Duet+Maestro+Guide+Part+1:+Wiring/37
The RRF3 version is started here, but still working on it.
https://duet3d.dozuki.com/Guide/Ender+3+Pro+and+Duet+3+Mini+5++Guide+Part+1:+Wiring/87
-
; Configuration file for Duet WiFi (firmware version 3)
; executed by the firmware on start-up
;
; generated by RepRapFirmware Configuration Tool v3.2.1 on Tue Jan 19 2021 15:22:13 GMT-0500 (Eastern Standard Time); General preferences
G90 ; send absolute coordinates...
M83 ; ...but relative extruder moves
M550 P"Creola" ; set printer name; Network
M552 S1 ; enable network
M586 P0 S1 ; enable HTTP
M586 P1 S0 ; disable FTP
M586 P2 S0 ; disable Telnet; Drives
M569 P0 S0 ; physical drive 0 goes backwards
M569 P1 S0 ; physical drive 1 goes backwards
M569 P2 S1 ; physical drive 2 goes forwards
M569 P3 S0 ; physical drive 3 goes backwards
M584 X0 Y1 Z2 E3 ; set drive mapping
M350 X16 Y16 Z16 E16 I1 ; configure microstepping with interpolation
M92 X80.00 Y80.00 Z400.00 E93.00 ; set steps per mm
M566 X900.00 Y900.00 Z60.00 E120.00 ; set maximum instantaneous speed changes (mm/min)
M203 X6000.00 Y6000.00 Z600.00 E1200.00 ; set maximum speeds (mm/min)
M201 X500.00 Y500.00 Z120.00 E250.00 ; set accelerations (mm/s^2)
M906 X800 Y800 Z800 E800 I30 ; set motor currents (mA) and motor idle factor in per cent
M84 S30 ; Set idle timeout; Axis Limits
M208 X0 Y0 Z0 S1 ; set axis minima
M208 X300 Y300 Z400 S0 ; set axis maxima; Endstops
M574 X1 S1 P"xstop" ; configure active-high endstop for low end on X via pin xstop
M574 Y1 S1 P"ystop" ; configure active-high endstop for low end on Y via pin ystop
M574 Z1 S1 P"!zstop" ; configure active-high endstop for low end on Z via pin !zstop; Z-Probe
M558 P0 H18 F120 T480000 ; disable Z probe but set dive height, probe speed and travel speed
M557 X10:220 Y10:220 S20 ; define mesh grid; Heaters
M308 S0 P"e0temp" Y"thermistor" T9880 B4185 ; configure sensor 0 as thermistor on pin e0temp
M950 H0 C"e0heat" T0 ; create nozzle heater output on e0heat and map it to sensor 0
M307 H0 B0 S1.00 ; disable bang-bang mode for heater and set PWM limit
M143 H0 S250 ; set temperature limit for heater 0 to 250C
M308 S1 P"bedtemp" Y"thermistor" T9880 B4185 ; configure sensor 1 as thermistor on pin bedtemp
M950 H1 C"bedheat" T1 ; create bed heater output on bedheat and map it to sensor 1
M307 H1 B0 S1.00 ; disable bang-bang mode for the bed heater and set PWM limit
M140 H1 ; map heated bed to heater 1
M143 H1 S80 ; set temperature limit for heater 1 to 80C; Fans
M950 F0 C"fan0" Q20 ; create fan 0 on pin fan0 and set its frequency
M106 P0 S0 H-1 ; set fan 0 value. Thermostatic control is turned off
M950 F1 C"fan1" Q20 ; create fan 1 on pin fan1 and set its frequency
M106 P1 S1 H1 T45 ; set fan 1 value. Thermostatic control is turned on; Tools
M563 P0 S"Extruder" D0 F0:1 ; define tool 0
G10 P0 X0 Y0 Z0 ; set tool 0 axis offsets
G10 P0 R0 S0 ; set initial tool 0 active and standby temperatures to 0C; Custom settings are not defined
; Miscellaneous
M501 ; load saved parameters from non-volatile memory
M911 S21 R23 P"M913 X0 Y0 G91 M83 G1 Z3 E-5 F1000" ; set voltage thresholds and actions to run on power loss; homeall.g
; called to home all axes
;
; generated by RepRapFirmware Configuration Tool v3.2.1 on Tue Jan 19 2021 15:30:54 GMT-0500 (Eastern Standard Time)
G91 ; relative positioning
G1 H2 Z18 F480000 ; lift Z relative to current position
G1 H1 X-305 Y-305 F3000 ; move quickly to X and Y axis endstops and stop there (first pass)
G1 H2 X5 Y5 F480000 ; go back a few mm
G1 H1 X-305 Y-305 F3600 ; move slowly to X and Y axis endstops once more (second pass)
G1 H1 Z-405 F3600 ; move Z down stopping at the endstop
G90 ; absolute positioning
G92 Z0 ; set Z position to axis minimum (you may want to adjust this); Uncomment the following lines to lift Z after probing
;G91 ; relative positioning
;G1 Z18 F8000 ; lift Z relative to current position
;G90 ; absolute positioning; homex.g
; called to home the X axis
;
; generated by RepRapFirmware Configuration Tool v3.2.1 on Tue Jan 19 2021 15:31:40 GMT-0500 (Eastern Standard Time)
G91 ; relative positioning
G1 H2 Z18 F480000 ; lift Z relative to current position
G1 H1 X-305 F3000 ; move quickly to X axis endstop and stop there (first pass)
G1 H2 X5 F480000 ; go back a few mm
G1 H1 X-305 F3600 ; move slowly to X axis endstop once more (second pass)
G1 H2 Z-18 F480000 ; lower Z again
G90 ; absolute positioning; homez.g
; called to home the Z axis
;
; generated by RepRapFirmware Configuration Tool v3.2.1 on Tue Jan 19 2021 15:31:58 GMT-0500 (Eastern Standard Time)
G91 ; relative positioning
G1 H2 Z18 F480000 ; lift Z relative to current position
G1 H1 Z-405 F3000 ; move Z down until the endstop is triggered
G92 Z0 ; set Z position to axis minimum (you may want to adjust this); Uncomment the following lines to lift Z after probing
;G91 ; relative positioning
;G1 Z18 F8000 ; lift Z relative to current position
;G90 ; absolute positioningIve checked my wiring and it all seems correct.
-
@gabrealek said in New to the duet COMPLETE NEWBIE:
; Heaters
M308 S0 P"e0temp" Y"thermistor" T9880 B4185 ; configure sensor 0 as thermistor on pin e0temp
M950 H0 C"e0heat" T0 ; create nozzle heater output on e0heat and map it to sensor 0
M307 H0 B0 S1.00 ; disable bang-bang mode for heater and set PWM limit
M143 H0 S250 ; set temperature limit for heater 0 to 250C
M308 S1 P"bedtemp" Y"thermistor" T9880 B4185 ; configure sensor 1 as thermistor on pin bedtemp
M950 H1 C"bedheat" T1 ; create bed heater output on bedheat and map it to sensor 1
M307 H1 B0 S1.00 ; disable bang-bang mode for the bed heater and set PWM limit
M140 H1 ; map heated bed to heater 1
M143 H1 S80 ; set temperature limit for heater 1 to 80CIt would be more traditional for heater0 to be the bed heater and for heater1 to be the first tool heater. I don't think that's strictly enforced now with RRF3 being more flexible about it, but still not a bad idea to conform to the standard.
Also, your tool definition is lacking a heater.
Maybe take another crack at the config tool. https://duet3d.dozuki.com/Guide/Ender+3+Pro+and+Duet+Mini+5++Guide+Part+2:+Configuration/88
-
@Phaedrux Okay, back into the studio I go. Thank you for helping me!!!!
-
Double check your heater and thermistor connections as well. Hopefully that will resolve the odd heater reporting in DWC.
Otherwise the config looks ok so far.
After the heaters are sorted you'd want to carefully check the motor directions are correct and endstops are working and then test homing. And then test and tune the heaters and calibrate the extruder.
follow along
https://duet3d.dozuki.com/Guide/Ender+3+Pro+and+Duet+Maestro+Guide+Part+3:+Commissioning/39 -
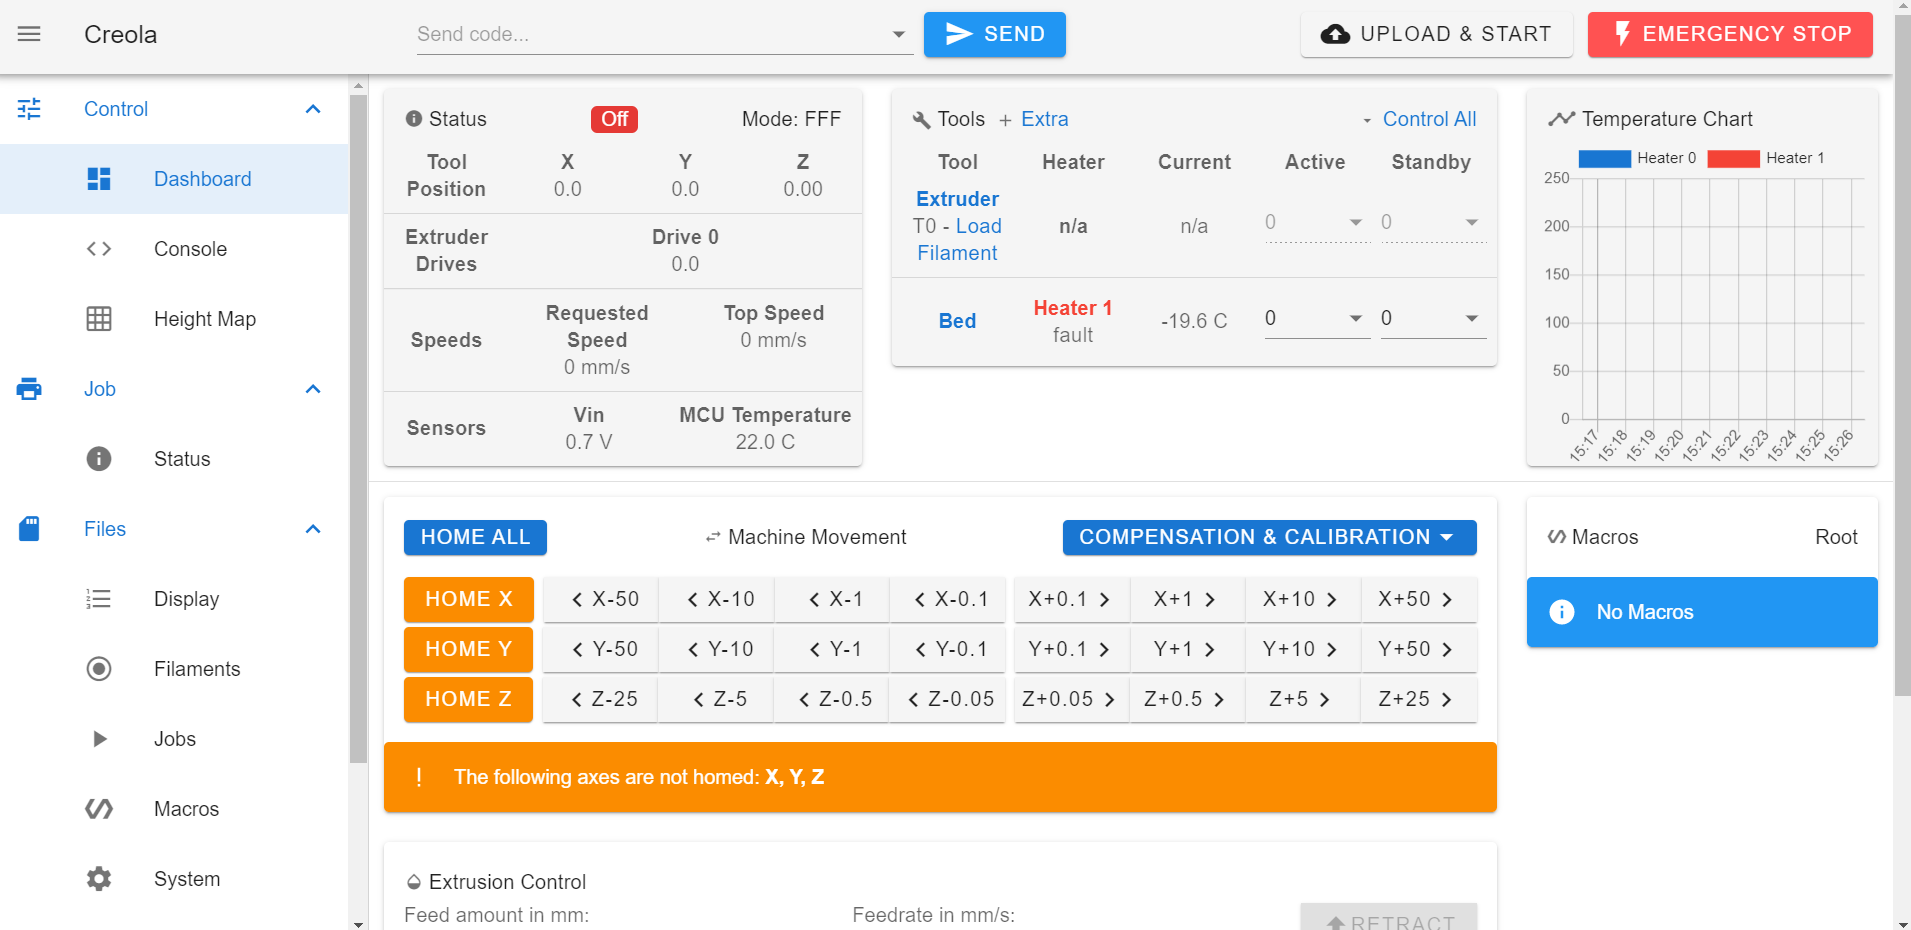
@Phaedrux thanks. Ive checked the connections and redid them as the ender tutorial and now i am having a fault in the hotend and also the bed when i try to heat it as well.
Here is my new config . . ive been trying to get it right all day. ive done it exactly as the tutorial as well.
; Configuration file for Duet WiFi (firmware version 3)
; executed by the firmware on start-up
;
; generated by RepRapFirmware Configuration Tool v3.2.1 on Tue Jan 19 2021 17:33:25 GMT-0500 (Eastern Standard Time); General preferences
G90 ; send absolute coordinates...
M83 ; ...but relative extruder moves
M550 P"Creola" ; set printer name; Network
M552 S1 ; enable network
M586 P0 S1 ; enable HTTP
M586 P1 S0 ; disable FTP
M586 P2 S0 ; disable Telnet; Drives
M569 P0 S0 ; physical drive 0 goes backwards
M569 P1 S0 ; physical drive 1 goes backwards
M569 P2 S1 ; physical drive 2 goes forwards
M569 P3 S0 ; physical drive 3 goes backwards
M584 X0 Y1 Z2 E3 ; set drive mapping
M350 X16 Y16 Z16 E16 I1 ; configure microstepping with interpolation
M92 X80.00 Y80.00 Z400.00 E93.00 ; set steps per mm
M566 X900.00 Y900.00 Z60.00 E120.00 ; set maximum instantaneous speed changes (mm/min)
M203 X6000.00 Y6000.00 Z600.00 E1200.00 ; set maximum speeds (mm/min)
M201 X500.00 Y500.00 Z120.00 E250.00 ; set accelerations (mm/s^2)
M906 X800 Y800 Z800 E800 I30 ; set motor currents (mA) and motor idle factor in per cent
M84 S30 ; Set idle timeout; Axis Limits
M208 X0 Y0 Z0 S1 ; set axis minima
M208 X300 Y300 Z400 S0 ; set axis maxima; Endstops
M574 X1 S1 P"xstop" ; configure active-high endstop for low end on X via pin xstop
M574 Y1 S1 P"ystop" ; configure active-high endstop for low end on Y via pin ystop
M574 Z1 S1 P"!zstop" ; configure active-high endstop for low end on Z via pin !zstop; Z-Probe
M558 P0 H18 F120 T480000 ; disable Z probe but set dive height, probe speed and travel speed
M557 X10:220 Y10:220 S20 ; define mesh grid; Heaters
M308 S0 P"e0temp" Y"thermistor" T9880 B4185 ; configure sensor 0 as thermistor on pin e0temp
M950 H0 C"e0heat" T0 ; create bed heater output on e0heat and map it to sensor 0
M307 H0 B0 S1.00 ; disable bang-bang mode for the bed heater and set PWM limit
M140 H0 ; map heated bed to heater 0
M143 H0 S250 ; set temperature limit for heater 0 to 250C
M308 S1 P"e1temp" Y"thermistor" T9880 B4185 ; configure sensor 1 as thermistor on pin e1temp
M950 H1 C"e1heat" T1 ; create nozzle heater output on e1heat and map it to sensor 1
M307 H1 B0 S1.00 ; disable bang-bang mode for heater and set PWM limit
M143 H1 S80 ; set temperature limit for heater 1 to 80C; Fans
M950 F0 C"fan0" Q20 ; create fan 0 on pin fan0 and set its frequency
M106 P0 C"PartCool" S0 H-1 ; set fan 0 name and value. Thermostatic control is turned off
M950 F1 C"fan1" Q20 ; create fan 1 on pin fan1 and set its frequency
M106 P1 S1 H T45 ; set fan 1 value. Thermostatic control is turned on; Tools
M563 P0 S"Hotend" D0 H1 F0 ; define tool 0
G10 P0 X0 Y0 Z0 ; set tool 0 axis offsets
G10 P0 R0 S0 ; set initial tool 0 active and standby temperatures to 0C; Custom settings are not defined
; Miscellaneous
M501 ; load saved parameters from non-volatile memory
M911 S21 R23 P"M913 X0 Y0 G91 M83 G1 Z3 E-5 F1000" ; set voltage thresholds and actions to run on power loss
T0 ; select first tool -
@gabrealek said in New to the duet COMPLETE NEWBIE:
T9880
I think you're missing a digit in your T values.
-
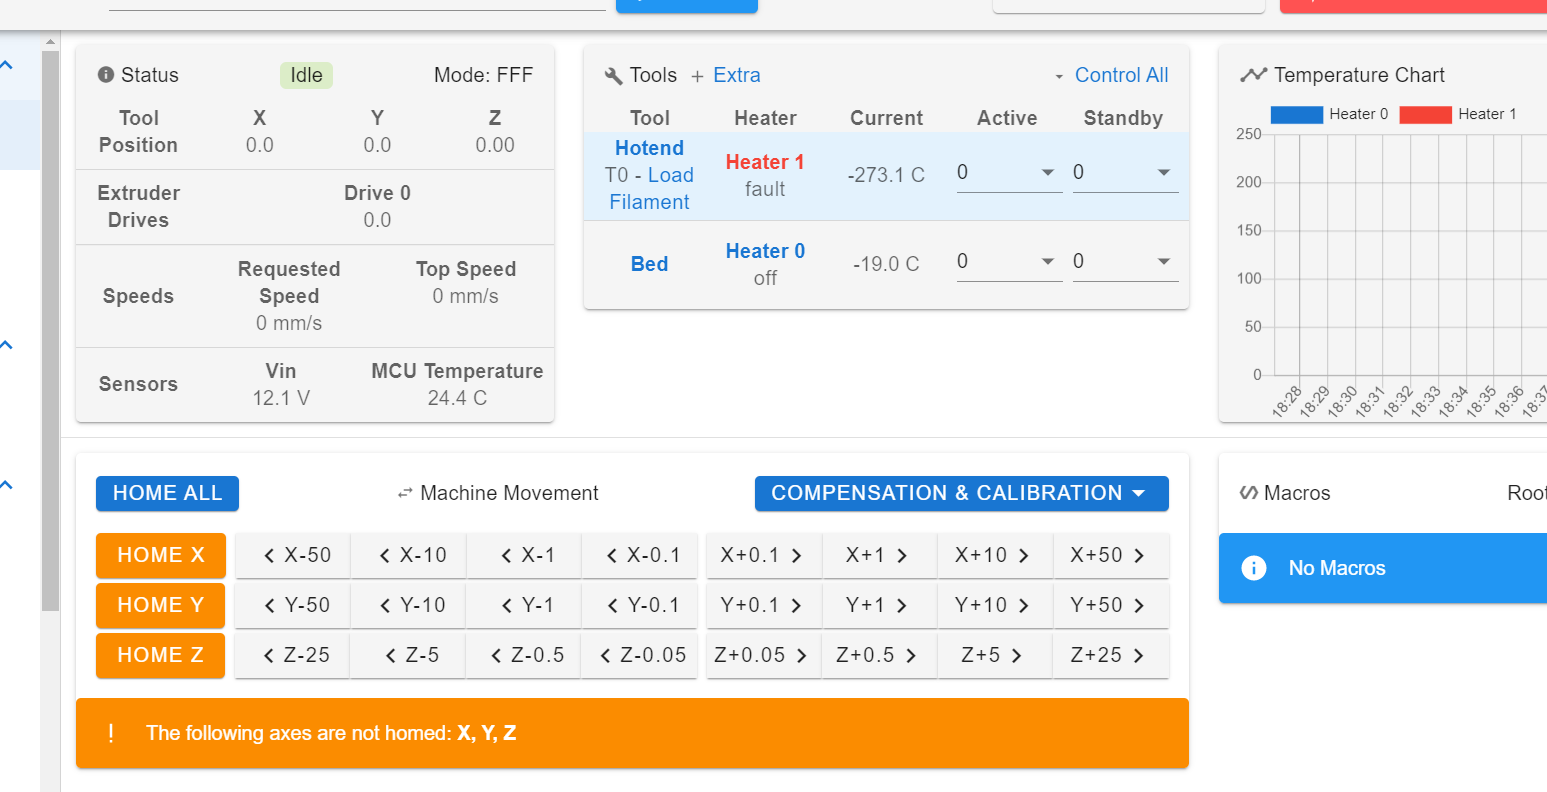
@Phaedrux I dont understand how i would correct that. . its in there twice. . Ive tried to look up what a T9880 is . . i cant find anything .. Is it a problem with the setting i put in the config?
-
The correct values are
T98801