Texture mapping with feltpen carousel?
-
Hi guys,
it's only a wild idea yet, but I need a reason to keep me from doing it. So please talk me out of it!
The plan is to do texture mapping with felt pens dyeing the filament. The idea to add color by using feltpens isn't new, but I haven't heard of someone who actually tried to map an image to the outer perimeters or upper layer.The mechanical part consists of a pen-carousel with several pens of different color surrounding the filament above the extruder. Each pen has a solenoid to move it away from the filament.
Defining different tools, it should even be possible to mix those pen colors.
The whole arrangement rotates slowly around the filament, hence pen carousel. The rotation allows each pen to dye the whole circumfence.Now the firmware or post-processing part.
Controlling the pens activity requires a lot of brain. The preprocessor needs to know the filament length between nozzle and the pen-carousel. (easy try and error)
It also needs to know where in the gcode it can find the outer perimeters or the top layer.
This can be done by defining a certain speed in the slicer exclusively for the tracks we want to dye. A postprocessor should be able to search for a line that contains G1 X...Y... F3456. (where F3456 is the exclusive speed that marks the surface)
Now it has to calculate where in the gcode it has to insert the pen-tool directives to compensate the huge? nozzle-carousel distance. It sums up all the E-related lenght's that occure before the track in question. Retractions with G11 are no problem as long as the postprocessor knows the retraction lenght.
Also the printspeed of the code, where the tool- directives are to be placed,is important.
The pen-tools have to be in sync with the momentary filament speed and also be aware of retraction moves.I might have forgotten a few details, but this is the idea in general. I hope my lack of english tech-talk didn't confuse you too much and you got a picture of what I try to achieve and how.
-
I support your desire to try this. Sounds cool.
-
@o_lampe said in Texture mapping with feltpen carousel?:
This can be done by defining a certain speed in the slicer exclusively for the tracks we want to dye. A postprocessor should be able to search for a line that contains G1 X...Y... F3456. (where F3456 is the exclusive speed that marks the surface)
This may work, except that is valid to send, e.g.
G1 F3456
G1 X100 Y100 E0.1
G1 X101 Y101 E0.1
G1 F2345etc
So it would need to collect all lines until the feedrate changes. Better if you can, to get the slicer to make all lines as "outer permeter" or "top layer" with a comment.
when i experimented with manually colouring filament with pens many years ago I found that, like with mixing nozzles, the transitions were not sharp. you ended up with a fade of pastel blue to pastel pink etc. YMMV with different pens and different plastics (that was with sharpies and natural ABS AFAIR).
Before going to the trouble of making the hardware or coding the post processor I would try and see what the sharpest transitions you can get. I suppose you can add a purge area (and purge in infil as well)..
-
Thanks for the encouraging comments and handson experiences.
@Phaedrux Is it the right subforum?I figured, it would be easiest to ink the filament in a separate process. The filament speed would be steady without retractions and such...
Also it seems best to let the carousel turn 360 CW and 360 CCW. Wiring the solenoids is much easier then.Before I woke up my printer from it's 3 years beautysleep I've built a pen plotter from scratch. I made a short video, how the solenoid (12V car relais) and felt pen worked together.
Maybe it's easier to dye the printed part with a multi-pen plotter. At least for flat top layer texture mappings.... -
Today I tried to get the latest news about THE post processing app for RRF3 and eg. PrusaSlicer. But informations were sparse.
The manual of PS mentions a way to implement scripts and guided me to a github page with 4-9 years old examples.
I'm sure there has been a development going on in the last few years, especially with the SBC-option for Duet3.So what's your favourite post processing app on a Raspberry?
It should have features like finding a string, replace and insert command lines, extract numbers and convert them from string2float. -
I think there is more discussion of prusaslicer post processing on the prusa forums. I don't do much post processing myself but I do recall finding myself there at one point.
-
I tested 4 different felt pens from different brands with white PLA and 3 of them hardly stick to the filament or dry over time.
Only a noname permanent marker did the job and I could extrude some colored filament in free air.
The result was quite disappointing, I could hardly see a difference. Black turns into shades of grey") and red gets pink.
and red gets pink.
A mix of red and blue finally showed pale violet. I believe it was better because I used twice the ink.
I also noticed that a lot of the color sticked to the nozzle and my hope is that the colors show more clearly when the nozzle actually prints something.
I will build a carousel now for the pens I chose and see where a thick layer of ink leads to. -
-
@Phaedrux
Thanks for the video, I knew it was possible!
In the comments there where hundreds of replies regarding servos moving the pens, etc... I believe it's just a matter of time until we see a texture mapping of some kind.
So I can finish my project and wait for others to come up with a solution. (much faster than I could with my limitted knowledge and budget)Maybe my idea is two steps forward in the agenda, but as soon as they come up with a color mixing sharpie-tool, they want to use it in sync with the print.
Et Voila: Texture mapping. -
@o_lampe said in Texture mapping with feltpen carousel?:
Maybe my idea is two steps forward in the agenda...
Let's get crazy and talk about step three in my agenda:
Build a Delta printer onTop of my CoreXY and attach an effector that holds the feltpens and solenoids. (No carousel required)
Then print a layer with CoreXY & park the printhead.
Then dye the perimeters with the Delta using one felt pen at a time. The data is extracted from the original gcode and can include mixing colors and patterns.
Then park the Delta and go on printing.Print-dye-print-dye (or PDPD) as I'd like to call it in my biography
Will it require two Duet boards or is it just a matter of toolchange?
I wouldn't care since this is IMHO the best way to get brilliant color texture mapping without a multicolor mixing extruder. -
@o_lampe said in Texture mapping with feltpen carousel?:
Build a Delta printer onTop of my CoreXY and attach an effector that holds the feltpens and solenoids. (No carousel required)
The carousel sounds easier, no?
-
@o_lampe said in Texture mapping with feltpen carousel?:
Will it require two Duet boards or is it just a matter of toolchange?
In theory, given a Duet system with enough stepper drivers and other outputs, you could switch the mapped axis and kinematics on every tool change CoreXY -> Delta tool1 -> delta tool2 ->CoreXY etc.
But just because you can do so, it does not mean that you should !
I think it would require very careful though to how it fails, how homing can always be safe no matter what configuration it is in etc. Homing might actually be ok, as long as you always home the delta first... I think you might need to home between each switch between Delta and CoreXY...
Offsets could be used to make the delta reach down into the CoreXY build space without having to change the coordinates of the print between the two printers...
 .... hmm If you decide to do this I would love to see it!
How do you propose to extract the colour information from the model and convert it into sensible paths for your felt tip pen delta toolchanger?
-
@T3P3Tony said in Texture mapping with feltpen carousel?:
hmm If you decide to do this I would love to see it!
How do you propose to extract the colour information from the model and convert it into sensible paths for your felt tip pen delta toolchanger?In another thread, i added a second carrier to my CoreXY. I guess I'll follow this route and use it as pen-holder.
The idea of texture mapping came, when I saw parts printed as wood and thought, there is no wood grain to see.
Flat horizontal surfaces with random patterns would be an easy start, since any mistake wouldn't be so obvious.
My python experience is pretty limitted, but with some help, we could extract each surface line of a print and detect which pixels of the texture it covers. Defining tools with different colours leads to a pattern each involved pen would ink. Inking vertical walls would require the PDPD method I described above.
Describing the tool colours would be in RGB or CMY manner. Same as the bitmap-structure of the texture is. Then we have to allow a threshold to find the best matching colour or how to mix two colours.Then the size of the print and texture must fit. And the origin must be fixed.
It's probably a long way until we see a texture mapped Mona Lisa -
@Phaedrux said in Texture mapping with feltpen carousel?:
@o_lampe said in Texture mapping with feltpen carousel?:
Build a Delta printer onTop of my CoreXY and attach an effector that holds the feltpens and solenoids. (No carousel required)
The carousel sounds easier, no?
Yes, but the colour saturation is so much better when we ink the already printed part. And that requires some extra tool axis'
-
Not much of a braincrunching project (which is usually most of the fun), but a decent option to texture 3D prints could be hydro-dipping:

It can do wood grain nicely.
Requires a suitable inkjet printer, hydrodipping sheets, activator and a bucket of water. I never actually did it, but maybe I might someday.
-
@DaBit
Looks good too.
I'm also sure there are SLA printers which dye every layer with an inkjet, but they don't fit in my budget. -
Sure, directly painting the surface makes sense. How to get decent resolution is a good question. Inktjet gets you there. Felt markers, meh.
For occasional use hydrodipping might just be the answer. Standard patterns are available as rolls, custom can be done with blank sheets and an inkjet printer (but not any inkjet).
I might want to try it one day. UV-unwrap the object in Blender and use hydrodipping to transfer graphics to a printerd part.
-
Just found a new playground for feltpen-layer inking:
I made some monochrome Lithopanes and realized, how easy it would be to add some colour by inking just the right places between each layer.
Finally a green Yoda Lithopane
-
I promised you a carousel, but here is a draft of a different way of toolchanging.
The red tool is active, the crossbeam can move along the bed.
When the crossbeam parks between the curved "OpenV-extrusions" the tools can trade places. Imagine the whole rear area is full of parking tools.
They all have their own motor, geared like the Hitchhiker, but running on rack and pinion.The curved OpenV profile is printed, there is no need for a tight and accurate guideance. Only the crossbeam is the real stuff.
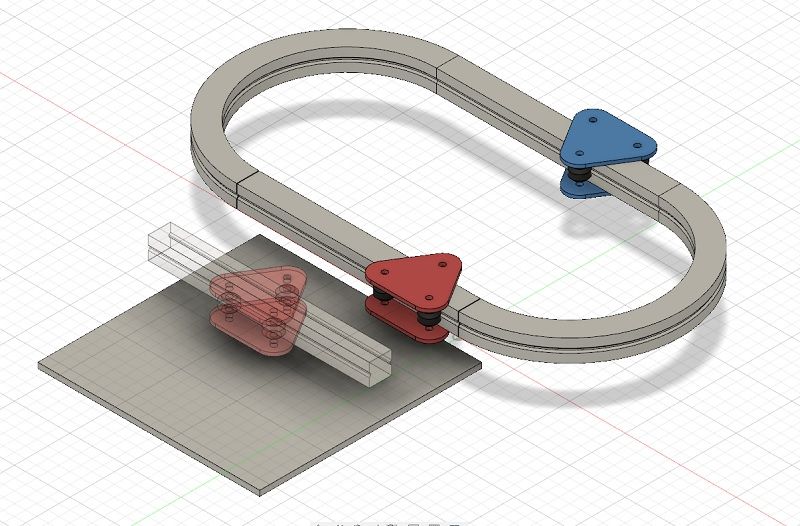
I hope you get my intention...
-
@phaedrux said in Texture mapping with feltpen carousel?:
https://www.youtube.com/watch?v=yQwkHDDed0o&t=87s&ab_channel=MakeAnything
for your research
@o_lampe, did you try with natural translucent filament?