Duet3D Logo Duet3D
    • Tags
    • Documentation
    • Order
    • Register
    • Login

    DWC 3.1.1

    Scheduled Pinned Locked Moved
    Duet Web Control
    4
    114
    6.1k
    Loading More Posts
    • Oldest to Newest
    • Newest to Oldest
    • Most Votes
    Reply
    • Reply as topic
    Log in to reply
    This topic has been deleted. Only users with topic management privileges can see it.
    • luca Massimilianoundefined
      luca Massimiliano
      last edited by

      30c872d2-25aa-4743-853d-0224da4b8923-image.png

      1 Reply Last reply Reply Quote 0
      • luca Massimilianoundefined
        luca Massimiliano
        last edited by

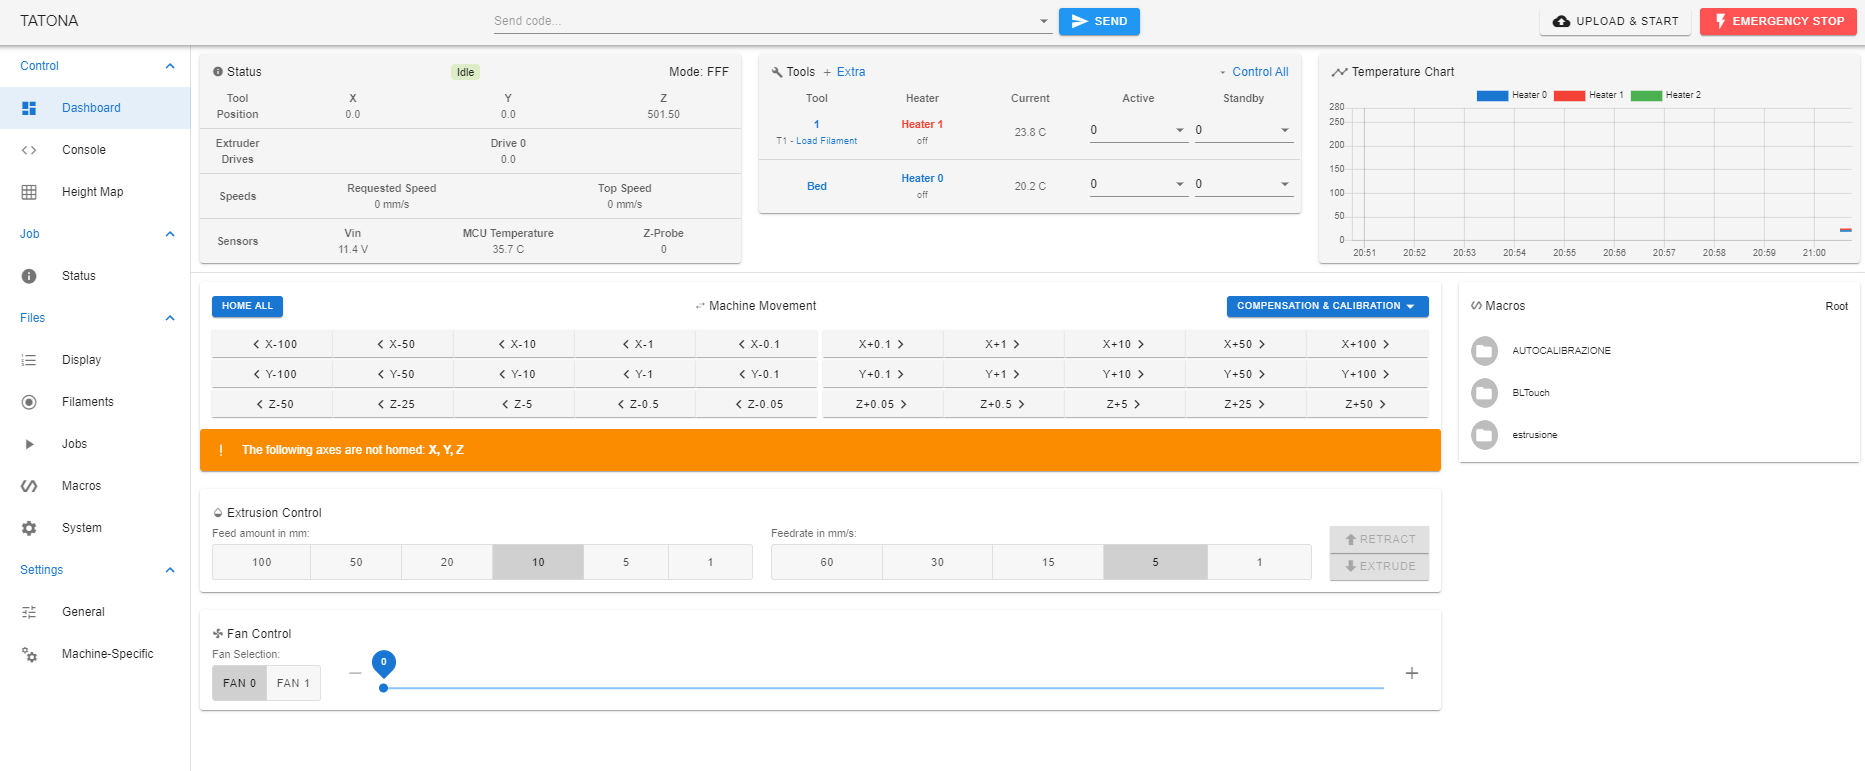
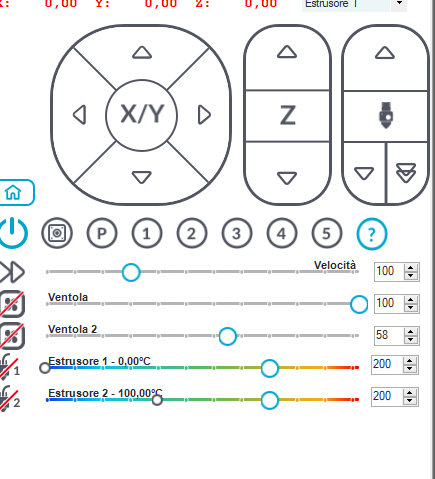
        ORA OK , MANCA IL SECONDO RISCALDATORE , SONO NOMINITA 0 E 1 ANCHE REPETIER LI NOMINA COSI' E NON SETE LA TEMPERATURA DEL PRIMO RISCALDATORE . HO RISOLTO GRAZIE A TE LA VERSIONE TE NE SONO GRATO MA NON CAPISCO PERCHE' FUNZIONA SOLO CON JAVA.
        1 IL PRIMO RISCALDATORE ASSENE
        2 PERCHE' JAVA ?

        1 Reply Last reply Reply Quote 0
        • luca Massimilianoundefined
          luca Massimiliano
          last edited by

          d862f657-e0a1-44b8-818d-9e75823e22c0-image.png

          1 Reply Last reply Reply Quote 0
          • luca Massimilianoundefined
            luca Massimiliano
            last edited by

            c748faee-7060-4c1f-9de9-bdf111042c5c-image.png

            1 Reply Last reply Reply Quote 0
            • luca Massimilianoundefined
              luca Massimiliano
              last edited by

              ; Heaters
              M308 S0 P"bedtemp" Y"thermistor" T100000 B3950 ; configure sensor 0 as thermistor on pin bedtemp
              M950 H0 C"bedheat" T0 ; create bed heater output on bedheat and map it to sensor 0
              M307 H0 B1 S1.00 ; enable bang-bang mode for the bed heater and set PWM limit
              M140 H0 ; map heated bed to heater 0
              M143 H0 S120 ; set temperature limit for heater 0 to 120C
              M308 S1 P"e0temp" Y"thermistor" T100000 B4388 ; configure sensor 1 as thermistor on pin e0temp
              M950 H1 C"e0heat" T1 ; create nozzle heater output on e0heat and map it to sensor 1
              M307 H1 B0 S1.00 ; disable bang-bang mode for heater and set PWM limit
              M143 H1 S280 ; set temperature limit for heater 1 to 280C
              M308 S2 P"e1temp" Y"thermistor" T100000 B4388 ; configure sensor 2 as thermistor on pin e1temp
              M950 H2 C"e1heat" T2 ; create nozzle heater output on e1heat and map it to sensor 2
              M307 H2 B0 S1.00 ; disable bang-bang mode for heater and set PWM limit
              M143 H2 S280 ; set temperature limit for heater 2 to 280C

              1 Reply Last reply Reply Quote 0
              • Phaedruxundefined
                Phaedrux Moderator
                last edited by

                Post the full contents of your config.g

                Java is required for it to work. That's just the way it's made.

                Z-Bot CoreXY Build | Thingiverse Profile

                luca Massimilianoundefined 1 Reply Last reply Reply Quote 0
                • luca Massimilianoundefined
                  luca Massimiliano
                  last edited by

                  SCUSA AMICO , NON HO CAPITO COSA DEVO FARE

                  1 Reply Last reply Reply Quote 0
                  • luca Massimilianoundefined
                    luca Massimiliano @Phaedrux
                    last edited by

                    ; Configuration file for Duet WiFi (firmware version 3)
                    ; executed by the firmware on start-up
                    ;
                    ; generated by RepRapFirmware Configuration Tool v3.2.2 on Wed Jan 20 2021 16:02:24 GMT+0100 (Ora standard dell’Europa centrale)

                    ; General preferences
                    G90 ; send absolute coordinates...
                    M83 ; ...but relative extruder moves
                    M550 P"TATONA" ; set printer name
                    M665 R165.29 L334 B130 H501.5 ; Set delta radius, diagonal rod length, printable radius and homed height
                    M666 X0 Y0 Z0 ; put your endstop adjustments here, or let auto calibration find them

                    ; Network
                    M540 PBE:EF:DE:AD:FE:ED ; set custom MAC address
                    M552 S1 ; enable network
                    M586 P0 S1 ; enable HTTP
                    M586 P1 S0 ; disable FTP
                    M586 P2 S0 ; disable Telnet

                    ; Drives
                    M569 P0 S1 ; physical drive 0 goes forwards
                    M569 P1 S1 ; physical drive 1 goes forwards
                    M569 P2 S1 ; physical drive 2 goes forwards
                    M569 P3 S1 ; physical drive 3 goes forwards
                    M584 X0 Y1 Z2 E3 ; set drive mapping
                    M350 X16 Y16 Z16 E16 I1 ; configure microstepping with interpolation
                    M92 X80.00 Y80.00 Z80.00 E663.00 ; set steps per mm
                    M566 X1200.00 Y1200.00 Z1200.00 E1200.00 ; set maximum instantaneous speed changes (mm/min)
                    M203 X18000.00 Y18000.00 Z18000.00 E1200.00 ; set maximum speeds (mm/min)
                    M201 X1000.00 Y1000.00 Z1000.00 E1000.00 ; set accelerations (mm/s^2)
                    M906 X1000 Y1000 Z1000 E800 I30 ; set motor currents (mA) and motor idle factor in per cent
                    M84 S30 ; Set idle timeout

                    ; Axis Limits
                    M208 Z-0.1 S1 ; set minimum Z

                    ; Endstops
                    M574 X2 S1 P"xstop" ; configure active-high endstop for high end on X via pin xstop
                    M574 Y2 S1 P"ystop" ; configure active-high endstop for high end on Y via pin ystop
                    M574 Z2 S1 P"zstop" ; configure active-high endstop for high end on Z via pin zstop

                    ; Z-Probe
                    M950 S0 C"exp.heater7" ; create servo pin 0 for BLTouch
                    M558 P9 C"^zprobe.in" H10 F120 T2400 ; set Z probe type to bltouch and the dive height + speeds
                    M558 H30 ;*** Remove this line after delta calibration has been done and new delta parameters have been saved
                    G31 P500 X11 Y0 Z2 ; set Z probe trigger value, offset and trigger height
                    M557 R130 S20 ; define mesh grid

                    ; Heaters
                    M308 S0 P"bedtemp" Y"thermistor" T100000 B3950 ; configure sensor 0 as thermistor on pin bedtemp
                    M950 H0 C"bedheat" T0 ; create bed heater output on bedheat and map it to sensor 0
                    M307 H0 B1 S1.00 ; enable bang-bang mode for the bed heater and set PWM limit
                    M140 H0 ; map heated bed to heater 0
                    M143 H0 S120 ; set temperature limit for heater 0 to 120C
                    M308 S1 P"e0temp" Y"thermistor" T100000 B4388 ; configure sensor 1 as thermistor on pin e0temp
                    M950 H1 C"e0heat" T1 ; create nozzle heater output on e0heat and map it to sensor 1
                    M307 H1 B0 S1.00 ; disable bang-bang mode for heater and set PWM limit
                    M143 H1 S280 ; set temperature limit for heater 1 to 280C
                    M308 S2 P"e1temp" Y"thermistor" T100000 B4388 ; configure sensor 2 as thermistor on pin e1temp
                    M950 H2 C"e1heat" T2 ; create nozzle heater output on e1heat and map it to sensor 2
                    M307 H2 B0 S1.00 ; disable bang-bang mode for heater and set PWM limit
                    M143 H2 S280 ; set temperature limit for heater 2 to 280C

                    ; Fans
                    M950 F0 C"fan0" Q500 ; create fan 0 on pin fan0 and set its frequency
                    M106 P0 S0 H-1 ; set fan 0 value. Thermostatic control is turned off
                    M950 F1 C"fan1" Q500 ; create fan 1 on pin fan1 and set its frequency
                    M106 P1 S1 H-1 ; set fan 1 value. Thermostatic control is turned off

                    ; Tools
                    M563 P1 S"1" D0 H1 F0 ; define tool 1
                    G10 P1 X0 Y0 Z0 ; set tool 1 axis offsets
                    G10 P1 R0 S0 ; set initial tool 1 active and standby temperatures to 0C

                    ; Custom settings
                    m501

                    ; Miscellaneous
                    M575 P1 S1 B57600 ; enable support for PanelDue
                    M501 ; load saved parameters from non-volatile memory

                    Phaedruxundefined 1 Reply Last reply Reply Quote 0
                    • Phaedruxundefined
                      Phaedrux Moderator @luca Massimiliano
                      last edited by

                      @luca-Massimiliano said in DWC 3.1.1:

                      ; Tools
                      M563 P1 S"1" D0 H1 F0 ; define tool 1
                      G10 P1 X0 Y0 Z0 ; set tool 1 axis offsets
                      G10 P1 R0 S0 ; set initial tool 1 active and standby temperatures to 0C

                      You only have one tool defined, so only one tool will show in the web interface.

                      You have the heater configured, but it needs to be associated with a tool to be controlled.

                      Z-Bot CoreXY Build | Thingiverse Profile

                      1 Reply Last reply Reply Quote 0
                      • luca Massimilianoundefined
                        luca Massimiliano
                        last edited by

                        GRAZIE VERAMENTE PRECISO E PREPARATISSIMO FUNZIONA , (NON HO PROVATO L ESTRUSIONE PER ORA)
                        HO UN PROBLEMA INVECIE PanelDue Firmware. CON QUALE Firmware DIVENTA COMPATIBILE?

                        0c3d04d6-891c-4406-98e6-a00a239ac6ed-image.png

                        1 Reply Last reply Reply Quote 0
                        • Phaedruxundefined
                          Phaedrux Moderator
                          last edited by

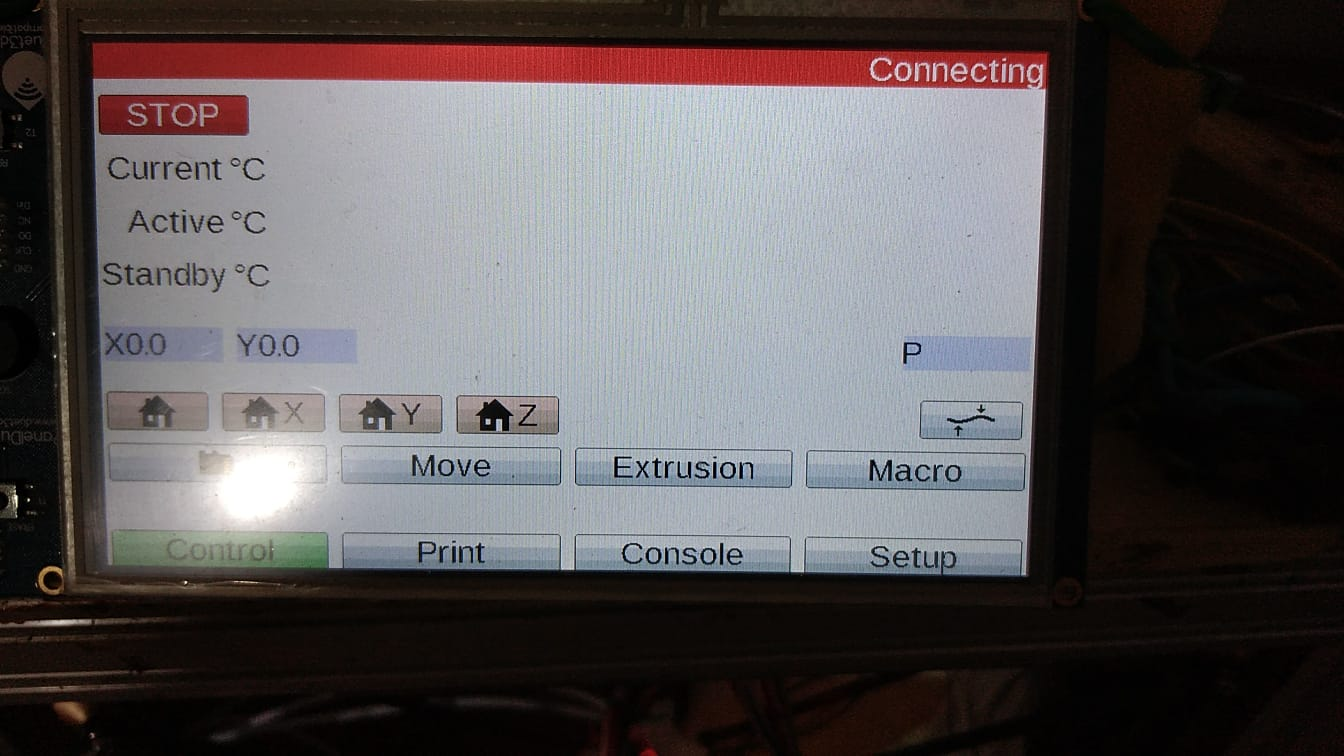
                          What version of firmware is on the PanelDue? Check in the Setup page on the Panel.

                          It should be at least 1.24

                          https://duet3d.dozuki.com/Wiki/PanelDue_Firmware_update

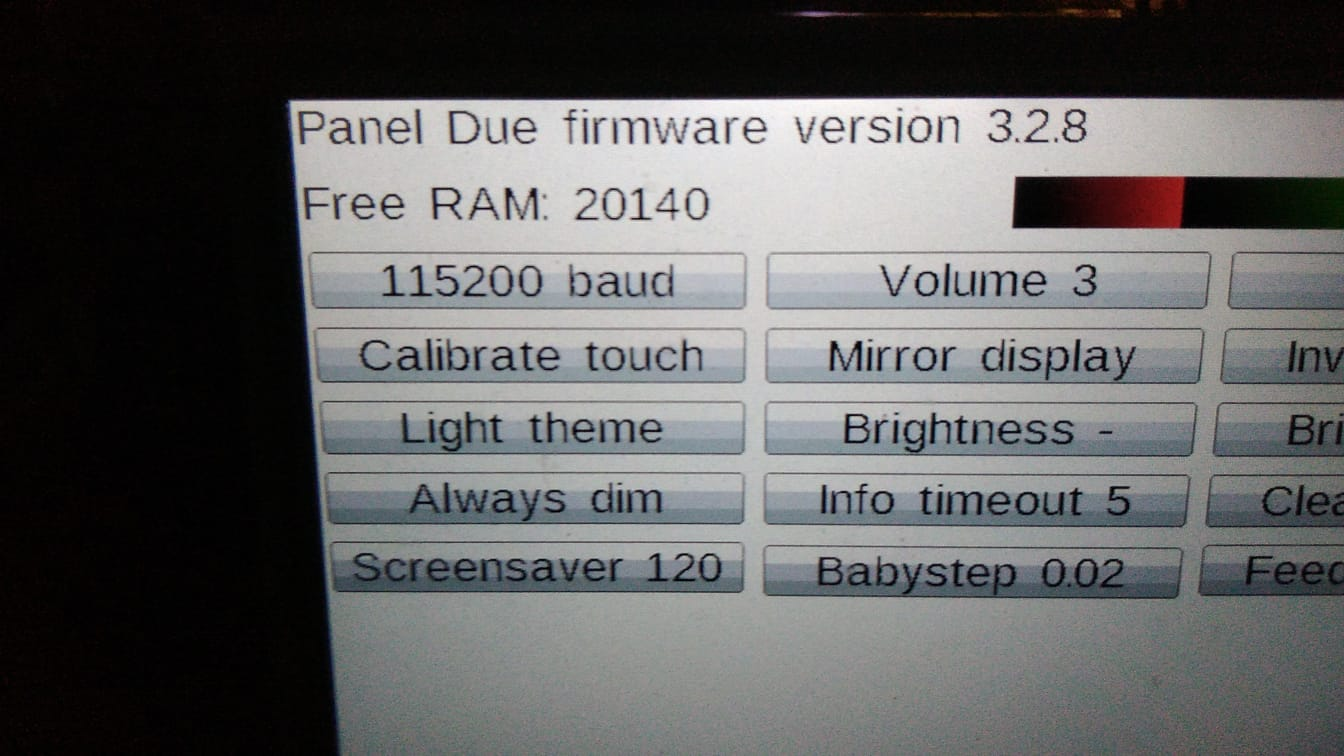
                          What baud rate is it set to? It should be 57600 to match what you have set in config.g

                          Z-Bot CoreXY Build | Thingiverse Profile

                          1 Reply Last reply Reply Quote 0
                          • luca Massimilianoundefined
                            luca Massimiliano
                            last edited by

                            3.28

                            2f2bdae4-8787-4318-af3d-df7e216ffffe-image.png

                            Phaedruxundefined 1 Reply Last reply Reply Quote 0
                            • Phaedruxundefined
                              Phaedrux Moderator @luca Massimiliano
                              last edited by

                              Your baud rate doesn't match. In PanelDue it shows 115200 baud. Press that button until it shows 57600.

                              Z-Bot CoreXY Build | Thingiverse Profile

                              1 Reply Last reply Reply Quote 0
                              • luca Massimilianoundefined
                                luca Massimiliano
                                last edited by

                                GRANDIOSO I BAUD GRAZIE MILLE . SONO A BUON PUNTO DIREI COME POSSO RICAMBIARE IL TUO ENORME AIUTO

                                1 Reply Last reply Reply Quote 1
                                • luca Massimilianoundefined
                                  luca Massimiliano
                                  last edited by

                                  NON HO FATTO CON A NUOVA CONFIGURAZIONE SONDAGGIO AUTOMATICO . IO HO UNA DELTA KOSSEL CIRCOLARE E RIPORTA I VALORI APPROSIMATICI E NORMALE CHE USI UNA BASE QUADRATA? SCUSA NON VORREI AVER DIMETICATO DELLE CONFIGURAZIONI.37d73ebb-0588-46af-8e97-7f30d097d871-image.png

                                  1 Reply Last reply Reply Quote 0
                                  • Phaedruxundefined
                                    Phaedrux Moderator
                                    last edited by

                                    https://duet3d.dozuki.com/Wiki/ConfiguringRepRapFirmwareDeltaPrinter

                                    https://duet3d.dozuki.com/Wiki/Calibrating_a_delta_printer

                                    Z-Bot CoreXY Build | Thingiverse Profile

                                    1 Reply Last reply Reply Quote 0
                                    • luca Massimilianoundefined
                                      luca Massimiliano
                                      last edited by

                                      CIAO
                                      non ho mai capito una cosa :
                                      perche' se MODIFICO IL VALORE NEL CONFIG .G DI H506.5 NON CAMBIA MAI E DEVO CAMBIARLO SU RepRapFirmware Configuration Tool ?
                                      M665 R165.29 L334 B130 H506.5 ; Set delta radius, diagonal rod length, printable radius and homed height

                                      1 Reply Last reply Reply Quote 0
                                      • Phaedruxundefined
                                        Phaedrux Moderator
                                        last edited by

                                        I think that would be handled with delta calibration. I'm not very savvy with deltas, but those two links to configure and calibrate should get you going.

                                        Z-Bot CoreXY Build | Thingiverse Profile

                                        1 Reply Last reply Reply Quote 0
                                        • luca Massimilianoundefined
                                          luca Massimiliano
                                          last edited by

                                          SI HAI RAGIONE POSSO CAMBIARLO SOLO CON Configuration Tool MA LO CALCOLCO PRIMA MEDIANTE I SOLITI SISEMI , MA SOLO Configuration Tool RIESCE A SALVARE IL VALORE ,IL CHE RENDE TUTTO MOLTO PIU' LABORIOSO, GRAZIE

                                          1 Reply Last reply Reply Quote 0
                                          • Phaedruxundefined
                                            Phaedrux Moderator
                                            last edited by

                                            Just edit the config.g file in the web interface. It's in the system tab. You do not need to go back to the configuration tool every time.

                                            Z-Bot CoreXY Build | Thingiverse Profile

                                            1 Reply Last reply Reply Quote 0
                                            • First post
                                              Last post
                                            Unless otherwise noted, all forum content is licensed under CC-BY-SA