help with config.g
-
@fcwilt m122
still having trouble with hotend
###########################################################
=== Diagnostics ===
RepRapFirmware for Duet 3 MB6HC version 3.2 running on Duet 3 MB6HC v1.01 or later (standalone mode)
Board ID: 08DJM-956L2-G43S8-6J9FD-3SJ6R-TB0AG
Used output buffers: 1 of 40 (12 max)
=== RTOS ===
Static ram: 149788
Dynamic ram: 92524 of which 160 recycled
Never used RAM 116360, free system stack 200 words
Tasks: NETWORK(ready,199) ETHERNET(blocked,109) HEAT(blocked,297) CanReceiv(blocked,927) CanSender(blocked,371) CanClock(blocked,354) TMC(blocked,53) MAIN(running,1123) IDLE(ready,19)
Owned mutexes:
=== Platform ===
Last reset 00:01:10 ago, cause: software
Last software reset at 2021-03-12 07:19, reason: User, GCodes spinning, available RAM 116360, slot 2
Software reset code 0x0003 HFSR 0x00000000 CFSR 0x00000000 ICSR 0x00400000 BFAR 0x00000000 SP 0x00000000 Task MAIN Freestk 0 n/a
Error status: 0x00
Aux0 errors 0,0,0
Aux1 errors 0,0,0
MCU temperature: min 28.8, current 29.5, max 29.7
Supply voltage: min 21.4, current 22.4, max 24.6, under voltage events: 0, over voltage events: 0, power good: yes
12V rail voltage: min 12.0, current 12.1, max 12.1, under voltage events: 0
Driver 0: position 971943, standstill, reads 1384, writes 14 timeouts 0, SG min/max 0/0
Driver 1: position 971943, standstill, reads 1384, writes 14 timeouts 0, SG min/max 0/0
Driver 2: position 971943, standstill, reads 1385, writes 14 timeouts 0, SG min/max 0/0
Driver 3: position 0, standstill, reads 1385, writes 14 timeouts 0, SG min/max 0/0
Driver 4: position 0, standstill, reads 1388, writes 11 timeouts 0, SG min/max 0/0
Driver 5: position 0, standstill, reads 1388, writes 11 timeouts 0, SG min/max 0/0
Date/time: 2021-03-12 07:20:19
Slowest loop: 4.14ms; fastest: 0.05ms
=== Storage ===
Free file entries: 10
SD card 0 detected, interface speed: 25.0MBytes/sec
SD card longest read time 2.3ms, write time 0.0ms, max retries 0
=== Move ===
DMs created 125, maxWait 0ms, bed compensation in use: none, comp offset 0.000
=== MainDDARing ===
Scheduled moves 0, completed moves 0, hiccups 0, stepErrors 0, LaErrors 0, Underruns [0, 0, 0], CDDA state -1
=== AuxDDARing ===
Scheduled moves 0, completed moves 0, hiccups 0, stepErrors 0, LaErrors 0, Underruns [0, 0, 0], CDDA state -1
=== Heat ===
Bed heaters = 2 -1 -1 -1 -1 -1 -1 -1 -1 -1 -1 -1, chamberHeaters = 1 -1 -1 -1
=== GCodes ===
Segments left: 0
Movement lock held by null
HTTP is idle in state(s) 0
Telnet is idle in state(s) 0
File is idle in state(s) 0
USB is idle in state(s) 0
Aux is idle in state(s) 0
Trigger is idle in state(s) 0
Queue is idle in state(s) 0
LCD is idle in state(s) 0
SBC is idle in state(s) 0
Daemon is idle in state(s) 0
Aux2 is idle in state(s) 0
Autopause is idle in state(s) 0
Code queue is empty.
=== Network ===
Slowest loop: 6.76ms; fastest: 0.02ms
Responder states: HTTP(0) HTTP(0) HTTP(0) HTTP(0) HTTP(0) HTTP(0) FTP(0) Telnet(0), 0 sessions Telnet(0), 0 sessions
HTTP sessions: 1 of 8- Ethernet -
State: active
Error counts: 0 0 1 0 0
Socket states: 5 2 2 2 2 0 0 0
=== CAN ===
Messages queued 281, send timeouts 631, received 0, lost 0, longest wait 0ms for reply type 0, free buffers 48
###############################################################
M98 P"config.g"
HTTP is enabled on port 80
FTP is disabled
TELNET is disabled
Warning: Sensor number 0 has not been defined
Tool 0 offsets: X0.00 Y0.00 Z0.00
- Ethernet -
-
tried both 0 and 1 no go...
;****************************************** Hotend ********************************************************************
M308 S1 P"spi.cs0" Y"rtd-max31865" ; configure sensor 0 as thermistor // Smart effector // pt 100 // on daugherboard
M950 H0 C"out1" T0 ; create nozzle heater output on out1 and map it to sensor 0
M307 H0 B0 S1.00 ; disable bang-bang mode for heater and set PWM limit
M143 H0 S380 ; set temperature limit for heater 0 to 380C -
@patterson6 said in help with config.g:
tried both 0 and 1 no go...
;****************************************** Hotend ********************************************************************
M308 S1 P"spi.cs0" Y"rtd-max31865" ; configure sensor 0 as thermistor // Smart effector // pt 100 // on daugherboard
M950 H0 C"out1" T0 ; create nozzle heater output on out1 and map it to sensor 0
M307 H0 B0 S1.00 ; disable bang-bang mode for heater and set PWM limit
M143 H0 S380 ; set temperature limit for heater 0 to 380Cyou should be using H1 rather H0 otherwise the heater won't be created correctly for the tool
-
@Veti what do you mean its not a result of a delta calibration? what am i missing? Where would the M501 go? Yeah i didnt pid tune anything yet. Just trying to get it all working first. I am not great with Gcode.
-
-
@jay_s_uk what does the S do in M308? reprap says sensor number but idk whats what. i was just matching the heater number. also still dont work. i tried both spi.cs1 and spi.cs0
;HEATERSHEATERSHEATERSHEATERSHEATERSHEATERSHEATERSHEATERSHEATERSHEATERSHEATERSHEATERS
;****************************************** Hotend ********************************************************************
M308 S3 P"spi.cs1" Y" rtd-max31865" ; define temperature sensor number 3 as a PT100 on the first port of a temperature daughter board plugged into mainboard
M950 H1 C"out1" T0 ; create nozzle heater output on out1 and map it to sensor 0
M307 H1 A498.0 C324.4 D4.2 B0 S1.00 ; disable bang-bang mode for heater and set PWM limit
M143 H1 S350 ; set temperature limit for heater 0 to 350C
;****************************************** Chamber/Radiator heater ****************************************************
M308 S1 P"temp2" Y"thermistor" T50000 B3950 ; configure sensor 1 as thermistor on pin temp2 two sensors wired together
M570 H0 P10000 T15 ; Set heater fault detection for out 3, 1,000 second anomaly, 10c excursion
M950 H0 C"out3" T1 ; create chamber heater output on out3 and map it to sensor 1
M307 H0 A72.0 C71.5 D1.4 B0 S1.00 ; disable bang-bang mode for the chamber heater and set PWM limit
M141 H0 ; map chamber to heater 1
M143 H0 S90 ; set temperature limit for heater 1 to 90C
;***************************************** Bed Heater ****************************************************************
M308 S2 P"temp0" Y"thermistor" T100000 B4138 ; configure sensor 2 as thermistor on pin temp0
M950 H2 C"out0" T2 ; create bed heater output on out0 and map it to sensor 2
M307 H2 A183.1 C1561.5 D.7 B0 S1.00 ; disable bang-bang mode for the bed heater and set PWM limit
M140 H2 ; map heated bed to heater 2
M143 H2 S120 ; set temperature limit for heater 2 to 120C -
Here's what a sane setup for heaters looks like right out of the config tool.
; Heaters
M308 S0 P"temp0" Y"thermistor" T100000 B3950 ; configure sensor 0 as thermistor on pin temp0
M950 H0 C"out0" T0                           ; create bed heater output on out0 and map it to sensor 0
M307 H0 B0 S1.00                             ; disable bang-bang mode for the bed heater and set PWM limit
M140 H0                                      ; map heated bed to heater 0
M143 H0 S120                                 ; set temperature limit for heater 0 to 120C
M308 S1 P"spi.cs0" Y"rtd-max31865"           ; configure sensor 1 as thermocouple via CS pin spi.cs0
M950 H1 C"out1" T1                           ; create nozzle heater output on out1 and map it to sensor 1
M307 H1 B0 S1.00                             ; disable bang-bang mode for heater  and set PWM limit
M143 H1 S280                                 ; set temperature limit for heater 1 to 280C
M308 S2 P"temp1" Y"thermistor" T100000 B3950 ; configure sensor 2 as thermistor on pin temp1
M950 H2 C"out2" T2                           ; create chamber heater output on out2 and map it to sensor 2
M307 H2 B0 S1.00                             ; disable bang-bang mode for the chamber heater and set PWM limit
M141 H2                                      ; map chamber to heater 2
M143 H2 S280                                 ; set temperature limit for heater 2 to 280C
I didn't duplicate your fans or tools though.
-
@Phaedrux I found that at the bottom H1 was not declared under tools. So now my hotend pops up on dwc but under current for temp i am reading 2000.0c before it was just n/a. so then i changed the spi.cs0 to spi.cs1 even spi.cs2 even spi.cs3. nothing worked and all said 2000c. I checked all my connections and everything seems right.
The bright side my expansion board came today and i wired up the rgb led and found the extension on the out.6 pin just need an 1.out.6. So those work and i also added some more thermistors in extra. Pretty cool. I wish the trend chart was bigger.
; Configuration file for Duet 3 (firmware version 3)
;NETWORKNETWORKNETWORKNETWORKNETWORKNETWORKNETWORKNETWORKNETWORKNETWORKNETWORKNETWORK***NETWORK
M552 P0.0.0.0 S1 ; enable network and acquire dynamic address via DHCP
M586 P0 S1 ; enable HTTP
M586 P1 S0 ; disable FTP
M586 P2 S0 ; disable Telnet;GENERAL PREFERENCESGENERAL PREFERENCESGENERAL PREFERENCESGENERAL PREFERENCESGENERAL PREFERENCESGENERAL PREFERENCES
G90 ; send absolute coordinates...
M83 ; ...but relative extruder moves
M550 P"Duet 3" ; set printer name
M665 R316 L616.42 B215 H989.4 ; Set delta radius, diagonal rod length, printable radius and homed height
M666 X0 Y0 Z0 ; put your endstop adjustments here, or let auto calibration find them;DRIVESDRIVESDRIVESDRIVESDRIVESDRIVESDRIVESDRIVESDRIVESDRIVESDRIVESDRIVESDRIVES
;X,Y,Z stepper motors 23HM22-2804S https://www.omc-stepperonline.com/nema-23-bipolar-0-9deg-1-26nm-178-4oz-in-2-8a-2-5v-57x57x56mm-4-wires.html
;E steper motor 42BYGHW811 on Nimble 2
M569 P0.0 S1 ; physical drive 0.0 goes forwards
M569 P0.1 S1 ; physical drive 0.1 goes forwards
M569 P0.2 S1 ; physical drive 0.2 goes forwards
M569 P0.3 S0 ; physical drive 0.3 goes backwards
M584 X0.0 Y0.1 Z0.2 E0.3 ; set drive mapping
M350 X64 Y64 Z64 E16 I1 ; configure microstepping with interpolation
M92 X640.00 Y640.00 Z640.00 E1775.00 ; set steps per mm
M566 X72000.00 Y72000.00 Z72000.00 E2400.00 ; set maximum instantaneous speed changes (mm/min)
M203 X330000.00 Y330000.00 Z330000.00 E216000.00 ; set maximum speeds (mm/min)
M201 X5400.00 Y5400.00 Z5400.00 E120.00 ; set accelerations (mm/s^2)
M906 X2800 Y2800 Z2800 E1800 I40 ; set motor currents (mA) and motor idle factor in per cent
M84 S30 ; Set idle timeout;AXIS LIMITSAXIS LIMITSAXIS LIMITSAXIS LIMITSAXIS LIMITSAXIS LIMITSAXIS LIMITSAXIS LIMITS***AXIS LIMITS
M208 Z0 S1 ; set minimum Z;ENDSTOPSENDSTOPSENDSTOPSENDSTOPSENDSTOPSENDSTOPSENDSTOPSENDSTOPSENDSTOPSENDSTOPS***ENDSTOPS
M574 X2 S1 P"io0.in" ; configure active-high endstop for high end on X via pin io0.in
M574 Y2 S1 P"io1.in" ; configure active-high endstop for high end on Y via pin io1.in
M574 Z2 S1 P"io2.in" ; configure active-high endstop for high end on Z via pin io2.in;Z-PROBEZ-PROBEZ-PROBEZ-PROBEZ-PROBEZ-PROBEZ-PROBEZ-PROBEZ-PROBEZ-PROBEZ-PROBEZ-PROBE
M558 P5 R0.4 C"io3.in+io3.out" H5 F500 T1500 ; set Z probe type to effector and the dive height + speeds
G31 P100 X0 Y0 Z4 ; set Z probe trigger value, offset and trigger height
M557 R215 S25 ; define mesh grid;****************************************** Hotend ********************************************************************
M308 S1 P"spi.cs0" Y"rtd-max31865" A"Hotend" ; define temperature sensor number 1 as a PT100 on the first port of a temperature daughter board plugged into mainboard
M950 H1 C"out1" T1 ; create nozzle heater output on out1 and map it to sensor 1
M307 H1 A498.0 C324.4 D4.2 B0 S1.00 ; disable bang-bang mode for heater and set PWM limit
M143 H1 S280 ; set temperature limit for heater 0 to 280C
;****************************************** Chamber/Radiator heater ****************************************************
M308 S2 P"temp2" Y"thermistor" A"Radiator" T50000 B3950 R2300 ; configure sensor 2 as thermistor on pin temp2 two sensors wired parallel
M570 H2 P10000 T15 ; Set heater fault detection for out 3, 1,000 second anomaly, 10c excursion
M950 H2 C"out3" T2 ; create chamber heater output on out3 and map it to sensor 2
M307 H2 A72.0 C71.5 D1.4 B0 S1.00 ; disable bang-bang mode for the chamber heater and set PWM limit
M141 H2 ; map chamber to heater 2
M143 H2 S90 ; set temperature limit for heater 2 to 90C
;***************************************** Bed Heater ****************************************************************
M308 S0 P"temp0" Y"thermistor" A"Bed" T100000 B3950 ; configure sensor 0 as thermistor on pin temp0
M950 H0 C"out0" T0 ; create bed heater output on out0 and map it to sensor 0
M307 H0 A183.1 C1561.5 D.7 B0 S1.00 ; disable bang-bang mode for the bed heater and set PWM limit
M140 H0 ; map heated bed to heater 0
M143 H0 S120 ; set temperature limit for heater 2 to 120C;EXTRASEXTRASEXTRASEXTRASEXTRASEXTRASEXTRASEXTRASEXTRASEXTRASEXTRASEXTRASEXTRASEXTRAS
;****************************************** Recirc air temp from hepa ****************************************************
M308 S5 P"temp3" Y"thermistor" A"Filter air temp" T100000 B3950 R2500 ; configure sensor 5 as thermistor on pin temp3
;****************************************** MCU Temp *****************************************************************
M308 S6 Y"mcu-temp" A"MCU" ; configure sensor 6 as mcu temp on motherboard
;****************************************** Air temp above effector ****************************************************
M308 S7 P"temp1" Y"thermistor" A"Effector air temp" T100000 B3950 ; configure sensor 6 as thermistor on pin temp3;COOLINGCOOLINGCOOLINGCOOLINGCOOLINGCOOLINGCOOLINGCOOLINGCOOLINGCOOLINGCOOLINGCOOLING
;****************************************** Water pump for hotend ****************************************************
M950 F0 C"out5" Q500 ; create fan 0 on pin out5 and set its frequency
M106 P0 C"water pump " S1 H1:1 T35 ; set fan 0 name and value. Thermostatic control is turned on
;****************************************** Chamber fan blowing on radiator*******************************************
M950 F1 C"out8" Q500 ; create fan 1 on pin out8 and set its frequency
M106 P1 C"radiator fan" S1 H1:1 T35 ; set fan 1 name and value. Thermostatic control is turned on
;****************************************** Recirc/hepa filter fan ****************************************************
M950 F2 C"out7" Q500 ; create fan 2 on pin out7 and set its frequency
M106 P2 C"recirc/hepa fan" S1 H1:1 T35 ; set fan 2 value. Thermostatic control is turned on
;****************************************** Berd air ******************************************************************
M950 F3 C"out4" Q500 ; create fan 3 on pin out4 and set its frequency
;M106 P3 C"berd air" S1 H3 T35 ; set fan 3 value. Thermostatic control is turned on // Not needed at this time;LEDLEDLEDLEDLEDLEDLEDLEDLEDLEDLEDLEDLEDLEDLEDLEDLEDLEDLEDLED
;***************************************** RGBW led strip on build area **********************************************
M950 F4 C"out9" ; create white led on mainboard pin out9
M950 F5 C"1.out6" ; create red led on expansion pin out 6
M950 F6 C"1.out7" ; create green led on expansion pin out 7
M950 F7 C"1.out8" ; create blue led on expansion pin out 8;TOOLSTOOLSTOOLSTOOLSTOOLSTOOLSTOOLSTOOLSTOOLSTOOLSTOOLSTOOLSTOOLSTOOLS***TOOLS
M563 P0 D0 H1 F0 ; define tool 0
G10 P0 X0 Y0 Z0 ; set tool 0 axis offsets
G10 P0 R0 S0 ; set initial tool 0 active and standby temperatures to 0C;MiscellaneousMiscellaneousMiscellaneousMiscellaneousMiscellaneousMiscellaneousMiscellaneousMiscellaneous
M501 ; load saved parameters from non-volatile memory -
@patterson6 said in help with config.g:
i changed the spi.cs0 to spi.cs1 even spi.cs2 even spi.cs3. nothing worked and all said 2000c.
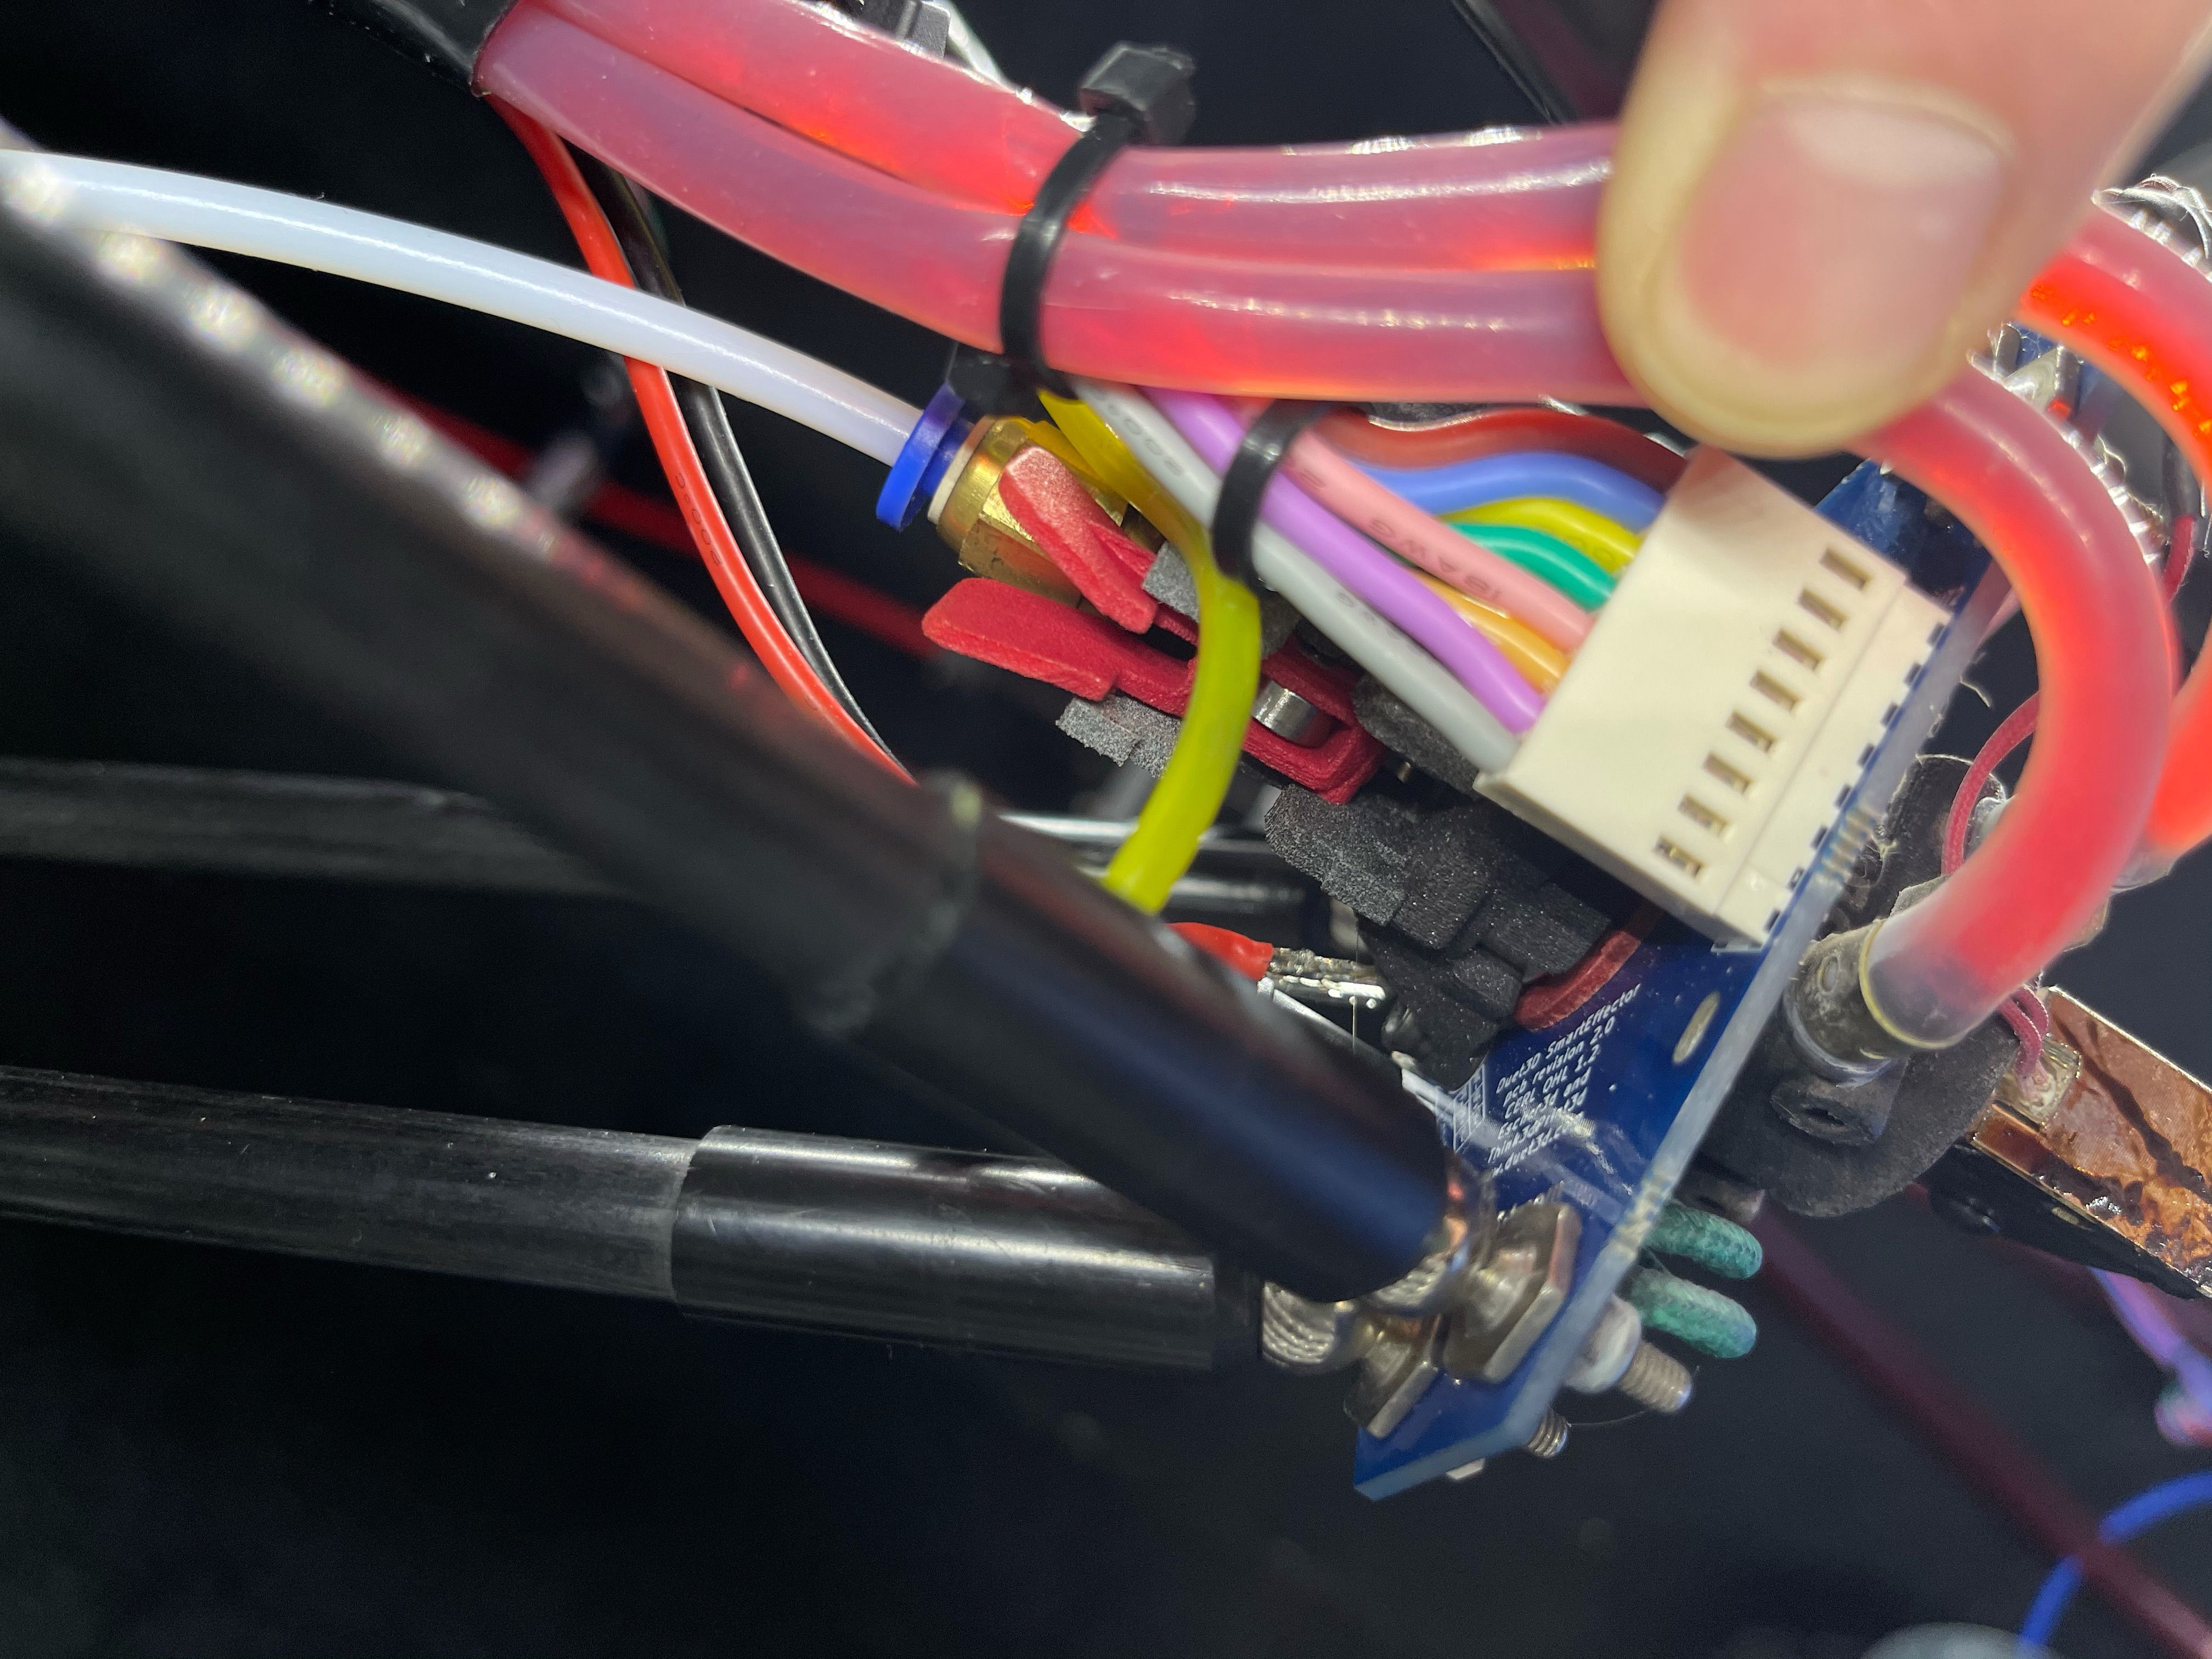
Photo of your wiring at the daughterboard?
-
from the duet 2 to duet 3 the rest of the hardware has been untouched. Its been a year but i think the pt100 was working at that time.
-
Can you get a closer show of the daughterboard itself? Can you remove it and reseat it?
-
@Phaedrux i removed it and checked the pins. seems to be seated properly. i have an extra smart effector i can try that i guess. if not i can buy another pt100. seems more like software.
-
Can you do this test on the daughterboard?
-
@Phaedrux pretty sure i can. give me a little bit
-
@Phaedrux so i found a 100ohm in my bin and wired it up. On channel P"spi.cs0". I am now getting 4.3c on the hotend. So i am going to put in the new smart effector when i can and order a new pt100 to be safe. thanks
-
The daughter board comes with a 100Ω resistor that you can wire in place of a two wire sensor to check the board is working correctly. With the resistor in place, the reading should be 0°C.
If the reading at room temperature is higher than it should be, then you probably have a bad connection between the RTD interface board and the sensor, or the wires to the sensor are too long or too thin. Each additional ohm of wiring resistance will increase the temperature reading by 2.5C. Using a 4 wire solution PT100 sensor will improve this. If you only have a 2 wire P100 sensor you can still improve the accuracy by using 4 wires for the majority of the distance
-
@Phaedrux You mind checking my starting and ending scripts? The starting script seems to work like it should. let me know if you see anything out of place or odd. The ending script does not work like it really should. One of the main problems was the color Teal would not even show in the cool down period. It would just go to green as showing finished.
starting script
;*********************************** RED HEATING UP ********************************************
M106 P4 S0.0 ; Turn off white led
M106 P5 S1.0 ; Turn on red led
M106 P6 S0.0 ; Turn off green led
M106 P7 S0.0 ; Turn off blue led
;*************************************************************************************************G21 ; Set Units to Millimeters
G90 ; Set to Absolute Positioning
M82 ; Set extruder to absolute mode
G28 ; Home
M400 ; Finish all moves above firstM104 S140 ; Set extruder temperature
M141 H2 S70 ; Set chamber radiator temperature
;M141 H2 S35 ; Set chamber recirc temperature *not in use at this time
M191 P70 ; Wait for chamber temperature to reach target temp
M109 S140 ; Wait for extruder temperature to reatch target temp
M400 ; Finish all moves above firrst;********************************** PURPLE * PRE HEATED and START CALI * **************************
M106 P7 S1.0 ; Turn on blue to make purple
;**************************************************************************************************G32 ; Auto Calibration
M400 ; Finish all moves above first;********************************** ORANGE Achieve final temps * ***********************************
M106 P6 S0.06 ; Turn on green led 6% to make orange
M106 P7 S0.0 ; Turn off blue
;*************************************************************************************************M104 S[extruder0_temperature] T0 ; Set extruder temperature
M109 S[extruder0_temperature] T0 ; Set extruder temperature to first layer temp
M400 ; Finish all moves above first;*********************************** WHITE * START PRINT* *****************************************
M106 P4 S1.0 ; Turn on white led
M106 P5 S0.0 ; Turn off red led
M106 P6 S0.0 ; Turn off green led
M106 P7 S0.0 ; Turn off blue led
;**************************************************************************************************ending script
G28 ; Move home
M104 S0 ; Cool the extruder
M106 P3 S0.0 ; Turn off berd-air;*********************************** TEAL COOLING OFF *********************************************
M106 P4 S0.0 ; Turn off white led
M106 P5 S0.0 ; Turn off red led
M106 P6 S1.0 ; Turn on green led
M106 P7 S1.0 ; Turn on blue led
;****************************************************************************************************M191 S35 ; Wait for chamber temperature to reach target temp
M190 S35 ; Wait for bed temperature to reach target temp
M400 ; Finish all moves above firstM140 S0 ; Turn off bed
M141 H2 S0 ; Turn off chamber radiator
;M141 H2 S0 ; Turn off chamber recirc heater *not in use at this time
M400 ; Finish all moves above first;*********************************** GREEN FINISHED **********************************************
M106 P4 S0.0 ; Turn off white led
M106 P5 S0.0 ; Turn off red led
M106 P6 S1.0 ; Turn on green led
M106 P7 S0.0 ; Turn off blue led
;***************************************************************************************************M84 ; Disable motors
;end -
@patterson6 said in help with config.g:
M191 S35 ; Wait for chamber temperature to reach target temp
M190 S35 ; Wait for bed temperature to reach target tempIt's probably ignoring these commands because the target temp is too low.
Note: M190 will not wait for temperatures below 40c because in many cases they may never be reached due to ambient temps. So if you want to wait for a bed to cool, use 41c or higher.
This goes for all the other heater commands as well.
-
ok so i really haven't been able to print anything yet. The problem i am having is the nozzle is pushing down on the bed at the start of the print. Added 2mm to Z-axis in S3D and im still getting the same effect. I tried just using auto cali, mesh and then both and same results in starting script. When i G32 i M500 and saved the info to config override. The height map is mostly green with a touch of blue after G29. Im not great at this part. What would you need to see to help me?
Back on the duet 2 i had this bad boy printing anywhere with no prob using mesh. I dont have a mesh.g. Do i need one? Thanks
-
Let's see your bed.g, homedelta.g for starters.