Duet3D Logo Duet3D
    • Tags
    • Documentation
    • Order
    • Register
    • Login

    banding on one axis

    Scheduled Pinned Locked Moved Solved
    Tuning and tweaking
    5
    18
    1.7k
    Loading More Posts
    • Oldest to Newest
    • Newest to Oldest
    • Most Votes
    Reply
    • Reply as topic
    Log in to reply
    This topic has been deleted. Only users with topic management privileges can see it.
    • nick9one1undefined
      nick9one1 @Phaedrux
      last edited by nick9one1

      @phaedrux I've rotated he box 45 degrees and the banding happens on every side - I think this means it isn't skipped steps on a single axis?

      20210501_224135.jpg

      this is the printer

      20210501_211527.jpg
      20210502_122706.jpg

      and config.g

      ; Configuration file for Duet WiFi (firmware version 3)
      ; executed by the firmware on start-up
      ;
      ; generated by RepRapFirmware Configuration Tool v3.1.4 on Sat Sep 05 2020 23:57:30 GMT+0100 (British Summer Time)
      
      ; General preferences
      M80					       	; Turns on the ATX power supply
      G90                                            	; send absolute coordinates...
      M83                                            	; ...but relative extruder moves
      M550 P"MGN Cube"                           	; set printer name
      M669 K1                                        	; select CoreXY mode
      
      ; Network
      M552 S1                                        	; enable network
      M586 P0 S1                                     	; enable HTTP
      M586 P1 S0                                     	; disable FTP
      M586 P2 S0                                     	; disable Telnet
      
      ; Drives
      M569 P0 S0                                     	; physical drive 0 goes backwards
      M569 P1 S1                                     	; physical drive 1 goes forwards
      M569 P2 S1                                     	; physical drive 2 goes forwards
      M569 P3 S0                                     	; physical drive 3 goes backwards
      M584 X0 Y1 Z2 E3                               	; set drive mapping
      M350 X16 Y16 Z16 E16 I1                        	; configure microstepping with interpolation
      M92 X200.00 Y200.00 Z3200.00 E965.00           	; set steps per mm
      M566 X700.00 Y700.00 Z50.00 E150.00             ; set maximum instantaneous speed changes (mm/min)
      ;M566 X820.00 Y820.00 Z70.00 E300.00			; original
      M203 X12000.00 Y12000.00 Z300.00 E2000.00      	; set maximum speeds (mm/min)
      M201 X2500.00 Y2500.00 Z150.00 E1500.00        	; set accelerations (mm/s^2)
      M906 X1200 Y1200 Z1200 E900 I30               	; set motor currents (mA) and motor idle factor in per cent
      M84 S30                                        	; Set idle timeout
      
      ; Pressure advance
      M572 D0 S0.05
      
      ; Axis Limits
      M208 X-15:315 Y0:330  Z0 S1                     ; set axis minima
      
      ; Endstops
      M564 H0					       					; allow jog without homing
      M574 X1 S1 P"xstop"                            	;
      M574 Y2 S1 P"ystop"                            	;
      M574 Z1 S1 P"zstop"                            	; configure Z-probe endstop for low end on Z
      M591 D0 P7 C"e0_stop" S0 R50:120 L6.967 E20
      
      ; Z-Probe
      M950 S0 C"exp.heater3"								
      M558 P9 C"^zprobe.in" H2.5 F300 T12000 S0.003 R0.5 B0	; set Z probe type to switch and the dive height + speeds
      G31 P500 X50 Y-20 Z2.7                      			; set Z probe trigger value, offset and trigger height (higher no. = closer to bed)
      M557 X50:306 Y10:300 P10                       			; define mesh grid
      
      ; Heaters
      M308 S0 P"bedtemp" Y"thermistor" T100000 B3950 C0 A"Bed Temp" 				; configure sensor 0 as thermistor on pin bedtemp
      M950 H0 C"bedheat" T0                          								; create bed heater output on bedheat and map it to sensor 0
      M140 H0                                        								; map heated bed to heater 0
      M143 H0 S100                                   								; set temperature limit for heater 0 to 100C
      M307 H0 R0.291 C1127.4 D26.90 S1.00				 							; Set PID for bed values
      M308 S1 P"e0temp" Y"thermistor" T100000 B4725 C7.06e-8 A"Hotend Temp"		; Semtec Thermistor
      M950 H1 C"e0heat" T1                           								; create nozzle heater output on e0heat and map it to sensor 1
      M143 H1 S280                              									; set temperature limit for heater 1
      M307 H1 R2.551 C268.1:175.5 D7.02 S1.00 V23.9								; Set PID for hotend values
      
      ; Fans
      M950 F0 C"Fan2" Q50                   	     	; create fan 0 on pin 2 and set its frequency
      M106 P0 S0 H-1 X204                             ; set fan 0 value. Thermostatic control is turned off
      ;M950 F0 C"Fan0" Q100                           ; create fan 2 on pin fan2 and set its frequency
      ;M106 P0 S1 H1 T45                              ; set fan 2 value. Thermostatic control is turned on
      
      ; Tools
      M563 P0 D0 H1 F0                               	; define tool 0
      G10 P0 X0 Y0 Z0                                	; set tool 0 axis offsets
      G10 P0 R0 S0                                   	; set initial tool 0 active and standby temperatures to 0C
      
      ; Screen
      M575 P1 B57600 S1


      peter247undefined 1 Reply Last reply Reply Quote 0
      • peter247undefined
        peter247 @nick9one1
        last edited by

        @nick9one1 only using a single stepper for Z ?

        Ender 5 plus linear rail and hemera powered by duet 2 wifi , CR10s pro v1 with bltouch mostly stock , BLV mgn Cube slowly being built powered by duet 3 mini 5+

        nick9one1undefined 1 Reply Last reply Reply Quote 0
        • nick9one1undefined
          nick9one1 @peter247
          last edited by

          @peter247 Z is dual MGN12 rails and dual steppers

          20210501_211513.jpg
          20210502_140600.jpg

          peter247undefined 1 Reply Last reply Reply Quote 0
          • peter247undefined
            peter247 @nick9one1
            last edited by

            @nick9one1 Should have said that better , only using 1 motor drivers for both motors and not a driver per stepper motor.

            Ender 5 plus linear rail and hemera powered by duet 2 wifi , CR10s pro v1 with bltouch mostly stock , BLV mgn Cube slowly being built powered by duet 3 mini 5+

            1 Reply Last reply Reply Quote 0
            • nick9one1undefined
              nick9one1
              last edited by

              @peter247 ah I understand. the Z steppers are connected to the Z motor 1&2 ports on the duet2 board. I believe this controls them in series?

              peter247undefined 1 Reply Last reply Reply Quote 0
              • peter247undefined
                peter247 @nick9one1
                last edited by

                @nick9one1 The advantage of driving each z motor separate is X axis auto levelling.

                Ender 5 plus linear rail and hemera powered by duet 2 wifi , CR10s pro v1 with bltouch mostly stock , BLV mgn Cube slowly being built powered by duet 3 mini 5+

                nick9one1undefined 1 Reply Last reply Reply Quote 0
                • nick9one1undefined
                  nick9one1 @peter247
                  last edited by

                  @peter247 said in banding on one axis:

                  @nick9one1 The advantage of driving each z motor separate is X axis auto levelling.

                  yes, but I cant see how that has anything to do with the issue I'm having?

                  alankilianundefined 1 Reply Last reply Reply Quote 0
                  • alankilianundefined
                    alankilian @nick9one1
                    last edited by alankilian

                    @nick9one1 WOW! That's a beautiful and huge printer.

                    I'm 0% COREXY experienced, so maybe this isn't helpful at all, but of course it's the internet, so I'll share all my ideas. 🙂

                    Initially, you saw that one axis printed well and the other axis had all these wiggles. When you rotated the object 45-degrees all walls had wiggles. I think that eliminates some strange issue with the slicer or GCODE (which no one suspected in the first place) and it's still consistent with one axis working well and the other axis having problems.

                    As I understand COREXY, both "axis" stepper motor turn when you move along X or Y, they just move different directions.

                    Since you see the problem going both "West" on X and "East" on X and it doesn't seem to wiggle around as you are traveling (It looks like it's still a straight line) it seems like when the printer finishes it's last Y move, that it is not in the exact correct location in Y and that's giving you the wiggles along the X-aligned wall.

                    The wiggles look big enough that you should be able to see them with your eye.

                    I would try this experiment:

                    • Set up some kind of square block on the print bed. Could be something like a can of Spam or something.
                    • Move the print head until some part of it (doesn't have to be the nozzle) JUST touches the block. Or maybe put a sheet of paper between them and move until it just grabs the paper.
                    • Command the head to move away from the block like 50mm in Y
                    • Command the head to move 50mm in X and then 50mm back
                    • Command the head to move 50mm back towards the block in Y

                    Then see if the head is in exactly the original location. Use the paper test to see where it is.

                    I think you are going to see that the extruder is not moving to the location it needs to be.

                    If so, you can experiment with moving just in Y and back to see if that works and moving diagonal etc.

                    It really seems like something is mechanically awry in your printer and that's causing this.

                    Good luck.

                    SeemeCNC Rostock Max V3 converted to V3.2 with a Duet2 Ethernet Firmware 3.2 and SE300

                    nick9one1undefined 1 Reply Last reply Reply Quote 0
                    • nick9one1undefined
                      nick9one1 @alankilian
                      last edited by nick9one1

                      @alankilian

                      Thanks for the suggestion. I'll try that 🙂

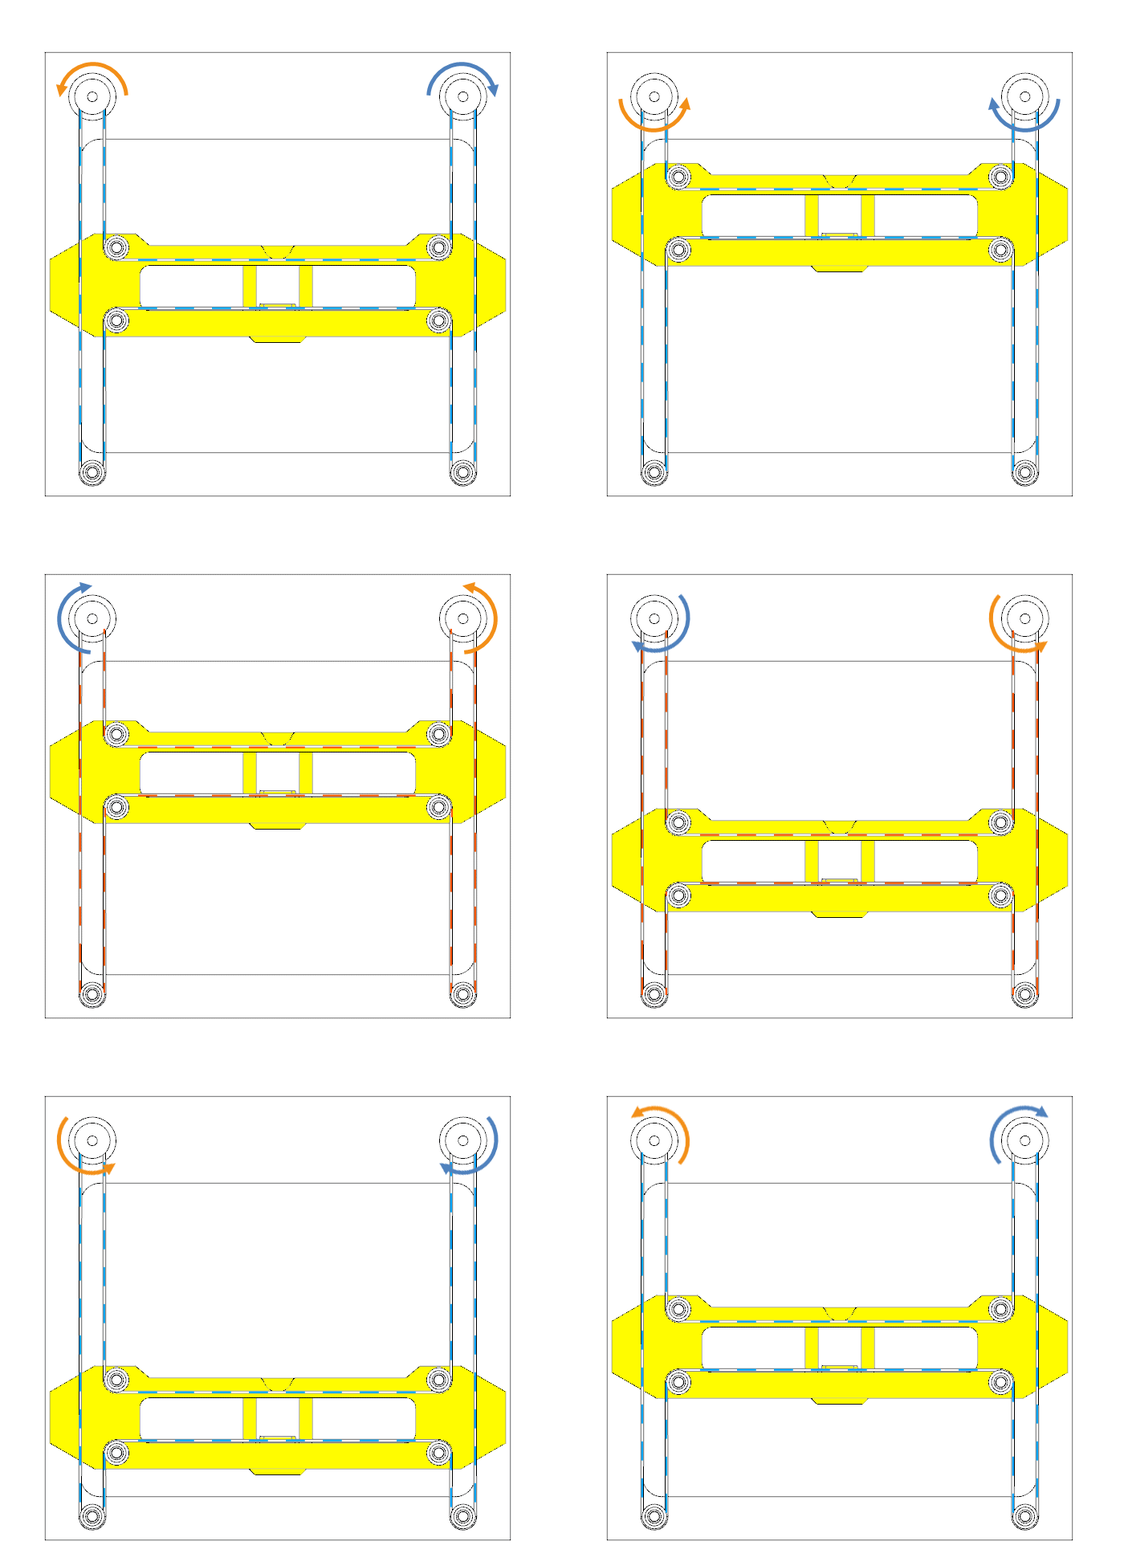
                      I've done a little more reasearch and I think its also worth pointing out that on a core XY, moving just one motor moves the head at a 45 degree angle.
                      So unlike a non core XY, printing a cube square to the bed requires movement by both motors for each line printed.
                      This means that a problem like this cant be related to skipped steps, loose belts or anything to do with the motion system. If it was, the banding would show on both axes.

                      It can only really be movement or flex in the hotend assembly or bed.
                      CoreXY-Yaxis-httpinfinum3d.blogspot.co_.uk_.gif
                      CoreXY-Xaxis-httpinfinum3d.blogspot.co_.uk_.gif

                      peter247undefined 1 Reply Last reply Reply Quote 0
                      • peter247undefined
                        peter247 @nick9one1
                        last edited by

                        @nick9one1 The problem with a BLV mgn Cube is there is so many ways to get it wrong ?
                        Assembling for example my Ender 5 plus it was put a bolt in a pre drilled hole so if they have drilled it correct you shouldn't be able to get it wrong. Is there a forum for the BLV mgn Cube and people who have built them ?.

                        Ender 5 plus linear rail and hemera powered by duet 2 wifi , CR10s pro v1 with bltouch mostly stock , BLV mgn Cube slowly being built powered by duet 3 mini 5+

                        Phaedruxundefined 1 Reply Last reply Reply Quote 0
                        • Phaedruxundefined
                          Phaedrux Moderator @peter247
                          last edited by

                          @peter247 https://www.blvprojects.com/blv-mgn-cube-3d-printer

                          Z-Bot CoreXY Build | Thingiverse Profile

                          nick9one1undefined 1 Reply Last reply Reply Quote 0
                          • nick9one1undefined
                            nick9one1 @Phaedrux
                            last edited by

                            it was alignment of the Y rails causing the problem. Unless they are perfectly aligned they can bind.

                            alankilianundefined peter247undefined 2 Replies Last reply Reply Quote 1
                            • alankilianundefined
                              alankilian @nick9one1
                              last edited by

                              @nick9one1 AWESOME!!!

                              I'm so glad you kept your experiments going and figured it out.

                              Print-on dude!

                              SeemeCNC Rostock Max V3 converted to V3.2 with a Duet2 Ethernet Firmware 3.2 and SE300

                              1 Reply Last reply Reply Quote 1
                              • peter247undefined
                                peter247 @nick9one1
                                last edited by

                                @nick9one1 Glad to know you fixed it, because I'm at the start of building a BLV mgn Cube, waiting for my frame to come so I can start to build it , but it is a winter project so still missing a lot of bits yet like the heated bed / extruder / and some nut and bolt for I'm not building a kit.
                                Most of my plastic part are printed at 7 hours a part printing at 90% on petg.

                                Ender 5 plus linear rail and hemera powered by duet 2 wifi , CR10s pro v1 with bltouch mostly stock , BLV mgn Cube slowly being built powered by duet 3 mini 5+

                                1 Reply Last reply Reply Quote 0
                                • First post
                                  Last post
                                Unless otherwise noted, all forum content is licensed under CC-BY-SA