Mesh Bed Level Issues
-
Have you tried the same print in different locations on the bed? Do you get the same results in those other locations?
It might also be worth trying the same print (in the same location) but with the spring sheet rotated say 90 degrees. This might give an indication as to a possible problem with the evenness of the sheet or coating (as the owner of a twotrees Saphire plus I'm not very impressed with their QA).
-
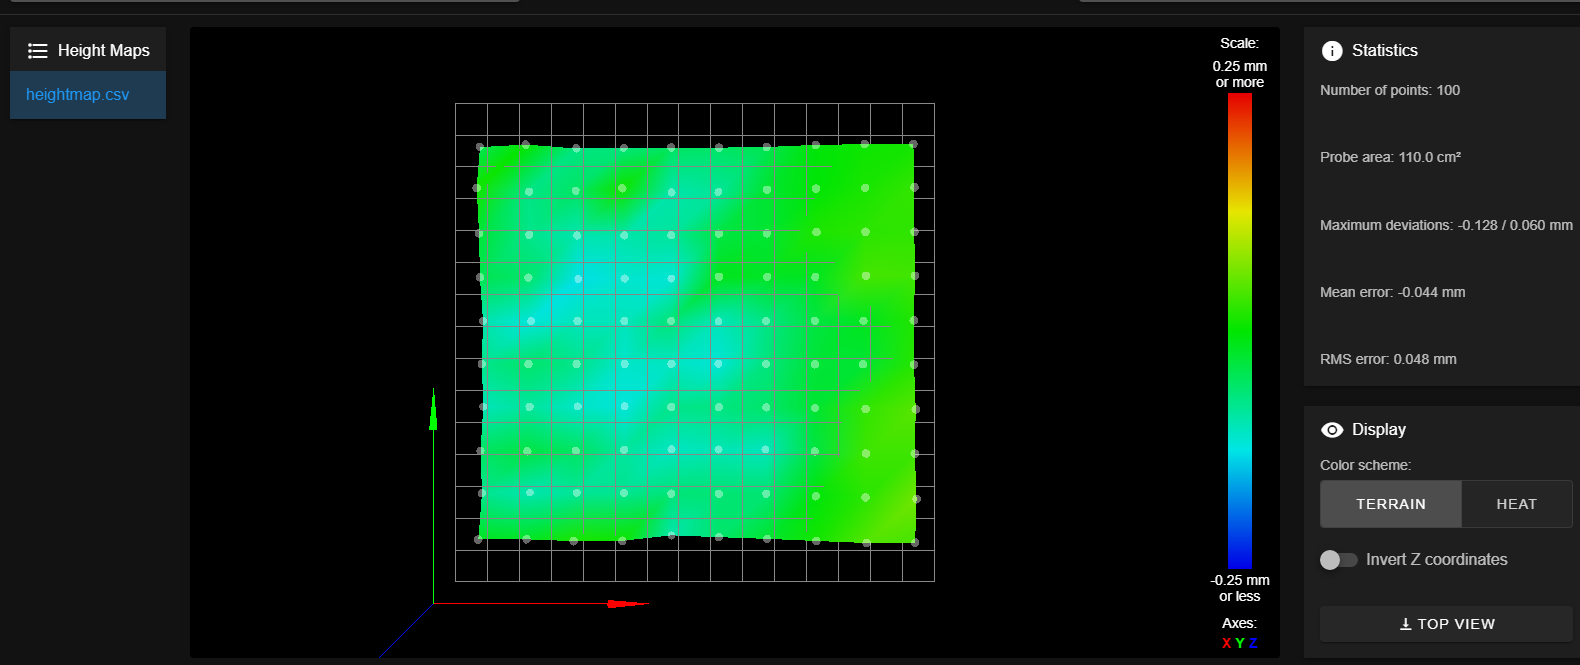
Well your bed looks fairly "smooth" just tilted.
I would find a way to manually level your bed to minimize the mesh compensation needed during printing.
Here is an simplified example of how I implement mesh.g - I have added some comments.
; mesh.g ; called to probe the bed and create the height map needed for mesh compensation ; ============================================ ; G29 with no parameters will invoke this file ; ============================================ ; ==================================================== ; these may not be necessary but it is safe to do them ; ==================================================== M290 R0 S0 ; cancel baby stepping G29 S2 ; cancel mesh bed compensation ; ================================================================================== ; the G1 command below moves the PROBE to the center of the bed ; the code computes the center based on XY min/max values and probe XY offset values ; ================================================================================== G1 X{((move.axes[0].max + move.axes[0].min) / 2) - sensors.probes[0].offsets[0]}, Y{((move.axes[1].max + move.axes[1].min) / 2) - sensors.probes[0].offsets[1]}, F1800 G30 ; do single probe - sets Z to probe trigger height - if trigger height is wrong Z position will be wrong M557 Xaaa:bbb Yccc:ddd P20:20 ; define 400 point probing grid G29 S0 ; probe bed and create height map ; ==================================================================== ; I disable mesh compensation here so manual XY moves are not effected ; I re-enable mesh compensation in my print start code ; ==================================================================== G29 S2 ; cancel mesh bed compensation -
@fcwilt
Not trying to hijack. Do you have a link to any resources where I can read up on why G29 should be used instead of G32?I recently upgraded to RRF3.3b3
-
@64bit https://duet3d.dozuki.com/Wiki/Setting_up_automatic_probing_of_the_print_bed
Obsolete information
The remainder of this page describes G32 bed probing for bed compensation, which is no longer recommended. For G29 bed probing, see Using mesh bed compensation.
-
@megaloduet Appreciate it. Seems as though Ill have no real benefit from changing at this time.
-
@megaloduet G32 is NOT obsolete, and is still recommended. It's best to get your bed as physically level as possible; G29 mesh compensation is to compensate for anomalies in the bed surface, not for a skewed bed (though it can).
G32 just calls bed.g. You can use this in a number of ways; if you have multiple independent leadscrews (2, 3 or 4), they can level the bed plane: https://duet3d.dozuki.com/Wiki/Bed_levelling_using_multiple_independent_Z_motors
You can also use it if you have manual bed adjustment screws: https://duet3d.dozuki.com/Wiki/Using_the_manual_bed_levelling_assistantThe part of G32 that is obsolete is defining points to probe, which then creates a very crude bed mesh. It was deprecated in RRF 1.18.
Ian
Bed-slinger - Mini5+ WiFi/1LC | RRP Fisher v1 - D2 WiFi | Polargraph - D2 WiFi | TronXY X5S - 6HC/Roto | CNC router - 6HC | Tractus3D T1250 - D2 Eth
-
@droftarts said in Mesh Bed Level Issues:
The part of G32 that is obsolete is defining points to probe, which then creates a very crude bed mesh. It was deprecated in RRF 1.18.
Ian
Thanks for providing that information. You saved me some work.
Frederick
-
@64bit said in Mesh Bed Level Issues:
@megaloduet Appreciate it. Seems as though Ill have no real benefit from changing at this time.
Unless in the future, behind the scenes, G32 and G29 do something unique to leveling (G32) or mesh compensation (G29).
If you "convert" now to using G32 and/or G29 as intended you will be ready for any future changes.
Frederick
-
@droftarts do you have an advice in regards to the topic main problem ?
-
Two things have been suggested so far that stand out as good next steps.
- rotate the build surface and see how it changes the problem.
- try and shim up or adjust the bed mounting to remove that tilt.
Couple other things I can think of. Clean the build surface thoroughly. PID tune the heaters.
-
@megaloduet said in Mesh Bed Level Issues:
@droftarts do you have an advice in regards to the topic main problem ?
I wonder if it has anything to do with trying to print on a tilted surface?
When you look at some of the graphics showing how the filament is laid down as a flattened strip adjusting the height alone doesn't compensate for the fact the surface is tilted.
Is the tilt enough to be causing your problem? I just don't know, I have never tried to print on a surface as tilted as yours.
All of my printers either have manual leveling screws for the bed or do automatic leveling using multiple Z steppers and the beds are pretty well leveled.
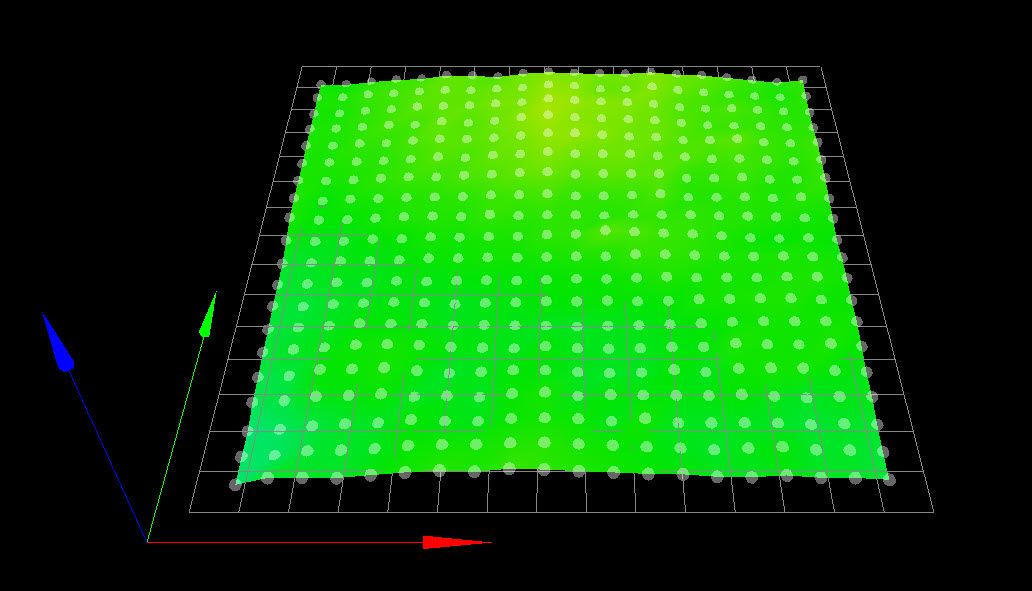
Here is one of my printers height map. You can see that it has some unevenness but overall it is level.
-
@phaedrux rotating the buildplate 90° has a slight improvement.
Will test another buildplate tomorrow and also clean both.Shouldn't the meshbed leveling be capable of compensating the slight tilt? As done by the original Prusa ?
Have ordered springs and knobs to adjust the bed will also try this (I am afraid I can't use it because of narrow space between Y carriage an frame)
PID is tuned, this one I ruled out already.
Will report the progress tomorrow with both buildplates cleaned. If both show the same artifacts I think at least we can rule out the buildplate.
Next guess would be move the print around on the buildplate, maybe de magnets in the bed interfer with the hotend and push it down while printing over magnets ? Does this sound reasonable to test?
-
Yes mesh compensation can adjust for some amount of tilt by moving the nozzle up and down, but if the tilt is extreme there is also nozzle geometry to think about. One side of the nozzle will be closer to the bed than the other and might cause some dragging/digging. Not sure if that's what's happening here, but might be part of it?
-
@megaloduet said in Mesh Bed Level Issues:
@droftarts do you have an advice in regards to the topic main problem ?
Get the bed plane flat, so that bed mesh doesn’t have so much to do. My guess is that Z is binding moving up and down, or there’s some other inaccuracy in Z movement, which is why there can be a difference between one line and the next, or even within a line (it will usually be worse when going down).
As the machine is a bed slinger with dual Z, most likely the two Z motors are out of sync, so one side (the left) is lower than the right. This may be enough to cause binding. Adjust one motor up or down until the bed plane is level. Or if you have a spare stepper driver on your Duet, separate the Z motors, and let the firmware level it up; see this, follow instructions for two motors, which is how I have mine set up: https://duet3d.dozuki.com/Wiki/Bed_levelling_using_multiple_independent_Z_motors
Ian
Bed-slinger - Mini5+ WiFi/1LC | RRP Fisher v1 - D2 WiFi | Polargraph - D2 WiFi | TronXY X5S - 6HC/Roto | CNC router - 6HC | Tractus3D T1250 - D2 Eth
-
@droftarts regarding the both z steppers, I also thought in this direction but could not find how others fix it. Seems that I got alot new hints how to tackle the issue. Irrespective the other Tipps I think a proper way to sync the motors is anyhow a good idea
-
IF you have a free driver you can put each Z motor on it's own and then control them independently to do tilt correction.
https://duet3d.dozuki.com/Wiki/Bed_levelling_using_multiple_independent_Z_motors
-
@phaedrux There's an echo in here!
Ian
-
@megaloduet If the bed is not adjustable, and you're happy that it's square to the frame, then most likely the X axis is tilted. As the only thing keeping it up is the Z motors, so probably one of them has slipped. I've just noticed you've got linear rails on all axes; these REALLY don't like being anything other than perfectly perpendicular to each other, and will bind if they are not.
Check the couplers are tight, too. As the couplers are the compressible springy kind, the best thing to do is to put a ball bearing in the middle of it, resting on the top of the motor shaft, with the leadscrew resting on top of the ball bearing. This stops the coupler compressing under load, but still lets it do what it's designed to do, which is to account for any movement in the leadscrew, eg if it's bowed.
Ian
Bed-slinger - Mini5+ WiFi/1LC | RRP Fisher v1 - D2 WiFi | Polargraph - D2 WiFi | TronXY X5S - 6HC/Roto | CNC router - 6HC | Tractus3D T1250 - D2 Eth
-
Sounds like you have some good suggestions to look into already.
I totally agree that if your Z axis is binding, it will not be able to track with the tiny mesh compensations. You could physically test this by setting up an indicator between the carriage and bed, then requesting tiny Z moves up and down, to see if the actual motion is reliable.
I leveled our i3 MK3 bed mechanically at work by using shim stock between the bed and the spacers. Works beautifully. But, I agree, check the X axis first, might save you a bunch of work.
Also, double check that your probe offset values are truly correct. It isn't hard to get them inverted. You can command your print head to the 4 corners of a bounding box, and mark them with a marker or tape. Then define that mesh boundary and probe, looking for good probe alignment to the box.
-
@droftarts just ordered 8mm steel balls, to rule this out as well, seems like a good tipp anyhow.
Did manually level the X axis, this slightly improved the result, but still same artifacts with less magnitude. I noticed a Z motor was slightly tilted. Didnt had time to decouple the Z Stepper motors and to make them indepedent, will update soon. However do you have any tipp to test for binding? If I move the z motors by hand it seems to run smooth.
Will collect the results of today and will upload it tomorrow, for further details on improvement.
This is what the heighmap looks now: