levelling and mesh
-
S2 is huge, ive always ran S0.02 previously
-
Are you repeating the process or is it auto repeating with conditional gcode?
Can you upload your actual config.g, homeall.g, bed.g etc?
-
@Phaedrux here they are
")
config.g; Configuration file for Duet 3 (firmware version 3) ; executed by the firmware on start-up ; ; generated by RepRapFirmware Configuration Tool v3.1.10 on Wed Dec 16 2020 20:30:34 GMT+0000 (Greenwich Mean Time) ; General preferences G90 ; send absolute coordinates... M83 ; ...but relative extruder moves M550 P"Bustamove" ; set printer name M669 K1 ; select CoreXY mode G4 S5 ; Wait for CAN Bus ; Drives M569 P0.0 S0 ; Drive 0 Left Motor goes backwards M569 P0.1 S0 ; Drive 1 Right Motor goes backwards M569 P0.2 S0 ; Drive 2 Extruder motor goes forwards ;M569 P0.3 S1 ; Drive 3 Not Used M569 P0.4 S0 ; Drive 4 Y2 motor goes backward M569 P0.5 S0 ; Drive 5 X2 motor goes backward M569 P1.0 S1 ; Drive 3 Zleft motor goes forward M569 P1.1 S1 ; Drive 4 Zrear motor goes forward M569 P1.2 S1 ; Drive 5 Zright motor goes forward ; Drive Selection M584 X0.0:0.5 Y0.1:0.4 Z1.0:1.1:1.2 E2 ; Three Z motors connected to driver outputs 1.0, 1.1 and 1.2 (Needs to be posted before M350 microstepping) M671 X-16.698:172.011:360.72 Y2.021:355.231:2.021 s2.0 ; Z LIFT POINT POSITIONS M350 X16 Y16 Z16 E8 I0 ; configure microstepping without interpolation M92 X160.00 Y160.00 Z800.00 E359.90 ; set steps per mm M566 X800.00 Y800.00 Z60 E1400 ; Set maximum instantaneous speed changes (mm/min) M203 X50000.00 Y50000.00 Z1000.00 E10000.00 ; Set maximum speeds (mm/min) / feedrate M201 X8000.00 Y8000.00 Z90.00 E800 ; Set accelerations (mm/s^2) M906 X1800.00 Y1800.00 Z1100.00 E600 I30 ; Set motor currents (mA) and motor idle factor in per cent M84 S30 ; Set idle timeout M593 F38.1 ; cancel ringing at 65.5Hz - print speed / distance between peaks of ringing ; Axis Limits M208 X-2 Y-12 Z-0.3 S1 ; set axis minimum M208 X315 Y325 Z320 S0 ; set axis maximum ; Endstops M574 X1 S1 P"io1.in" ; configure active-high endstop for low end on X via pin io0.in M574 Y1 S1 P"io2.in" ; configure active-high endstop for low end on Y via pin io1.in ; Z-Probe M574 Z1 S2 ; configure Z-probe endstop for low end on Z M950 S0 C"io7.out" ; create servo pin 0 for BLTouch M558 P9 C"^io7.in" H6.0 A3 S0.02 F300 T10000 ; set Z probe type to bltouch and the dive height + speeds ;M558 H30 ;*** Remove this line after delta calibration has been done and new delta parameters have been saved G31 P500 X25 Y-10 Z2.058 ; set Z probe trigger value, offset and trigger height M557 X25:330 Y-10:305 P8 ; define mesh grid ; Heaters M308 S0 P"temp0" Y"thermistor" T100000 B4138 ; configure sensor 0 as thermistor on pin temp0 M950 H0 C"out0" T0 ; create bed heater output on out0 and map it to sensor 0 M307 H0 B1 S1.00 ; enable bang-bang mode for the bed heater and set PWM limit M140 H0 ; map heated bed to heater 0 M143 H0 S120 ; set temperature limit for heater 0 to 120C ;M308 S1 P"temp1" Y"thermistor" T4606017 B5848 C5.548428e-8 ; DYZE HIGH TEMP 500C Thermister M308 S1 P"temp1" Y"pt1000" A"nozzle_temp" ; configure sensor 1 as PT1000 on pin temp1 M950 H1 C"out1" T1 ; create nozzle heater output on out1 and map it to sensor 1 ; old M307 H1 R2.822 C405.600:226.700 D6.90 S1.00 V24.7 B0 ; PT1000 Autotuned M307 H1 R2.339 C413.3 D7.08 S1.00 V23.6 B0 ;M307 H1 B0 S1.00 ; disable bang-bang mode for heater and set PWM limit M143 H1 S350 ; set temperature limit for heater 1 to 350C ; Fans M950 F0 C"out7" Q500 ; create fan 0 on pin out7 and set its frequency M106 P0 S0 H-1 ; set fan 0 value. Thermostatic control is turned off ;M308 S3 Y"drivers" A"DRIVERS" ; setup a virtual temperature sensor for the Drivers: M308 S4 Y"mcu-temp" A"MCU" ; setup a virtual temperature sensor for the MCU: M950 F1 C"!out4+out4.tach" A"MCU" Q25000 ; create fan 1 on pin out4 - figure out frequency rqd M106 P1 S1 X1 B0.3 T35:50 H3:4 L0.3 ; set fan 1 value. Thermostatic control is turned on ; Tools M563 P0 S"Volcano" D0 H1 F0 ; define tool 0 G10 P0 X0 Y0 Z0 ; set tool 0 axis offsets G10 P0 R0 S0 ; set initial tool 0 active and standby temperatures to 0C ; Miscellaneous M575 P1 S1 B57600 ; enable support for PanelDue M501 ; load saved parameters from non-volatile memory M911 S22 R23.5 P"M913 X0 Y0 G91 M83 G1 Z3 E-5 F1000" ; set voltage thresholds and actions to run on power loss M912 P0 S-4.5 ; MCU Calibration ; Safety Contactor For Heatbed ; Use Gcodes in start print and end print and macros for pre-heating bed levelling etc ; M42 P2 S1 ; to turn contactor on ; M42 P2 S0 ; to turn contactor off M950 P2 C"out3" ; set out3 to heatbed safety contactor M42 P2 S0 ; set heatbed contactor off T0bed.g , I have played with this a little tonight
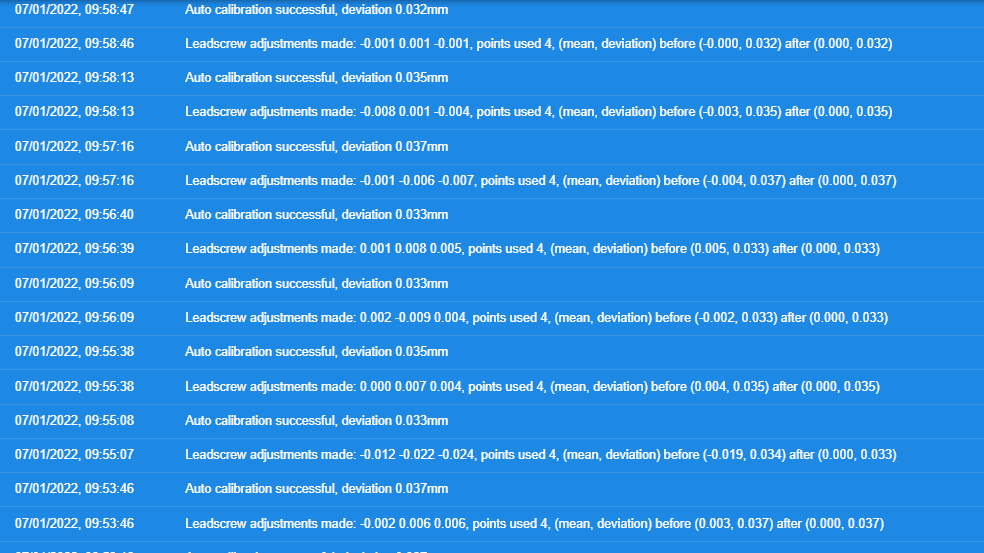
; bed.g
; called to perform automatic bed compensation via G32
;
; generated by RepRapFirmware Configuration Tool v3.1.10 on Wed Dec 16 2020 20:30:34 GMT+0000 (Greenwich Mean Time)
M561 ; clear any bed transform
; If the printer hasn't been homed, home it
if !move.axes[0].homed || !move.axes[1].homed || !move.axes[2].homed
  G28
; Probe the bed and do auto calibration
G1 X25 Y-20 Z10 F9000        ; go to just above the first probe point
while true
  if iterations = 5
    M291 P"Bed Leveling Aborted" R"Pass Limit Reached"
    abort "Bed Leveling Aborted - Pass Limit Reached"
; run leveling pass
  G30 P0 X25 Y-20 Z-99999     ; LF
  if result != 0
    continue
  G30 P1 X25 Y300 Z-99999     ; LR
  if result != 0
    continue
  G30 P2 X330 Y300 Z-99999    ; RR
  if result != 0
    continue
  G30 P3 X330 Y-20 Z-99999 S3 ; RF
  if result != 0
    continue
  ; check results - exit loop if results are good
  if move.calibration.initial.deviation <= 0.024
    break
  echo "Repeating calibration because deviation is too high (" ^ move.calibration.initial.deviation ^ "mm)"
; end loop

echo "Auto calibration successful, deviation", move.calibration.final.deviation ^ "mm"
G1 X0 Y0 Z10                ; move front left
homeall.g
; homeall.g
; called to home all axes
;
M98 P"homex.g" ; Home X
M98 P"homey.g" ; Home Y
M98 P"homez.g" ; Home Z
homex.g and homey.g are basically the same as each other
; homex.g
; called to home the X axis
;
; generated by RepRapFirmware Configuration Tool v3.1.10 on Wed Dec 16 2020 20:30:34 GMT+0000 (Greenwich Mean Time)
G91               ; relative positioning
G1 H2 Z5 F9000   ; lift Z relative to current position
G1 H1 X-345 F9000 ; move quickly to X axis endstop and stop there (first pass)
G1 X5 F9000       ; go back a few mm
G1 H1 X-345 F300  ; move slowly to X axis endstop once more (second pass)
G1 H2 Z-5 F9000  ; lower Z again
G90               ; absolute positioning
homez.g
; homez.g ; called to home the Z axis ; ; generated by RepRapFirmware Configuration Tool v3.1.10 on Wed Dec 16 2020 20:30:34 GMT+0000 (Greenwich Mean Time) G91 ; relative positioning G1 H2 Z5 F9000 ; lift Z relative to current position G90 ; absolute positioning G1 X145 Y155 F9000 ; move probe to centre of the bed G30 ; home Z by probing the bed ; Uncomment the following lines to lift Z after probing G91 ; relative positioning G1 Z5 F9000 ; lift Z relative to current position G90 ; absolute positioning -
@mikedc said in levelling and mesh:
if move.calibration.initial.deviation <= 0.024
It looks like your conditional is doing what you're asking.
Did you mean to use 0.24 instead?
-
No i was using 0.02 I increased it to 0.024 where i was playing.
it used to always be around 0.016 so 0.02 was enough
now the lowest i can get it is 0.049 but more often it is anywhere between 0.071 and 0.11 -
If you do a repeated G30 S-1 test at your probe points are the results consistent?
Is it possible to move the Z motors to the mainboard?
-
@MikeDC @Phaedrux Have a look at the David's answer in our thread about CAN delays with external boards:
@dc42 said:
I have put preliminary firmware that resolves this issue at https://www.dropbox.com/sh/cx760ysonlzzkjd/AACfsVfX4olHipuqmbWut5EKa?dl=0. Please test this firmware with care because I have only tested it using Duet 3 MB6HC + EXP3HC (the Z motor was connected to the EXP3HC).
If you are running your Duet with an attached Raspberry Pi then you must upgrade to RRF 3.4.0beta7 from the package server BEFORE you use these files.
Unfortunately we couldn't test it yet, so it's a good start point to see if this issue is addresed.
Best,
-
One simple change that may help is just reduce the probing speed a lot, so any delays result in smaller errors.
In the config you posted earlier it is 300; try 50 or even less and see how that works?
I only use 60 even with a directly wired BLTouch!
As long as the clearance height is not excessive, it should not make all that much difference in speed but could increase accuracy a lot.
Robert J.
Printers: Overlord pro, Kossel XL+ with Duet 6HC and "Frankentron", TronXY X5SA Pro converted to E3D toolchange with Duet 6HC and 1LC toolboards.
-
Ok with Z on the 3HC they was definately not consistent
I have now moved the 2 Y motors temporarily to the 3HC and moved the 3 Z motors back to the mainboard
I think this is clearly showing it a 3HC can issue
consistent probing even if its not the 0.016 i was getting previously
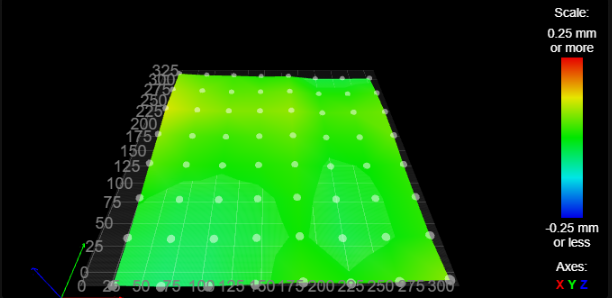
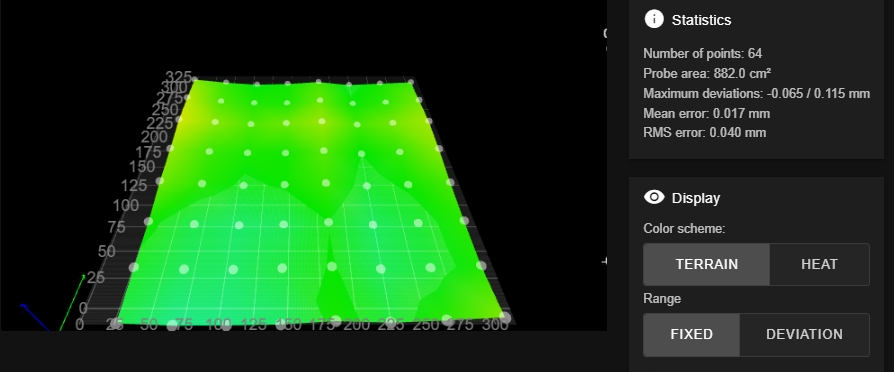
but at least its not going as high as 0.71-0.11 now and look at the difference in the mesh, the 0.2mm difference front to back is gone. -
This post is deleted! -
@marcossf said in levelling and mesh:
@MikeDC @Phaedrux Have a look at the David's answer in our thread about CAN delays with external boards:
@dc42 said:
I have put preliminary firmware that resolves this issue at https://www.dropbox.com/sh/cx760ysonlzzkjd/AACfsVfX4olHipuqmbWut5EKa?dl=0. Please test this firmware with care because I have only tested it using Duet 3 MB6HC + EXP3HC (the Z motor was connected to the EXP3HC).
If you are running your Duet with an attached Raspberry Pi then you must upgrade to RRF 3.4.0beta7 from the package server BEFORE you use these files.
Unfortunately we couldn't test it yet, so it's a good start point to see if this issue is addresed.
Best,
I will definately test these files next thankyou
-
@rjenkinsgb said in levelling and mesh:
One simple change that may help is just reduce the probing speed a lot, so any delays result in smaller errors.
In the config you posted earlier it is 300; try 50 or even less and see how that works?
I only use 60 even with a directly wired BLTouch!
As long as the clearance height is not excessive, it should not make all that much difference in speed but could increase accuracy a lot.
I have already tried this, It doesnt help the inconsistancy,
Thankyou for the suggestion tho -
@mikedc said in levelling and mesh:
If the motors are delaying then i cannot put x or y or e here either as they will all have differing issues.
I believe the firmware limitation is purely limited to probing moves as the motors will keep moving until the probe triggers and register their position (I.e. an unplanned event), whereas normal xy moves are all preplanned so can be synchronised between the boards. This seems to match what you are seeing
-
@engikeneer I agree,
I started a print around an hour ago, first one since i added the 3hc board.
with Z on the 3hc and the levels and mesh i dare not try printing,
but with the 2 Y motors on the board it seemed more stable so have started a print and so far its looking ok.maybe one small alignment issue at the start of the print, between the brim and the part but i need to wait for it to finish to check it properly.
-
It is fixed in B7+2
see my post herehttps://forum.duet3d.com/topic/25720/g30-stop-values-increasing-each-time/26?_=1641577026578
to confirm, Z is back on 3HC and multiprobing each point is giving good results again.

-
 undefined Phaedrux marked this topic as a question
-
undefined Phaedrux has marked this topic as solved