e3d TC coupler motor is not moving and homing C has no errors?
-
I am not sure that "General discussion" is the correct place. I apologize in advance for this
So I home the x >y >z> then I home the C axis no errors but the motors does not rotate at all.
Also when I try the unlock or lock coupler macro nothing moves. What am missing?
Here is my config file... I know my 3-axis z is not set up nor are my tools plugged in but please ignore that. (unless this is why the coupler motor is not moving at all)
; Configuration file for Duet WiFi (firmware version 3.4.0)
; executed by the firmware on start-up
;
; ---------------------------------------------------------------------------------------------------------------------------------------------------------------------------------------
;
; General Global Preferences and critical Drive Configuration Section -  These must come before all else.
;M80																	; ATX ON
G4 P2000																; Hold your Horses.  Add a little time to allow things to settle and complete.
G90  																	; send absolute coordinates...
M83  																	; ...but relative extruder moves
G21																		; Set units to Millimeters
M550 P"Cube 3D Printer Duet" 											; set printer name -  change this to whatever you'd like
M584 X1 Y0 Z7:8:9 C2 E3:4:5:6 										    ; set drive mapping to each axis --- *EDP* - 1 The "Z2:5:6" would be
																		;  Note the M567 commage later. These are related and connected. This command must always come before a number of other commands.  Refer to https://duet3d.dozuki.com/Wiki/RepRapFirmware_3_overview

M575 P1 S1 B57600														; Start Serial Com with PanelDue
M669 K1																	; Select CoreXY mode
;
; ---------------------------------------------------------------------------------------------------------------------------------------------------------------------------------------
;
; Network Configuration Section
M552 S1 																; enable network
M587 S"DAHWIFI" P"Nandina95"											; Add a WiFi host network to the remembered list.
M586 P0 S1 																; enable HTTP
M586 P1 S0 																; disable FTP
M586 P2 S0 																; disable Telnet
;
; ---------------------------------------------------------------------------------------------------------------------------------------------------------------------------------------
;
;Stall Detection
;M915 Z S6 F0 H200 R3													; Z axis
;M915 E S6 F0 H400 R3													; Extruder
;M915 X Y S3 F0 H400 R3													; X / Y Axes, S=lower values more sensitive R3=pause&rehome.g&resume print
;
; ---------------------------------------------------------------------------------------------------------------------------------------------------------------------------------------
;
; Drives - Establish the Drive designation and the direction they turn.
; Validate these settings as a first step.
; If your wiring differs, you can fix the direction here instead of rewiring.
M569 P0 S0																; X axis
M569 P1 S1 																; Y axis
M569 P2 S1 																; Coupler MAY HAVE TO INVERT TO S1!!!
M569 P3 S1 																; Tool 1 Extruder
M569 P4 S1 																; Tool 2 Extruder
M569 P5 S0																; Tool 3 Extruder
M569 P6 S0																; Tool 4 Extruder
M569 P7 S0																; z-axis: mid left
M569 P8 S0																; z-axis: front right
M569 P9 S0																; z-axis: back right

M671 X-64:206:206 Y60:-25:120 S15										; Set up three Z-axis location
																		; *EDP* - 1  This tells the Duet the physical location of the center of the leadscrews.
																		; for reference the order/sequence of defined coordinate positions MUST correspond to
																		; the order of axis drives that was specified above in the M584 gcode 1 - left, 2 - front right and 3 - rear right

M92 X200.00 Y200.00 Z200.00 C200 E562:562:562:562 						; set steps per mm, based on using 1.8 degree steppers for X/Y/Z
M350 E16:16:16:16 I1 													; configure micro-stepping with interpolation
M350 C16 I0
M350 X16 Y16 Z16 I1
M566 X400.00 Y400.00 Z8.00  C2 E200:200:200:200 						; set maximum instantaneous speed changes (mm/min)
M203 X35000.00 Y35000.00 Z1200.00 C10000 E5000:5000:5000:5000 			; set maximum speeds (mm/min) *EDP*
M201 X3000.00 Y3000.00 Z100.00 C500 E2500:2500:2500:2500 				; set accelerations (mm/s^2)
;M204 P2000 T4000														; set printing and travel acceleration
M906 X1300 Y1300 Z800 C500 E500:500:500:500 I30 						; set motor currents (mA) and motor idle factor in per cent
M84 S30  																; Set idle timeout
;
; ---------------------------------------------------------------------------------------------------------------------------------------------------------------------------------------
;
; Axis Limits NEED CHANGING FOR TC. CONSERVATIVE GUESS NOW for XY
M208 X-14 Y0 Z0 S1 														; set axis minima
M208 X330 Y265 Z350 S0 													; set axis maxima
;--> print size: 300x300x400
; ---------------------------------------------------------------------------------------------------------------------------------------------------------------------------------------
;
; Endstops

M574 Y1 P"xstop"														; X min active low endstop switch
M574 X1 P"ystop"  														; Y max active low endstop switch Was S0 before TC
M574 Z0																	; No z endstop
M574 C1 S3																; Stall detect coupler at low end of its range
;
; ---------------------------------------------------------------------------------------------------------------------------------------------------------------------------------------
;
;Z-probe

M558 P8 C"zstop" H3 F120 I0 T20000      							    ; set Z probe type to switch IF WORKS, CHANGE TO F360 I0 T20000. MAYBE CHANGE I0 TO C"!..." TO INVERT?
G31 P200 X0 Y0 Z0	 													; set Z probe trigger value, offset and trigger height Z0.9 seems to be a bit too close for pla
;
; ---------------------------------------------------------------------------------------------------------------------------------------------------------------------------------------
;
 Stall detection
;M915 C S6 F0 H200 R0													; Coupler
;
; ---------------------------------------------------------------------------------------------------------------------------------------------------------------------------------------
;
; Configure Heaters and Sensors
;
; Bed Heater:
M308 S0 P"bedtemp" Y"thermistor" A"Bed Heater" T100000 B3950			; Configure bed temperature sensor -
M950 H0 C"bedheat" T0 													; Define heater 0 (bed heater) - bind the bed_heat pin and Temp Sensor0		together as defined above as "P0" gain 115.8, time constant 171.5, dead time 2.2, max PWM 1.00, calibration voltage 24.1, mode PID
M143 H0 S120															; set temperature limit for heater 0 to 120C
;M307 H0 ;A115.8 C171.5 D2.2 V24.1 B0									; disable bang-bang mode for the bed heater and set PWM limit
M140 H0																	; Informs the firmware that bed heater 0 (implied, because no P parameter is provided) uses heater 0.

; Tool  0:
M308 S1 P"e1temp" Y"thermistor" A"T0" T100000 B4725 C0.0000000706  		; Configure extruder_0 temperature sensor. Attach sensor to e0_temp refer to wiki. Trianglelabs thermistor.
M950 H1 C"e1heat" T1 													; Define heater 1 (hot-end E0) - bind the "e1_heat" pin (default first extruder) and Temp Sensor 1 together, as defined above as "P1"
M143 H1 S280  															; set temperature limit for heater 1 to 280C
;M307 H1 A425.3 C182.6 D5.1 V24.1 B0									; tuning parameters from 6.2.21: Heater 1 model: gain 425.3, time constant 182.6, dead time 5.1, max PWM 1.00, calibration voltage 24.1, mode PID


; Tool  1:
M308 S2 P"e2temp" Y"thermistor" A"T1" T100000 B4725 C0.0000000706  		; Configure extruder_0 temperature sensor. Attach sensor to e0_temp refer to wiki. Trianglelabs thermistor.
M950 H2 C"duex.e2heat" T2 												; Define heater 1 (hot-end E0) - bind the "e1_heat" pin (default first extruder) and Temp Sensor 1 together, as defined above as "P1"
M143 H2 S280  															; set temperature limit for heater 1 to 280C
;M307 H2 A516.5 C163.7 D5.6 V24.2 B0									; tuning parameters from: date 6.2.21

; Tool  2:
M308 S3 P"e3temp" Y"thermistor" A"T2" T100000 B4725 C0.0000000706  		; Configure extruder_0 temperature sensor. Attach sensor to e0_temp refer to wiki. Trianglelabs thermistor.
M950 H3 C"duex.e3heat" T3 												; Define heater 1 (hot-end E0) - bind the "e1_heat" pin (default first extruder) and Temp Sensor 1 together, as defined above as "P1"
M143 H3 S280  															; set temperature limit for heater 1 to 280C
;M307 H3 A480.8 C171.0 D5.7 V24.2 B0									; tuning parameters from: date 6.2.21

; Tool 3:
M308 S4 P"e4temp" Y"thermistor" A"T3" T100000 B4725 C0.0000000706  		; Configure extruder_0 temperature sensor. Attach sensor to e0_temp refer to wiki. Trianglelabs thermistor.
M950 H4 C"e0heat" T4 													; Define heater 1 (hot-end E0) - bind the "e1_heat" pin (default first extruder) and Temp Sensor 1 together, as defined above as "P1"
M143 H4 S280  															; set temperature limit for heater 1 to 280C
;M307 H4 A588.5 C179.1 D7.9 V24.1 B0									; tuning parameters from: date 6.2.21
; ---------------------------------------------------------------------------------------------------------------------------------------------------------------------------------------
;
; Fans (all duex fans are on 24V)
;
M950 F1 C"duex.fan3"													; T1 HF
M950 F2 C"duex.fan7"													; T1 PCF
M950 F3 C"duex.fan4"													; T2 HF
M950 F4 C"duex.fan8"													; T2 PCF
M950 F5 C"duex.fan5"													; T3 HF
M950 F6 C"fan0"															; Cave: 24V -- T3 PCF
M950 F7 C"duex.fan6"													; T4 HF
M950 F8 C"fan2"															; Cave: 24V -- T4 PCF

M106 P1 S255 H1 T50														: T1 HF
M106 P2 S0																; T1 PCF
M106 P3 S255 H2 T50														: T2 HF
M106 P4 S0																; T2 PCF
M106 P5 S255 H3 T50														: T3 HF
M106 P6 S0																; T3 PCF
M106 P7 S255 H4 T50														: T4 HF
M106 P8 S0																; T4 PCF
;
; ---------------------------------------------------------------------------------------------------------------------------------------------------------------------------------------
;
; Set up the Tools, which combine heaters, fans, and sensors to work as one Tool.

; Tool 0
M563 P0 S"T0" D0 H1 F2
G10 P0 X-9 Y39 Z-5														; Set Nozzle offset
G10 P0 R0 S0															; Reset initial tool 0 active and standby temperatures to 0C

; Tool 1
M563 P1 S"T1" D1 H2 F4
G10 P1 X-9 Y39 Z-5														; Set Nozzle offset
G10 P1 R0 S0															; Reset initial tool 0 active and standby temperatures to 0C

; Tool 2
M563 P2 S"T2" D2 H3 F6
G10 P2 X-9 Y39 Z-5														; Set Nozzle offset
G10 P2 R0 S0															; Reset initial tool 0 active and standby temperatures to 0C

; Tool 3
M563 P3 S"T3" D3 H4 F8
G10 P3 X-9 Y39 Z-5														; Set Nozzle offset
G10 P3 R0 S0															; Reset initial tool 0 active and standby temperatures to 0C
;
; ---------------------------------------------------------------------------------------------------------------------------------------------------------------------------------------
;
; Miscellaneous
;
; Advanced calibrations:
;M593 F50																; cancel ringing at 50hz https://forum.e3d-online.com/threads/accelerometer-and-resonance-measurements-of-the-motion-system.3445/

; Pressure advance
M572 D0 S0.2															; pressure advance T0
M572 D1 S0.2															; pressure advance T1
M572 D2 S0.2															; pressure advance T2
M572 D3 S0.2															; pressure advance T3

M911 S23 R24 P"M913 X0 Y0 G91 M83 G1 Z3 E-5 F1000"						; set voltage thresholds and actions to run on power loss

;M376 H15																; bed compensation taper
;
; ---------------------------------------------------------------------------------------------------------------------------------------------------------------------------------------
;
;Tool Offsets (!ESTIMATED! offsets):
; V6-tool: X-9 Y39 Z-5 <<<<<<<<< same as V6
; Volcano-tool: X-9 Y39 Z-13.5
; Hemera-tool: X-37.5 Y43.5 Z-6

G10 P0 X-9 Y39 Z-5														; T0 -5 is large distance to bed
G10 P1 X-9 Y39 Z-5														; T1
G10 P2 X-9 Y39 Z-5														; T2
G10 P3 X-9 Y39 Z-5														; T3

;deselect tools
T-1

;M501																	; Store parameters. Deprecated?
Please help? I am totally stumped.
Thank you.
-
I'd firstly for ease of use move your M584 to after you drive definitions.
And I can't see any axis limits for the coupler?
Follow my adventures in 3D Printing, laser cutting and electronics. https://linktr.ee/Rushmere3D
-
@voodoobane The normal setup on an e3d toolchanger is not to have any sort of endstop for the C axis. Instead the motor is just driven until it hits the physical stop (the homec.g file will normally reduce the motor current during this process). It looks like you have a stall detection endstop defined. Perhaps that is causing problems. DC42 published his toolchanger configuration here: https://github.com/Duet3D/RRF-machine-config-files/tree/master/E3D_Tool_Changer/dc42-duet3-centreZero-2Titan-2Hemera/sys
I have something very similar setup on my TC and it seems to work fine...
-
Stall detection does not work for the coupler stepper.
Here are the relevant bits from my code:
; from config.g file

; C (tool coupler) (M92 is set so G1 commands are in degrees)

M92  C182.044      ; ( 32 steps-per-rev (stepper) * 64 (gearbox) * 2 (gears) * 16 (microsteps) ) / 360
M203 C5000         ; max speed (mm/min) (default 300) (suggested 5000)
M201 C500          ; acceleration (mm/s^2) (default 20) (suggested 500)
M566 C2            ; max instant speed change (jerk) (mm/min) (default 12) (suggested 2)
M906 C500          ; motor current (mA) (stepper rating 400mA RMS per phase) (suggested 500)

M350 C16 I1        ; 16x microstepping with interpolation

M208 C-41:225      ; set axis min/max values (determined by testing)
; --- homeC.g --- ; --- compute max C rotation --- var cmin = move.axes[3].min var cmax = move.axes[3].max var ctot = {var.cmax} - {var.cmin} ; --- home C --- M400 ; wait for any moves to finish M913 C50 ; insure "normal" stepper current G91 ; relative moves G1 H2 C{-var.ctot} F5000 ; turn CCW to limit of rotation G92 C-41 ; set logical position (determined by testing so unlocked is 90, locked is 180) M98 P"tool_unlock.g" ; turns to 90; --- tool_lock.g --- M400 ; wait for moves to finish M913 C100 ; increase current to improve locking G90 ; absolute moves G1 C180 F5000 ; turn to locked position M400 ; wait for moves to finish M913 C50 ; restore current to normal; --- tool_unlock.g --- M400 ; wait for moves to finish M913 C100 ; increase current to improve unlocking G90 ; absolute moves G1 C90 F5000 ; turn to unlocked position M400 ; wait for moves to finish M913 C50 ; restore current to normalFrederick
-
I agree with Rushmere3d, you need to add some limits for C.
I have 0 and 500 on mine.
; Axis Limits NEED CHANGING FOR TC. CONSERVATIVE GUESS NOW for XY
M208 X-14 Y0 Z0  C0 S1 														; set axis minima
M208 X330 Y265 Z350 C500 S0
And this is my home C file:
; homec.g
; called to home the C axis (coupler)
;
;G91
M400
G92 C499
M400
M913 C60		; MOTOR TO 60% CURRENT
G1 H1 C0 F2000
;
M400
G92 C0
;G90
M913 C100			; MOTOR TO 100% CURRENT
G1 C0 F10000

;Open Coupler
M98 P"/macros/Coupler - Unlock"
I have the lock position as C33 and unlock as C125
-
I will try this guys!
-
All I see is the homeC.
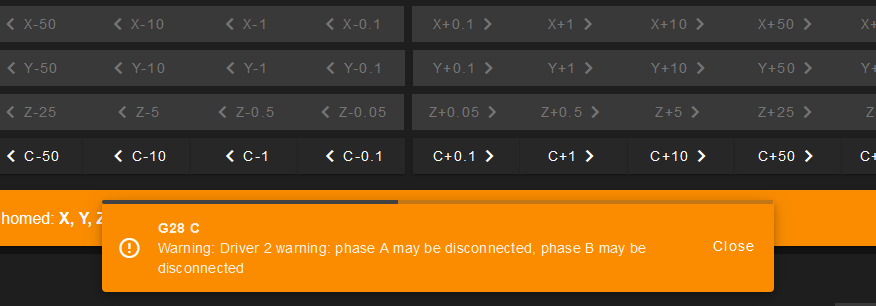
But no I have another problemIs it normal if this isn't all set to have the Home C tell me the wiring is wrong? I have a 2nd motor just in case. and it gives me the same error. I double-checked my wiring and everything. I do not understand it is saying my wiring is bad. could s0 and s1 be a factor? I have little information about this tool changer motor.
-
@voodoobane I checked the A and B poles and they are correct.
-
@voodoobane said in e3d TC coupler motor is not moving and homing C has no errors?:
Is it normal if this isn't all set to have the Home C tell me the wiring is wrong?
What message are you seeing, and what firmware version are you using?
Duet WiFi hardware designer and firmware engineer
Please do not ask me for Duet support via PM or email, use the forum
http://www.escher3d.com, https://miscsolutions.wordpress.com -
@dc42 I using Version 3.4
-
@dc42 I figured it out... Driver 2 is bad...
-
How did you determine that?