BABYSTEPPING NOT AVAILABLE DURING PRINTING
-
With my new Voron 2.4 actually in test, the babystepping is active until before printing ( on Paneldue and DWC ), but when it is printing, the adjustment function is no longer active.
If I see that the printhead is too high or too low, I can't correct the situation.
My system includes: Voron 2.4 350mm, Duet 3 6HC, Duet 3 1LC toolboardCONFIG.G
; Note: VORON 2.4 Duet3 ( SBC RASPBERRY SD 64GB )
; Data di aggiornamento: 11/07/2023 NOTE: post montaggio cinghie, sistemato origine xy in basso a destra e homing, in test livellamento gantry,
; sostituito puleggia Z1, collegato i motori Z correttamente, settato le macro setup_printing.g e setup_probing.g, aggiunto resume.g, sostituito hotend "rapido"
;
; ---------- GENERAL PREFERENCES ---------
; G4 S2                                                  			; WAIT 2 SEC FOR 1LC
G90                                                					; absolute coordinates...
M83                                                					; relative extruder moves
M669 K1                                                 			; Select CoreXY mode
M564 S1 H1                                             			 	; Forbid axis movements when not homed
M575 P1 S1 B57600                              	   					; enable support for Paneldue display
M290 R0 S0                                                          ; reset babystepping
;
; ---------- DRIVES MAPPINGS ----------
;
;       Rear
;	| Z1 | Z2 |
;	-----+-----
;	| Z0 | Z3 |
;	-----+-----
;	   Front
;
M584 X4 Y5 Z0:1:2:3 E121.0											; set drive mapping +++ possible swap X and Y
M569 P0 S1      													; Z0 motor FL goes forwards
M569 P1 S0      													; Z1 motor RL goes backwards
M569 P2 S1      													; Z2 motor RR goes forwards
M569 P3 S0      													; Z3 motor FR goes backwards
M569 P4 S1 										    				; A motor goes forwards
M569 P5 S1 										    				; B motor goes forwards
M569 P121.0 S1      												; E1 motor Extruder goes forwards (scheda 1LC porta 121)
M671 X-67.5:-67.85:422.5:422.5 Y-10:443.8:443.8:-10 S10				; Define Z belts locations (Z0=Front_Left Z1, Z2, Z3...ecc) S10=mm di correzione massima
;
; ---------- DRIVES PARAMETERS ----------
M350 X32 Y32 Z32 E16 I1                            					; configure microstepping with interpolation
M92 X158.5 Y158.5 Z800 E417          	   							; set steps per mm (417 afterburner, 710 stealthburner)
M566 X800 Y800 Z60 E1000        	                                ; Set maximum instantaneous speed changes (mm/min)
M203 X25000 Y25000 Z9000 E1200 		                                ; Set maximum speeds (mm/min)
M201 X5000 Y5000 Z500 E3000     	                                ; Set maximum accelerations (mm/s^2)
M906 X2000 Y2000 Z1400 E850 I30                                     ; set motor currents (mA) and motor idle factor 30%
M84 S20                                                             ; riduzione potenza motori dopo 20sec
;
; ---------- AXIS LIMITS ----------
M208 X0 Y0 Z0 S1 									    			; set axis minima (S1)
M208 X350 Y350 Z345 S0 								    			; set axis maxima (S0)
;
; ---------- ENDSTOP ---------
M574 Y2 S1 P"!io1.in"                              					; Configure enstop Y(2) posizione alta dello switch e pin !io1.in invertito
M574 X2 S1 P"!io2.in"                              					; Configure enstop x(2) posizione alta dello switch e pin !io2.in invertito
; M591 P2 C"121.io1.in" S1 D0     									; filament monitor connected to E0_stop su scheda espansione 1LC porta 121
;
; ---------- Z-PROBE ----------
; M558 P8 C"!121.io1.in" H10 F600 T5000				    			; set Z probe type inductive (P8),  altezza tastatura (H10), velocità tastatura mm/min (F600), velocità di spostamento mm/min (T6000) su scheda espansione 1LC porta 121
; G31 P500 X0 Y24 Z2.95                          					; set Z probe trigger value, PIU' ALTO E' Z PIU' SI AVVICINA AL LETTO
; M557 X15:325 Y24:334 S62						   					; define mesh grid (GRIGLIA maglia 5 x 5 con 63mm di spazio)
;
; ---------- Z-PROBE (BL-TOUCH) ----------
M950 S0 C"121.io0.out"                           					; create servo pin 0 for BLTouch
M558 P9 C"121.io0.in" H10 F800 T5000              					; set Z probe type to bltouch(P9) and the dive height(H10) + speeds (F120 + F5000)
G31 P500 X0 Y24 Z2.60                             					; set Z probe trigger value, PIU' ALTO E' Z PIU' SI AVVICINA AL LETTO
M557 X5:340 Y24:350 S60							   					; define mesh grid (GRIGLIA maglia 5 x 5 con 63mm di spazio)
;
; ----------- HO - HEATERS BED ----------
M308 S0 P"temp0" Y"thermistor" T100000 B4138 A"LETTO"   			; configure sensor 0 as thermistor on pin temp0
M950 H0 C"out1" T0                                 					; create bed heater output on out1 and map it to sensor 0
M307 H0 R0.961 K0.467:0.000 D3.05 E1.35 S1.00 B0					; 28/05/22 DOPO AUTOTARATURA LETTO CON (M303 H0 P1 S90)
M140 H0                                            					; map heated bed to heater 0
;
; ----------- H1 - HEATERS NOZZLE ----------
;
M308 S1 P"121.temp0" Y"thermistor" T100000 B4138 A"ESTRUSORE"		; Configure sensor 1 as thermistor on pin temp1
M950 H1 C"121.out0" T1                                 				; Create nozzle heater output on out0 su scheda espansione 1LC porta 121 and map it to sensor 1
M307 H1 R4.216 K0.327:0.000 D8.25 E1.35 S1.00 B0 V29.4			    ; DOPO AUTOTARATURA NOZZLE CON (M303 H1 P1 S250) il 05/06/23.
M143 H1 S275                                       					; set temperature limit for heater 1 to 275C
;
; ---------- TOOLS ----------
M563 P0 S"TOOLS-0" D0.5 H1 F0                  		                ; DEFINE TOOL 0 =>  P0=Tool 0,  S"..."=Tool name, D0.5=drive 0.5,  H1=heather 1,  F0=fan 0.
G10 P0 X0 Y0 Z0                                    		            ; set tool 0 axis offsets
G10 P0 R0 S0                                       		            ; set initial tool 0 active and standby temperatures to 0C
;
;	---------- FAN 0 VENTOLA RAFFR. STAMPA PWM (out4) 24v ----------
M950 F0 C"121.out2" Q500							                ; Fan 0 su 121.out2, use PWM, using 121.out2
M106 P0 C"VENTOLA FILO" S0.0 H-1                     				; set FAN_0 name and value.
;
; ---------- FAN 1 VENTOLA HOTEND (out8) 24v ----------
M950 F1 C"121.out1" Q500							                ; Fan 0 su 121.out2, use PWM, using 121.out2
M106 P1 C"HOTEND" H1 L0.1 X0.3 B0.3 T60:250  	                    ; PARAMETRICA Termostatica ( da L=10% a X=30% con temp. da 60°C a 250°C )
;
; ---------- FAN 2 VENTOLA MCU PWM (out5) 24v ---------
M308 S3 Y"mcu-temp" A"MCU" 						   					; configure sensor 3 as thermistor for MCU
M950 F2 C"!out5+out5.tach" 											; Fan 2 su out5, use PWM (needs ! inverted), using out5.tach
M106 P2 C"VENTOLA MCU" L0.1 X0.8 B0.1 T26:35 H3		    			; set FAN_2 value  T26:32°C  velocità ventola L-10% X-80%
;
; ---------- FAN 3 VENTOLA PWM RASPBERRY (out6) 24v ---------
M308 S4 P"temp2" Y"thermistor" T100000 B4138 A"RASPBERRY" 			; Configura il sensore 4 (S4) come riscaldatore sul pin temp2 con nome RASPBERRY
M950 F3 C"!out6+out6.tach" 											; Fan 3 su out6, use PWM (needs ! inverted), using out6.tach
M106 P3 C"VENTOLA RASPBERRY" L0.1 X1.0 B0.9 T35:45 H4				; set FAN_3 value  T35:45°C  velocità ventola L-10% X-100%
;
; ---------- PORT 1 RELE' ACCENSIONE (io4.out) IO PORT PWM ----------
M950 P1 C"io4.out" Q500												; allocate GPIO PORT.1 to io4.out at 500Hz
; M42 P1 S0.0  														; Printer OFF set 0% PWM on GPIO port 1
; M42 P1 S1.0  														; Printer ON set 100% PWM on GPIO port 1
;
; ---------- ACCELEROMETRO ----------
M955 P121.0 I10                                         			; ACCELEROMETRO SU SCHEDA 1LC (I10 = orientamento scheda)
M593 P"ZVDDD" F40										            ; parametri riduzione risonanza
;
; ---------- PULSANTE FISICO CHE ATTIVA MACRO ----------
; M950 J5 C"io5.in"
;      										                        ; Crea trigger n°5 su porta "121.button0"
M950 J5 C"121.button0"         						    		    ; Crea pin 5 su porta 121.button0 della scheda 1LC
M581 P5 T2 S1 R0													; P5=pin 5 creato con M950 (J5), T2=Trigger logico a cui associare gli ingressi, S1=funziona da inattivo ad attivo, R0=attivo in ogni momento
;  	Qualsiasi numero di trigger # maggiore di 1 provoca l'esecuzione del file della macro sys/trigger2.g (T2)
M950 J6 C"121.button1"                                              ; Crea trigger n°6 su porta "121.button0"
M581 P6 T3 S1 R0                                                    ; Crea pin 56 su porta 121.button1 della scheda 1LC
;
;---------- EMERGENCY BUTTON ----------
; M950 J7 C"121.button0" 											; Crea trigger n°7 su porta "121.button0"
; M581 P7 T4 S1 R0 													; configurara pin IN N°7 (P7), ed aziona trigger 4
;
; ---------- NEOLED ----------
; M150 X1 Q3000000													; SPI frequency to 3MHz
M950 E0 C"led" T1
M98 P"0:/macros/6-NEOLED ITALIA.g"									; Esegui la MACRO "7C-NEOLED ITALIA.g"
; M150 R255 U255 B255 P90 S25 F0									; Luce bianca per 25 led potenza 90 su 255
; M150 R0 U0 B255 P200 S24 F0										; Set luce BLU per 24 LED
;
; ---------- MISCELLANEUS ----------
M912 P0 S-1									   					    ; parametro per tarare la temperatura della MCU (-1°C)
; M911 S24.5 R24.9 P"M913 X0 Y0 G91 M83 G1 Z3 E-2 F500" 			; Autosalvataggio stampa per mancanza di corrente, sospende a 25.0v e riparte a 25.8v
M300 S2500 P3000								   					; Emette suono a S=2500Hz per P=3 secondi
T0                                             	        			; select first tool ACTIVE
; ---------- END SCRIPT -----------
;
;
; ---------- FUNZIONI NON PIU' ATTIVE ----------
;
; ---------- INPUT SHAPING ----------
;
; ---------- FAN 4 LUCE LED su RISCALDATORE (out3) 24v ----------
;M950 F4 C"out3" Q1000						       					;create FAN_4 on pin out3 and set its frequency at 1000hz
;M106 P4 C"LUCE LED" S0.1            			   					;LED ON AL 10%
;M106 P4 S0.0									   					;PER SPEGNERE LED
;
; ---------- SERVOCOMANDO RC ----------
; M950 S2 C"out9" 													; assign GPIO port 2 to out9 (Servo header)
; M280 P2 S100 														; S25 fine corsa DX S175 fine corsa SX S100 centro corsa
;
HOMEALL.G
; homeall.g (DUET 3 SBC)
; called to home all axes (consigliato sul forum)
;
G91                   							    ; relative positioning
G1 H2 Z5 F2000        							    ; lift Z relative to current position
G1 H1 X350 Y350 F4000 							    ; move quickly to X or Y endstop and stop there (first pass)
G1 H1 X350            						    	; home X axis
G1 H1 Y350            							    ; home Y axis
G1 X-10 Y-10 F4000    							    ; go back a few mm
G1 H1 X10 F800       							    ; move slowly to X axis endstop once more (second pass)
G1 H1 Y10 F800       							    ; then move slowly to Y axis endstop once more (second pass)
G90                   							    ; absolute positioning
G1 X175 Y175 F4000    							    ; muovi al centro del piatto
G30                   							    ; home Z by probing the bed
; end
I also have another Cartesian printer with Duet 2 and the babystepping works even during printing.
-
I have the latest firmware, 3.5.0-beta.4
-
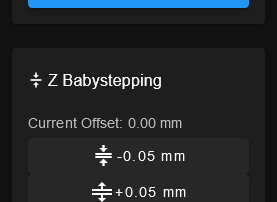
@Gianluca Are you using DWC 3.5.0-beta.4 as well (updated via apt)? The babystepping panel shows up correctly on my SBC setup and it remains enabled when a print is being done:
-
@chrishamm said in BABYSTEPPING NOT AVAILABLE DURING PRINTING:
@Gianluca Are you using DWC 3.5.0-beta.4 as well (updated via apt)? The babystepping panel shows up correctly on my SBC setup and it remains enabled when a print is being done:
Yes, I confirm, 3.5.0 b4 updated via apt on SBC.
Babystepping is available both on paneldue and DWG (before printing and during printing), it is possible to increase or decrease the position, but the printhead, only on printing, does not receive the modification. -
Are there any other suggestions or tests to do to have babystepping active when printing the first layers? that would be very helpful...
-
@Gianluca because it's not very clear what issue you're having.
Are you trying to make babystepping negative to make the nozzle go closer to the bed or increase it to make the nozzle further away?
Works fine for me here -
@Gianluca your current offset says 0.00mm. Unless you have an M208 Z minimum value of a negative number, baby stepping can’t go any lower.
Ian
Bed-slinger - Mini5+ WiFi/1LC | RRP Fisher v1 - D2 WiFi | Polargraph - D2 WiFi | TronXY X5S - 6HC/Roto | CNC router - 6HC | Tractus3D T1250 - D2 Eth
-
@droftarts said in BABYSTEPPING NOT AVAILABLE DURING PRINTING:
@Gianluca your current offset says 0.00mm. Unless you have an M208 Z minimum value of a negative number, baby stepping can’t go any lower.
Ian
yes, correct, my Z min in the M280 says X0 Y0 Z0 S1.
So my print head can't go down... I need to check if it can go up when it's printing, I'm not sure. Thank you! -
You can set your minimum value to a slightly negative number to give you some room to go lower.
M208 Z-1 for instance.
-
@Phaedrux said in BABYSTEPPING NOT AVAILABLE DURING PRINTING:
You can set your minimum value to a slightly negative number to give you some room to go lower.
M208 Z-1 for instance.
Yes thanks, that's exactly what I did.
It works!
You can mark it as solved. -
 undefined droftarts marked this topic as a question
-
undefined droftarts has marked this topic as solved