BLTouch Configuration
-
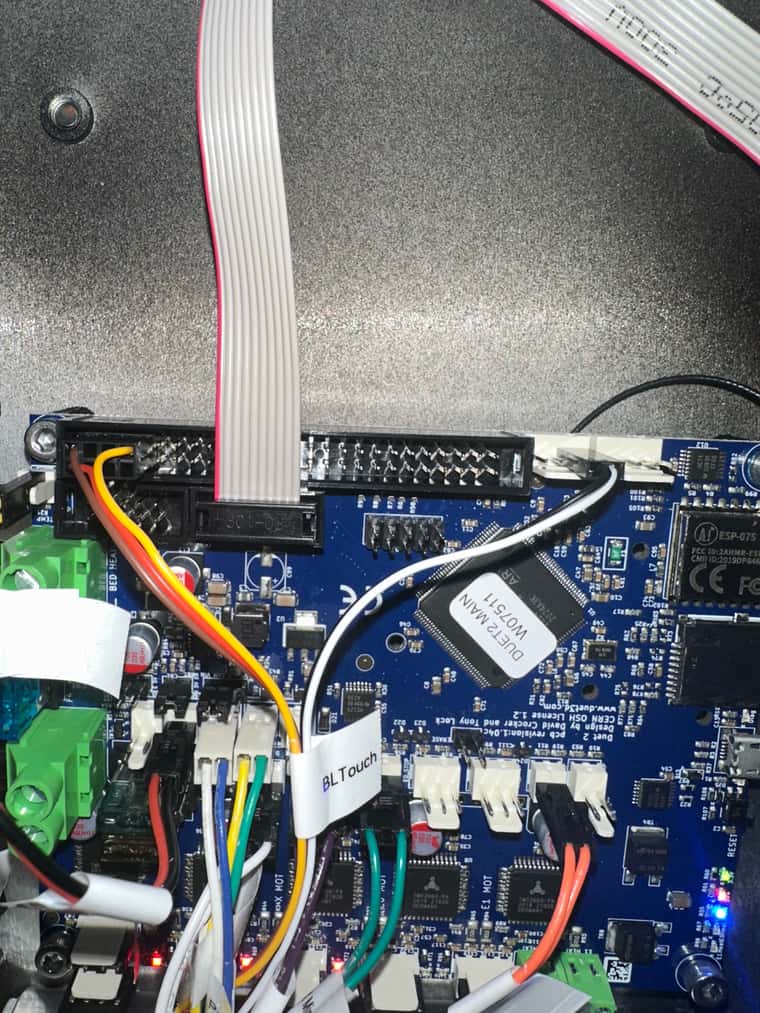
After hours or reading I am still having issues with setting up a BLTouch on an initial printer setup. I've taken a Lulzbot Workhorse, put a Hemera XS with BLTouch on it, replaced the board and screen with a Duet 2 Wifi and Paneldue. That said, I am running 3.4.6 and am going through the commissioning process. I am on step 11 for the Z Probe. I cant seem to even get it to deploy with an M401 command and I dare not go any further until I do. I have done this a few times before on a Duet2/Duex combo without issue, so I'm kinda baffled. I have verified that it is not the BLTouch itself as I have two brand new ones and have verified functionality on other machines. Here is how I have it wired (board is installed upside down):
And here is how I have it configured:
; Configuration file for Duet WiFi (firmware version 3.3)
; executed by the firmware on start-up
;
; generated by RepRapFirmware Configuration Tool v3.3.16 on Sun Oct 15 2023 20:07:59 GMT-0400 (Eastern Daylight Time); General preferences
M575 P1 S1 B57600 ; enable support for PanelDue
G90 ; send absolute coordinates...
M83 ; ...but relative extruder moves
M550 P"Lulzbot Workhorse" ; set printer name; Network
M552 S1 ; enable network
M586 P0 S1 ; enable HTTP
M586 P1 S0 ; disable FTP
M586 P2 S0 ; disable Telnet; Drives
M569 P0 S1 ; X physical drive 0 goes forwards
M569 P1 S1 ; Y physical drive 1 goes forwards
M569 P2 S0 ; Z LEFT physical drive 2 goes backwards
M569 P4 S1 ; Z RIGHT pysical drive 3 goes forwards
M569 P3 S0 ; E0 physical drive 4 goes backwards
M584 X0 Y1 Z2:4 E3 ; set drive mapping
M350 X16 Y16 Z16 E16 I1 ; configure microstepping with interpolation
M92 X80.00 Y80.00 Z400.00 E420.00 ; set steps per mm
M566 X900.00 Y900.00 Z60.00 E120.00 ; set maximum instantaneous speed changes (mm/min)
M203 X6000.00 Y6000.00 Z180.00 E1200.00 ; set maximum speeds (mm/min)
M201 X500.00 Y500.00 Z20.00 E250.00 ; set accelerations (mm/s^2)
M906 X750 Y750 Z1180 E730 I30 ; set motor currents (mA) and motor idle factor in per cent
M84 S30 ; Set idle timeout; Axis Limits
M208 X0 Y0 Z0 S1 ; set axis minima
M208 X230 Y210 Z200 S0 ; set axis maxima; Endstops
M574 X1 S1 P"xstop" ; configure switch-type (e.g. microswitch) endstop for low end on X via pin xstop
M574 Y1 S1 P"ystop" ; configure switch-type (e.g. microswitch) endstop for low end on Y via pin ystop
M574 Z2 S1 P"zstop" ; configure switch-type (e.g. microswitch) endstop for high end on Z via pin zstop
M574 Z1 S2 ; configure BLTouch for low end on Z; BLTouch
M950 S0 C"exp.heater3" ;create servo/gpio 0 on heater 3 pin on expansion connector
M558 P9 C"^zprobe.in" H5 F120 T6000 ; BLTouch connected to Z probe IN pin and the dive height + speeds
G31 P500 X50 Y-22 Z3.5 ; set Z probe trigger value, offset and trigger height
M557 X15:215 Y15:195 S40 ; define mesh grid
M376 H10 ; taper off bed compensation over 10mm; Heaters
M308 S0 P"bedtemp" Y"thermistor" T100000 B4138 ; configure sensor 0 as thermistor on pin bedtemp
M950 H0 C"bedheat" T0 ; create bed heater output on bedheat and map it to sensor 0
M307 H0 R0.322 K0.239:0.000 D1.69 E1.35 S1.00 B0 ; disable bang-bang mode for the bed heater and set PWM limit
M140 H0 ; map heated bed to heater 0
M143 H0 S120 ; set temperature limit for heater 0 to 120C
M308 S1 P"e0temp" Y"thermistor" T100000 B4138 ; configure sensor 1 as thermistor on pin e0temp
M950 H1 C"e0heat" T1 ; create nozzle heater output on e0heat and map it to sensor 1
M307 H1 R5.023 K0.673:0.686 D2.19 E1.35 S1.00 B0 V24.0 ; disable bang-bang mode for heater and set PWM limit
M143 H1 S280 ; set temperature limit for heater 1 to 280C; Fans
M950 F0 C"fan0" Q500 ; create fan 0 on pin fan0 and set its frequency
M106 P0 S0 H-1 ; set fan 0 value. Thermostatic control is turned off
M950 F1 C"fan1" Q500 ; create fan 1 on pin fan1 and set its frequency
M106 P1 S1 H1 T45 ; set fan 1 value. Thermostatic control is turned on; Tools
M563 P0 D0 H1 F0 ; define tool 0
G10 P0 X0 Y0 Z0 ; set tool 0 axis offsets
G10 P0 R0 S0 ; set initial tool 0 active and standby temperatures to 0C; Custom settings are not defined
Thank you very much for you help!
-
I'm not sure your endstop setting is correct.
I checked your wiring and pins and they look good to me for your board.
I'm running a Maestro board that had 3.4.6 and now 3.5RC1.
It has A moving bed with an optical endstop at the bottom of the printer and I use a BL-touch for Z0 when the bed is up top twords the nozzle.
My endstops are:M574 X1 S1 P"!xstop" ; configure switch-type (e.g. microswitch) endstop for high end on X via pin xstop WAS S1 Changed for Promega with mechanical X endstop 4-11-22 M574 Y2 S1 P"ystop" ; configure switch-type (e.g. microswitch) endstop for high end on Y via pin ystop. This is an optical sensor. M574 Z2 S1 P"zstop" ; configure switch-type (e.g. microswitch) endstop for high end on Z via pin zstop. This is an optical sensor.So if you have a mechanical switch at the other end I'd try
M574 Z1 S1 P"zstop"Hope this helps.
-
Have you created the deployprobe.g and retractprobe.g files, in the SYS folder, with the appropriate servo commands in them to deploy/retract the probe?
The M401 and M402 commands just run those files with a slight variation if you have multiple Z probes.
Frederick
-
@fcwilt I did not. I didn't even look for them because I figured the configurator would have created them. They are created now and I am conducting further testing.
-
Ok so I made some adjustments and built up the courage to run a Home All. It touched off to the X/Y and when it went to the Z probe it went to the wrong position (which i can fix). The problem is now that it moved like a snail. I looked at the speeds in the home files and the snail speed doesn't make any sense. I'm gonna continue to tweak but if you see any issues please point them out.
; homeall.g
; called to home all axes
;
; generated by RepRapFirmware Configuration Tool v3.3.16 on Sun Oct 15 2023 20:07:59 GMT-0400 (Eastern Daylight Time)
G91 ; relative positioning
G1 H2 Z5 F6000 ; lift Z 5mm relative to current position
G1 H1 X-235 Y-215 F1800 ; move quickly to X and Y axis endstops and stop there (first pass)
G1 H2 X5 Y5 F6000 ; go back a few mm
G1 H1 X-235 Y-215 F360 ; move slowly to X and Y axis endstops once more (second pass)
G90 ; absolute positioning
G1 X15 Y15 F6000 ; go to first bed probe point and home Z
G30 ; home Z by probing the bed; Uncomment the following lines to lift Z after probing
G91 ; relative positioning
G1 Z5 F100 ; lift Z relative to current position
G90 ; absolute positioning -
@SonnyD1 If you mean the Z probing is slow, it's because of this line in config.g:
M558 P9 C"^zprobe.in" H5 F120 T6000 ; BLTouch connected to Z probe IN pin and the dive height + speedsThe 'F120' is the probing speed, with is 120mm/minute, or 2mm/second. You can add another term to the F parameter, and the first term will be the first probe speed (ie fast to get close), while the second term will be the speed used for subsequent probes (ie slow for accuracy). See https://docs.duet3d.com/en/User_manual/Reference/Gcodes#m558-set-z-probe-type.
Fnnn or Fnnn:nnn Feed rate (i.e. probing speed, mm/min). Initial fast probe followed by probing at second speed supported in RRF 3.3 and later.
Make sure your probe is working properly before trying this! And perhaps slowly increase to a speed you're comfortable with. So try:
M558 P9 C"^zprobe.in" H5 F240:120 T6000 ; BLTouch connected to Z probe IN pin and the dive height + speedsThis will make the first probe twice the speed of subsequent probes. It will go up to the speed limit you set for the axis in M203, which you've actually set to 180mm/min; you might want to see if it can go faster without skipping, if you want faster probing.
Ian
-
If you move to the center of the bed, move to Z=5 and do a G30 what happens.
As to the speed issue in your M558 change F120 to F600:120
Frederick
-
I got it now. I have my speed turn up to a point that I like it and it probes Z in the center of the bed like it should too. Thank you @fcwilt and @droftarts.