Tool board 1.2a crimp question
-

Thanks do your help!
-
I found that making the crimp too tight will result in exactly what you are experiencing.
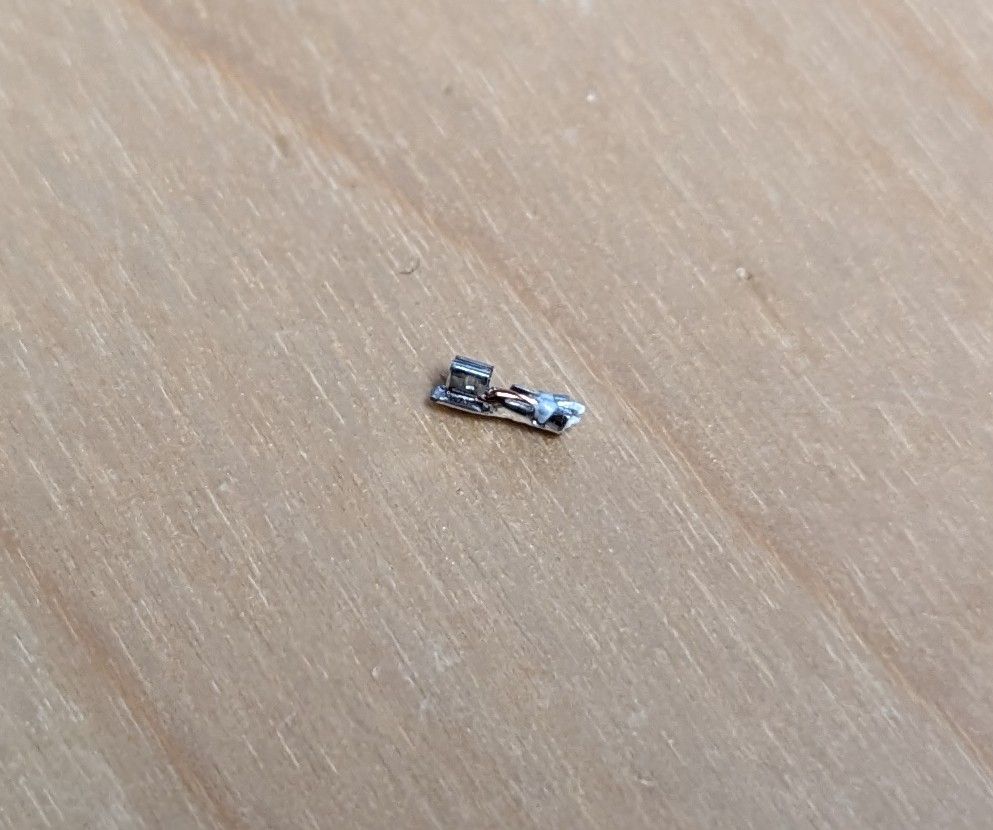
There are two crimp positions - the one that crimps only the wire and the one that crimps the wire with the insulation. I have only experienced wire breakage when crimping the wire and insulation crimp (seems that is what you are seeing as well)
Make sure that you don't use the same crimp position in the tool for both crimps!. If you have a tool that crimps both positions at the same time then you are golden but use one position larger than what you are currently using. If your tool does one crimp at a time then make sure the second crimp (with insulation) is one position larger than the wire only crimp. Again, go one position larger from the current setting.
If you are really reefing on the crimper you will kill the wire - it's got to be firm without causing damage.
You might be using the correct crimp position but use too much force.
I would say that 22 gauge is too large a wire - probably 24ga would be ok but it might require 28ga. The wire only crimp must completely encircle the wire (or pretty close to).
I can't tell for sure what is going on because of the low resolution. You might want to post a higher resolution picture so I can zoom in. Make sure you are using stranded wire (can't tell from the picture).
Lastly, yes the wires are fragile so make sure they don't vibrate when you are printing - use strain relief or zip ties.I would suggest doing some test crimps of the wire only crimp position and then tug on the wire to see how much force you need to pull out the wire. It's a feeling you develop with experience .....
-
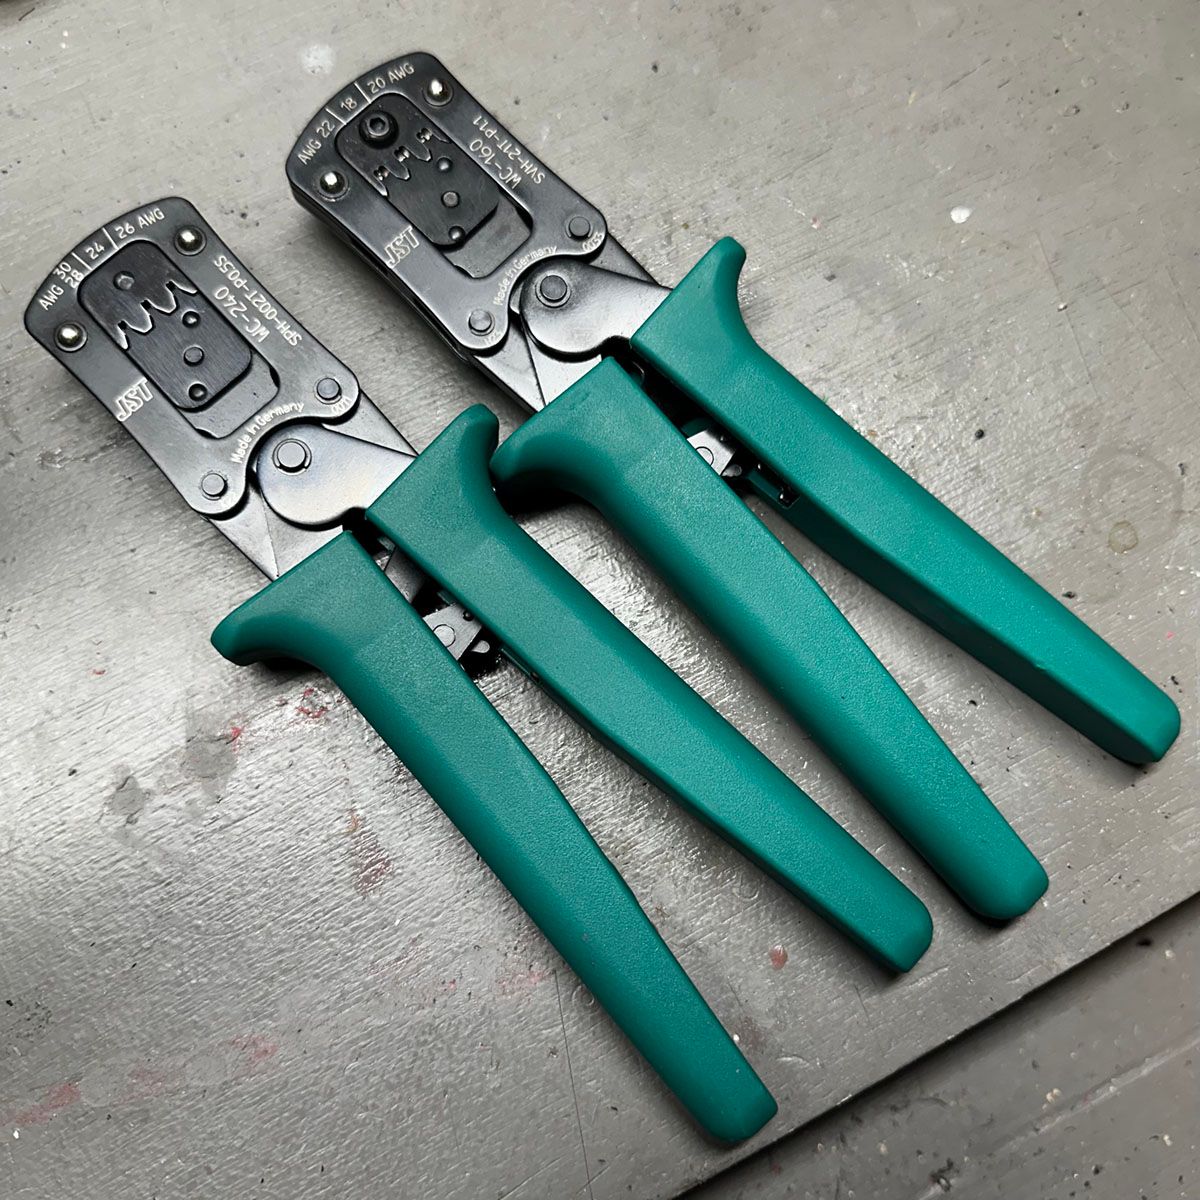
Crimping is an arduous task until you figure it out. I found the spring loaded "crimp both wire and retention part" versions of crimping tools had a too high failure rate. When I swapped to the Engineering PA style crimp tools that require a two-step crimping process, my success rate went from 30 per cent to 80 per cent (still atrocious for a professional rate, but as a hobbyist its acceptable) (-:
This video also is helpful to understand the theory behind crimping https://youtu.be/bAO9eCS65jw
Another fantastic, indepth detail resource for ALL things crimp related is the NASA documentation on crimps: https://nepp.nasa.gov/files/27631/NSTD87394A.pdf
-
I use the Engineer tools too (PA09 on JST 2.0 connectors) and I've not had a problem. Crimp the bare wire tight, but for the insulation use use a larger opening in the tool and don't crimp it tightly.
-
Thanks for the feedback.
The crimper I have crimps both the wire and insulation at the same time, ie I am not able to do one without the other. I get poor/no crimping on the wire itself, and too much on the plastic shielding and it breaks.
Reading your suggestions makes me believe I just don't have the right tool for these small JST connectors.
PA09 appears to be the correct one for the job, and appears simply searching for "JST 2.0" connectors on Amazon should help me find the correct replacement connectors I need.Thanks for the help!
-
@BlueDust I feel your pain; I'm wiring up a v1.2a 1LC at the moment, too! I needed a tool update, as I had a ratchet crimper that's been great for Molex KK, but is too big for these JST PH crimps. So I bought the PA-09 crimper, and experimented on a few crimps and bits of wire first. 22AWG wire is the biggest you can get in these crimps (E3D fan and thermistor extension wires) and are a bit of a pain to crimp. 26AWG (stepper motor wires) are almost too thin, and can easily pull out of the crimp if not crimped hard. I've found the following works well with the PA-09:
- strip off about 3mm of insulation. For thin wire you can strip double the length, then fold the wire in half, which would double the wire in the crimp and give it more to hold on to.
- use the 1.0 size for the part of the crimp over the wire
- Either put the crimp in the tool jaws, close up the jaws lightly, and feed the wire in, or lay the wire in the crimp and put it in the tool jaws, whatever works best for you and the size of wire
- crimp this part as hard as you can
- check wire is firmly held in crimp, and the part of the crimp that is over the wire is fully crimped over along its length
- use the pliers tip of the tool to squeeze the arms of the crimp over the insulation, so they are parallel
- use the 1.6 size to crimp the arms over the insulation. No need for too much pressure.
Good lighting and magnifying spectacles help! Thankfully I don't have to crimp the JST ZH connector!
Ian
-
While I feel certain almost no one else on the forum can (or should try to) justify such costly terminal crimpers, I'll throw out there that these official JST crimpers are the absolute shiznit. We have both the PH and VH models. Now if only Molex had something as high quality for the KK terminals.
-
@oozeBot
I only checked one site and not sure if it was an outlier... But those make expensive look cheap. -
@BlueDust not an outlier

-
Some people cannot afford to use cheap tools it seems (-: If I were to do this in a professional fashion I'd invest in an automated wire end stripper and Engineer PAD-01 or the likes until I made enough money to get the genuine articles.
-
I received the PA-09 crimper and plan to use it soon to try and improve some crimps/connections.
But I have an ongoing error I want to resolve first to help troubleshoot new problems I may have after I touch the crimps.
Question...
Can this error only be caused by bad crimps? Or is there another possible cause? I think I had this same error when I first setup one of my printers years ago, and from what I remember was caused by a physical wiring problem. The problem I have right now making me not want to touch anything, is that everything appears to be working, and was starting to think this was related to some left over stall config from the Duet2 that I never got working 100%... When I enabled stall detection, the printer stops and find homes randomly when not needed during the print (still needs tweaking). Also, when I had the printer still in pieces (but working) during this Duet3 upgrade, it appeared the drivers showing this problem are all on the Z axis.3/7/2024, 11:26:44 AM Warning: Driver 4 stalled at Z height 7.86
3/7/2024, 11:21:43 AM Warning: Driver 4 stalled at Z height 7.62
3/7/2024, 11:16:12 AM Warning: Driver 4 stalled at Z height 7.38
3/7/2024, 11:12:46 AM Warning: Driver 4 stalled at Z height 7.14
3/7/2024, 10:26:45 AM Warning: Driver 4 stalled at Z height 5.22
3/7/2024, 10:17:37 AM Warning: Driver 4 stalled at Z height 4.74
3/7/2024, 10:10:56 AM Warning: Driver 4 stalled at Z height 4.50
3/7/2024, 9:45:10 AM Warning: Driver 4 stalled at Z height 3.30
3/7/2024, 8:28:31 AM Warning: Driver 4 stalled at Z height 12.28
3/7/2024, 8:28:31 AM Warning: Driver 4 stalled at Z height 12.28 -
@BlueDust it's most unlikely that bad crimps would cause those stall reports. Most likely you either have the Z motor stall sensitivity set too sensitive, or have the Z acceleration or jerk set higher than the motor can comfortable handle at the current you have set.
Duet WiFi hardware designer and firmware engineer
Please do not ask me for Duet support via PM or email, use the forum
http://www.escher3d.com, https://miscsolutions.wordpress.com -
@dc42
Thanks for the feedback. I will have to play with this...M566 X700.00 Y700.00 Z60.00 E2000.00 ; set maximum instantaneous speed changes (mm/min) M203 X8400.00 Y8400.00 Z180.00 E3000.00 ; set maximum speeds (mm/min) M201 X1200.00 Y1200.00 Z40.00 E1600.00 ; set accelerations (mm/s^2) M906 X1200 Y1200 Z1200 E1000 I30 ; set motor currents (mA) and motor idle factor in per cent -
@BlueDust On a side note, are you using the stall detection to check for clogging or what's your plan for running it on the extruder?
-
@Exerqtor
I have never tested stall detection on the extruder but would if I used a Bowden Extruder. I was just trying to have the printer rehome X and Y if the fan shroud or BLtouch got stuck on a part of the print that bent upwards, but never finished dialing it in.