Y axis moving significantly slower than X axis
-
I've begun to calibrate sensorless homing for my custom core xyu 3d printer build. I got sensorless homing to run fine in the x axis. However it never stops ramming the side of the printer in the y axis. When I test the x axis it moves at the correct speed. However the Y axis moves significantly slower and I suspect this is why it never triggers stall detection. My firmware is straight from the configtool.reprapfirmware.org I have followed the wiki's instructions on setting sensorless homing as well. Attached below are the relevant sections of my config.g and homex.g and homey.g files. (z axis stuff is commented out because I have not plugged those motors in yet.)
Config.g:
; Smart Drivers
M569 P0.0 S1 D2 ; driver 0.0 goes forwards (X axis)
M915 P0.0 S1 ; set StallGuard threshold
M569 P0.1 S0 D2 ; driver 0.1 goes forwards (Y axis)
M915 P0.1 S1 ; set StallGuard threshold
M569 P0.2 S1 D2 ; driver 0.2 goes forwards (Z axis)
M915 P0.2 S1 ; set StallGuard threshold
M569 P0.4 S1 D2 ; driver 0.4 goes forwards (U axis)
M569 P0.5 S1 D2 ; driver 0.5 goes forwards (extruder 0); Motor Idle Current Reduction
M906 I10 ; set motor current idle factor
M84 S10 ; set motor current idle timeout; Axes
M584 X0.0 Y0.1 Z0.2 U0.4 ; set axis mapping
M350 U16 I0 ; configure microstepping without interpolation
M350 X16 Y16 Z16 I1 ; configure microstepping with interpolation
M906 X900 Y900 Z900 U0 ; set axis driver currents
M92 X80 Y80 Z400 U80 ; configure steps per mm
M208 X0:350 Y0:350 Z0:350 U0:200 ; set minimum and maximum axis limits
M566 X900 Y900 Z12 U900 ; set maximum instantaneous speed changes (mm/min)
M203 X6000 Y6000 Z180 U6000 ; set maximum speeds (mm/min)
M201 X500 Y500 Z20 U5 ; set accelerations (mm/s^2); Endstops
M574 X1 S4 ; configure X axis endstop
M574 Y1 S4 ; configure Y axis endstop
M574 Z1 S2 ; configure Z axis endstop
M574 U0 ; configure U axis endstopM915 X Y R0 F0 H400; manually added for sensorless homing
homex.g:
M400 ; Wait for current moves to finish
M913 X23 Y23 ; drop motor current to 20%
M400
G91 ; relative positioning
;G1 H2 Z10 F12000 ; lift Z relative to current position
G1 H1 X-400 F10000 ; move quickly to X axis endstop and stop there (first pass)
G1 H2 X5 F12000 ; go back a few mm
G1 H1 X-400 F7000 ; move slowly to X axis endstop once more (second pass)
;G1 H2 Z-10 F6000 ; lower Z again
G90 ; absolute positioning
M400
M913 X100 Y100 ; return current to 100%
M400homey.g:
M400 ; Wait for current moves to finish
M913 X23 Y23 ; drop motor current to 60%
M400
G91 ; relative positioning
;G1 H2 Z10 F12000 ; lift Z relative to current position
G1 H1 Y-400 F10000 ; move quickly to Y axis endstop and stop there (first pass)
G1 H2 Y5 F12000 ; go back a few mm
G1 H1 Y-400 F7000 ; move slowly to Y axis endstop once more (second pass)
;G1 H2 Z-10 F6000 ; lower Z again
G90 ; absolute positioning
M400
M913 X100 Y100 ; return current to 100%
M400Could you please help me resolve the y axis traveling so slowly so that I can get sensorless homing to work please?
-
@SamKudarauskas ignore some of the comments in my code as I have not updated their values yet.
-
your U acceleration is very low, probably a typo?
<>RatRig V-Minion Fly Super5Pro RRF<> V-Core 3.1 IDEX k*****r <> RatRig V-Minion SKR 2 Marlin<>
-
@SamKudarauskas there’s no obvious limit in the config that would slow the Y axis down. Do X and Y move the correct distance when, for example, a 100mm move is commanded on each?
Ian
Bed-slinger - Mini5+ WiFi/1LC | RRP Fisher v1 - D2 WiFi | Polargraph - D2 WiFi | TronXY X5S - 6HC/Roto | CNC router - 6HC | Tractus3D T1250 - D2 Eth
-
@oliof I haven't begun to calibrate the U axis yet. The only motors I currently have plugged in are my alpha and beta motors for my core xy kinematics.
-
@droftarts Both the x and Y axis move half the distance I tell them to. This is likely because I am using motors with .9 degree step angles and I have forgotten to change something in the config file to account for this. How could I fix this? Additionally, would this have anything to do with the Y axis moving significantly slower than the X axis?
I've also tried reversing the motor directions to see if that had anything to do with it and that just lead to the opposite problem of the x axis moving significantly slower than the y axis.
It should be noted also that the x axis moves cleanly and the motors are quiet where as with the y axis they seam to make a much louder sound before they begin moving.
I would appreciate anyones thoughts on how to fix this or other things to test.
Sam
-
@SamKudarauskas To fix the motors only moving half what you ask for change the steps/mm to be double what you currently have so:
M92 X160 Y160 Z400 U80What stepper motors are you using? Your current settings look like they may be a little low.
What happens if you unplug the X and Y motors from the board and (temporarily) swap them over does the axis that is running slowly change or not?
You might also want to post your complete config.g file (what you have posted already does not seem to be the full file). You may want to use "code" attributes when you post it to make it easier for folks to read.
-
@gloomyandy Hi, thank you for your help so far. I am using Nema 17 stepper mores with a 0.9 degree step angle. Model number : 17HM15-0904S. Doubling the steps per mm have resolved the problem of the print head moving half the specified distance. G1 X50 now results in 50mm of travel as intended.
Homex.g still works as intended, however homey.g has still has the same problem. I also tried flipping the motor ports and I had the same problem (just with it homing in the wrong direct due to the ports being opposite of what the code expects.)
Below I have included the entirety of my config.g file as requested. Note also though that the only things plugged into my duet board right now are my two motors so I haven't touched most of this config file.
; Configuration file for RepRapFirmware on Duet 3 Main Board 6HC
; executed by the firmware on start-up
;
; generated by RepRapFirmware Configuration Tool v3.5.0-rc.3 on Fri Mar 15 2024 11:41:50 GMT-0400 (Eastern Daylight Time)

; General
M550 P"Duet 3" ; set hostname

; Accessories
M575 P1 S0 B57600 ; configure PanelDue support

; Network
M552 P0.0.0.0 S1 ; configure Ethernet adapter
M586 P0 S1 ; configure HTTP

; Smart Drivers
M569 P0.0 S1 D2 ; driver 0.0 goes forwards (X axis)
M915 P0.0 S1 ; set StallGuard threshold
M569 P0.1 S0 D2 ; driver 0.1 goes forwards (Y axis)
M915 P0.1 S1 ; set StallGuard threshold
M569 P0.2 S1 D2 ; driver 0.2 goes forwards (Z axis)
M915 P0.2 S1 ; set StallGuard threshold
M569 P0.4 S1 D2 ; driver 0.4 goes forwards (U axis)
M569 P0.5 S1 D2 ; driver 0.5 goes forwards (extruder 0)

; Motor Idle Current Reduction
M906 I10 ; set motor current idle factor
M84 S10 ; set motor current idle timeout

; Axes
M584 X0.0 Y0.1 Z0.2 U0.4 ; set axis mapping
M350 U16 I0 ; configure microstepping without interpolation
M350 X16 Y16 Z16 I1 ; configure microstepping with interpolation
M906 X900 Y900 Z900 U0 ; set axis driver currents
M92 X160 Y160 Z400 U80 ; configure steps per mm
M208 X0:350 Y0:350 Z0:350 U0:200 ; set minimum and maximum axis limits
M566 X900 Y900 Z12 U900 ; set maximum instantaneous speed changes (mm/min)
M203 X6000 Y6000 Z180 U6000 ; set maximum speeds (mm/min)
M201 X500 Y500 Z20 U5 ; set accelerations (mm/s^2)

; Extruders
M584 E0.5 ; set extruder mapping
M350 E16 I1 ; configure microstepping with interpolation
M906 E900 ; set extruder driver currents
M92 E420 ; configure steps per mm
M566 E120 ; set maximum instantaneous speed changes (mm/min)
M203 E3600 ; set maximum speeds (mm/min)
M201 E250 ; set accelerations (mm/s^2)

; Kinematics
M669 K5 ; configure CoreXYU kinematics

; Probes
M558 K0 P9 C"io2.in" H5 F120 T6000 ; configure BLTouch probe via slot #0
G31 P500 X0 Y0 Z0.7 ; set Z probe trigger value, offset and trigger height
M950 S0 C"io2.out" ; create servo #0 for BLtouch

; Endstops
M574 X1 S4 ; configure X axis endstop
M574 Y1 S4 ; configure Y axis endstop
M574 Z1 S2 ; configure Z axis endstop
M574 U0 ; configure U axis endstop

M915 X Y R0 F0 H400; manually added for sensorless homing

; Mesh Bed Compensation
M557 X25:175 Y25:175 S40:40 ; define grid for mesh bed compensation

; Sensors
M308 S0 P"temp0" Y"thermistor" A"Heated Bed" T100000 B4725 C7.06e-8 ; configure sensor #0
M308 S1 P"temp1" Y"thermistor" A"Nozzle" T100000 B4725 C7.06e-8 ; configure sensor #1

; Heaters
M950 H0 C"out0" T0 ; create heater #0
M143 H0 P0 T0 C0 S140 A0 ; configure heater monitor #0 for heater #0
M307 H0 R2.43 D5.5 E1.35 K0.56 B1 ; configure model of heater #0
M950 H1 C"out1" T1 ; create heater #1
M143 H1 P0 T1 C0 S285 A0 ; configure heater monitor #0 for heater #1
M307 H1 R2.43 D5.5 E1.35 K0.56 B0 ; configure model of heater #1

; Heated beds
M140 P0 H0 ; configure heated bed #0

; Fans
M950 F0 C"out3" ; create fan #0
M106 P0 S0 L0 X1 B0.1 ; configure fan #0
M950 F1 C"out4" ; create fan #1
M106 P1 S0 B0.1 H1 T45 ; configure fan #1

; Tools
M563 P0 D0 H1 F0 ; create tool #0
M568 P0 R0 S0 ; set initial tool #0 active and standby temperatures to 0C
Thank you for your help so far as well.
Sam
-
@SamKudarauskas I should note also that when I hit the Home Y button on the web interface (when the gantry is far away from the (0,0) position and the y axis has a large distance to get up to speed) that it does turn blue (meaning that the axis is homed) when it comes in contact with the wall, although it continues to try to move anyways. I'm not sure what is causing this either as the x axis reaches max speed very rapidly but it takes the y axis 200mm to get anywhere near max speed.
-
 undefined Phaedrux moved this topic from Firmware installation
-
@SamKudarauskas I'm not at all familiar with core XYU kinematics perhaps you could post a picture of your printer. Are you sure that the settings you have for U are not impacting the X/Y performance?
Also are you sure you should be using endstop type 4 (multiple motor stall detection)? I would have thought that for a core XY type setup you would want to stop all of the motors when one of them stalls.
-
@gloomyandy I tried changing the kinematics type to just core xy instead of core xyu and it now works as intended. (Y axis moves at correct speed and now homes correctly).
I have no idea why this works as the u axis, and all of its movement definitions are independent of the base kinematics (or so I thought).
I guess I will try just manually declaring a U axis instead of using the core xyu preset.
Could you please clarify what the difference between end stop type 3 and 4 are? they both seem to work fine interchangeably in my set up.
Thanks everyone for all of your help.
Sam
-
@SamKudarauskas said in Y axis moving significantly slower than X axis:
Could you please clarify what the difference between end stop type 3 and 4 are? they both seem to work fine interchangeably in my set up.
I think the documentation does a pretty good job:
Endstop type S4 means use motor stall detection (like S3) but if there are multiple motors dedicated to a single axis, stop each one individually as it stalls. S3 means use motor stall detection but if there are multiple motors dedicated to a single axis, stop all those motors when the first one stalls.So basically if you have multiple motors on an axis, then with s3 if any motor stalls then all are stopped, with s4 each motor will be stopped when it stalls. I'm not sure if that actually applies in the case of corexy which sort of has two motors active when doing a pure X or Y move. But if it does you certainly want both motors to stop the moment the first one stalls. Basically unless you know that you need s4 I would use s3.
You should probably create a new thread and ask in there how core xyu mode is supposed to work. Perhaps your printer is not actually core xyu as defined by RRF.
-
@SamKudarauskas there are two ways of doing a CoreXYU (or CoreXY Idex); the first is a CoreXY with a Markforged U axis, while the second has an additional CoreXY belt pattern:
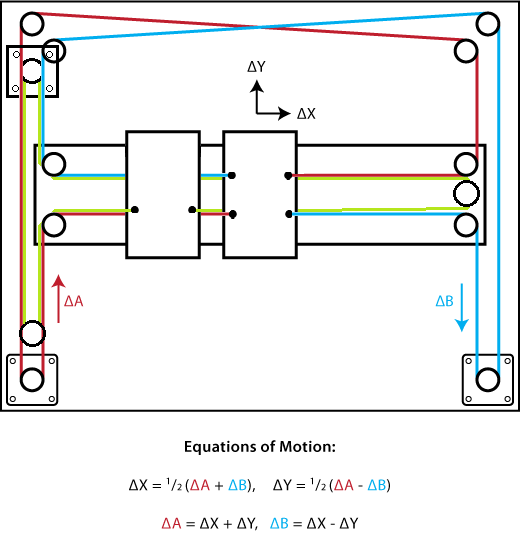
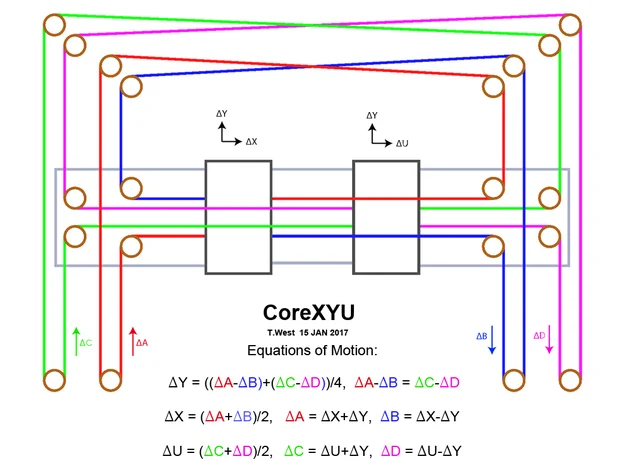
Both are supported by RRF, using the
M669 K5CoreXYU kinematic. The second version is a little more complicated, as it uses two motors for the U axis. For both, what it means is that movement in X only need to move the ‘X’ and ‘Y’ motors, but movements in Y and U rely on all motors, ‘X’, ‘Y’ and ‘U’. This means the config for XY and U axes has to be the same. Yours isn’t, and I was wrong earlier when I said I couldn’t see any errors.M906 X900 Y900 Z900 U0 ; set axis driver currents M92 X160 Y160 Z400 U80 ; configure steps per mm M208 X0:350 Y0:350 Z0:350 U0:200 ; set minimum and maximum axis limits M566 X900 Y900 Z12 U900 ; set maximum instantaneous speed changes (mm/min) M203 X6000 Y6000 Z180 U6000 ; set maximum speeds (mm/min) M201 X500 Y500 Z20 U5 ; set accelerations (mm/s^2)M906 has the U axis current set to 0
M92 has the steps per mm of U as half that of X and Y. Different motor? Ideally, it would be the same, and the steps per mm be the same.
M201 acceleration has U set to 5, 500 for the other axes.Ian
-
Thank you both for your help. I misunderstood what a core xyu is. My printer is a supposed to just be a core xy with an additional axis for the tool change mechanism. (my printer is most similar to E3D's tool changer 3D printer.)