Input shaping . can i just run a auto tune ?
-
Hi
I've just fitted the tool board to hot end , so i only have one accelerometer on the x-axis
but i have no idea what all these input shapers click boxes do , i just want a basic set up .So i don't know what box to click on on the right-hand side
any help would be great , thanks
-
@Richard-F
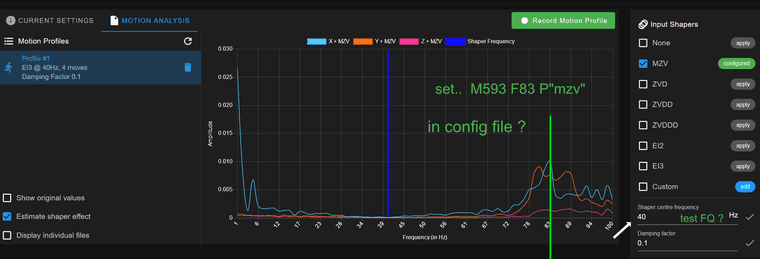
would it be M593 F40 ? .
configure / apply on the right of the tick boxes , I've no idea what thats doing . lol
.I've tried looking for video tutorial , me being neurodivergent ,a video is the best way for me to understand -
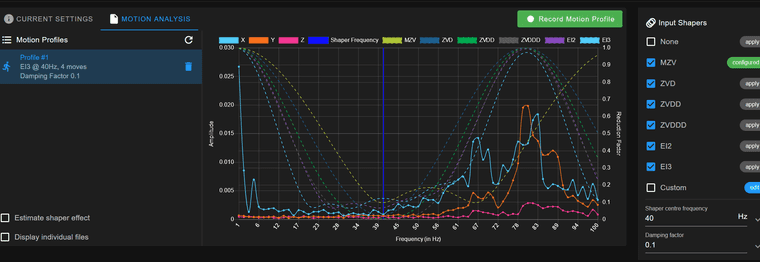
@Richard-F if you untick the check boxes on the right, you see the measurement from the accelerometer.
Choose one checkbox after the other to see how it affects the graphs.
You usually have one peak where one or both axes (X and Y, ignore Z on a typical printer) have the highest value on the graph. That should be the frequency to set in your M593 command.
The various algorithms do different amounts of shaping "around" your target frequency (ZV does the least, EI3 and ZVDDD to the most for our purposes). You would usually pick an algorithm that results in the flattest overall curve, while affecting the narrowest range of frequencies (otherwise you get the Input Shaper-induced slowdown for frequencies where it's not needed).
Since RepRapFirmware currently does not support setting individual frequencies per axis, you may need to pick a frequency that allows you to cover both peaks without going too wide.
If your X shows a peak at frequency 41Hz, and Y shows a peak at frequency 44Hz, you can usually just set
M593 F41 P"mzv"and call it a day. If the difference is higher, i.e. 37Hz on X and 78Hz on Y, you can try something likeM593 F63 P"zvddd"-- it really depends on your machine though.I don't know if the upcoming re-implementation of IS will provide a facility to set per axis frequencies (like Marlin and Klipper) and algorithms (like Klipper and Marlin with Fixed Time Motion Planning), we will have to wait and see what @dc42 comes up with.
Lastly: If you have multiple peaks on your measurement, you very likely have a mechanical issue that cannot be countered by Input Shaping (loose bolts, bad tension, broken bearings in pulleys), and you need to find and fix those.
<>RatRig V-Minion Fly Super5Pro RRF<> V-Core 3.1 IDEX k*****r <> RatRig V-Minion SKR 2 Marlin<>
-
@Richard-F If you follow the input shaping plugin guide: https://docs.duet3d.com/User_manual/Tuning/Input_shaping_plugin I think that gives a reasonable set of steps. In particular make sure that you start by running a motion profile with no input shaper configured (see: https://docs.duet3d.com/User_manual/Tuning/Input_shaping_plugin#determining-ringing-frequencies). This will show you the base state of things. After that you may want to try enabling a particular shaper and running further profiles to see how effective it has been.
It is hard to be sure but it looks like in the screenshot you have posted you may have had the EI3 shaper enabled when you collected that data, this may have changed the results you are observing.
-
@Richard-F Once you have followed the advice from @oliof and @gloomyandy, you can test the input shaping with a print. See the 'Klipper version' section here: https://docs.duet3d.com/en/How_to_guides/Calibration#input-shaping
Download the 'ringing tower' from the Klipper page. The first macro is for printing at different accelerations to show the ringing, so shouldn't be needed if you already know the frequency from the accelerometer. The second macro applies the different input shapers, to see the effect.
Ian
Bed-slinger - Mini5+ WiFi/1LC | RRP Fisher v1 - D2 WiFi | Polargraph - D2 WiFi | TronXY X5S - 6HC/Roto | CNC router - 6HC | Tractus3D T1250 - D2 Eth
-
@oliof Thank you so much for your time , i think i have a basic understanding , I'm setting up a new build so I'm working out many different things as i go
but i think this is right . i hope lol
-
@droftarts said in Input shaping . can i just run a auto tune ?:
@Richard-F Once you have followed the advice from @oliof and @gloomyandy, you can test the input shaping with a print. See the 'Klipper version' section here: https://docs.duet3d.com/en/How_to_guides/Calibration#input-shaping
Download the 'ringing tower' from the Klipper page. The first macro is for printing at different accelerations to show the ringing, so shouldn't be needed if you already know the frequency from the accelerometer. The second macro applies the different input shapers, to see the effect.
Ian
thanks IAN will do I'm just making my own build so i just need a basic set up at the moment and fine tune later , but that will be useful when i do")
-
@Richard-
40 is the default setting for Shaper Center Frequency I believe. Change that to 83 and try 0.0 as the damping factor.Your config command would then be
M593 P"mzv" F83.0 S0.0 L0.25If you are using Pressure Advance recheck that after any change to M593.
-
@tas thanks Tas . i will give that a go and fine tune later
-
@Richard-F you ran your test with EI3 enabled. Run accelerometer tests with IS disabled.