Implementing a custom code in the G code
-
Hi,
I have an Ender 3 3D printer with Duet 2 board and latest firmware, and I want to implement a specific sequence of G-code commands at the end of each layer. I am using Python to modify the G-code file and insert my commands after the code of printing each layer. I am trying to perform a specific movement before continuing the print with the next layer. (recording a video to make some quality control image processing on the current layer)Here is the G-code I am trying to implement after the completion of each layer:
G1 E-0.2                    ; Retract the filament slightly to prevent melted drops on the print
G4 S0.1                     ; Wait for 1 millisecond
G0 F9000 X50.0 Y117.5 Z30.0 ; Move to a reference starting point
G1 F9000 X200               ; Move the X-axis to the endpoint
G1 E0.2
However, I am encountering a couple of issues:
- Filament is being retracted a lot and after 20 or 30 layers its shifted back from the nozzle and not pushed enough.
- The movement speed for G0 F9000 X50.0 Y117.5 Z30.0 remains slow regardless of the feed rate I set.
- After about 30 layers, issues with returning to the correct layer height, causing the nozzle to collide with the print.
4-Sometimes a bit of melted filament sticks on the print and damaging the print if happens continually.
I am ensuring that this code is added before the printer prepares for the next layer, but I am still facing these problems.
Any thoughts or suggestions on whether the code is correct and how to improve the implementation process would be highly appreciated! Thanks!
-
@Muhammed which slicer are you using to insert that code; and is the slicer configured to use relative or absolute extrusion?
Duet WiFi hardware designer and firmware engineer
Please do not ask me for Duet support via PM or email, use the forum
http://www.escher3d.com, https://miscsolutions.wordpress.com -
@dc42 I am using Cura slicer to generate the g code, but not to add that code because as far as I know, I can only change the start and end g code on Cura from machine settings.
After generating the g code using Cura, I am manipulating the file with a python program to add my code block after each layer.
-
@Muhammed Cura slices in absolute extrusion mode by default, so your G1 E commands won't behave as you want. Preferably, set Cura to use relative extrusion, which is is what we recommend for RRF.
Duet WiFi hardware designer and firmware engineer
Please do not ask me for Duet support via PM or email, use the forum
http://www.escher3d.com, https://miscsolutions.wordpress.com -
@Muhammed if you are using absolute extrusion for the rest of the file, make the two moves in your macro relative by adding
G91before andG90after the two extruder moves.Alternatively, set the extruder position to zero before the first move with
G92 E0.Ian
-
@dc42 @droftarts Thanks everyone for your feedback.
Yeah, I understand now that Cura slices in absolute extrusion mode by default and there is an option for relative extrusion mode.
@droftarts Do you recommend changing the setting in Cura to relative mode? or just adding
G91before andG90after the two extruder moves.Also, is the speed issue related to this settings?
Thanks alot.
-
@Muhammed post your config.g. It’s possible Z is skipping, and X Y speed is limited. It may be sensible to post the Gcode file too; slicers have a habit of overriding speeds set in config.g.
Ian
Bed-slinger - Mini5+ WiFi/1LC | RRP Fisher v1 - D2 WiFi | Polargraph - D2 WiFi | TronXY X5S - 6HC/Roto | CNC router - 6HC | Tractus3D T1250 - D2 Eth
-
@droftarts Hi, this is the config file attached config.g.
And this is the gcode file that I prepared with Cura default settings then I implemented my code inside it. I haven't tried adding G91 and G90 yet. gmodified_CE3E3V2_20mm_calibration_cube.gcode
I am a newbie here and might be struggling with some basic points. Thank you for your support, it is really appreciated.
-
@Muhammed I'd suggest that you split this move into two parts, one part of the Z move, one for the X/Y move:
G0 F9000 X50.0 Y117.5 Z30.0The speed of the move will probably be limited by how fast your Z axis can move (compared with your X and Y axis). But more importantly there is a danger that you will scrape your printhead over the print (assuming that Z=30 is below the max height of your print). If Z=30 ia above the max height of any print then I suggest you do the Z move first followed by the X/Y move, if Z=30 can be below the max height of the print then do the X/Y move first followed by the Z move.
-
@gloomyandy Many thanks for your reply. Actually, I tried to split the Z move before X and Y but the speed still stays slow no matter what the
Fvalue is. Also, yes I am considering Z=30 as the max height of any print. I will give it a try again as you mentioned. -
@Muhammed said in Implementing a custom code in the G code:
the speed still stays slow no matter what the F value is
The speed limit for the axis from config.g may be set lower than your requested F value?
-
@Phaedrux I have the following values in my config.g file:
M566 X1200.00 Y1200.00 Z24.00 E300.00              ; set maximum instantaneous speed changes (mm/min)
M203 X6000.00 Y6000.00 Z180.00 E1500.00            ; set maximum speeds (mm/min)
M201 X500.00 Y500.00 Z100.00 E1000.00              ; set accelerations (mm/s^2)
I see
M203 Z180?!
I chose these values for Ender 3 printer from its Github page! do I need to modify them?Thanks!
-
@Muhammed said in Implementing a custom code in the G code:
I see M203 Z180 ?!
That's pretty slow. 3mm/s
How fast are you trying to move the Z axis? What F value are you trying to use?
I'd bet you get increase that value to M203 Z600 which would give you a maximum of 10mm/s. If that's too much, back it off a bit.
-
@Phaedrux I understand now.
I don't have specific speed requirement for now, but definitely not 3mm/s. This was the recommended speed by Creality for this printer. Would it be ok for the printer if I increased it to 600?
Thank you all. -
@Muhammed it's pretty difficult to give a definite answer on the maximum speed on an ender 3 because there are so many (unnamed) revisions and the build quality is highly variable, including questions about how square the Z axis drive is. If your ender 3 is in good shape, it should be able to do 10mm/sec (so your 600 value). In the end you'll need to do some experimentation to find the actual limit of your machine.
-
@oliof Thanks a lot for the valuable feedback, I will try that carefully and see how the printer will response.
-
Hello everyone, Thank you all for your support up to this point. It seems that putting the slicer in relative extrusion mode is giving better results, and the code below is working just fine:
G1 E-5                       ;Retract the filament slightly
G4 S0.3                      ;Wait for 3 millisecond
G0 F5000 X20.0 Y117.5 Z40.0  ;Move to a reference starting point
G4 S0.1                      ;Wait for 1 millisecond
G1 F9000 X200                ; Move the X-axis to the endpoint
G1 E5
However, after this code executes, the printer’s head returns from the Z40 height to start the next layer, but during this, a bit of filament is melting from the nozzle and affecting the print. Is there any way to adjust this?
Thanks!
-
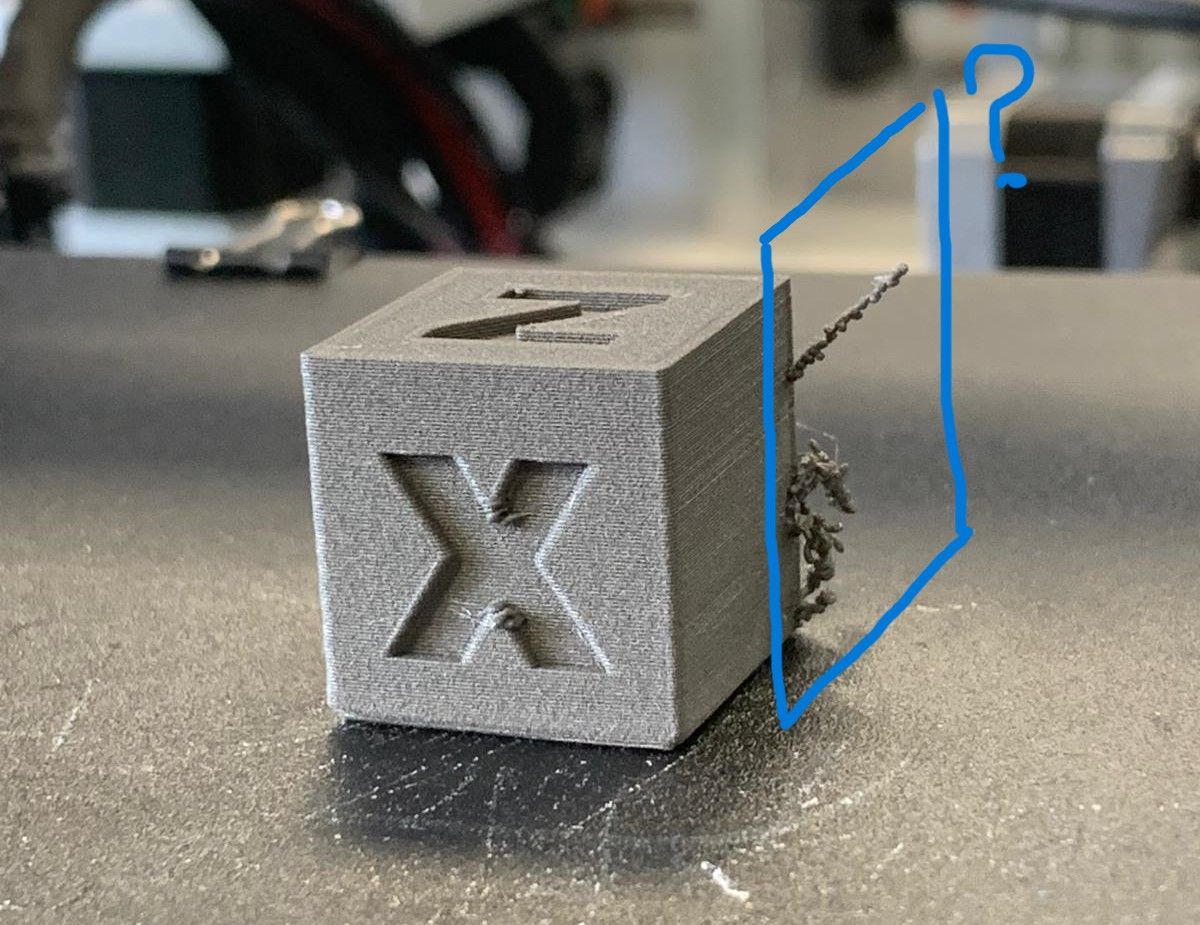
@Muhammed This is the current output while the above code is implemented during the printing process.! Is there anything I can do for improvements?
-
@Muhammed That looks like oozing from the nozzle as it goes off the print, then attaches like that when it comes back to the print. I think this is caused because you retract 5mm when you move off the print, but extrude 5mm before you move back to the print, so the melted filament has time to ooze out as it returns from X200 to the print.
You could save the position at the point your retract with
G60 S0(see https://docs.duet3d.com/en/User_manual/Reference/Gcodes#g60-save-current-position-to-slot), then move back to this after the move along the X axis withG1 R0 X0 Y0 Z2(see https://docs.duet3d.com/en/User_manual/Reference/Gcodes#g1-controlled-linear-move), then extrude 5mm, so you are where you left off before extruding. The 'Z2' means the nozzle comes back to the point 2mm above saved position.So you code would look like:
G1 E-5                       ;Retract the filament slightly
G60 S0                       ; Save position to slot 0
G4 S0.3                      ;Wait for 3 millisecond
G0 F5000 X20.0 Y117.5 Z40.0  ;Move to a reference starting point
G4 S0.1                      ;Wait for 1 millisecond
G1 F9000 X200                ; Move the X-axis to the endpoint
G1 R0 X0 Y0 Z2               ; Restore position
G1 E5
You may end up with a small bulge if it starts on the perimeter; you could offset the restart position into the print by a couple of mm in X and Y, to wipe the nozzle inside, as it restarts.
Ian
Bed-slinger - Mini5+ WiFi/1LC | RRP Fisher v1 - D2 WiFi | Polargraph - D2 WiFi | TronXY X5S - 6HC/Roto | CNC router - 6HC | Tractus3D T1250 - D2 Eth
-
@droftarts I really appreciate your support and thanks a lot
 . This solved the issue perfectly.
 -
 undefined Phaedrux marked this topic as a question
-
undefined Phaedrux has marked this topic as solved