Duet3D Logo Duet3D
    • Tags
    • Documentation
    • Order
    • Register
    • Login

    Configuring 12864 LCD on Maestro?

    Scheduled Pinned Locked Moved
    Duet Hardware and wiring
    20
    79
    23.1k
    Loading More Posts
    • Oldest to Newest
    • Newest to Oldest
    • Most Votes
    Reply
    • Reply as topic
    Log in to reply
    This topic has been deleted. Only users with topic management privileges can see it.
    • dc42undefined
      dc42 administrators @Cata
      last edited by

      @cata, the Duet WiFi and Ethernet do not have the hardware needed to level shift the LCD signals to 5V and gate the SPI clock for compatibility with common 12864 LCD/encoder combos. That's the main reason why the firmware builds for those boards don't include the 12864 support.

      Duet WiFi hardware designer and firmware engineer
      Please do not ask me for Duet support via PM or email, use the forum
      http://www.escher3d.com, https://miscsolutions.wordpress.com

      Cataundefined 1 Reply Last reply Reply Quote 0
      • Cataundefined
        Cata @dc42
        last edited by

        @dc42 a level shifter is too basic to implement, not the same with the firm support. Why not implement in the firm and let the users works with the level shifter?

        1 Reply Last reply Reply Quote 0
        • Vetiundefined
          Veti
          last edited by

          considering you need an adapter for the ramps to connect an lcd this would not be much different

          1 Reply Last reply Reply Quote 1
          • 3dmntbighkerundefined
            3dmntbighker
            last edited by

            Is anyone working on the print from SD card functions? It seems like the most glaring thing that's missing from what ships with a Maestro. I'm fully aware that this a back burner project for the devs.

            Scratch built CoreXY with Maestro
            Heavily modified Ender 3 with Maestro
            MPCNC work in progress with Duet WiFi

            Vetiundefined 1 Reply Last reply Reply Quote 0
            • Vetiundefined
              Veti @3dmntbighker
              last edited by

              @3dmntbighker
              not sure what you mean.
              the files uploaded to the maestro are stored on the sd card. you can select those and print them.
              also you can select them from the lcd and print them

              3dmntbighkerundefined 1 Reply Last reply Reply Quote 0
              • 3dmntbighkerundefined
                3dmntbighker @Veti
                last edited by 3dmntbighker

                @veti said in Configuring 12864 LCD on Maestro?:

                @3dmntbighker
                not sure what you mean.
                the files uploaded to the maestro are stored on the sd card. you can select those and print them.
                also you can select them from the lcd and print them

                My Maestro SD card failed a week ago. It arrived with a non-functional set of menu files for the 12864. I don't recall seeing any gcode models on the card out of the box either. I managed to get some portion of the menu to work between firmware updates and doing some editing. DC42 sent me the Crane files he had to get me functional again, but the stuff for navigating the card and printing has not worked for me so far since the card failure. I got a missing file error. I'll look it over again when the printer isn't busy.

                edit: For whatever reason it failed yesterday and it works now? Go figure.
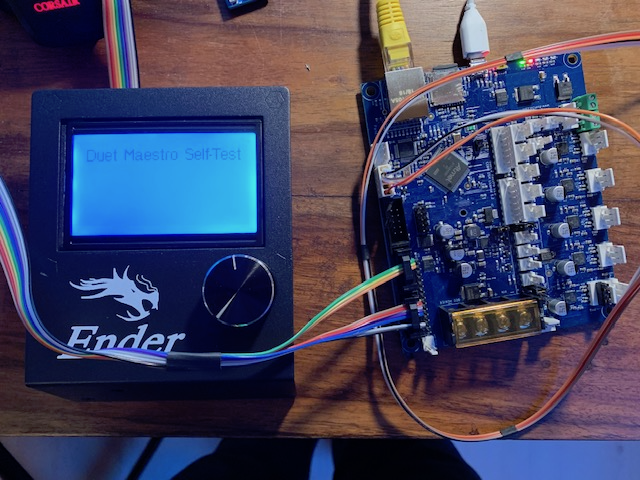
                Scratch built CoreXY with Maestro
                Heavily modified Ender 3 with Maestro
                MPCNC work in progress with Duet WiFi

                1 Reply Last reply Reply Quote 0
                • zanoneundefined
                  zanone
                  last edited by

                  Hi,

                  just received my Maestro board and took the 12684 lcd from my ramps board.
                  After powering the Maestro the lcd shows just a blue screen 😞
                  I have setup the "main" file with just the follwing line

                  text R0 C0 F1 T"My 3D Printer "

                  I tried upgrading the firmware to the latest , but the lcd is still not working.
                  Is there anything i i'll have to do to make it work?

                  Firmware Name: RepRapFirmware for Duet 2 Maestro
                  Firmware Electronics: Duet Maestro 1.0
                  Firmware Version: 2.02(RTOS) (2018-12-24b1)
                  Web Interface Version: 1.22.6

                  1 Reply Last reply Reply Quote 0
                  • Vetiundefined
                    Veti
                    last edited by

                    M918 P1 ; 128x64 Reprap Display

                    russellundefined 1 Reply Last reply Reply Quote 1
                    • russellundefined
                      russell @Veti
                      last edited by

                      @veti Hi i have M918 P1 E2

                      1 Reply Last reply Reply Quote 1
                      • zanoneundefined
                        zanone
                        last edited by

                        Thank you guys , it is working !

                        I am afraid i will bomb you soon with some more noob questions 🙂

                        Firmware Name: RepRapFirmware for Duet 2 Maestro
                        Firmware Electronics: Duet Maestro 1.0
                        Firmware Version: 2.02(RTOS) (2018-12-24b1)
                        Web Interface Version: 1.22.6

                        1 Reply Last reply Reply Quote 0
                        • jottesmanundefined
                          jottesman
                          last edited by

                          If you haven't found it already, you may find this post of interest.

                          There are some nice examples (shameless plug: Including my own) of menu files there

                          1 Reply Last reply Reply Quote 0
                          • secretmanundefined
                            secretman
                            last edited by

                            tank you guys for the work i got my lcd to work
                            helse than here i never saw that i needed to add G4 P200 M918 P1 any where
                            lcd are not necessery but i luv to see what is going on when i pass by 🙂

                            dc42undefined 1 Reply Last reply Reply Quote 0
                            • dc42undefined
                              dc42 administrators @secretman
                              last edited by

                              @secretman said in Configuring 12864 LCD on Maestro?:

                              tank you guys for the work i got my lcd to work
                              helse than here i never saw that i needed to add G4 P200 M918 P1 any where
                              lcd are not necessery but i luv to see what is going on when i pass by 🙂

                              What happens if you leave out the G4 P200 bit ?

                              Duet WiFi hardware designer and firmware engineer
                              Please do not ask me for Duet support via PM or email, use the forum
                              http://www.escher3d.com, https://miscsolutions.wordpress.com

                              secretmanundefined 2 Replies Last reply Reply Quote 0
                              • secretmanundefined
                                secretman
                                last edited by

                                will try tonight and report

                                1 Reply Last reply Reply Quote 0
                                • jameswoodundefined
                                  jameswood
                                  last edited by

                                  Hey gang! Just a quick note to thank you all for pointing me in the right direction to get my Creality CR10S screen working with the Maestro.

                                  I managed to pull the plastic connectors off the screen's EXP1 & 2 connectors, sliding them up and off the pins. Then I flipped them and slid them back on. No snipping or filing needed, just a prising thumbnail!

                                  0_1548911675017_R15jfGiCR%+kSTKifItNOA.jpg

                                  1 Reply Last reply Reply Quote 1
                                  • PuterProundefined
                                    PuterPro
                                    last edited by PuterPro

                                    @jameswood said in Configuring 12864 LCD on Maestro?:

                                    Just a quick note to thank you all for pointing me in the right direction to get my Creality CR-10S screen working with the Maestro.

                                    And a quick Thank YOU for confirming what I thought I needed to do on my CR-10S 👍 Complete with picture. Nice!!

                                    EDIT: Ahhh ... Just looked at my 12864 board and I don't have a EXP3 header at all. When did you get your 10S?
                                    Mine was from Nov 17. Did they add an SD Card to it later or something?

                                    jameswoodundefined 1 Reply Last reply Reply Quote 0
                                    • secretmanundefined
                                      secretman @dc42
                                      last edited by

                                      @dc42 im cheking this tonight i got a tuff week hahah

                                      1 Reply Last reply Reply Quote 0
                                      • secretmanundefined
                                        secretman
                                        last edited by

                                        and i will let this here juste like that lolll
                                        http://www.hobbytronics.co.uk/downloads/bmp-lcd

                                        1 Reply Last reply Reply Quote 0
                                        • secretmanundefined
                                          secretman @dc42
                                          last edited by

                                          @dc42 it work the same not needed 🙂

                                          1 Reply Last reply Reply Quote 0
                                          • pixelpieperundefined
                                            pixelpieper
                                            last edited by pixelpieper

                                            Hi, First post here, I thought that may help you guys out a bit...

                                            0_1549298878999_9d3d5687-011e-4ba7-a9a8-04a355cf58a0-image.png

                                            If anyone else wants a simple clean way to create a single ribbon cable which does not involve dupont connectors: You can easily crimp yourself a cable, just get yourself some connectors (like this one, no affiliation with sparkfun). You can either reuse the existing cable or, simpler, get some rainbow ribbon cable which allows you to follow this color scheme:
                                            0_1549298782224_21b3e5c3-3192-406a-9533-9d9a7f28791d-image.png
                                            All connectors as seen from the top, i.e. the order in which the pins are on the connectors

                                            Crimp the cable on the LCD side with all wires, if using a rainbow ribbon align the marker (small triangle) with the brown wire so that the colors match up the illustration. Carefully cut the ribbon after two wires, in the center and finally just before the outer two wires. For the EXP1 connector align the first two and last two wires identical to their position on the LCD side. Take the second three wire pair and align it flipped over with the first wires. The top "bridge" of the connector has some indentations which helps with the proper alignment. You should have three remaining wires, these go into the exp2 connector, again flipped over. make sure to skip the first two positions and you should be fine.

                                            Happy crimping!

                                            --Edit--
                                            Configuration when using this wiring to have the wheel inputs properly working:
                                            M918 P1 E-4

                                            Voron V2.434 / Duet 3 Mini5+, Duet 3 Expansion Mini 2+, Duet 1LC V1.1 Toolboard
                                            Voron V0.250 / Duet 2 Maestro

                                            PuterProundefined 1 Reply Last reply Reply Quote 4
                                            • First post
                                              Last post
                                            Unless otherwise noted, all forum content is licensed under CC-BY-SA