Duet3D Logo Duet3D
    • Tags
    • Documentation
    • Order
    • Register
    • Login
    1. Home
    2. PuterPro
    • Profile
    • Following 0
    • Followers 0
    • Topics 21
    • Posts 165
    • Best 21
    • Controversial 0
    • Groups 0

    PuterPro

    @PuterPro

    24
    Reputation
    15
    Profile views
    165
    Posts
    0
    Followers
    0
    Following
    Joined Last Online

    PuterPro Unfollow Follow

    Best posts made by PuterPro

    • RE: I built a printer! Thank you everyone for everything.

      @deckingman OH my goodness! I certainly didn't mean to offend ANYONE, and am certainly aware of how helpful you are here!!! My DEEPEST apologies for any slight!!

      I was not referring to any of the "regulars". Certainly "a LOT" was a simply a poor choice of words.
      I would edit the post and remove the offending remarks but that would break this discussion, so I'll just take my whipping like a man.

      What I was referring to was NOT any of the regulars who spend a lot of time helping people and sharing their work, but every forum out there has lurkers that either don't post, or only occasionally, and DON'T share but only come for help.

      Pros with "industrial" machines would understandably be reluctant to divulge what might be a proprietary design, which is what the OP had ALREADY STATED earlier, I was replying to that.

      Despite being a complete noob here, I've already attempted to share what little knowledge I have and have always tried to be upbeat and helpful. That I'm here posting at all when I'm not try to solve my own problems should speak to that. Simply being only a member for three months doesn't mean I'm stupid or just an ass, it just means I've only recently started in the Duet world, how long someone is a member doesn't make who they are. You hurt me with your remarks.

      I've also stated several times both here and on some other forums how great a forum this is, very little of the BS found on some of the 3D forums, and have referred people here.

      I think you were a bit harsh and quick to jump me. I know full well who you are and regard you as "one of the good guys" who could be counted on to help out (as you have in some of my questions).

      NO implied insult or put-down was intended in the SLIGHTEST. I really don't get how you could have read this as an attack or criticism, it wasn't aimed at you or anyone else here, it was a reply to the OP who was reluctant to share what might be a business advantage (HIS words). I was BEING NICE TO HIM, not attacking you.

      Most sorry you took it that way, and my DEEPEST apologies. ☹

      posted in My Duet controlled machine
      PuterProundefined
      PuterPro
    • New dual fan cooled Maestro case posted to Thingiverse

      Hi all !

      Just wanted to let you know I've posted a rework to an actively cooled case on Thingiverse for the Duet Maestro.

      Please take a peek and let me know of any issue or improvements you might like to see. Thx!! 😃

      https://www.thingiverse.com/thing:3520236

      posted in Duet Hardware and wiring
      PuterProundefined
      PuterPro
    • RE: A total minefield for a newbie

      A total minefield for a newbie

      I LOL'd at this one. I setup mine almost two years ago and thought that. After a lot of work and mind numbing reading of posts and articles (and a HEALTHY dose of help on here!) I finally mastered the beast.

      Here we are, a while down the road, and I made some upgrades to my machine and the house of cards came down. The old adage "If you don't use it you lose it" kicked in and again I found myself banging my head on the desk as I struggled relearn AND to grasp the changes that occurred since last time!

      I'm now back in it (mostly) and it occurs to me that I might try my hand at writing a beginners guide aimed at the total noob. I'm fairly good at explaining things once I grasp them, my biggest hurtle is that I tend to long winded. Nature of the beast {SIGH}.

      There are lots of guides out there, many of them excellent, but I'm thinking sorta a "Guide to the Guides" with some simple explanation of the major terms thrown in since that's often the main sticking point when starting a new field of learning.

      The guides don't always define their terms up front, so the beginner gets lost in the terms rather than the concepts being explained. The old "Well, I'm at the end of the page and I'm more confused then when I started" thing.

      I'm sure I'd be asking a lot of Q's of the old hands if I do it to ensure I don't send someone off a cliff, LOL! (I can hear the groans now 😜 )

      Hang in Bob, it'll start coming together. Good luck!

      posted in General Discussion
      PuterProundefined
      PuterPro
    • RE: "Backup" for 12V systems if powerloss?

      Or you can just cheat, and use a 1500VA UPS, like I do, for the whole thing. You also get surge protection, and on the better AVR ones, it smoothes during slight dips to preserve the battery on brownouts.

      If you really want to let out your "Inner Engineer" and want a little project, almost all of the better ones have a USB port that can communicate status & power loss. I imagine an Arduino or Raspi could grab that and send a signal to save and shutdown the printer when the battery gets low.

      If you do it, post it on Thingiverse and here, OK? 😀

      posted in Hardware wishlist
      PuterProundefined
      PuterPro
    • RE: Configuring 12864 LCD on Maestro?

      @jameswood Thanks! I have it hooked up and working with the two cables (reversed the plastic to fix polarity), was just curious if EXP3 was setup for SD card use. Just curiosity, no real need...

      It works fine but the contrast is terrible. Seems there's a pot to adjust it on most boards but if there's one on this one I sure can't find it!! Don't want to desolder the boards to look, but not visible from the edges.

      I'll control it from a touchscreen PC so the 12864 is strictly for redundancy. Thanks for the info!!

      posted in Duet Hardware and wiring
      PuterProundefined
      PuterPro
    • RE: Using WiFi Router on Maestro

      @3dmntbighker said in Using WiFi Router on Maestro:

      Things get a little cranky at times routing traffic. The routers don't seem to reliably route traffic between the two domains.

      LOL Yeah, that's WiFi in a nutshell!

      Fortunately, I have several (like a dozen) of various makes and models, Computer Tech if you didn't guess by my name ... 😉

      So if I find it being naughty I'll swap out for another. Doesn't seem like there would be all that much traffic most times.

      Fortunately I'm in an undense WiFi environment, except for all MY stuff LOL, and that I spread around the spectrums, so I don't expect to have much interference.

      A great app to get a handle on what's around you is WiFi Analyzer (Android only, Apple doesn't allow such things in their store). Works for both 2,4 and 5GHz spectrums, and it's free.

      Very much appreciate the heads up! Thx!! Also a big thanks for your other activity here, I've read a lot of your posts since the Ender is a cousin to my CR-10S.

      posted in General Discussion
      PuterProundefined
      PuterPro
    • RE: I built a printer! Thank you everyone for everything.

      Now it's my turn to stalk you ... 😇

      That's looking REALLY awesome. Love the dual printhead setup. You posted a video of it yet?

      What's the bed surface, PEI?

      Love the idea of two steel plates with rigid spacer blocks for the bed, Light but stiff, never saw that one, very cool. 👍 👍

      posted in My Duet controlled machine
      PuterProundefined
      PuterPro
    • RE: Crimping tool?

      @zapta said in Crimping tool?:

      This one for example doesn't need adjustment and will never nick the wires https://www.amazon.com/Teledyne-Thermal-Stripper-Without-Temperature/dp/B00DNQHBCS

      Well, if there was ever a tool that begged for a Chinesium knock off, that one sure fits the bill!

      A bit of looking around found this:
      https://smile.amazon.com/PATCO-Thermal-Wire-Stripper-PTS-10/dp/B00R3R86JU

      a bit less coin of the realm... With of course a downgrade in quality. Seems a great Instructables project for someone.

      @deckingman - I'm with ya!! You made me LMAO. I can do flat plaster, but when it comes to corners - looks like a three year old with palsey did it, and the more I try to fix it the worse it gets.

      If I need to crimp a plug with more than 4 wires I'll get three perfect, after much effort, then mangle the fourth, which of course make it too short now, so I have to settle for an uneven looking job or let my OCD take over and redo the d*mn thing. 😡

      posted in Duet Hardware and wiring
      PuterProundefined
      PuterPro
    • RE: Confirmation prior to purchase. CR-10 compatibility.

      I just converted my CR-10S which is just a bigger version of the CR-10. Still nailing down some little things but it's pretty straightforward, if a bit of work.

      For the Bed - they used a standard thermistor on it, it's not a PT100 (unless it's a brand new machine and they did something weird recently). As @dc42 says, use the standard thermistor, the Configuration tool default setting works fine.

      If you plan on doing real high temp stuff like nylon or Polycarbonate, etc. you might replace the thermistor in the hotend with a PT100 or PT1000. The PT100 is more accurate but more of a PITA as it requires an amplifier board (sensor has very low signal) and really should be wired with a 4 wire shielded cable rather than the current 2 wires you have.

      The reason for the change is the standard thermistor doesn't really have the accuracy at those high temps, it's at the end of it's range. It's a bit of a safety issue as well, but again, only if you plan real high temp stuff over about 260°C.

      I went with the PT1000 as it's almost as good as the PT100 but plug and play, especially if you go with a Maestro board, it's setup for it.

      The configuration part is the tricky part as the G-Code setup is pretty different than Marlin, but it makes a lot of sense and it really flexible, but be prepared to learn. 😉

      I agree with @genghisnico13 - take the time to put some thermal compound on that MOSFET.

      Octoprint - I imagine you can use it still, but I think you might take a look at Duet Web Control, it's how most people control it. Here's a link to the Manual: DWC

      I have all the motor info if you get stuck when configuring, and there's a bunch of other Creality people hanging around here.

      The screen - You can also use a tablet or laptop for Duet Web Control.

      It will be an adventure, but you'll have a big smile when you get it running, it's head and shoulders above the Marlin setup.

      posted in General Discussion
      PuterProundefined
      PuterPro
    • RE: I built a printer! Thank you everyone for everything.

      @bot said in I built a printer! Thank you everyone for everything.:

      I believe the bed assembly, excluding the ball screw and linear rails completely, weighs 16 kg!

      OMG! Not quite light, LOL! You could use that as a ballistic shield in a battle!

      my wife told me I need to change the design to be like that

      It's really cool your wife is not only understanding, but helping. Mine pretends she's not very knowledgeable but I explain everything to her as I go and she's probably a better engineer than a lot who pretend to be ... she's extremely smart. (Smarter than me for sure!) She's forever saying something when I'm fighting a problem that totally solves it from an unexpected angle.

      Look forward to a nice "Walkabout" video where you tell some of the decisions you made and why.

      Catch ya later, and again, well done.

      posted in My Duet controlled machine
      PuterProundefined
      PuterPro

    Latest posts made by PuterPro

    • RE: Extruder not showing Temps after upgrade

      @Phaedrux - Another note - I'll now do the Calibration for the PT1000 per:
      https://docs.duet3d.com/en/User_manual/Connecting_hardware/Temperature_connecting_thermistors_PT1000

      Puterpro - Out. Be well my distant friend.

      posted in Firmware installation
      PuterProundefined
      PuterPro
    • RE: Extruder not showing Temps after upgrade

      @Phaedrux said in Extruder not showing Temps after upgrade:

      And just on the off chance that something went wacky with all the firmware updates, you can re-apply the firmware entirely by uploading the 3.4.5 zip file to the sys folder.

      https://github.com/Duet3D/RepRapFirmware/releases/download/3.4.5/Duet2and3Firmware-3.4.5.zip

      Upload the file itself, don't extract first.

      That's what I started with, and I know to load the zip. I'll re-download just in case and try it if you haven't any thoughts about the heater test.

      EDIT: I edited "e0temp" to "ctemp" and moved Thermistor to there, same message - HE is "Active" and Temp is "n/a". I'll try reloading the firmware as above and let you know.

      BINGO! I suspected corrupted s/w but didn't question the Github download I'd done.
      Came right up but temp was wrong so I guess I'd used a PT1000 so I changed "pt1000" B4092 and we have:

      Duet Heaters3.PNG

      Yea! 😁 I'll move it back to E0 so I don't go "Huh??!?" six months from now. Ha!
      Thanks so much, you're a Prince.

      posted in Firmware installation
      PuterProundefined
      PuterPro
    • RE: Extruder not showing Temps after upgrade

      @Phaedrux Interesting thought! Wish I'd thought of it, LOL Here's the results (E0 disconnected)

      Duet Heaters2.PNG

      posted in Firmware installation
      PuterProundefined
      PuterPro
    • RE: Extruder not showing Temps after upgrade

      @Phaedrux said in Extruder not showing Temps after upgrade:

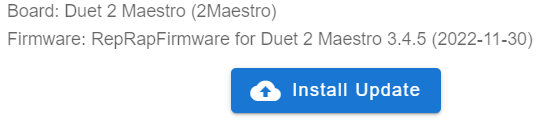
      If you're on firmware and DWC 3.4.5 just stay there. No need to jump around firmwares now.
      Noted. Wanted to be sure I got a good load and json matched my changes for future uploads to Configurator.

      If you copy and pasted the config sample for the heaters I posted, the config should be correct.
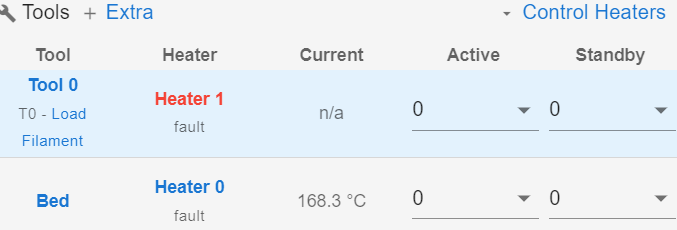
      I agree. But it didn't work ... 😉 Also - Heater and Thermistor wired to either E0 or E1 makes no change.

      Can you post your config.g as it currently is?

      Sure:

      ; Configuration file for Duet Maestro (firmware version 3.3)
      ; executed by the firmware on start-up
      ;
      ; generated by RepRapFirmware Configuration Tool v3.3.15 on Thu Jan 19 2023 09:20:10 GMT-0500 (Eastern Standard Time)

      ; General preferences
      G90 ; send absolute coordinates...
      M83 ; ...but relative extruder moves
      M550 P"CR-10S DUET" ; set printer name

      ; Network
      M552 P192.168.1.18 S1 ; enable network and set IP address
      M553 P255.255.255.0 ; set netmask
      M554 P192.168.1.254 ; set gateway
      M586 P0 S1 ; enable HTTP
      M586 P1 S0 ; disable FTP
      M586 P2 S0 ; disable Telnet

      ; Drives
      M569 P0 S1 ; physical drive 0 goes forwards
      M569 P1 S1 ; physical drive 1 goes forwards
      M569 P2 S1 ; physical drive 2 goes forwards
      M569 P3 S1 ; physical drive 3 goes forwards
      M584 X0 Y1 Z2:4 E3 ; set drive mapping
      M350 X16 Y16 Z16 E16 I1 ; configure microstepping with interpolation
      M92 X80.00 Y80.00 Z26.56 E419.80 ; set steps per mm
      M566 X900.00 Y900.00 Z31.80 E120.00 ; set maximum instantaneous speed changes (mm/min)
      M203 X12000.00 Y12000.00 Z699.60 E1200.00 ; set maximum speeds (mm/min)
      M201 X500.00 Y250.00 Z16.60 E166.00 ; set accelerations (mm/s^2)
      M906 X1100 Y1100 Z1000 E900 I30 ; set motor currents (mA) and motor idle factor in per cent
      M84 S30 ; Set idle timeout

      ; Axis Limits
      M208 X-5 Y-5 Z0 S1 ; set axis minima
      M208 X295 Y305 Z320 S0 ; set axis maxima

      ; Endstops
      M574 X1 S1 P"xstop" ; configure switch-type (e.g. microswitch) endstop for low end on X via pin xstop
      M574 Y1 S1 P"ystop" ; configure switch-type (e.g. microswitch) endstop for low end on Y via pin ystop
      M574 Z1 S2 ; configure Z-probe endstop for low end on Z

      ; Z-Probe
      M950 S0 C"zprobe.mod" ; create servo pin 0 for BLTouch
      M558 P9 C"^zprobe.in" H5 F120 T6600 ; set Z probe type to bltouch and the dive height + speeds
      G31 P500 X45 Y15 Z0.6 ; set Z probe trigger value, offset and trigger height
      M557 X5:295 Y5:305 S20 ; define mesh grid

      ; Heaters
      M308 S0 P"bedtemp" Y"thermistor" T100000 B4138 ; configure sensor 0 as thermistor on pin bedtemp
      M950 H0 C"bedheat" T0 ; create bed heater output on bedheat and map it to sensor 0
      M307 H0 B0 S1.00 ; disable bang-bang mode for the bed heater and set PWM limit
      M140 H0 ; map heated bed to heater 0
      M143 H0 S110 ; set temperature limit for heater 0 to 110C
      M308 S1 P"e0temp" Y"thermistor" T100000 B4725 C7.06e-8 ; configure sensor 1 as thermistor on pin e0temp
      M950 H1 C"e0heat" T1 ; create nozzle heater output on e0heat and map it to sensor 1
      M307 H1 B0 S1.00 ; disable bang-bang mode for heater and set PWM limit
      M143 H1 S280 ; set temperature limit for heater 1 to 280C

      ; Fans
      M950 F0 C"fan0" Q500 ; create fan 0 on pin fan0 and set its frequency
      M106 P0 S0 H-1 ; set fan 0 value. Thermostatic control is turned off
      M950 F1 C"fan1" Q500 ; create fan 1 on pin fan1 and set its frequency
      M106 P1 S1 H1 T45 ; set fan 1 value. Thermostatic control is turned on

      ; Tools
      M563 P0 D0 H1 F0 ; define tool 0
      G10 P0 X0 Y0 Z0 ; set tool 0 axis offsets
      G10 P0 R0 S0 ; set initial tool 0 active and standby temperatures to 0C

      ; Custom settings are not defined

      ; Miscellaneous
      M911 S10 R11 P"M913 X0 Y0 G91 M83 G1 Z3 E-5 F1000" ; set voltage thresholds and actions to run on power loss
      T0 ; select first tool
      ===========================================

      Also please post the results of sending M122 and M98 P"config.g" in the gcode console.

      1/20/2023, 7:56:04 AM M122
      === Diagnostics ===
      RepRapFirmware for Duet 2 Maestro version 3.4.5 (2022-11-30 19:42:44) running on Duet Maestro 1.0
      Board ID: 08D8M-9T8A2-MQNS0-7J9DD-3SS6S-9RT2X
      Used output buffers: 1 of 26 (23 max)
      === RTOS ===
      Static ram: 23620
      Dynamic ram: 67020 of which 0 recycled
      Never used RAM 23848, free system stack 218 words
      Tasks: NETWORK(ready,24.7%,262) HEAT(notifyWait,0.1%,356) Move(notifyWait,0.0%,404) TMC(notifyWait,1.3%,117) MAIN(running,73.8%,492) IDLE(ready,0.0%,31), total 100.0%
      Owned mutexes:
      === Platform ===
      Last reset 00:36:27 ago, cause: power up
      Last software reset at 2023-01-19 09:24, reason: User, GCodes spinning, available RAM 23848, slot 2
      Software reset code 0x0003 HFSR 0x00000000 CFSR 0x00000000 ICSR 0x00000000 BFAR 0xe000ed38 SP 0x00000000 Task MAIN Freestk 0 n/a
      Error status: 0x00
      Step timer max interval 1331
      MCU temperature: min 28.4, current 36.0, max 36.5
      Supply voltage: min 24.7, current 24.7, max 24.8, under voltage events: 0, over voltage events: 0, power good: yes
      Heap OK, handles allocated/used 0/0, heap memory allocated/used/recyclable 0/0/0, gc cycles 0
      Events: 0 queued, 0 completed
      Driver 0: standstill, read errors 0, write errors 0, ifcnt 6, reads 36867, writes 6, timeouts 0, DMA errors 0, CC errors 0
      Driver 1: standstill, read errors 0, write errors 0, ifcnt 6, reads 36867, writes 6, timeouts 0, DMA errors 0, CC errors 0
      Driver 2: standstill, read errors 0, write errors 0, ifcnt 6, reads 36867, writes 6, timeouts 0, DMA errors 0, CC errors 0
      Driver 3: standstill, read errors 0, write errors 0, ifcnt 6, reads 36867, writes 6, timeouts 0, DMA errors 0, CC errors 0
      Driver 4: standstill, read errors 0, write errors 0, ifcnt 6, reads 36867, writes 6, timeouts 0, DMA errors 0, CC errors 0
      Driver 5: not present
      Driver 6: not present
      Date/time: 2023-01-20 07:56:02
      Slowest loop: 16.85ms; fastest: 0.17ms
      I2C nak errors 0, send timeouts 0, receive timeouts 0, finishTimeouts 0, resets 0
      === Storage ===
      Free file entries: 10
      SD card 0 detected, interface speed: 15.0MBytes/sec
      SD card longest read time 3.6ms, write time 0.0ms, max retries 0
      === Move ===
      DMs created 83, segments created 0, maxWait 0ms, bed compensation in use: none, comp offset 0.000
      === MainDDARing ===
      Scheduled moves 0, completed 0, hiccups 0, stepErrors 0, LaErrors 0, Underruns [0, 0, 0], CDDA state -1
      === AuxDDARing ===
      Scheduled moves 0, completed 0, hiccups 0, stepErrors 0, LaErrors 0, Underruns [0, 0, 0], CDDA state -1
      === Heat ===
      Bed heaters 0 -1, chamber heaters -1 -1, ordering errs 0
      Heater 1 is on, I-accum = 0.0
      === GCodes ===
      Segments left: 0
      Movement lock held by null
      HTTP is idle in state(s) 0
      Telnet is idle in state(s) 0
      File is idle in state(s) 0
      USB is idle in state(s) 0
      Aux is idle in state(s) 0
      Trigger is idle in state(s) 0
      Queue is idle in state(s) 0
      LCD is idle in state(s) 0
      Daemon is idle in state(s) 0
      Autopause is idle in state(s) 0
      Code queue is empty
      === Network ===
      Slowest loop: 30.29ms; fastest: 0.02ms
      Responder states: HTTP(0) HTTP(0) HTTP(0) HTTP(0) FTP(0) Telnet(0)
      HTTP sessions: 1 of 8
      Interface state active, link 100Mbps full duplex
      ========================================
      1/20/2023, 7:57:37 AM M98 P"config.g"
      HTTP is enabled on port 80
      FTP is disabled
      TELNET is disabled

      And finally, how bout a photo of the wiring on the board?
      OK:
      Maestro.jpg

      Can you check continuity of the thermistor cabling?

      Mentioned twice above. 😉 Digital Multimeter reads both heater and Thermistor at normal values. I also said I'd substituted a new, good, (knowing that's NOT the same thing LOL) Thermistor for testing, still gives "Active" and "n/a" for temp. Note: this machine has been running perfectly for months under 2.03, only change is the Firmware. Not dealing with some recent hardware change. FYI - I know you deal with lots of wiring & bad parts issues, but I'm an Electronics Tech for a looong time. Not bragging, just info. Wirings messy but functional. Thanks for your help with this!! 😗 LOL

      posted in Firmware installation
      PuterProundefined
      PuterPro
    • RE: Extruder not showing Temps after upgrade

      @Phaedrux Well Hello old Friend! Very long time since we spoke, hope all's well in your world.

      No joy. I had moved to E1 for both heater and Thermistor, so for this code I moved them back to E0.
      Same thing. I get "Active" and "n/a" as above. DMM reads both as normal values.

      I grabbed a brand new Thermistor and tried it for a test, same thing.
      I'm guessing corrupt software somehow.
      I misunderstood in my 1st steps that Configurator would ALSO grab the latest files (Firmware and DWC) and include that in the zip, so I handled the config files & DWC as separate uploads from the Firmware. I get now that was wrong. 😕 😊

      My upgrade path was: 2.04 / DWC Equally old > Backup sys to zip > Update DWC only to 3.1.1 > updated to 3.0 Firmware > load updated 3.0 zip from Configurator > Load 3.4.5 from Configurator zip for all.
      BUT for the last step I unzipped the config.g from the zip, edited manually and verified line by line in Notepad++ 'Compare mode' to my old config.g, then replaced it back into the zip, THEN uploaded 3.4.5 to the Maestro.

      I realize now that was a lot of unneeded work and the Comparator handles it all. Duh. (OCD creeps out LOL)
      Here's current:
      Current Firmware.PNG
      Current DWC.PNG

      You think I should run Configurator directly from the json in sys and try again with a new load? EDIT: Did "edit via config tool" and re-ran Configurator, fixed a few values (matching current config.g above except a few minor things). I chose "Semitec 104NT" and SET values using it's defaults. No change. END EDIT

      Or go back to 3.3? Or wipe and try again?
      Note I went 2.04 > 3.0 > 3.4.5 not 2.04 > 3.0 > 3.3 > 3.4.5.

      I'm in your worthy hands. 😀

      posted in Firmware installation
      PuterProundefined
      PuterPro
    • RE: Extruder not showing Temps after upgrade

      @dc42 Yes Sir! BTW - I moved the Heater and the Thermistor back to E1 as it's been fine there for years. ALSO - I realized I had the old config-override.g with the old values so I renamed it config-override.g.old in case it was the culprit. No joy.

      ; Configuration file for Duet Maestro (firmware version 3.3)
      ; executed by the firmware on start-up
      ;
      ; generated by RepRapFirmware Configuration Tool v3.3.15 on Wed Jan 18 2023 09:54:15 GMT-0500 (Eastern Standard Time)
      ; MODIFIED by Bob M to transfer settings from 2.x

      ; General preferences
      G90 ; send absolute coordinates...
      M83 ; ...but relative extruder moves
      M550 P"CR-10S DUET" ; set printer name

      ; Network
      M552 P192.168.1.18 S1 ; enable network and set IP address
      M553 P255.255.255.0 ; set netmask
      M554 P192.168.1.254 ; set gateway
      M586 P0 S1 ; enable HTTP
      M586 P1 S0 ; disable FTP
      M586 P2 S0 ; disable Telnet

      ; Drives
      M569 P0 S1 ; physical drive 0 goes forwards
      M569 P1 S1 ; physical drive 1 goes forwards
      M569 P2 S1 ; physical drive 2 goes forwards
      M569 P3 S1 ; physical drive 3 goes forwards
      M569 P4 S1 ; physical drive 4 goes forwards

      M584 X0 Y1 Z2:4 E3 ; set drive mapping
      M350 X16 Y16 Z16 E16 I1 ; configure microstepping with interpolation
      M92 X80.00 Y80.00 Z1593.48 E419.80 ; set steps per mm Chng Z: 400 to 1600 (2mm Lead Acme Screw upgrade)11-18-21 Chg Z from 1600 to 1593.48 (measured)
      M566 X900.00 Y900.00 Z31.80 E120.00 ; set maximum instantaneous speed changes (mm/min)Chng Z: 12 to 32 (2mm Lead Acme Screw upgrade)
      M203 X12000.00 Y12000.00 Z700.00 E1200.00 ; set maximum speeds (mm/min)
      M201 X500.00 Y250.00 Z16.60 E166.00 ; set accelerations (mm/s^2)
      M906 X1100 Y1100 Z1000 E900 I30 ; set motor currents (mA) and motor idle factor in per cent CHGED Z 900 TO 1000 (2mm Lead Acme Screw upgrade)
      M84 S30 ; Set idle timeout

      ; Axis Limits
      M208 X-5 Y-5 Z0 S1 ; set axis minima
      M208 X295 Y305 Z320 S0 ; set axis maxima

      ; Endstops
      M574 X1 S1 P"xstop" ; configure switch-type (e.g. microswitch) endstop for low end on X via pin xstop
      M574 Y1 S1 P"ystop" ; configure switch-type (e.g. microswitch) endstop for low end on Y via pin ystop
      M574 Z1 S2 ; configure Z-probe endstop for low end on Z

      ; Z-Probe
      M950 S0 C"zprobe.mod" ; create servo pin 0 for BLTouch
      M558 P9 C"^zprobe.in" H5 F120 T6000 ; set Z probe type to bltouch and the dive height + speeds
      G31 P500 X45 Y15 Z0.6 ; set Z probe trigger value, offset and trigger height ORIG .4 Nozzle = Z0.6
      M557 X5:295 Y5:305 S20 ; define mesh grid

      ; Heaters
      M308 S0 P"bedtemp" Y"thermistor" T100000 B4388 ; configure sensor 0 as thermistor on pin bedtemp
      M950 H0 C"bedheat" T0 ; create bed heater output on bedheat and map it to sensor 0
      M307 H0 B0 S1.00 ; disable bang-bang mode for the bed heater and set PWM limit
      M140 H0 ; map heated bed to heater 0
      M143 H0 S120 ; set temperature limit for heater 0 to 120C
      M308 S1 P"e1temp" Y"thermistor" T100000 B4725 C7.06e-8 ; configure sensor 1 as Semitec 104NT on pin e1temp (E3D Gold)
      M950 H1 C"e1heat" T1 ; create nozzle heater output on e1heat and map it to sensor 1
      M307 H1 B0 S1 ; disable bang-bang mode for heater and set PWM limit
      M143 H1 S310 ; set temperature limit for heater 1 to 310C

      ; Fans
      M950 F0 C"fan0" Q500 ; create fan 0 on pin fan0 and set its frequency
      M106 P0 S0 H-1 ; set fan 0 value. Thermostatic control is turned off
      M950 F1 C"fan1" Q500 ; create fan 1 on pin fan1 and set its frequency
      M106 P1 S1 H1 T45 ; set fan 1 value. Thermostatic control is turned on

      ; Tools
      M563 P0 D0 H1 F0 ; define tool 0
      G10 P0 X0 Y0 Z0 ; set tool 0 axis offsets
      G10 P0 R0 S0 ; set initial tool 0 active and standby temperatures to 0C

      ; Custom settings are not defined

      ; Miscellaneous
      M501 ; load saved parameters from non-volatile memory
      M911 S10 R11 P"M913 X0 Y0 G91 M83 G1 Z3 E-5 F1000" ; set voltage thresholds and actions to run on power loss
      T0 ; select first tool

      EDIT: Here's the Heaters:
      Duet Heaters.PNG

      posted in Firmware installation
      PuterProundefined
      PuterPro
    • RE: Extruder not showing Temps after upgrade

      @jay_s_uk Found it:
      M98 P"config.g"
      HTTP is enabled on port 80
      FTP is disabled
      TELNET is disabled
      Error: Heater 2 not found

      posted in Firmware installation
      PuterProundefined
      PuterPro
    • RE: Extruder not showing Temps after upgrade

      @jay_s_uk K doing it ...

      Where's it put the output? I entered in console and nothing happened I could see

      posted in Firmware installation
      PuterProundefined
      PuterPro
    • Extruder not showing Temps after upgrade

      Long time user of Maestro, finally decided to get off 2.03.

      Ran through RRF configurator, mapped my values, created a zip and did a side by side update of my config.g to map in all values and fix errors. Saved changed file back into the RRF zip.
      Read tons of guides and after 1 false start managed to get from 2.03 to 3.0 to 3.4.5, including DWC up to 3.4.5 as well. I killed all the little bugs and typos and all's well except the Extruder.
      I've a CR-10S (highly modded) running a E3D Gold HE with a genuine E3D Semitec 104NT. All was working fine under 2.03
      It was attached as E1 heater and Themistor connected to Themistor 2 (E1). During Configuration I accidentally specified a pt1000 (had it on a Dragon HE which died). Realized my mistake and manually reconfig'd to the Semitec 104NT.
      Doesn't read temps. Heater shows Active and will select temps (doesn't heat of course) Temp shows "Current - n/a"
      Checked thermistor with a DMM, reads 101KΩ. Tried moving them both to E0 but same results!
      HALP! What the heck am I missing?? 😉

      Here's my config.g heater section:
      ; Heaters
      M308 S0 P"bedtemp" Y"thermistor" T100000 B4388 ; configure sensor 0 as thermistor on pin bedtemp
      M950 H0 C"bedheat" T0 ; create bed heater output on bedheat and map it to sensor 0
      M307 H0 B0 S1.00 ; disable bang-bang mode for the bed heater and set PWM limit
      M140 H0 ; map heated bed to heater 0
      M143 H0 S120 ; set temperature limit for heater 0 to 120C
      M308 S1 P"e0temp" Y"thermistor" T100000 B4725 C7.06e-8 ; configure sensor 1 as Semitec 104NT on pin e1temp (E3D Gold)
      M950 H1 C"e0heat" T1 ; create nozzle heater output on e1heat and map it to sensor 1
      M307 H1 B0 S1 ; disable bang-bang mode for heater and set PWM limit
      M143 H1 S310 ; set temperature limit for heater 1 to 310C

      EDIT: I forgot to mention I have a dual Z with the second motor on Drive 4 E1 Motor just as info ...
      ; Drives
      M569 P0 S1 ; physical drive 0 goes forwards
      M569 P1 S1 ; physical drive 1 goes forwards
      M569 P2 S1 ; physical drive 2 goes forwards
      M569 P3 S1 ; physical drive 3 goes forwards
      M569 P4 S1 ; physical drive 4 goes forwards

      M584 X0 Y1 Z2:4 E3 ; set drive mapping
      M350 X16 Y16 Z16 E16 I1 ; configure microstepping with interpolation
      M92 X80.00 Y80.00 Z1593.48 E419.80 ; set steps per mm Chng Z: 400 to 1600 (2mm Lead Acme Screw upgrade)11-18-21 Chg Z from 1600 to 1593.48 (measured)
      M566 X900.00 Y900.00 Z31.80 E120.00 ; set maximum instantaneous speed changes (mm/min)Chng Z: 12 to 32 (2mm Lead Acme Screw upgrade)
      M203 X12000.00 Y12000.00 Z700.00 E1200.00 ; set maximum speeds (mm/min)
      M201 X500.00 Y250.00 Z16.60 E166.00 ; set accelerations (mm/s^2)
      M906 X1100 Y1100 Z1000 E900 I30 ; set motor currents (mA) and motor idle factor in per cent CHGED Z 900 TO 1000 (2mm Lead Acme Screw upgrade)
      M84 S30 ; Set idle timeout

      posted in Firmware installation
      PuterProundefined
      PuterPro
    • RE: RRF Config Tool not showing BLTouch as choice

      That did the trick! Thx! So much to absorb ... 🙃

      posted in Firmware installation
      PuterProundefined
      PuterPro