• Tags
  • Documentation
  • Order
  • Register
  • Login
Duet3D Logo Duet3D
  • Tags
  • Documentation
  • Order
  • Register
  • Login

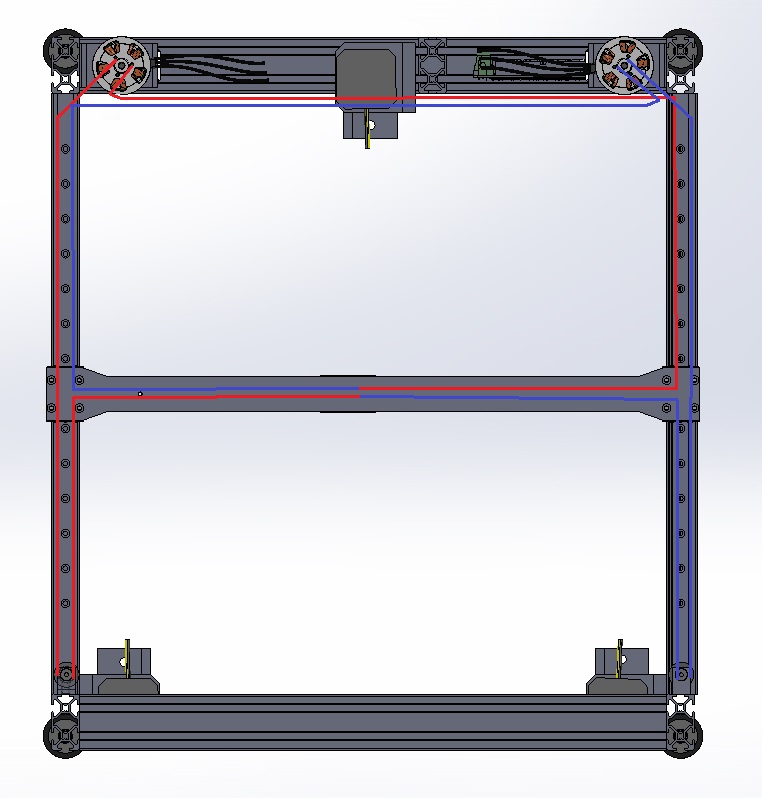
CoreXY belt pattern.

Scheduled Pinned Locked Moved
My Duet controlled machine
10
28
7.5k
Loading More Posts
  • Oldest to Newest
  • Newest to Oldest
  • Most Votes
Reply
  • Reply as topic
Log in to reply
This topic has been deleted. Only users with topic management privileges can see it.
  • undefined
    OG3D
    last edited by 4 Dec 2018, 17:01

    There are several different design on the belt path and keeping it tension, could you guys shear your experience.

    Thanks,
    Oleg

    undefined 1 Reply Last reply 4 Dec 2018, 17:58 Reply Quote 0
    • undefined
      Stephen6309 @OG3D
      last edited by 4 Dec 2018, 17:58

      @og3d Here is my setup: https://www.thingiverse.com/thing:1470253/files
      The two belts have a tensioner on each side of the x-carriage.

      1 Reply Last reply Reply Quote 0
      • undefined
        mrehorstdmd
        last edited by 4 Dec 2018, 18:08

        You might find this useful: https://drmrehorst.blogspot.com/2018/08/corexy-mechanism-layout-and-belt.html

        https://drmrehorst.blogspot.com/

        1 Reply Last reply Reply Quote 2
        • undefined
          deckingman
          last edited by 4 Dec 2018, 19:53

          Mine is here https://somei3deas.wordpress.com/my-corexy-printer-build/. Essentially it's the "standard" stacked belt arrangement. What I do that is a bit different is that the belts to the X carriage run along the centre line of the carriage rails and attach to the centre of the X carriage, rather than either side of it (which can impart a twisting force). The motor mounts are slotted where the bolts attach them to the front rail but the other bolts fit into V-slot nuts. Tensioning is done by slackening the fixing bolts then there is a thumb screw arrangement so turning the screw in against the frame pushes the motor mount backwards. When the tension is set the fixing bolts are tightened and the thumbscrew locked.

          Ian
          https://somei3deas.wordpress.com/
          https://www.youtube.com/@deckingman

          1 Reply Last reply Reply Quote 0
          • undefined
            Phaedrux Moderator
            last edited by 4 Dec 2018, 21:27

            https://www.thingiverse.com/thing:2849355

            I use tensioner blocks that slot into the carriage itself. They use a bolt to tighten. As long as the belts are snug by adjusting the self locking block at one end, there is enough travel on the tensioning blocks to get nice even tension on both belts.

            0_1543958785875_IMG_3742.JPG

            Z-Bot CoreXY Build | Thingiverse Profile

            1 Reply Last reply Reply Quote 0
            • undefined
              mrehorstdmd
              last edited by 5 Dec 2018, 01:06

              I made motor mounts from rectangular aluminum tubing, and I slide the mounts to tighten the belts:

              alt text

              https://drmrehorst.blogspot.com/

              1 Reply Last reply Reply Quote 0
              • undefined
                brunofporto
                last edited by 5 Dec 2018, 02:27

                I made mine with the motors at the back with the belt tensioner.

                https://www.thingiverse.com/thing:3072219

                alt text

                undefined 1 Reply Last reply 19 Feb 2019, 03:28 Reply Quote 0
                • undefined
                  OG3D
                  last edited by OG3D 14 Jan 2019, 16:14

                  Thanks guys for the info and the links

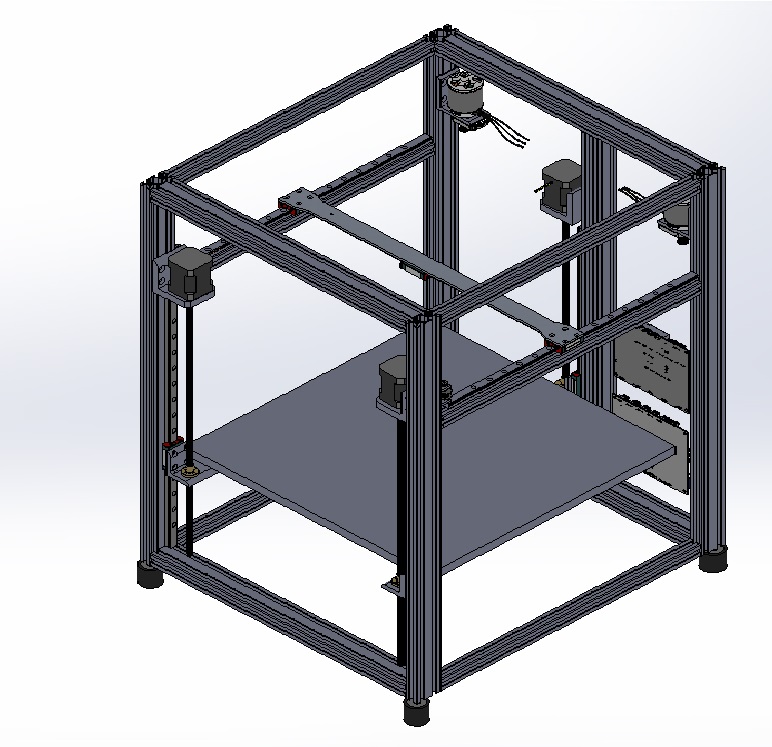
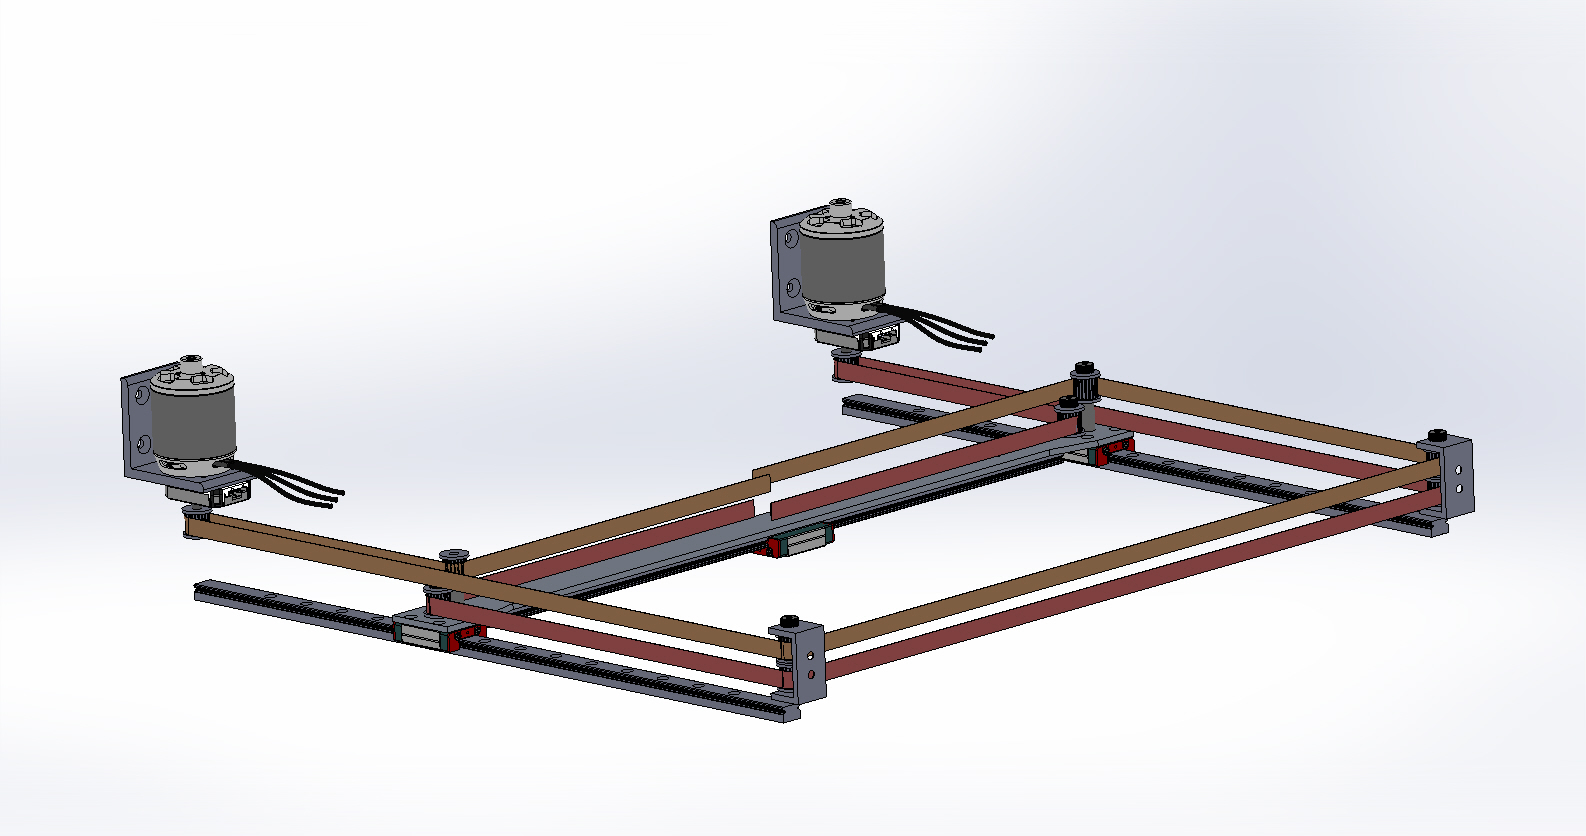
                  This is what I came up with, any comments appreciated. 0_1547482419060_Full Assembly Belt path.jpg

                  Here is an ISO View.

                  0_1547482719596_Full Assembly ISO.JPG

                  1 Reply Last reply Reply Quote 0
                  • undefined
                    mrehorstdmd
                    last edited by 14 Jan 2019, 16:46

                    There's not much to comment on other than the lines you drew to represent the belts look about right. The trick is in positioning the pulleys to actually put the belts along those paths, and to build it so that the belt tension doesn't cause the pulleys to tilt under belt tension force.

                    Are you planning to use BLDC motors for the XY drive? How will you control them? How will you get adequate resolution?

                    https://drmrehorst.blogspot.com/

                    1 Reply Last reply Reply Quote 0
                    • undefined
                      Surgikill
                      last edited by 14 Jan 2019, 17:41

                      I would suggest you go with a fabtotum style belt pattern, that way there will be no twisting or crossing of belts.

                      1 Reply Last reply Reply Quote 0
                      • undefined
                        OG3D
                        last edited by OG3D 15 Jan 2019, 03:51

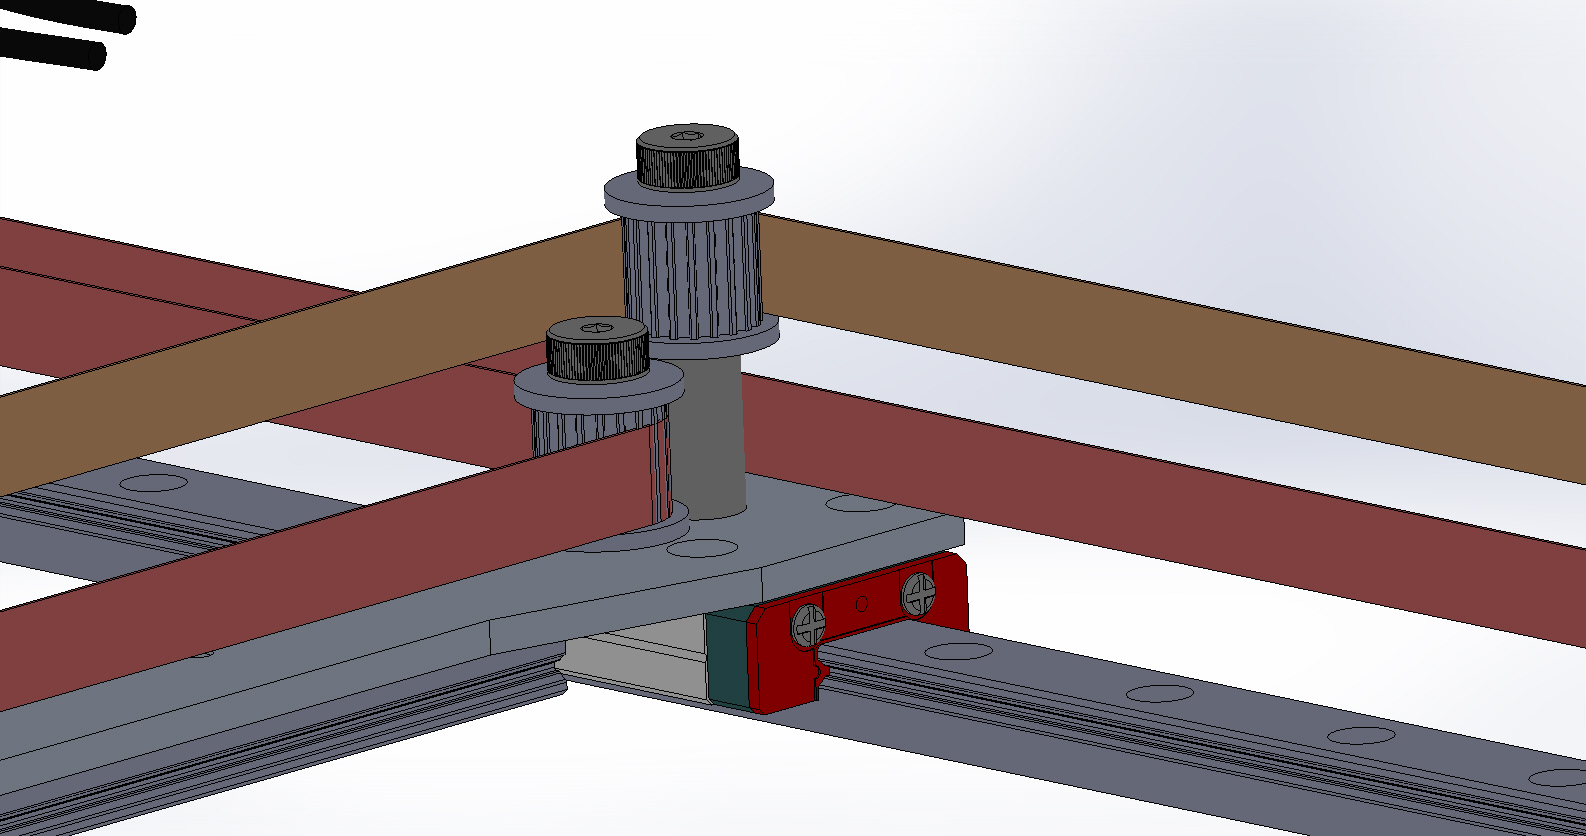
                        @Surgikill I am stacking the belts to avoid the twisting. Fabtotum style dose look simpler. My goal is to make the XY belt path in such a way that the brackets for the pulley can be easily machined. As this will be a all metal machine, trying to avoid plastic as much as possible.

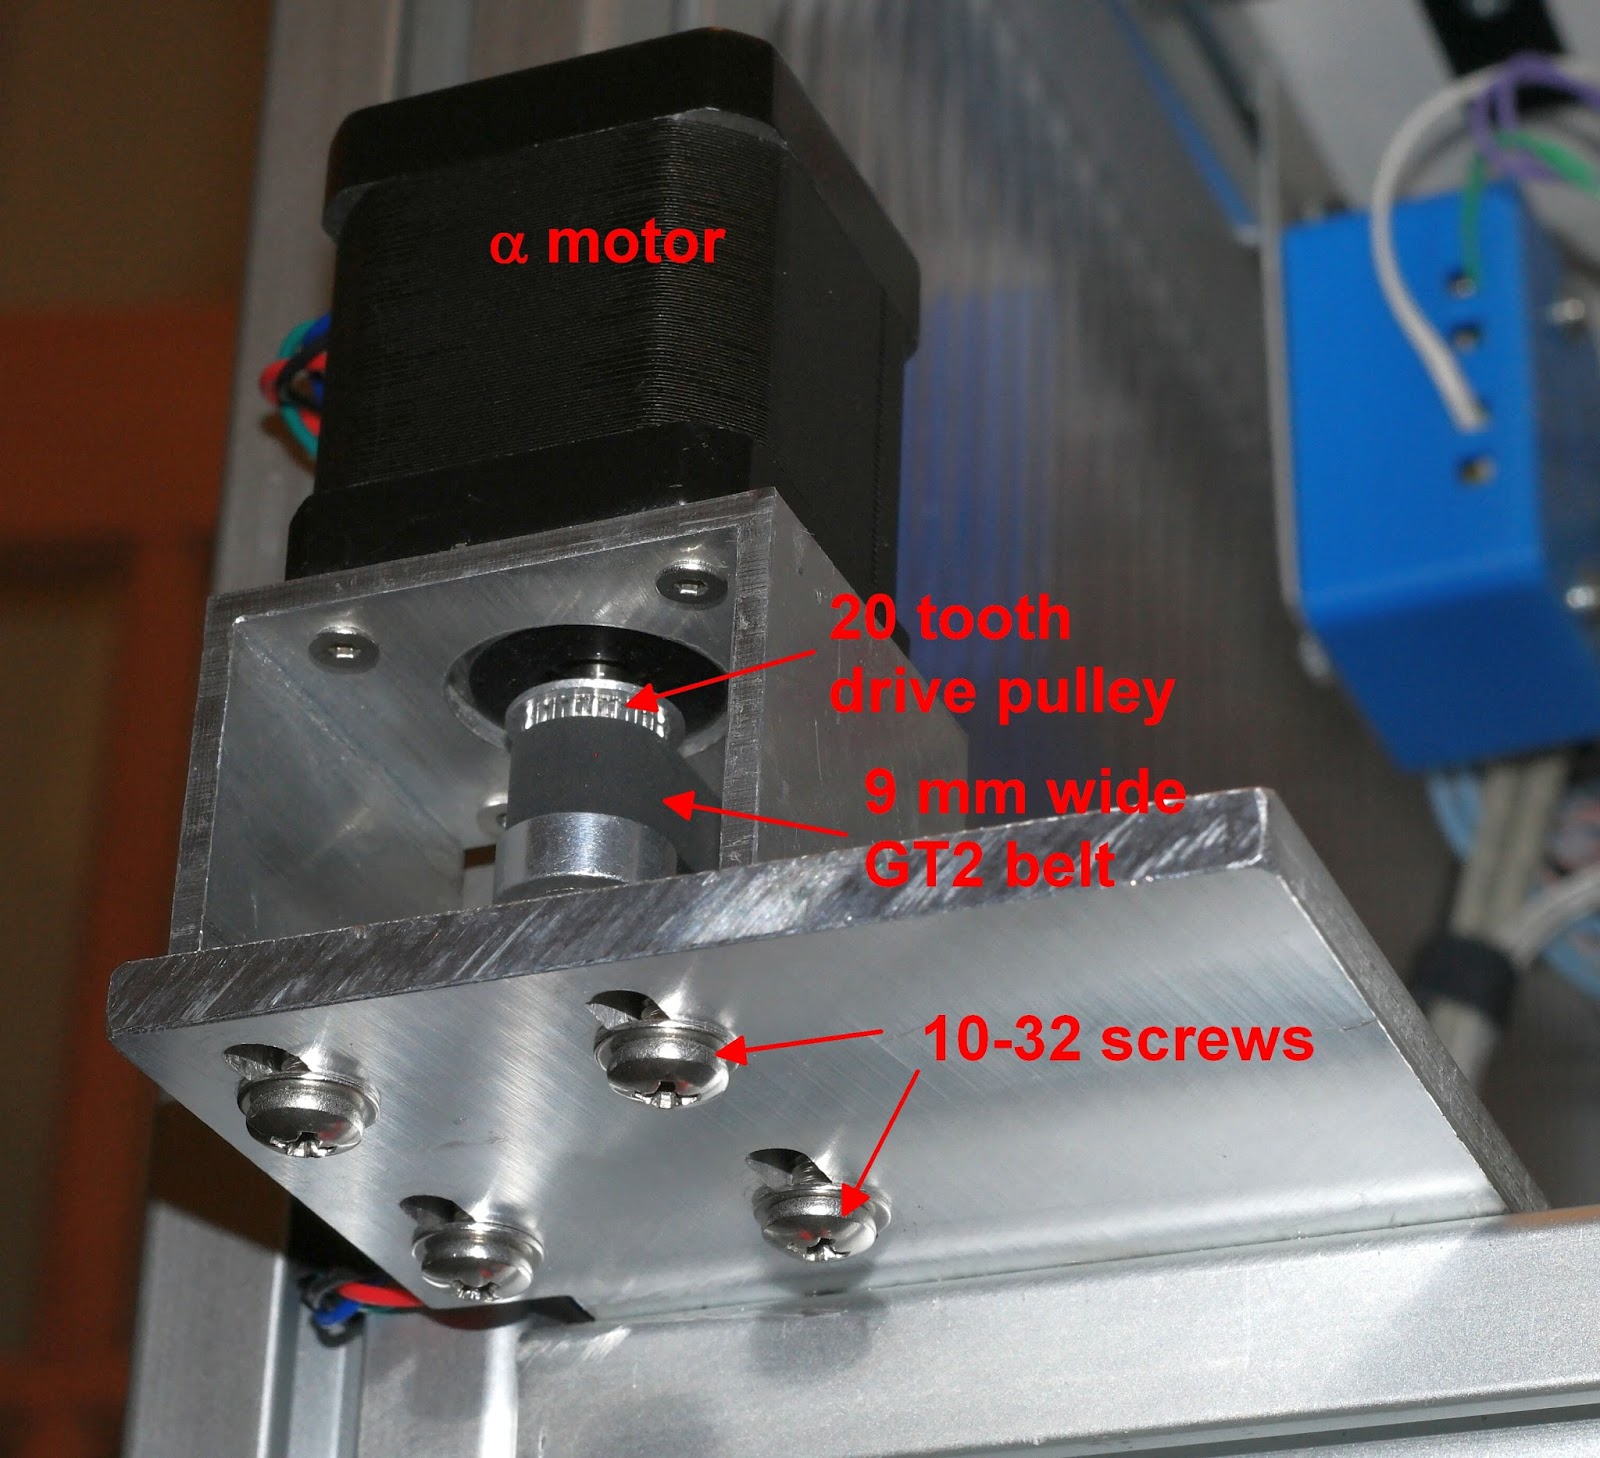
                        @mrehorstdmd hope you don't mind me using your photo as reference.
                        So do the position of the idlers P1/P2/P3/P4 have effect on the precision of the XY Motion?

                        0_1547522874906_72f1abf0-721e-4fde-9d7a-cdd1c59f3bed-image.png

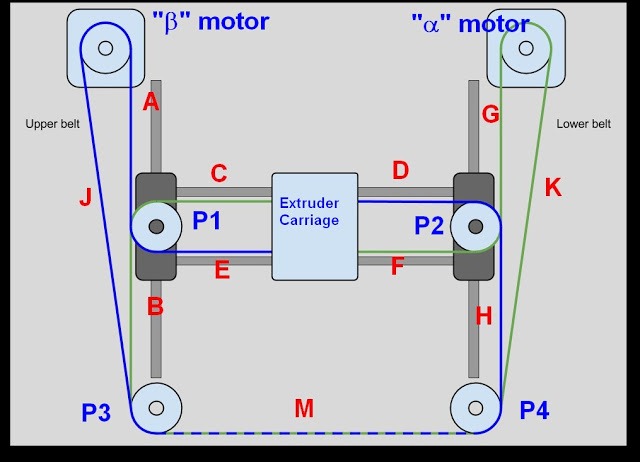
                        For the BLDC motor I will be using odrive to drive the two motors.
                        Think ill be going with D5065 270kv Motor and a CUI AMT102 "8196 CPR capacitive encoder", haven't decide on the motor type 100%.

                        undefined 1 Reply Last reply 15 Jan 2019, 15:00 Reply Quote 0
                        • undefined
                          Scachi
                          last edited by 15 Jan 2019, 07:08

                          You can change the position of the idlers as long as you keep this to be true:

                          The most important thing in any coreXY implementation is that the belt segments (a segment being the belt between two pulleys or between the extruder carriage and the end pulleys) whose length varies (labeled A-H in the diagram below), must be kept parallel to their respective guide rails.

                          from https://drmrehorst.blogspot.com/2018/08/corexy-mechanism-layout-and-belt.html

                          1 Reply Last reply Reply Quote 0
                          • undefined
                            Surgikill
                            last edited by 15 Jan 2019, 12:25

                            @OG3D I actually just made a corexy machine. It went through about 10 revisions before I was happy with it. Only issue is machining the the pulley mounts on mine would cost a shit load of money. I can post some pictures here if you want. The pulley pieces were over engineered so there should be no issue whatsoever using plastic for them.

                            1 Reply Last reply Reply Quote 0
                            • undefined
                              mrehorstdmd @OG3D
                              last edited by 15 Jan 2019, 15:00

                              @og3d Interesting. How does odrive interface to the Duet controller?

                              Will you be able to get sufficient resolution and low speed torque using BLDCs?

                              https://drmrehorst.blogspot.com/

                              undefined 1 Reply Last reply 2 Feb 2019, 00:07 Reply Quote 0
                              • undefined
                                OG3D
                                last edited by 1 Feb 2019, 23:51

                                0_1549064699952_Full Assembly ISO.JPG

                                0_1549065033688_Full Assembly Belt path.jpg

                                0_1549064844328_Full Assembly Belt Path XY.jpg

                                After Several revision, I think I'm happy with this design.
                                Thanks for the help at @mrehorstdmd and @Surgikill

                                1 Reply Last reply Reply Quote 0
                                • undefined
                                  OG3D @mrehorstdmd
                                  last edited by OG3D 2 Feb 2019, 00:08 2 Feb 2019, 00:07

                                  @mrehorstdmd odrive supports the step/dir interface. I'm not sure if I will have enough torque at low speeds so this will be like an experiment for me. I know the odrive creator had good results using odrive to control his Pick and Place Machine link text.

                                  The reason for leaning toward BLDC motors is to decrease the tool change time during the printing as this printer will have a tool changer similar to E3Ds approach.

                                  undefined 1 Reply Last reply 2 Feb 2019, 04:56 Reply Quote 0
                                  • undefined
                                    mrehorstdmd @OG3D
                                    last edited by 2 Feb 2019, 04:56

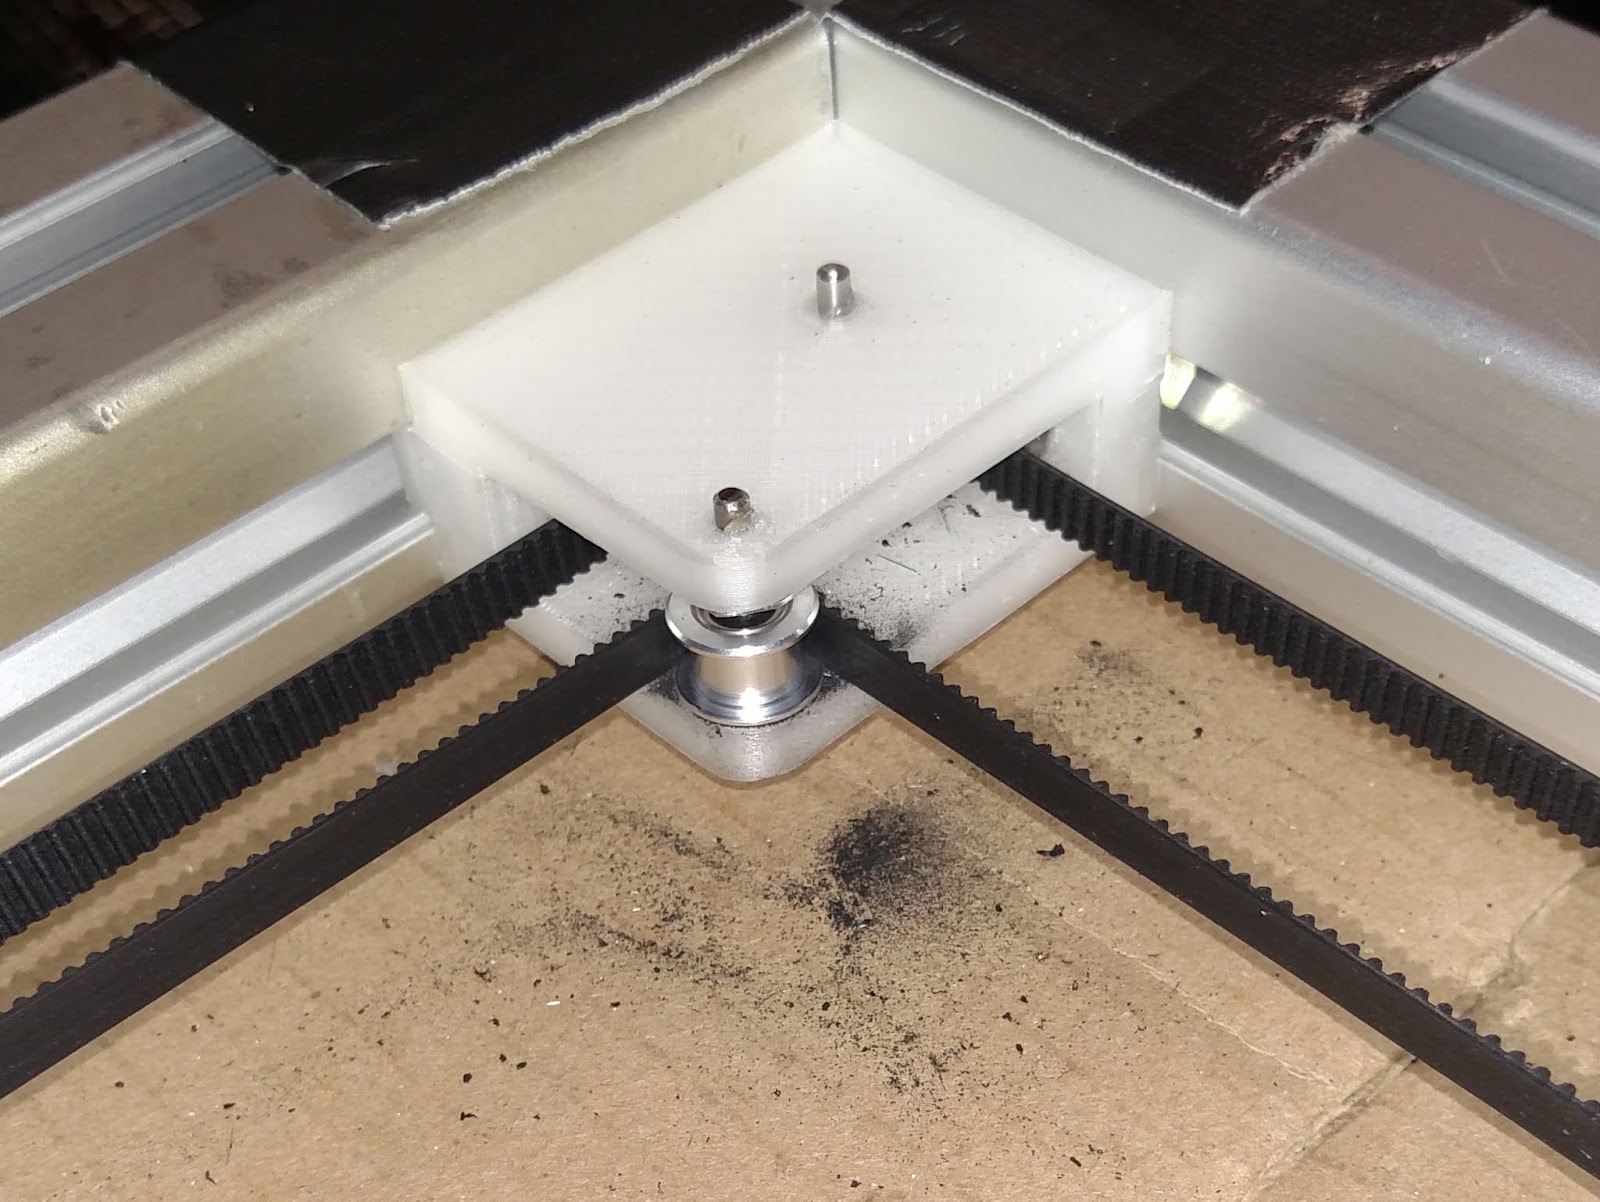
                                    @og3d I think you're going to find that the upper pulleys on the ends of the X axis will tilt when you apply tension to the belts, and that will cause the belt to ride hard against the pulley flanges and will quickly wear the edge(s) of the belt.

                                    How many steps per rev will that BLDC driver and motor give you? A stepper motor is a brushless DC motor, but unlike the airplane motors, they are designed to provide many steps per rev instead of maximizing rpm. In a high precision positioning mechanism like a 3D printer, you really want a high steps/rev count.

                                    https://drmrehorst.blogspot.com/

                                    1 Reply Last reply Reply Quote 0
                                    • undefined
                                      OG3D
                                      last edited by 18 Feb 2019, 16:57

                                      @mrehorstdmd yes I knew its gonna happen but didn't thick it would be bad for the belt.

                                      For BLDC motor I'm still figuring how much steeps per revolution I could get out of it.
                                      If you'll watch this Youtube video link text
                                      It looks there are issues when traveling at low speed with resonance frequency but he claimed that it could be solved in firmware update. This is all new to me so I'm learning as I go.

                                      undefined 1 Reply Last reply 18 Feb 2019, 19:15 Reply Quote 0
                                      • undefined
                                        mrehorstdmd @OG3D
                                        last edited by 18 Feb 2019, 19:15

                                        @og3d This is what happened when I put a 180 degree twist in a couple 1m long segments of belt in my sand table. The twist was forcing the belts to ride on the pulley flanges which were grinding away the edges of the belts.

                                        alt text

                                        https://drmrehorst.blogspot.com/

                                        1 Reply Last reply Reply Quote 0
                                        • undefined
                                          Phaedrux Moderator
                                          last edited by 18 Feb 2019, 21:58

                                          I use a 180 twist on my DBot to keep the smooth side of the belt on the smooth idlers at the back corners and haven't noticed anything like that. Mind you it uses two flanged bearings rather than a rimmed idler like that.

                                          Z-Bot CoreXY Build | Thingiverse Profile

                                          undefined 1 Reply Last reply 19 Feb 2019, 03:36 Reply Quote 0
                                          • First post
                                            Last post
                                          Unless otherwise noted, all forum content is licensed under CC-BY-SA