Duet3D Logo Duet3D
    • Tags
    • Documentation
    • Order
    • Register
    • Login
    1. Home
    2. brunofporto
    • Profile
    • Following 4
    • Followers 0
    • Topics 35
    • Posts 297
    • Best 34
    • Controversial 0
    • Groups 0

    brunofporto

    @brunofporto

    58
    Reputation
    25
    Profile views
    297
    Posts
    0
    Followers
    4
    Following
    Joined Last Online

    brunofporto Unfollow Follow

    Best posts made by brunofporto

    • Indirect (bearing) laser filament monitor concept

      I designed a new casing for the Duet3D Laser Filament Monitor to hold two bearings with a compliant mechanism spring to try indirect reading of filament extrusion. The sensor will read the bearing surface instead of the filament and I hope this should end the issues with different filament colors and types.

      I'll test print it today and if it works I'll publish the files as soon as possible.

      0_1555008032340_e91dc443-903c-4da7-9ee4-d24b7b96d471-image.png

      0_1555008045838_5f0783ce-6f81-4d19-aba3-61fff1448790-image.png

      0_1555008056857_ea8da22a-70bb-473f-b26d-48d7e5af793e-image.png

      posted in Filament Monitor
      brunofportoundefined
      brunofporto
    • RE: Pressure Advance Calibration

      @deckingman

      “My dear Frodo!’ exclaimed Gandalf. ‘3DPrinters really are amazing creatures, as I have said before. You can learn all that there is to know about their ways in a month, and yet after a hundred years they can still surprise you at a pinch.”

      ― J.R.R. Tolkien, The Fellowship of the Plastic 😂

      posted in Tuning and tweaking
      brunofportoundefined
      brunofporto
    • Filament Extrusion Measurement Rig

      In order to make it easier to measure the filament and correctly set the steps/mm for the extrusion, I designed this filament rig!

      You use it before your extruder and with it you can mark the filament, straight it and measure with a proper caliper and reference surface.

      I hope it will help!

      alt text

      https://www.thingiverse.com/thing:3093665

      posted in Filament Monitor
      brunofportoundefined
      brunofporto
    • My CoreXY 3D Printer The forkLIFT

      It all started with the idlers mount from my Hypercube Evolution cracking every time. Then I designed a more robust, not prone to cracking due to fatigue over the layers, idler holder.

      During this process, I decided that I needed a reliable system and my rat nest of wires, DCDC converters, UBEC, Raspberry Pi and cheap RAMPS+Fakarduino was far from it. The first upgrade to reliability was installing a Duet2 Ethernet 😄

      With more and more parts been developed and with the help of @token47 we designed a new 3d printer with better maintenance and more simple construction to align axis and belts accordingly (the main, and real, reason for my original idlers mounts cracks....). Also with the freedom and flexibility of the reprapfirmware gcode everywhere philosophy a multi-tool system was not a hard thing to try. So this printer was designed from the start to be a multi-tool system.

      Then the forkLIFT was born 😄

      0_1543319291397_IMG_20181123_104051828.jpg

      posted in My Duet controlled machine
      brunofportoundefined
      brunofporto
    • RE: M48 Measure Z Probe repeatability and print to serial output.

      @dc42 said in M48 Measure Z Probe repeatability and print to serial output.:

      Z-9999

      Worked like a charm... so.... No need for the M48.

      Maybe have a special area at the gcodes wiki page mentioning about commands alternatives - like the M109 or M48 in this case.

      Thank you very much.

      The macro:

      M291 P"Probe will be tested 10 times and return mean and standard deviation. Ok or Cancel?" R"WARNING" S3 ; User must click OK or cancel.
      G28
      M401
      G30 P0 X151 Y161 Z-9999
      G30 P1 X151 Y161 Z-9999
      G30 P2 X151 Y161 Z-9999
      G30 P3 X151 Y161 Z-9999
      G30 P4 X151 Y161 Z-9999
      G30 P5 X151 Y161 Z-9999
      G30 P6 X151 Y161 Z-9999
      G30 P7 X151 Y161 Z-9999
      G30 P8 X151 Y161 Z-9999
      G30 P9 X151 Y161 Z-9999 S-1
      M402

      posted in Firmware wishlist
      brunofportoundefined
      brunofporto
    • RE: Duet 2 Wifi new install - Ender 3

      I think the best approach would use the new web config file generator (https://configurator.reprapfirmware.org/Start) to create the basic set and then read all config files with gcode documentation (https://duet3d.dozuki.com/Wiki/Gcode) besides it to tweak what you feel like.

      And read this: https://duet3d.dozuki.com/Wiki/ConfiguringRepRapFirmwareCartesianPrinter

      posted in General Discussion
      brunofportoundefined
      brunofporto
    • RE: Giving in and Reverting to Marlin/Ramps?

      I migrate from Marlin/Ramps to Duet and it was not easy. But the potential of macros and fully gcode based configuration is so vast that I can not even think of rolling back 😄

      There was a lot of things, like unload and load a new filament, that I find it very difficult to implement with Marlin and now it is just a very clever macro that even asks me to confirm the insertion of a the new filament. My printer is so silent (of course you can achieve that with better drivers with the Ramps) that sometimes I tough that there was some issue.

      Also the electronics and wiring does not look like a bad neighborhood in the Blade Runner universe like it was with my Ramps. 😄

      So... Finish your design and polish it. When you have time get the Duet again with more time to tweak it. When you get used o the configuration/macros things it will even feel (and be) much that recompile and rewrite your firmware every time you change something.

      posted in Tuning and tweaking
      brunofportoundefined
      brunofporto
    • My approach to the Housing for Duet3D Laser Filament Monitor

      First, this approach is a hypothesis! I am not sure about the aperture or if this will help to increase the sampling and speed sensibility!

      alt text
      https://www.thingiverse.com/thing:3119908

      I used the datasheet as reference, based at the 1,275 cpi at 1mm. I calculated the size of the pixel based on the 3.5mm of the chip (I know.... the sensor and laser are smaller, etc... but just to make things easier) and calculated the size of the footprint at 30mm. This rendered approximately 120 degrees of aperture.

      Using as reference the 9mm distance from the filament and opening the area only to the length of the filament, and a little to the perpendicular, i think it can increase the sensibility and give a better response to fast movements than that very tiny small window of the reference housing. Avoiding scattering of the laser will be achieved by a light sanding of the internal surfaces.

      aperture

      sensor view

      The casing is designed to with Z heights that are both 0.3mm and 0.2mm compatible.

      exploded

      Another hypothesis I would like to test and compare is using 0.15mm and 0.1mm as I fell that higher Z definition will help the reduce the "shineness" of the printed part.

      posted in Filament Monitor
      brunofportoundefined
      brunofporto
    • RE: Issues with pressure advance since RRF 3.4

      I am having several issues with PA too.... The test using the python script have bulges AND under extrusion even on very high values of PA.

      3d0641ca-5444-4a1d-b257-ff94c80548ed-imagem.png
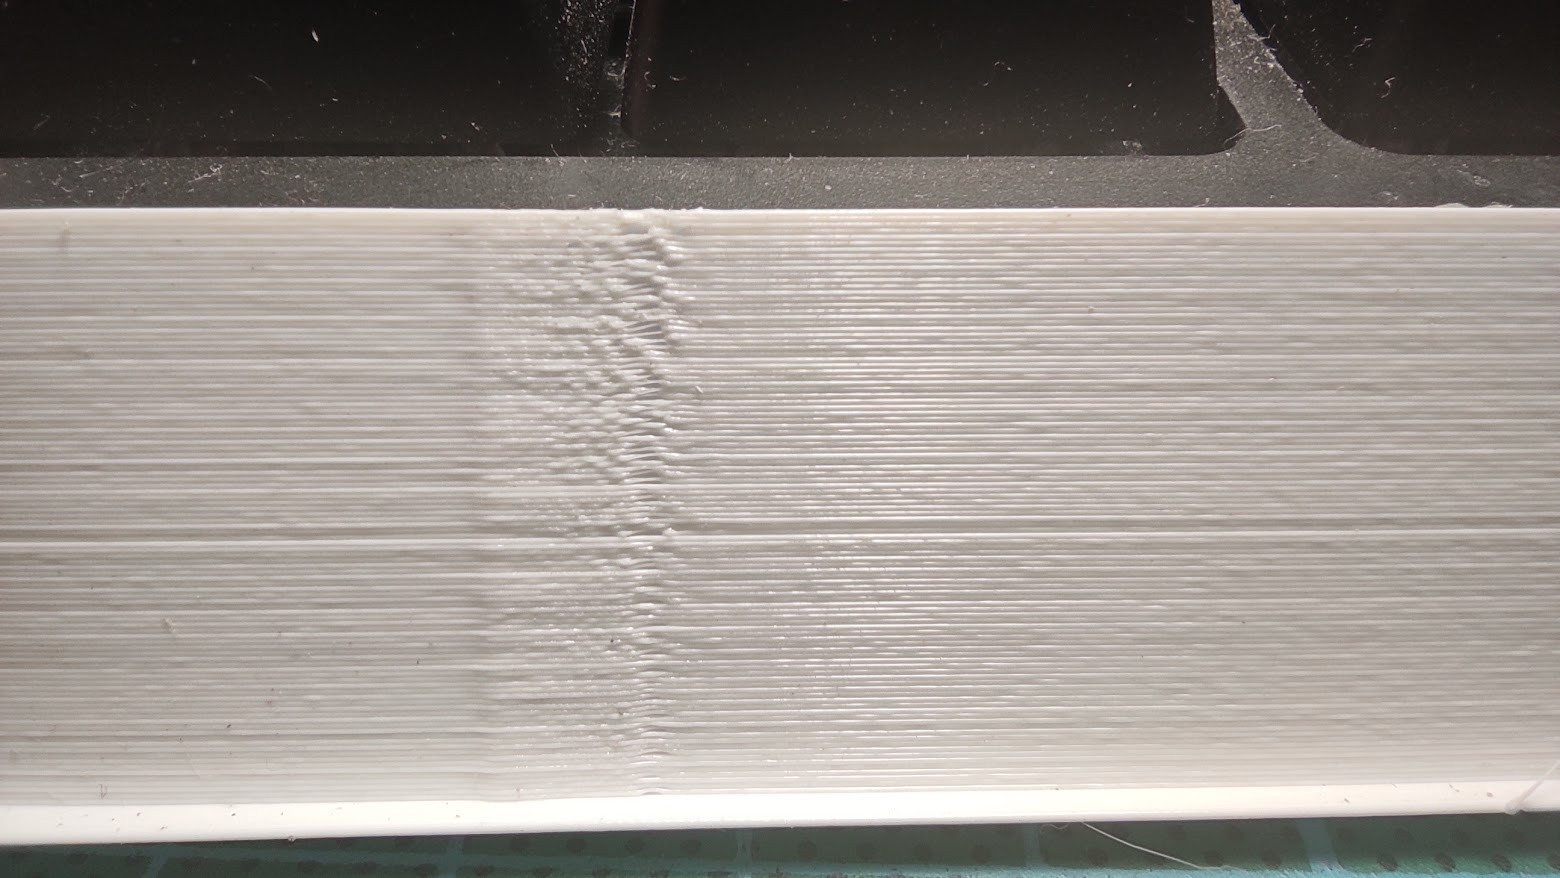
      Here an example for PLA from 0.5 to 0.9 - The bulge NEVER disappear even when the under extrusion after starts to show.

      In the past there always a clear transition where the slow segments had the same width and no under extrusion after.

      Also I simply cannot find a value of PA + Retract that lead to good results. It starts to to cause excessive retraction and blocking issues much before solving any oozing.

      I reviewed all my hardware looking for possible issues and after finding this thread I think it is related.

      It is very severe with small details and curved surfaces (like round small posts for retraction tuning) it is so severe that sometimes and entire layer is mission while others spurts excessive material. For straight lines - like a small cube walls - only the bulge is apparent and the under extrusion after the bulge for higher PA.

      I had not updated my board for a long time and the issues started after the update to 3.4 - I do not remember what older version I had before.

      But the issues are the same: Excess extrusion even with very high PA with under extrusion right after for higher PA. I had not of these issues before.

      I will test 3.4.2 now and then roll back to 3.3 and repeat the Python script test to compare.

      posted in General Discussion
      brunofportoundefined
      brunofporto
    • RE: E3D heater burn spot

      If the cables are not protected against movement it can render a "hinge" that can cause this too.

      posted in Duet Hardware and wiring
      brunofportoundefined
      brunofporto

    Latest posts made by brunofporto

    • RE: Is it possible to have my Duex to deal with a laser engraver?

      @droftarts and @dc42 thank you very much!

      posted in General Discussion
      brunofportoundefined
      brunofporto
    • Is it possible to have my Duex to deal with a laser engraver?

      I have a Duet 2 Ethernet happily working on my 3D printer for years now. And I have a Duex expansion board that I bought back in the day to be able to make a multi tool printer.

      Is it possible to use the Duex to control the laser engraver steppers and laser module in such way that when I enter laser mode then The duet only controls the laser engraver.

      So, using the same Duet board to controll both the 3d printer and the laser engraver, not at the same time, but without the need to dedicate my controller board to a single device?

      Thanks!

      posted in General Discussion
      brunofportoundefined
      brunofporto
    • RE: CoreXY homing

      @dc42 said in CoreXY homing:

      Assuming that you are using one of our standard stable builds of RRF, I can't see any way that RRF could fail to execute a G90 command. Please check using M115 or M122 exactly which firmware version you are using and tell us.

      FIRMWARE_NAME: RepRapFirmware for Duet 2 WiFi/Ethernet FIRMWARE_VERSION: 3.4.5 ELECTRONICS: Duet Ethernet 1.02 or later FIRMWARE_DATE: 2022-11-30 19:36:12

      Thanks, I will remove the "fine hope" part

      posted in Documentation
      brunofportoundefined
      brunofporto
    • RE: CoreXY homing

      @mrehorstdmd yes. But the topic here is fail to detect the G90 command after the last movement. It was solved by a M400.

      I using latest firmware release on a Duet 2 Ethernet

      ; General preferences
      G90                                                     ; send absolute coordinates...
      M83                                                     ; ...but relative extruder moves
      M550 P"forkLIFT"                                        ; set printer name
      M669 K1                                                 ; select CoreXY mode
      
      ; Network
      M551 P"notyourbusiness"                                        ; set password
      M552 P0.0.0.0 S1                                        ; enable network and uses defined IP
      M586 P0 S1                                              ; enable HTTP
      M586 P1 S0                                              ; disable FTP
      M586 P2 S0                                              ; disable Telnet
      
      ; Drives
      M569 P0 S1                                              ; physical drive 0 goes forwards
      M569 P1 S1                                              ; physical drive 1 goes forwards
      M569 P2 S0                                              ; physical drive 2 goes backwards
      M569 P3 S0                                              ; physical drive 3 goes backwards
      M569 P4 S0                                              ; physical drive 4 goes backwards
      M584 X0 Y1 Z2:4 E3                                      ; set drive mapping
      M350 E256 I0                                            ; configure microstepping without interpolation
      M350 X16 Y16 Z16:16 I1                       		    ; configure microstepping with interpolation
      M92 X80.18 Y79.71 Z398.98 E6640                          ; set steps per mm
      M201 X700 Y700 Z100 E3000                               ; Set accelerations (mm/s^2) 
      M201.1 X300 Y300 Z20                                    ; Set reduced acceleration for special move types
      M203 X15000 Y15000 Z1400 E3600                          ; Set maximum speeds (mm/min)
      ;M204 P500 T2500		                                    ; Set printing and travel accelerations
      M566 X720 Y720 Z300 E3600                               ; Set maximum instantaneous speed changes (mm/min)
      M906 X1800 Y1800 Z1500 E1500 I30                        ; set motor currents (mA) and motor idle factor in per cent
      M84 S30                                                 ; Set idle timeout
       
      ; Axis Limits
      M208 X0 Y0 Z0 S1                                        ; set axis minima
      M208 X298 Y300 Z290 S0                                  ; set axis maxima
      
      ; Endstops
      M574 X1 S3                                               ; configure sensorless endstop for low end on X
      M574 Y1 S3                                             ; configure sensorless endstop for low end on Y
      M574 Z1 S2												; configure Z-probe endstop for low end on Z
      M915 X Y R0 F0 S4   									; Configuring Sensorless Homing
      
      ; Z-Probe
      M950 S0 C"exp.heater7"                                  ; create servo/gpio 0 on heater 7 pin on expansion connector
      M558 P5 C"^zprobe.in" H5 F120 T12000                    ; set Z probe type to switch and the dive height + speeds
      G31 P600 X0 Y-41.9 Z0.321                               ; set Z probe trigger value, offset and trigger height
      M557 X20:278 Y0:258 P5:5                                ; Define mesh grid
      
      ; Heaters
      M308 S0 P"bedtemp" Y"thermistor" T100000 B4725 C7.06e-8 ; configure sensor 0 as thermistor on pin bedtemp
      M950 H0 C"bedheat" T0                                   ; create bed heater output on bedheat and map it to sensor 0
      M307 H0 B0 S1.00                                        ; disable bang-bang mode for the bed heater and set PWM limit
      M140 H0                                                 ; map heated bed to heater 0
      M143 H0 S150                                            ; set temperature limit for heater 0 to 150C
      
      M308 S1 P"e0temp" Y"thermistor" T100000 B4725 C7.06e-8  ; configure sensor 1 as thermistor on pin e0temp
      M950 H1 C"e0heat" T1                                    ; create nozzle heater output on e0heat and map it to sensor 1
      M307 H1 B0 S1.00                                        ; disable bang-bang mode for heater  and set PWM limit
      M143 H1 S285                                            ; set temperature limit for heater 1 to 280C
      
      ; Fans
      M950 F0 C"fan0" Q500                                    ; create fan 0 on pin fan0 and set its frequency
      M106 P0 S0 H-1                                          ; set fan 0 value. Thermostatic control is turned off
      
      ; Tools
      M563 P0 S"Basic" D0 H1 F0                               ; define tool 0
      G10 P0 X0 Y0 Z0                                         ; set tool 0 axis offsets
      G10 P0 R0 S0                                            ; set initial tool 0 active and standby temperatures to 0C
      
      ; Custom settings are not defined
      
      ; Miscellaneous
      M575 P1 S1 B57600                                       ; enable support for PanelDue
      T0                                                      ; select first tool
      M703                                                    ; reload loaded filament settings
      M912 P0 S-23.6                                          ; MCU temperature Calibration
      M501                                                    ; load saved parameters from non-volatile memory
      
      posted in Documentation
      brunofportoundefined
      brunofporto
    • RE: CoreXY homing

      @mrehorstdmd No misaligment for sure. It clearly move X when it fails to detect the first stall "jump".

      As it move diagonally on the first move it is only using one motor. When it fails to detect the first stall it forces a few steps into Y0 making X move by consequence. If I set it to be more sensitive it does not happens at all BUT it also detect false hits.

      No steel core belts also. The prints are well calibrated along 5 to 150mm on both axis and without skeweness and right angle reference parts are perpendicular.

      But the homing issue is not the topic of this thread.

      The topic here is that the printer fails to detect G90 after the fine home Y (line 9 of the example above) and it caused issues. A m400 failsafe that.

      I will open another post to discuss the homeall issues 😄 As soon as I have time to describe it and organize to post I put the link here.

      posted in Documentation
      brunofportoundefined
      brunofporto
    • RE: Scanning Z probe support in RRF 3.5

      @dc42 plus the issue with different types of surfaces...... Still have my laser filament sensor 😄

      I like @CNCModeller idea of the indirect measurement with a ball but then there is the dynamic problem of a ball "jumping" on small defects or residual first layers.

      posted in Beta Firmware
      brunofportoundefined
      brunofporto
    • RE: Scanning Z probe support in RRF 3.5

      @dc42 One can always use a mall single beam LIDAR as those small ones used by drones..... Those are not tailored for small distances but something similar for short distances may exist.

      posted in Beta Firmware
      brunofportoundefined
      brunofporto
    • CoreXY homing

      I was having a lot of issues with my homing with my CoreXY printer depending on the relative position of the tool head at the start of the home all. The home X, Y and Z individually worked like a charm but the Home all was always a surprise.

      As a good Duet user I go to the documentation, cleaned my home all g file and started from scratch testing it line by line.

      I will discuss it in more detail on other post but here is something I noted that is an Issue with the current example.

      Sometimes after the homeall my printer did not register the G90 and was kept at the relative movement!

      I did need to add a M400 after the last homing movement before the G90 and the Z homing sequence.

      Another issue is that sometimes when homing the Y it moved a few mm the X so it is a good practice to go back a few mm both X and Y after the coarse homing to avoid it.

      G91                     ; relative mode
      G1 H1 X-240 Y-240 F3000 ; coarse home X or Y
      G1 H1 X-240             ; coarse home X
      G1 H1 Y-240             ; coarse home Y
      G1 X4 Y4 F600           ; move away from the endstops
      G1 H1 X-10              ; fine home X
      G1 X4 Y4 F600           ; move away from the endstops
      ; this last one avoids the "residual" X movement that can or not happens when stalling at Y homing.
      G1 H1 Y-20              ; fine home Y
      M400                        ; wait for movement to finish
      G90                            ; Absolute positioning
      ; Z homing section follows
      ...
      
      posted in Documentation
      brunofportoundefined
      brunofporto
    • RE: Issues with pressure advance since RRF 3.4

      @gloomyandy Nope. Duet 2 Ethernet v1.02 (the one before the on board fuses).

      posted in General Discussion
      brunofportoundefined
      brunofporto
    • RE: Issues with pressure advance since RRF 3.4

      @phaedrux I'll try!

      posted in General Discussion
      brunofportoundefined
      brunofporto