Pressure Advance seems to not be working.
-
Currently trying the print again with Jerk set to 800 rather than 1000
-
I still believe there is something causing PA to not take full effect, i don't believe there is much change on this new cube either. I've lowered my Jerk even more but the fact that I don't see much change at all up the seam, I don't believe its having full effect. Testing another cube now with a Jerk of 400.
-
Lowering the jerk will limit pressure advance even more. Unless you're using a high gear ratio remote direct drive like the Zesty Nimble reducing the jerk isn't really necessary.
I believe you're using the Voron2 Mobius extruder? Which is 4:1?
I would think that a extruder jerk and acceleration in the 3000 to 6000 range should be suitable.
I'm using a 3:1 titan aero with 0.9 degree motor and I use 6000 max speed, and 3000 accel and jerk. Mind you it's direct drive, so my PA value is very low 0.03 to 0.05.
Earlier you said you tried values between 0.5 and 7. Did you mean 0.5 and 0.7?
If you went up to 7 and nothing change something is wrong. If you only went up to 0.7 you haven't gone high enough.
What does the Voron 2 community suggest for extruder value configuration?
-
@Samuel235 I'm facing the similar thing.
My extruder is BMG with 3:1 ratio. Bowden 55cm.
Printed test cube with jerk set to 600 and PA set to 0.2 through 1.0 - got very minor effect.
Previous experiments with python PA test script showed effect with PA set to 1.6-1.65 which made my extruder sing with forward-backward-forward rapid move on every line.
Now i think about trying to set jerk to 0 and raise acceleration, as the formula in doc is: actual_extrusion_speed = requested_extrusion_speed + (K * current_extruder_acceleration), which makes me think the jerk should be minimal while acceleration should be high. -
@Phaedrux I did mean 0.5-0.7 sorry. I'm currently getting the printer ready for the print I said I'm running so I will change some settings back now then. I will put the Jerk back to the original 8000 (this is the default for this extruder, the majority of the community are running this value, with PA), and will change my test to range from 0.8 to 1.5 to see if I see any changes there.
How does that sound, too much or still too little PA?
-
@Samuel235 Ok that makes some more sense then. 0.7 may simply not be enough.
Jerk of 8000 simply removes jerk from the equation, which is fine if the extruder motor can handle it rapid direction changes. This is a problem for the Nimble because of the high gear ratio and the high speed it would need to rotate and the back emf that results. But in your case I don't think it will be an issue at all. It may be a bit noisy though.
0.8 to 1.5 would be the logical next range to test with. 650mm bowden tube is fairly long, so I would think closer to the 1.5 mark.
-
My BMG was skipping at such a high jerk. And that will also result in an annoying nocking noise....
-
Printing now with a Jerk of 5000 to give the extruder some chance of not being the fault of the next print (I will see if I hear any skipped steps), PA ranging from 0.8 to 1.5 with 0 between every 25 layers. Will post back shortly when its all finished.
-
@Samuel235
Just for information, what is the retraction distance and speed? Material? -
@DIY-O-Sphere - Retraction is 4mm at 60mm/s with a prime at 30mm/s and with Rigid Ink ABS in Black.
Edit: Correcting a typo
-
This cube has come out with no visual difference up the seam again. I had the following PA values at the respected layers:
Layer   | PA Value
25      | 0.7
50      | 0
75      | 0.9
100     | 0
125     | 1.1
150     | 0
175     | 1.3
200     | 0
225     | 1.5
No change at all other than it stopped extruding a little for 6/7 layers during the 1.1 value set of layers (layers 125 to 150).
M122 for this print:
M122
=== Diagnostics ===
RepRapFirmware for Duet 2 WiFi/Ethernet version 2.03 running on Duet WiFi 1.02 or later + DueX5
Board ID: 08DGM-956GU-DJMSN-6J1F4-3SJ6N-1BNBF
Used output buffers: 5 of 24 (18 max)
=== RTOS ===
Static ram: 25680
Dynamic ram: 94256 of which 308 recycled
Exception stack ram used: 492
Never used ram: 10336
Tasks: NETWORK(ready,524) HEAT(blocked,1236) DUEX(suspended,156) MAIN(running,1668) IDLE(ready,160)
Owned mutexes:
=== Platform ===
Last reset 02:37:52 ago, cause: software
Last software reset time unknown, reason: User, spinning module GCodes, available RAM 10312 bytes (slot 1)
Software reset code 0x0003 HFSR 0x00000000 CFSR 0x00000000 ICSR 0x0441f000 BFAR 0xe000ed38 SP 0xffffffff Task 0x4e49414d
Error status: 0
Free file entries: 10
SD card 0 detected, interface speed: 20.0MBytes/sec
SD card longest block write time: 0.0ms, max retries 0
MCU temperature: min 54.2, current 54.3, max 57.1
Supply voltage: min 24.0, current 24.3, max 24.6, under voltage events: 0, over voltage events: 0, power good: yes
Driver 0: standstill, SG min/max 0/1023
Driver 1: standstill, SG min/max 0/243
Driver 2: standstill, SG min/max not available
Driver 3: standstill, SG min/max 0/972
Driver 4: standstill, SG min/max not available
Driver 5: standstill, SG min/max 9/249
Driver 6: standstill, SG min/max 14/254
Driver 7: standstill, SG min/max 0/255
Driver 8: standstill, SG min/max 0/259
Driver 9: standstill, SG min/max not available
Date/time: 1970-01-01 00:00:00
Cache data hit count 4294967295
Slowest loop: 100.31ms; fastest: 0.08ms
I2C nak errors 0, send timeouts 0, receive timeouts 0, finishTimeouts 0, resets 0
=== Move ===
Hiccups: 0, FreeDm: 169, MinFreeDm: 159, MaxWait: 7ms
Bed compensation in use: mesh, comp offset 0.000
=== DDARing ===
Scheduled moves: 0, completed moves: 0, StepErrors: 0, LaErrors: 0, Underruns: 0, 0
=== Heat ===
Bed heaters = 0 -1 -1 -1, chamberHeaters = -1 -1
Heater 0 is on, I-accum = 0.0
Heater 1 is on, I-accum = 0.5
=== GCodes ===
Segments left: 0
Stack records: 4 allocated, 0 in use
Movement lock held by null
http is idle in state(s) 0
telnet is idle in state(s) 0
file is idle in state(s) 0
serial is idle in state(s) 0
aux is idle in state(s) 0
daemon is idle in state(s) 0
queue is idle in state(s) 0
autopause is idle in state(s) 0
Code queue is empty.
=== Network ===
Slowest loop: 202.15ms; fastest: 0.08ms
Responder states: HTTP(0) HTTP(0) HTTP(0) HTTP(0) FTP(0) Telnet(0) Telnet(0)
HTTP sessions: 1 of 8
- WiFi -
Network state is running
WiFi module is connected to access point
Failed messages: pending 0, notready 0, noresp 3
WiFi firmware version 1.23
WiFi MAC address XXXXXXXXXXXXXX
WiFi Vcc 3.32, reset reason Turned on by main processor
WiFi flash size 4194304, free heap 24592
WiFi IP address XXXXXXXXXXXXXX
WiFi signal strength -56dBm, reconnections 0, sleep mode modem
Socket states: 0 0 0 0 0 0 0 0
How far before the seam point on each layer should PA start to kick in because its literally right on top of the seam that the extruder shows some movement for PA. It doesn't change at all for the corners, its one continuous extrusion from start of layer to the end of the layer. I'm not sure it should really be like that....
-
How fast are you printing? Is Cura limiting your acceleration and jerk?
-
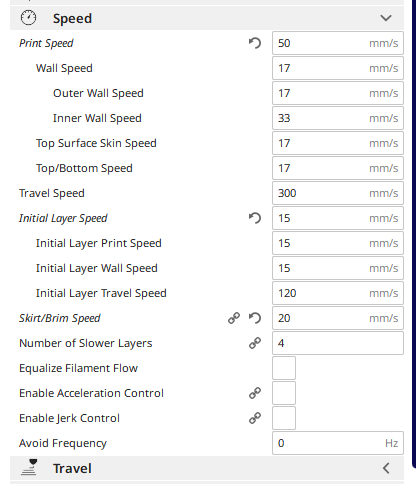
Neither of them are enabled and my speed is what I would class as fairly slow if i'm honest with you.. 17mm/s (i'm only printing a single wall)
-
That's really slow. Pressure advance is meant to reduce the effects of pressure build up. At such low speeds you're not building much pressure.
Try using 2 walls with some amount of infill to increase layer time. 5% will do. And increase your print speeds to something closer to a normal print. 50mm/s or more.
-
I assumed you'd seen this, but maybe not?
-
I have indeed seen that, I'm currently printing another with 5% infil with two walls. Its like I knew what you was going to say haha. My extruder is now behaving a little more like expected, sounds like a machine gun now, but like its skipping steps, I'm running M122's to check for missed steps but seeing nothing. I have brought my Jerk down to 3000 for this test just to stop the extruder exploding while i'm testing for the right PA value, at 3000 it still sounds like its going to explode now.
I still have the outer wall set to 17mm/s, I might need to change it to configure PA though, so might need another print after this before I see any difference in the print.
-
Print has just completed with the following settings
Speed Settings:

M566 X700 Y700 Z60 E2000        ; Set maximum instantaneous speed changes (mm/min)
M203 X18000 Y18000 Z3000 E15000 ; Set maximum speeds (mm/min)
M201 X2000 Y2000 Z250 E1800     ; Set maximum accelerations (mm/s^2)
M204 P1500 T2000                ; Set printing acceleration and travel accelerations
Current Settings:
; Drive currents
M98 P"/macros/print_scripts/xy_current_high.g"	; XY (AB) currents high
M98 P"/macros/print_scripts/z_current_high.g"   ; Z currents high
M906 E1600                                      ; E current
M906 I30                                        ; idle current percentage
PA Values:
Layers    | PA Value
0 - 25    | 0.3
25 - 50   | 0.0
50 - 75   | 0.4
75 - 100  | 0.0
100 - 125 | 0.5
125 - 150 | 0.0
150 - 175 | 0.6
175 - 200 | 0.0
200 - 225 | 0.7
Results:


Conclusion:
If PA is now functioning correctly, I have something else to be dealing with, more than likely retraction prime amount. I'm not really convinced by any of the PA values here but if I had to choose one, I would have to say 0.5 performed the best. I was hoping the severity of my seam was due to PA, but it seems (no pun intended) that its not helped me at all really. I imagine it will serve a huge part in correct infil lay down though, you can see on the rear of the print (side with no seam) that on the PA=0 layers you are unable to see where the infil joins the walls, so thats a huge positive from this exercise.Time to start troubleshooting other settings to help me with hiding the seam, most prints will have their seam on a corner, but sometimes the seam is out and visible (round objects) and I would like to dial that in if possible.
-
That crap in the last image is most likely to be caused by un-retracted travel. If you are using combing, you really need to set the max comb distance with no retract setting to something like 10, 20, etc.
-
If you correct for the coasting issue mentioned you may get some better results on the seam from higher PA values than 0.7. I'd also try upping the extruder acceleration a bit. Say 3000ish.
-
Also, as pressure advance increases the amount of retraction needed decreases, so even though it's noisy, some of that noise can be reduced after you find the PA value by retuning your retraction amount. You can also probably reduce the retraction speed a bit.