Hypercube Fusion movement help
-
@Phaedrux Thanks I will change the values once I get my head round the bed mesh leveling which is bending my brain at the moment. but on the plus side thanks to you and everyone else in the Duet forum that has been so helpful I am hoping I will be able to do my 1st test print this weekend.
-
@RAM said in Hypercube Fusion movement help:
How much $$ to do the star wars for the dark side theme
Because I was on a roll today....
; 0:/macros/Musical Tunes/Vader.g ; Imperial March (Vader's Theme) G4 P500 M300 S392 P400 G4 P410 M300 S392 P400 G4 P410 M300 S392 P400 G4 P410 M300 S311 P300 G4 P310 M300 S466 P100 G4 P100 M300 S392 P400 G4 P410 M300 S311 P300 G4 P310 M300 S466 P100 G4 P110 M300 S392 P800 G4 P810 M300 S587 P400 G4 P410 M300 S587 P400 G4 P410 M300 S587 P400 G4 P410 M300 S622 P300 G4 P310 M300 S466 P100 G4 P110 M300 S370 P400 G4 P410 M300 S311 P300 G4 P310 M300 S466 P100 G4 P110 M300 S392 P800 G4 P810 M300 S784 P250 G4 P260 M300 S392 P300 G4 P310 M300 S392 P100 G4 P110 M300 S784 P400 G4 P410 M300 S740 P300 G4 P310 M300 S698 P100 G4 P110 M300 S659 P100 G4 P110 M300 S622 P100 G4 P110 M300 S659 P100 G4 P110 G4 P300 M300 S392 P100 G4 P110 G4 P100 M300 S554 P400 G4 P410 M300 S523 P300 G4 P310 M300 S494 P100 G4 P110 M300 S466 P100 G4 P110 M300 S440 P100 G4 P110 G4 P300 M300 S311 P100 G4 P110 G4 P100 M300 S370 P450 G4 P460 M300 S311 P300 G4 P310 M300 S466 P100 G4 P110 M300 S392 P400 G4 P410 M300 S311 P300 G4 P310 M300 S466 P100 G4 P110 M300 S392 P800 G4 P810 -
@Phaedrux You have way too much time on your hands.

My excuse is that I'm now retired, what's yours?
-
@deckingman hey maybe I'm semi retired myself.
 And well it's not like it's an original composition or anything. I just googled for imperial March Arduino code and the hard part of finding the notes and their durations was already done for me. Then it was just a matter of transcribing those into a list and using find replace to swap the notes for frequencies (I have a handy chart for that already) and changing the duration to milliseconds and building up the gcode command around it. To my surprise it worked the first time.
 -
@Phaedrux thanks so much for that, it will be getting added to my simplify3d endscript.
I would also like to thank you guys so much for helping me get the printer to the stage that it is at


It finally prints

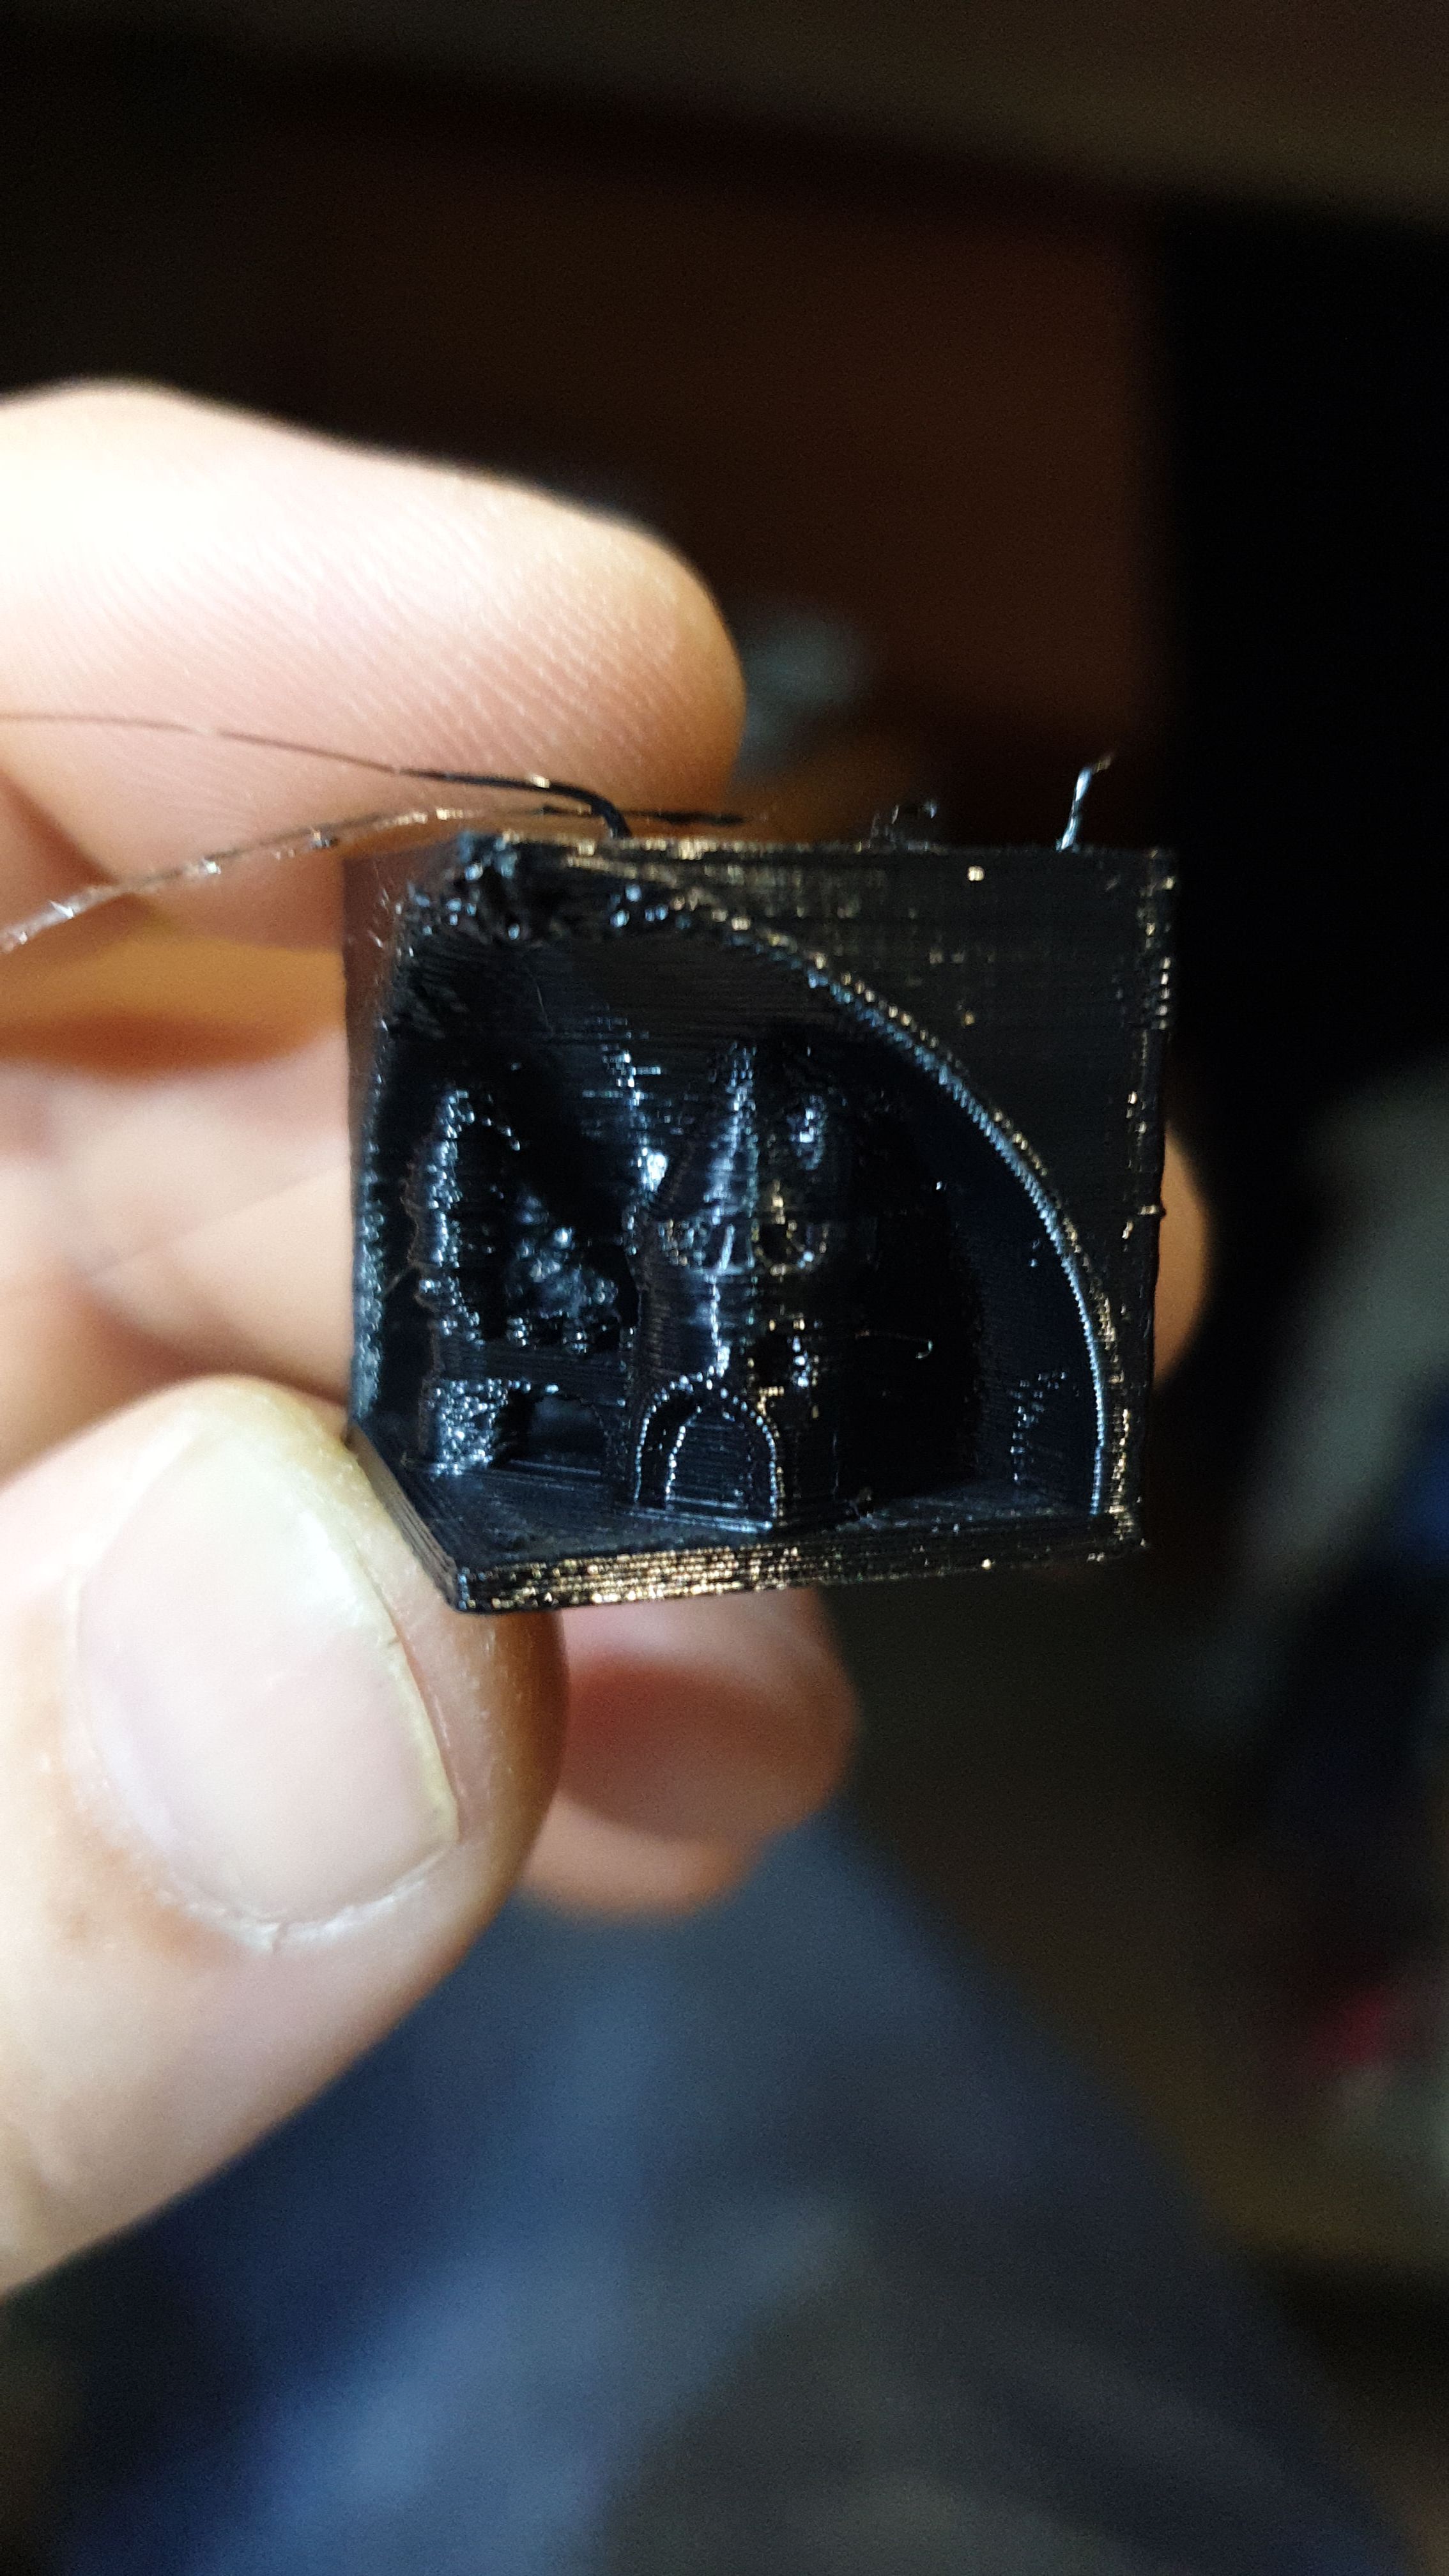
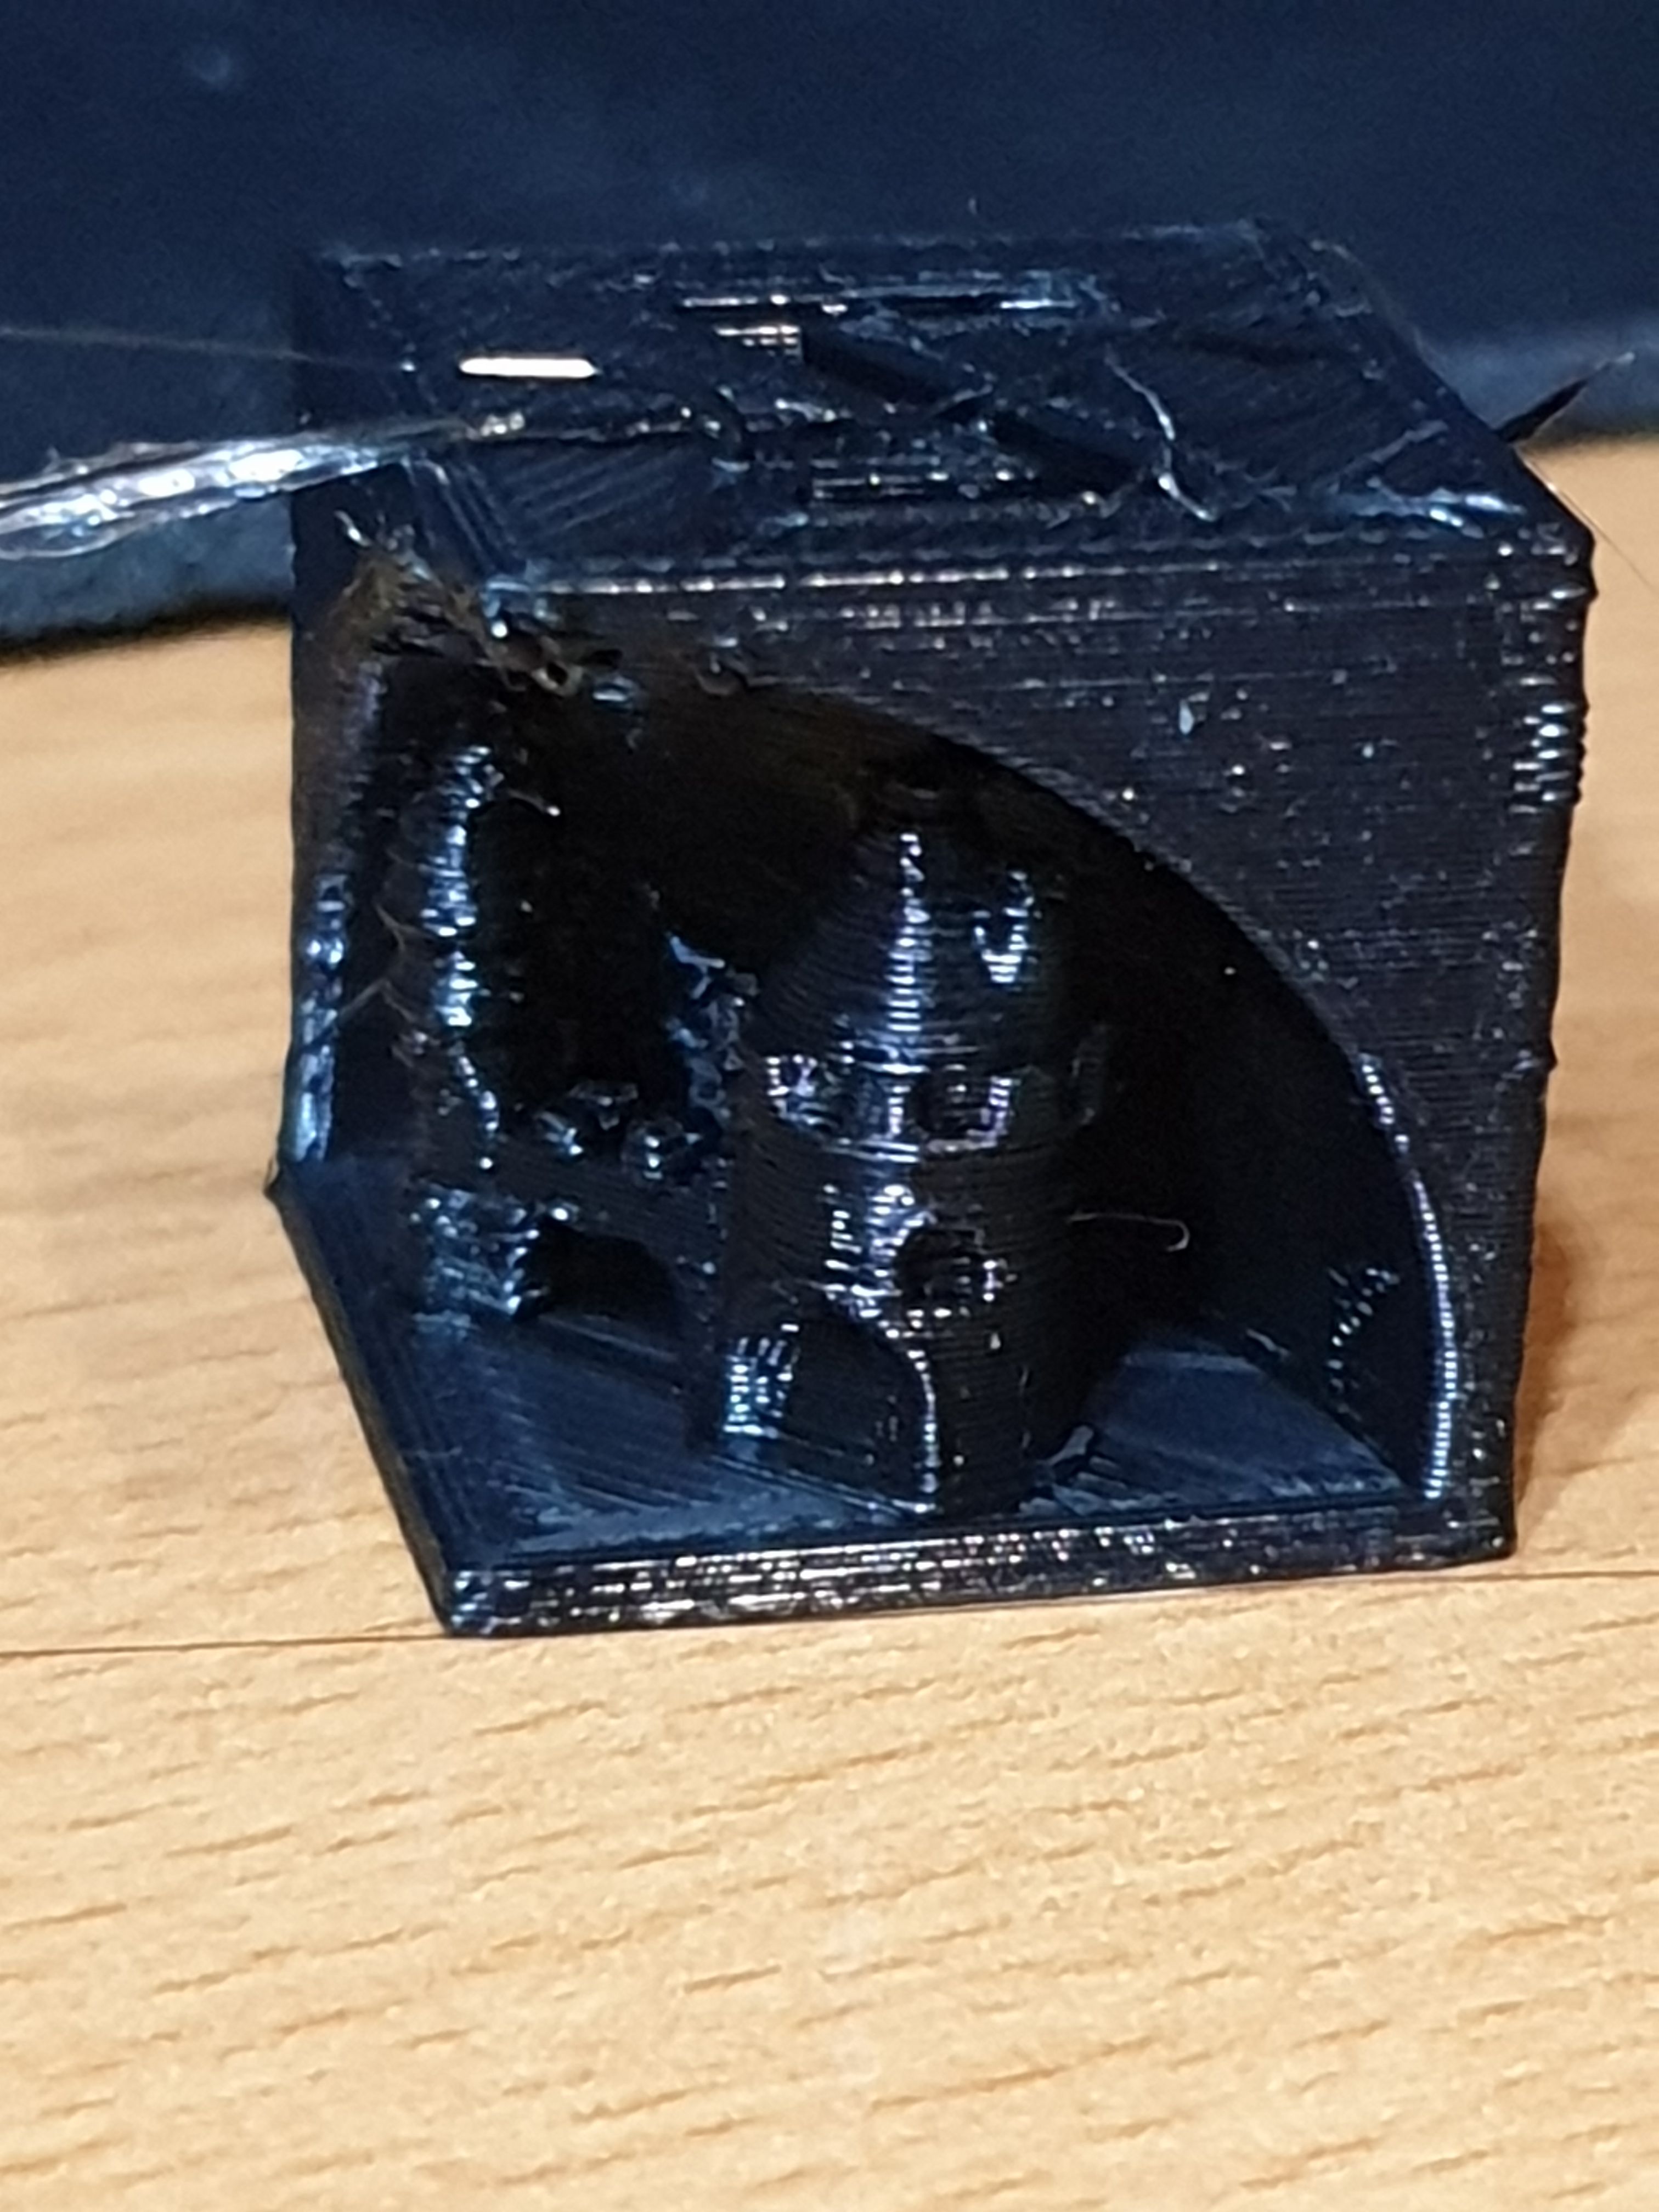
The 20 x 20 x 20 calibration cube measuring it is.
X 20.34
Y20.34
Z 20.00I don't know if it acceptable on the X & Y axis or if they need to be tweaked and if they do is there a guide I could follow.
Leveling the bed was an absolute nightmare and took me about 5 hours to get it to where it is now.
I ended up realising that for some reason the mesh bed leveling is showing upside down for some strange reason but I have no understanding as to why it is the way it is.The other strange thing I cant work out is when I was starting to heat up for printing the estimations based on (file progress) was showing time that was going up.
I don't know why I keep getting the stringing at the top of the print when it finishes.
-
I wouldn't focus too much on the details of such a tiny object. Print something larger or scale that object up to get a better sense of what's going on. Even printing two of them at a time helps.
It looks slightly over extruded, which could explain the larger measured size. But it could also just be from overheating such a tiny object.
Have you calibrated the extruder and filament flow yet?
https://duet3d.dozuki.com/Guide/Ender+3+Pro+and+Duet+Maestro+Guide+Part+4:+Calibration/40#s165
-
@Phaedrux I did do part of that but i couldn't work out the formula for the Step 11 Find Maximum Extrusion Rate.
-
@Phaedrux got my little maths genius to work it out for me.
I am hoping this is right.
100mm extrusion without slipping was 4mm per second
4 x 3.14 x 1.75/2)2 = 9.61625 so for safety 9Then 0.4 nozzle, 0.2 layer height
9/(0.2*0.4) = 112.5 mm per second printing speed if I am not mistake.If i am wrong could you please I form me where I have gone wrong.
-
Yes that seems to check out.
Though 112mm/s may be too fast from a thermal management or mechanical movement perspective. As in, if you print that fast, the molten filament may not have enough time to cool before the next layer leading to surface quality issues. So for small objects with short layer times you may need to slow down or set a minimum layer time. For larger objects it may be perfectly fine.
Or the mechanics of the printer may not be able to handle it without ringing or shaking. You can test for this by creating a gcode file that goes through some series of movements without extrusion, and then use the speed factor to alter the speed for each iteration. You'll be able to see/hear/sense when things are running smoothly, or if there is a resonance or harsh movement. The same thing can be done to find good values for acceleration and jerk.
-
@Phaedrux I did do a print at that speed and apart from it warping the print quality was really nice even the supports came out good, it wasn't very high as it was just a clip in led support for the 3030 extrusion frame as it really needs some lighting so I can see what is happening with the print.
I did notice that I have to increase the z height by baby stepping by 0.05 even though I have the mesh bed compensation loaded and I have set the a probe up exactly as dc42 says on his wordpress page and it seems to run a new probe sequence at the start of every print. But if all I have to do to get a perfect 1st layer is put up with adding 0.05 and letting it run the probing everytime then that is fine by me.
Compared to my old printer which was a hictop i3 3dp11 with no bed probing and now looking back only able to get so so print quality, my hypercube fusion is pure enjoyment. It is quite, smooth, fast & the prints are really nice.
I just can't wait for my new E3D gold v6 to arrive to see how much of a difference it will make. I will probably also change to a genuine BMG or see what Bowden setups E3D has to offer to try and improve the printer even more.
-
@RAM said in Hypercube Fusion movement help:
I have to increase the z height by baby stepping by 0.05
You can modify your G31 Z value with that 0.05. Consider it a final tuning.
-
@Phaedrux oh cool I wasn't sure if I could do that as I didn't know if the probe would go out of sync, it never seems to give me the value below 2.5mm I think it is at 2.56 at the moment. I will change it so it reads 2.61
-
@Phaedrux when I add the 0.05 do I just add it in the config.g or do I need to run the whole z-prove calibration again 1st then add it ?
The reason I ask is I added it but it didn't seem to help. I run the bed mesh again and adjusted the bed slightly so could that have caused the issue where it didn't work ? -
@RAM the calibration just finds you the value. You can adjust it afterwards no problem.
Did you add 0.05 to the g31 z or subtract it? If you did one, try the other.
-
@Phaedrux I added it but now my new E3D 24v Gold V6 has arrived I will go through the whole calibration process again when it is fitted.
On a different thing would you say it is better to have the dual a setup so it will level the bed or is it more aggravation then it is worth the time of setting it up ?
-
@RAM said in Hypercube Fusion movement help:
On a different thing would you say it is better to have the dual a setup so it will level the bed or is it more aggravation then it is worth the time of setting it up ?
Do you mean this? https://duet3d.dozuki.com/Wiki/Bed_levelling_using_multiple_independent_Z_motors
It's not too difficult to setup, and if you are using 2 seperate Z motors anyway they are bound to get out of sync overtime, so having a means of leveling them automatically is pretty handy.
-
@Phaedrux yep that's what I meant, I will see if I can do it once I get the hotend installed and recalibrate/ tuned.
-
@Phaedrux just want to make sure I am understanding this right before I actually do this.
My build plates 310 x 320 mm in size, I have 2 leadscrews and the machine printable height is roughly 480mm
;example for 2 leadscrews for config.g M584 X0 Y1 Z2:4 E3; two Z motors connected to driver outputs Z and E1 M671 X-20:220 Y0:0 S0.5 ; leadscrews at left (connected to Z) and right (connected to E1) of X axis M208 X-5:205 Y0:200 ; X carriage moves from -5 to 205, Y bed goes from 0 to 200 So looking at this I take it I remove one of the stepper motors from the ZB socket and connect it to E1 motor socket.
Then make the config look like this so it fits my machine.
M584 X0 Y1 Z2:4 E3; two Z motors connected to driver outputs Z and E1 M671 X-20:320 Y0:0 S0.5 ; 320 would be changed to the actual distance of the other z screw from the 0 z screw M208 X-5:320 Y0:330 ; X carriage moves from -5 to 320, Y bed goes from 0 to 330 Am I thinking right or totally wrong ?
-
@RAM said in Hypercube Fusion movement help:
So looking at this I take it I remove one of the stepper motors from the ZB socket and connect it to E1 motor socket.
You have to move a specific motor. Because of the order you have defined the motors, Z2:4, and the order you have defined the leadscrews (left at X-20 Y0, then right at X320 Y0), you need to:
Plug the motor that's turning the left leadscrew at X-20 Y0 into Z
Plug the motor that's turning the right leadscrew at X320 Y0 needs to be plugged into E1Also, don't forget to put the jumpers back on the second set of Z motor pins.
Ian
-
@droftarts thanks for the information on how to do that I will have a go at it once I get everything working as it should.
Think I might have messed something up along the way.
I did a print last night with a word on it and it came out back to front so do I have the motors in the wrong ports or could I have something else messed up.
Please excuse the poor art work but I thought it might be best to show how my machine is to try and make things clearer.
as you can see my machine homes to the left on the X and to the rear on the Y.
I tried to look this up but DC tends to explain things in a way that I don't always understand. Please don't get me wrong the guy is a wizard but I miss the way he explains some of the things sometimes.
From what I read and if I understand this right is my machine meant to be homing to the left for the X axis and to the front for the Y axis ? and if I input say +15 Y on the DWC then it is meant to move to the rear and not to the front like it is currently and +15 on the X will make it move to the right as it currently is ?
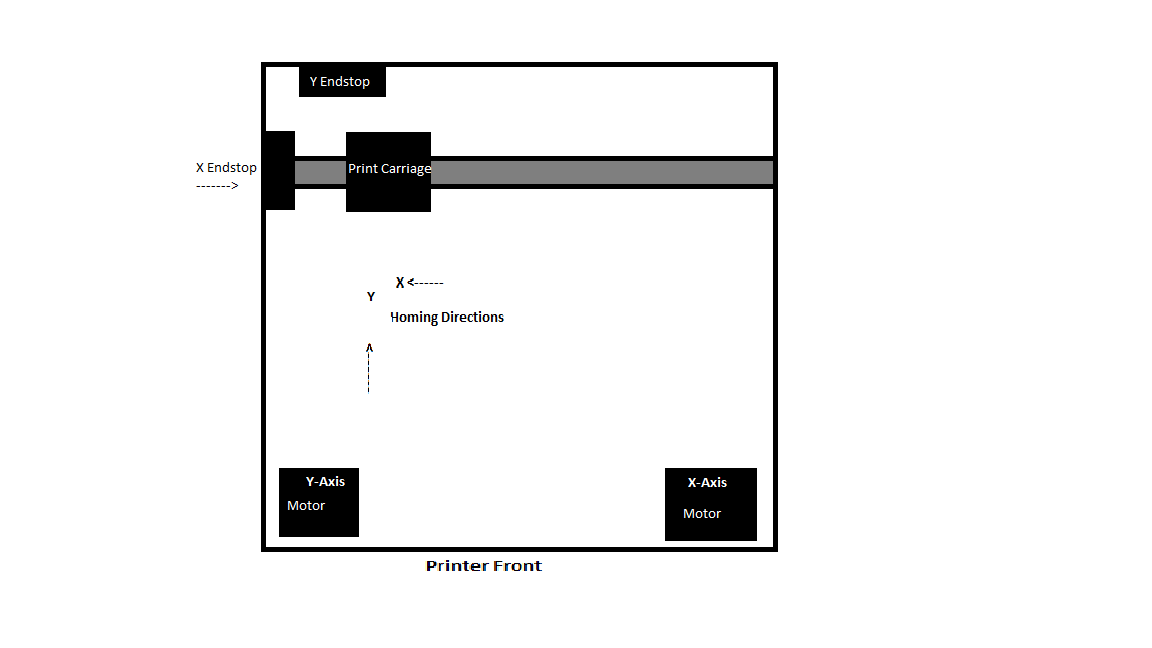
the way the motors are marked in the picture is how they are plugged into the Duet 2 wifi
If my corexy machine is meant to home the X to the left as it is and the Y to the front then could you please tell me what I need to change as I am really confused at the moment with what it is doing.